|
|
PBP Commentary |
Coming up we have a light heavyweight MMA rules bout between Jaycen Solo (ranked 1452 p4p, 1516 weight class) and Rakeem Marley (ranked 196 p4p, 206 weight class). Marley is bobbing his head along to his entrance song: Damian Marley - Welcome to Jamrock. This should be fireworks!
 |
|
 |
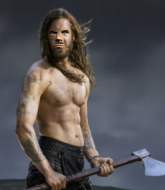
| 190 cm
21
225
7 - 5 - 0 |
|
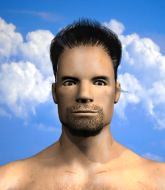
189 cm
21
223
5 - 2 - 0 |
Good wrestling
Solid boxing
Cardio machine |
|
BJJ Purple Belt
Excellent boxer
Powerful |
|
| |
|
Ladies and gentlemen. This fight is 3 rounds, in the light heavyweight division.
Introducing the fighter to my left, fighting out of the red corner.
With a record of 7 - 5 - 0, fighting out of New York, Jaycen Solo!
And introducing the fighter to my right, fighting out of the blue corner.
With a record of 5 - 2 - 0, fighting out of New York, Rakeem Marley!
The judges for this bout are Jorge Garcia, John Roberts and Joseph Jones.

The bell rings for round one and we are underway!
The bell rings for round one and we are underway!
Marley loads up on a big right hand but Solo slips the punch.
Marley has been working on his striking defense in training and it's paying off as Solo is landing a low percentage of strikes.
Marley looks to land a combination but Solo avoids it well.
Marley scores with a nice right hand.
Marley throws a half hearted mid kick.
Solo avoids a punch combination nicely.
Solo appears to be looking for a counter takedown.
Marley throws a nice looking combination but Solo bobs and weaves to avoid any damage.
Solo feinted with a counter takedown.
We've had a slow start to the round here - hopefully the action picks up.
Solo fails to land the takedown.
Despite the aggression on Marley's face he doesn't fully commit to the counter.
Marley throws a nice looking combination but Solo bobs and weaves to avoid any damage.
Solo moves forwards but Marley connects with a nice, crisp jab.

That's one minute gone in the round.

Oooooh!!! Marley has knocked Solo down with a huge combo! Marley steps away and waves a wobbly Solo back to his feet! This one might not go much longer!

Solo is rocked!
Marley is the aggressor but that punch slipped nicely by Solo.
Solo showing good head movement there, avoiding the strikes from Marley.
Marley misses with a jab, cross combination.
We've been hearing reports that Solo has been drilling takedowns in recent sessions so let's see if that has an impact on the result of this fight.
Marley throws a right and a left that Solo avoids nicely.
Solo tries to counter with a takedown but Marley is quick to defend against it.
Marley misses with a wild combination.
Solo changes levels looking for a counter takedown but doesn't commit.
Marley lands a jab. Then a cross. Then finally a nice hook to the body. Good work there by Marley.

That's two minutes gone in the round.
This has been an exciting period of action!
Solo closes the distance and clinches up with Marley, looking for a takedown. Solo pushes Marley against the cage but Marley circles to the side and manages to break the clinch.
Marley throws a jab, cross combination which is slipped

and Solo counters with a nice shoot takedown that brings the fighters to the ground.
Solo trying to land body shots but he keeps hitting the mat.

Marley manages to wriggle out and sneak his way back up to his feet, so the fighters are now clinched up against the cage.

Marley manages to pull guard.
Solo loading up with the ground and pound but he's missing more than he's landing in this flurry.
Solo throwing strikes from guard but Marley blocks nicely.
The fighters are pressed up against the cage, both looking to find a bit of space to work.
Solo preventing the sweep.
Solo makes a bit of distance and scores with some ground and pound, still in guard.

It looks like Rakeem Marley has been cut.
Marley manages to wriggle out and sneak his way back up to his feet, so the fighters are now clinched up against the cage.
Marley is defending well against a takedown attempt.
That's three failed takedown attempts in the round for Jaycen Solo. That's going to take a lot out of him.
Marley is pressed up against the cage. Solo has hold of a leg and is looking to drag Marley down to the mat. Marley avoids the attempt though and has circled away. We're back to striking at a distance.
Marley swings away but doesn't land with a series of punches.

That's three minutes gone in the round.
Marley dips down and scores with a jab to the body.
Rakeem Marley seems to be the more aggressive standup fighter in this bout.
Marley's corner calls for a 1, 2 combination and Marley duly obliges.
Nice cross by Marley.
Solo fakes high and shoots in for a takedown but Marley avoids it really well and circles away.
Marley fails with an attempt to clinch.
Marley lands with a two punch combination before moving back out of range.
Nice takedown defense from Marley. No joy for Solo on that attempt.

That's four minutes gone in the round.
Marley misses with a jab, cross combination.
Some wild striking there from Marley.
Solo feinted with a counter takedown.
Solo walks into a stiff left hand from Marley.
The crowd are loving this. Great action here.
Solo looks shocked there as he takes a right hand to the temple.
Marley misses with a looping left.
Solo drops down looking for a counter takedown but Marley sprawls and moves away.
The fighters circle momentarily. Marley darts into range and connects with a nice straight punch.
Marley throws a left and a right that both miss
and Solo counters with a nice double leg into guard.
And thats the end of the round the fighters go back to their corners.
Rakeem Marley dominated that round.
The cut man is working on Rakeem Marley's cut.
That's the end of the interval. I'm sure that seemed a lot quicker than a minute for our two fighters! Back to the action.

Marley just misses with a punch to the body.
Solo attempts a counter takedown but Marley avoids it well and moves away.
Marley throws a combination that misses
and Solo counters with a driving takedown into guard. Nice work there by Solo.
Marley wants to stand but Solo is controlling the position.
Solo postures up and lands a big shot to Marley's brow.
Solo in full guard, throwing the ground and pound. No damage this time.
Solo trying to land body shots but he keeps hitting the mat.
Solo with a flurry of punches that miss.
Marley has scooted to the edge of the canvas and used the cage to get back to his feet. Solo has stuck on his opponent and is forcing him back against the cage.
Solo is looking to take this one to the mat.
Solo is working on a leg, looking for a takedown but Marley is defending well.
Solo works for the underhooks and manages to get a trip takedown into guard.
Fantastic stuff here - a very entertaining period of action, which has drawn cheers from the crowd.
Marley manages to escape and get back to his feet.
Rakeem Marley seems to be getting the better of the standup.
Marley tries to bum rush Solo with a series of wild strikes but Solo uses good footwork to avoid the assault.
Solo feinted with a counter takedown.
Marley connects with a lovely jab that went straight through the gap between Solo's hands.
That's one minute gone in the round.
Solo takes one on the chin but keeps coming.
Marley throws out a loose jab but Solo uses good head movement to avoid it.
A lazy left from Marley finds it's target.
Nice takedown defense from Marley. No joy for Solo on that attempt.
That's three failed takedown attempts in the round for Jaycen Solo. That's going to take a lot out of him.
Solo dives in and scores a takedown into Marley's guard.
Solo prevents Marley from getting back to his feet.
Solo in full guard, throwing the ground and pound. No damage this time.
A big thud reverberates around the arena there as Solo accidentally thumps the mat. Hopefully he's not broken his hand.
A big thud reverberates around the arena there as Solo accidentally thumps the mat. Hopefully he's not broken his hand.
Solo throws a big right hand that misses.
Marley wants to get back to his feet but Solo is in a dominant position and won't allow it.
That's two minutes gone in the round.
Solo trying to land body shots but he keeps hitting the mat.
The ref warns both fighters not to hold the cage as they work up against the meshing.
Marley pulls Solo in to control the position.
Solo throwing shots from guard but he's hitting more mat than opponent.
Solo throws a big elbow that misses.
Marley has momentary wrist control but Solo slips an elbow through the middle.
Marley is looking to get back to his feet but can't, whilst Solo is controlling him.
Solo postures up and lands a big shot to Marley's brow.

Marley is rocked!
Marley has been the more effective fighter overall so far.
Solo lands a couple of digs.
Marley is still in real trouble! Can Solo finish him?
Solo postures up from his opponent's guard, before exploding into some vicious ground and pound! Marley covers up, he's hurt! Solo keeps throwing the strikes, glancing at the referee... Will he stop it?? One more big shot from Solo and the ref steps in to end the fight! Solo can't hide his delight as he celebrates with his corner.
Ladies and gentlemen, after 2:55 of round 2, we have a winner by way of TKO (Strikes). Jaycen Solo!
A very excited looking Jaycen Solo made sure he remembered to thank all the fans both in the arena and on the internet. He said all the coolest people spend all day on MMA websites, which got a big reaction.
|
|
|
|
|
|
|
|
|
|
|
|
|
|
|
|
|
|
|
|
|
|
|
| S |
C
A |
G |
S |
C
B |
G |
|
S |
C |
G |
|
energy
A | B |
|
hype
A | B |
|
pop
A | B |
|
mgr
A | B |
|
FIGHT
RATING
65% |
|
|
|
|
|
|
