|
|
PBP Commentary |
Coming up we have a heavyweight MMA rules bout between Tom Kerr (ranked 0 p4p, 0 weight class) and Mark Layfield (ranked 0 p4p, 0 weight class). Tom Kerr had a look across the cage there at his opponent. He definitely means business
 |
|
 |
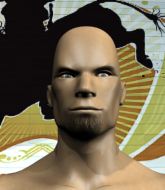
| 180 cm
25
260 lbs
3 - 0 - 0 |
|
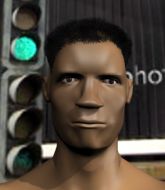
198 cm
24
265 lbs
9 - 3 - 0 |
Decent wrestler
Basic striking
Very strong |
|
BJJ Purple Belt
Decent boxing
Powerful |
|
| |
|
Ladies and gentlemen. This fight is 5 rounds, for the heavyweight championship of the world!
Introducing the champion to my left, fighting out of the red corner.
With a record of
3 - 0 - 0, fighting out of Hilo, Tom Kerr!
And introducing the challenger to my right, fighting out of the blue corner.
With a record of
9 - 3 - 0, fighting out of Hilo, Mark Layfield!
The judges for this bout are , and .

The bell rings for round one and we are underway!
Kerr lands an overhand left. A wild punch that just about connected.
Tom Kerr seems to be the more aggressive standup fighter in this bout.
Layfield takes a hook to the side of the head. I wonder if that's got his ears ringing.
Layfield fails with the takedown

and Kerr counters with a shoot takedown into half guard.
Layfield is looking to improve his position.
Layfield wants to control but Kerr is keeping busy and won't allow it.
Layfield moves into full guard.
Kerr throws a big right hand that misses.
Kerr content to strike from guard, landing some decent shots.
Kerr is looking to work some ground and pound but Layfield has wrist control.
Kerr postures up.
Layfield looking to control the pace of the fight rather than finish it.

That's one minute gone in the round.
Layfield looking to hit a scissor sweep but Kerr is one step ahead there.
Kerr working some ground and pound from guard but it's not doing any damage.
Kerr not doing a lot at the moment. He'll have to show some more aggression or the fight will get stood up.
Kerr tries to free his leg and advance position but Layfield is retaining full guard.
Kerr wants to control from the top but Layfield keeps moving.
Layfield has control of Kerr's left arm, preventing Kerr from doing any damage.

That's two minutes gone in the round.
My god... these two guys really need to pick up the pace or everyone will leave to go get a beer.

It looks like we're going to have a standup here. Neither fighter is doing enough on the ground.
Kerr drives through with a really nice takedown into side control.
Layfield regains half guard, as Kerr was trying to land strikes.
Layfield gets full guard.
Kerr trying to control but Layfield is working from the bottom.
The fighters are pressed up against the cage, both looking to find a bit of space to work.
Kerr pressing down on his opponent's thigh, looking to pass guard. Layfield is keeping the position for now.
Kerr is just sitting in guard, looking to avoid any submissions.

That's three minutes gone in the round.
Layfield is adopting a defensive guard.
The referee is asking the fighters to pick up the pace.
Kerr stopping the sweep attempt from Layfield.
We're going to have a standup here because Tom Kerr wasn't active enough for the referee's liking.
Layfield tries for a takedown but Kerr circles away easily
letting Kerr counter with a right hand.
Layfield misses with a takedown attempt

and Kerr counters by moving into the clinch.
Tom Kerr has stuffed three takedown attempts in the round now. That's going to take a lot out of Mark Layfield.
Layfield has a body lock and is looking for a takedown. Kerr is bouncing around trying to prevent the takedown and somehow he has indeed managed to stay on his feet.
Layfield looking for a takedown.
Layfield is working for takedown but Kerr is calmly controlling the position for now.
Kerr gets underhooks to prevent Layfield's takedown attempt.

That's four minutes gone in the round.
Kerr is looking to break free of the clinch but Layfield has double underhooks.
Layfield being controlled against the cage.
The fighters are starting to perspire pretty heavily.
Layfield is trying to drag Kerr to the mat but Kerr just about manages to keep his footing. He used the cage to his advantage there.
With the fighters clinched against the cage, Kerr creates a bit of distance for himself and scores with a nice uppercut.
Kerr lands a nice trip takedown into half guard.
Layfield is looking for a sweep. Kerr is wise to his cunning plan and keeps the top position.
Kerr is looking to take a break and control but Layfield is keeping him honest, looking to work from the bottom.
And thats the end of the round the fighters go back to their corners.
Tom Kerr dominated that round.
The corners get their ten second warning. Both fighters stand from their stools and stare eachother down, ready to get back to the action.

Layfield doesn't succeed with the takedown
and Kerr counters into the clinch. Nicely done.
Layfield is looking for a takedown up against the cage. Kerr gets underhooks though and prevents the takedown attempt.
Layfield can't get the takedown.
Tom Kerr has stuffed three takedown attempts in the round now. That's going to take a lot out of Mark Layfield.
A frustrated look appears on Kerr's face as he tries to break the clinch.
Layfield is working on a single leg takedown against the cage. Kerr can't fight it off and eventually Layfield manages to take the fight to the floor. Kerr looks annoyed but at least he's managed to land in guard.
Kerr looking to hit a scissor sweep but Layfield is one step ahead there.
Layfield trying to control but Kerr is working from the bottom.
Kerr wants to sweep but no luck.
That's one minute gone in the round.
Kerr keeping moving, preventing Layfield from controlling successfully.
Layfield stands up and looks to throw the legs aside to pass to side control. Kerr swivels though and keeps the full guard.
We may be looking at a referee standup if the pace doesn't pick up soon.
Layfield advances position into side control!
Layfield is maintaining the dominant position - no doubt Kerr will start to get frustrated soon if he's not already.
Kerr is positioning himself to get back to half guard.
The referee asks Layfield politely if he wouldn't mind getting on with it and actually doing something. Layfield prefers to stall for the moment though.
That's two minutes gone in the round.
Layfield wants to lay and pray for a moment but Kerr keeps working.
The ref stands the fighters back up. Mark Layfield was stalling too much, according to the referee.
Kerr looks to score with a jab to the body but Layfield is just out of range.
Kerr misses the shot to the body.
Kerr bobs and weaves into range and then changes levels and scores with a nice takedown into side control.
The strikes coming from Kerr are missing the target in this wave of attacks.
Layfield defending against the ground and pound.
Layfield tries to buck Kerr off but Kerr is having none of it.
Kerr wants to lay and pray for a moment but Layfield keeps working.
Layfield is sneaking out the side here. He's bucked Kerr off and has taken his back!
Layfield controlling well, preventing Kerr from escaping the position.
That's three minutes gone in the round.
Will Layfield go for the finish here or will he try and keep control of the position?
Layfield really has the hooks in deep now - there seems like no escape for Kerr.
Layfield has the hooks in. Kerr is trying to push off one leg but he has to do so cautiously to avoid being submitted.
Good control from Layfield.
Mark Layfield has forced the referee to step in and restart the fight on the feet.
Layfield shoots and misses
and Kerr counters with a nice body shot.
That's four minutes gone in the round.
Kerr loads up on a big right hand but Layfield slips the punch.
Layfield with a poor takedown
and Kerr counters with a nice double leg into side control. Layfield won't be happy with that.
Layfield is not content to let Kerr control the position.
Kerr throwing ground and pound but whilst doing so, he forgets to control position and Layfield works his way back to half guard. Good composure under pressure.
Kerr wants to control but Layfield is keeping him busy.
Kerr thows a huge punch but Layfield dodges it nicely.
Layfield is trying to control but can't.
Layfield is trying to avoid being dragged into an even worse position than he's already in but Kerr is staying active.
And thats the end of the round the fighters go back to their corners.
That was a close second round but I would say that Tom Kerr will probably get the nod.
The referee calls time. The cornermen exit stage left and we're back to business.

Layfield with a lazy takedown attempt
so Kerr counters with a double leg into guard. Good agility.
Tom Kerr overall seems to be getting the better of the ground position in the fight so far.
Kerr is stalling in the full guard.
Kerr throws a big right hand that misses.
Kerr distracts Layfield with his right hand and drops a big elbow with his other arm.
Kerr trying to move into half guard but instead Layfield has managed to sweep!
Kerr tries to land a sweep but no joy.
Layfield trying to control the position from guard on top but Kerr is wriggling around, looking for whatever he can.
Layfield won't allow Kerr to sweep him here.
Layfield controlling from the top position.
That's one minute gone in the round.
Kerr keeping moving, preventing Layfield from controlling successfully.
The ref stands the fighters back up, due to lack of action by Mark Layfield.
Layfield closes the distance and gets a trip takedown into side control. Kerr quickly recovers to half guard.
Neither fighter is being very active at the moment, with Layfield in particular looking to stall.
Layfield is looking to take a break and control but Kerr is keeping him honest, looking to work from the bottom.
Layfield is taking a breather. Kerr says something to him but it's hard to make out. Perhaps he's telling him to get on with it and actually do something.
The referee must be thinking about standing these guys back up.
The ref stands the fighters back up, due to lack of action by Mark Layfield.
A telegraphed right hand from Kerr misses the target.
That's two minutes gone in the round.
Layfield fails with the takedown
and Kerr counters with a shoot takedown into half guard.
Kerr is just content to waste time from the top position. Layfield takes advantage of the situation and regains full guard.
The ref warns both fighters not to hold the cage as they work up against the meshing.
Layfield is avoiding any damage by keeping wrist control.
Kerr trying to control the position from guard on top but Layfield is wriggling around, looking for whatever he can.
Kerr missing there with some ground and pound from the guard.
Layfield looking to sweep here. No luck so far.
Kerr trying to control the position from guard on top but Layfield is wriggling around, looking for whatever he can.
That's three minutes gone in the round.
Kerr throws a big right hand that misses.
Layfield trying to control the position here.
Kerr working some ground and pound from guard but it's not doing any damage.
Kerr throws a strike but Layfield rolls with it and manages to sweep. Now he's in guard on top.
Kerr wants to sweep but no luck.
Layfield wants to control from the top but Kerr keeps moving.
Layfield stands up and looks to throw the legs aside to pass to side control. Kerr swivels though and keeps the full guard.
That's four minutes gone in the round.
Neither fighter has done anything of merit for a good minute or two here and the crowd are not happy about it.
Kerr keeping moving, preventing Layfield from controlling successfully.
Kerr tries to land a sweep but no joy.

Kerr throwing his legs up looking for a triangle.
Layfield prevents Kerr from getting back to his feet.
Kerr trying to keep a closed guard but Layfield is proving a slippery customer.
Layfield engaging in some classic timewasting tactics.
Kerr keeping moving, preventing Layfield from controlling successfully.
And thats the end of the round the fighters go back to their corners.
Tom Kerr clearly takes that round.
The fighters get back to their feet, the hooter sounds and we're back to the action!

Layfield has his takedown stuffed
and Kerr counters with a takedown into side control.
Kerr with the ground and pound but Layfield regains half guard under the barage of strikes.
Layfield regains full guard. Nicely done.
A big thud reverberates around the arena there as Kerr accidentally thumps the mat. Hopefully he's not broken his hand.
Kerr stopping the sweep attempt from Layfield.
Kerr is looking to work some ground and pound but Layfield has wrist control.
Layfield is working the butterfly guard. He manages to land a nice scissor sweep and is now in half guard on the top. Nice move.
Kerr tries to roll over but Layfield keeps him under control.
That's one minute gone in the round.
Kerr wants to sweep but Layfield has passed to side control!
Layfield wants to lay and pray for a moment but Kerr keeps working.
Layfield controls the position.
Layfield wants to lay and pray for a moment but Kerr keeps working.
Layfield controlling the position from side mount.
Layfield wants to lay and pray for a moment but Kerr keeps working.
That's two minutes gone in the round.
The crowd are hurling abuse towards the fighters... You can hardly blame them though because there isn't a lot going on in the fight.
The ref calls for a clean break and stands the fighters back up. Mark Layfield wasn't active enough on the ground.
Layfield bobs and weaves into range and then changes levels and scores with a nice takedown into side control.
Kerr being controlled for a moment.
You can see the frustration on Kerr's face, being in this tough position on the bottom.
Kerr tries to improve position but can't.
Layfield is looking to take a break and control but Kerr is keeping him honest, looking to work from the bottom.
Kerr tries to improve position but can't.
That's three minutes gone in the round.
Layfield just content to control the position.
If this pace continues, the referee will definitely step in and force a standup.
Kerr is positioning himself to get back to half guard.
Layfield staying calm.
That's four minutes gone in the round.
My god... these two guys really need to pick up the pace or everyone will leave to go get a beer.
The ref stands the fighters back up. Mark Layfield was stalling too much, according to the referee.
Layfield misses with a takedown
and Layfield takes a counter punch right on the button for his troubles.
Mark Layfield is looking to throw some combinations by the looks of things.
Layfield shoots in but doesn't get the takedown
and Kerr counters with a straight punch to the midsection.
Tom Kerr has stuffed three takedown attempts in the round now. That's going to take a lot out of Mark Layfield.
Layfield is absolutely dripping with sweat - he looks exhausted.
Kerr throws out a powerful jab.
Layfield with a lazy takedown attempt
and Kerr counters with a nice single leg takedown and he's in Layfield's guard now.
Kerr trying to control but Layfield is working from the bottom.
Layfield working the defensive guard well to avoid strikes from Kerr.
And thats the end of the round the fighters go back to their corners.
That was a close fourth round but I would say that Tom Kerr will probably get the nod.
That's the end of the interval. I'm sure that seemed a lot quicker than a minute for our two fighters! Back to the action. This is the final round!

Kerr is looking to take this fight into the clinch.
Layfield defending well as Kerr loads up on a big left hand.
Kerr throws a hard body shot but it just misses.
Layfield misses with a takedown
and Layfield takes a counter punch right on the button for his troubles.
Layfield shoots in and bounces Kerr off the cage to secure the takedown into guard.
Kerr wants to sweep but no luck.
Layfield looking to pass the guard.
Layfield trying to control the position from guard on top but Kerr is wriggling around, looking for whatever he can.
Layfield is wobbling all over the place through exhaustion. Will he make it to the final bell?
That's one minute gone in the round.
Layfield controlling from the top position.
The ref stands the fighters back up, due to lack of action by Mark Layfield.
Layfield gets his takedown attempt stuffed easily
and Kerr counters nicely by changing levels and landing a hook to the body.
Layfield blocks a jab.
Kerr scores with a jab to the jaw of his opponent.
Layfield with a lazy takedown attempt
and Kerr cracks him with a counter punch right on the button.
Tom Kerr has stuffed three takedown attempts in the round now. That's going to take a lot out of Mark Layfield.
Kerr connects with a body shot that sends Layfield's belly button to the back.
Nice defenses there by Layfield.
Nice defenses there by Layfield.
Kerr looks to throw the jab but Layfield is out of range.
Layfield has his takedown stuffed
and Kerr counters with a nice single leg takedown and he's in Layfield's guard now.
Kerr throwing elbows and punches but not connecting, as Layfield works some decent striking defense from the bottom.
Kerr connects with a couple of short punches.
Kerr controls from within his opponent's guard.
That's two minutes gone in the round.
Kerr in full guard, throwing the ground and pound. No damage this time.
Kerr is intent on slowing down the pace of the fight, simply looking to control.
Kerr stands up and looks to throw the legs aside to pass to side control. Layfield swivels though and keeps the full guard.
Kerr trying to control the position from guard on top but Layfield is wriggling around, looking for whatever he can.
If this pace continues, the referee will definitely step in and force a standup.
That's three minutes gone in the round.
The referee decides to stand the fighters back up, due to lack of activity on the part of Tom Kerr.
Layfield misses with a takedown
and Kerr holds on and brings the fighters into a clinch.
Layfield tries for a takedown. No joy.
Layfield has Kerr pressed up against the cage and is working for takedown. Kerr manages to improve position though and keeps the fight standing.
Layfield goes for a body shot but it's blocked.
Kerr stops a takedown attempt from Layfield.
Kerr has had enough of the clinch and is looking to separate.
Kerr content to slow the pace in the clinch.
Kerr tries to circle away but Layfield has him pinned against the cage.
Come on Kerr - let's have some action - none of this stalling nonsense.
Layfield tries for a takedown. No joy.
That's four minutes gone in the round.
Neither fighter has done anything of merit for a good minute or two here and the crowd are not happy about it.
A right hook to the body lands for Kerr.
Layfield looking for a takedown.
Layfield is looking for a takedown up against the cage. Kerr gets underhooks though and prevents the takedown attempt.
Kerr lands a hook to the body. It's hard to tell if that hurt Layfield or not.
Some stalling of biblical proportions here from Kerr.
Layfield has a body lock and is looking for a takedown. Kerr is bouncing around trying to prevent the takedown and somehow he has indeed managed to stay on his feet.
And that's the end of the fight!
Tom Kerr showed his dominance in that final round.
Well Kerr has outscored his opponent in every aspect of the fight today. Only a scarily incompetent judge or two will keep him from a well deserved win... Over to the ring announcer for the scorecards.
Ladies and gentlemen, after 5 rounds of action, we go to the scorecards for a decision.
Judge Andi Peters scores the fight 50:45
Judge Gordon Ramsey scores the fight 50:45
Judge Frank Skinner scores the fight 50:45
In favor of your winner, by unanimous decision... Tom Kerr!
Tom Kerr is the new heavyweight champion!
|
|
|
|
|
|
|
|
|
|
|
|
|
|
|
|
|
|
|
|
|
|
|
| S |
C
A |
G |
S |
C
B |
G |
|
S |
C |
G |
|
energy
A | B |
|
hype
A | B |
|
pop
A | B |
|
mgr
A | B |
|
FIGHT
RATING
62% |
|
|
|
|
|
|

