|
|
PBP Commentary |
Coming up we have a featherweight MMA rules bout between Christian Birchmont (ranked 0 p4p, 0 weight class) and Bucky The Badger (ranked 0 p4p, 0 weight class). Well, the cameraman is lingering on a pretty young lady for a bit too long there. Keep your eyes on the fighters buddy or you'll miss the fighter intros!
 |
|
 |
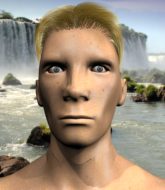
| 177 cm
22
147 lbs
7 - 3 - 0 |
|
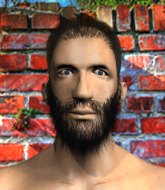
160 cm
22
152 lbs
6 - 0 - 0 |
BJJ Purple Belt
World class boxer
Granite chin |
|
Good wrestler
World class MT
Granite chin |
|
| |
|
Ladies and gentlemen. This fight is 3 rounds, in the featherweight division.
Introducing the fighter to my left, fighting out of the red corner.
With a record of
7 - 3 - 0, fighting out of Sydney, Christian Birchmont!
And introducing the fighter to my right, fighting out of the blue corner.
With a record of
6 - 0 - 0, fighting out of Sydney, Bucky The Badger!
The judges for this bout are Eliza Hachem, Steve Erwin and Skip Squint.

The bell rings for round one and we are underway!
The Badger throws a left and a right that both miss
and Birchmont counters with a shot to the ribs. That looked like it hurt.
The Badger looks for a takedown here. Will he get it? Birchmont is fending him off so far but The Badger persists. Nope, Birchmont circles away and we're back to standing.
The Badger bobs and weaves well there to avoid the strikes.
Birchmont misses with a looping left.
The Badger misses with a series of wild punches.
The Badger connects with an inside leg kick.
Birchmont lands a jab to The Badger's midsection.
A combination from Birchmont does no damage.
The fighters circling - Birchmont throws out the jab but it was never going to land.
Birchmont waving his hands out in front of him, looking to distract The Badger.
The Badger throws a head kick that misses.
The Badger thumps Birchmont with a low kick.
Bucky The Badger seems to be the more aggressive standup fighter in this bout.
Birchmont misses the jab.
Birchmont misses with a hook.
We've seen a great period of action over the last minute or so - credit to both fighters for going all out!
The Badger feints and then cracks Birchmont's leading leg with a nice low kick. He's obviously looking to slow Birchmont down.
The Badger lands an overhand left. A wild punch that just about connected.
The Badger gets his head snapped back by a nice shot there.
Birchmont's corner calls for a 1-2. Birchmont obliges with the 1 part as he scores the single shot and moves back out of range.

That's one minute gone in the round.
The Badger throws an overhand right that lands on Birchmont's shoulder, as Birchmont tries to avoid the shot.
Birchmont uses good footwork to avoid the strikes from The Badger.
The Badger avoids a lazy jab quite easily.
The Badger blocks a jab.
The Badger walks into a jab.
The Badger connects with an inside leg kick.
Birchmont misses with a hook. The Badger ducked under it nicely.
The Badger listening to his corner there, landing a nice uppercut.
The Badger moves out of range as Birchmont strikes.
Birchmont throws out a loose jab but The Badger uses good head movement to avoid it.
Birchmont moves into range and throws a lovely three punch combination.
Birchmont misses with a wild body shot.
The Badger lands with a nice low kick. That'll leave a bruise.
The fans in attendance giving it up for the two fighters, who have really let it all hang out in the last minute or so!
The Badger rushes forward with a series of wild hooks but Birchmont moves out of range and avoids them all easily.
Birchmont is really head hunting here, hardly looking to strike to the body at all.

The Badger gets in close and instigates a clinch.
The Badger lands with a light punch inside.
Birchmont takes a shot to the head.
The Badger scores with a shot to the side of Birchmont's head.

That's two minutes gone in the round.
Birchmont misses with a punch on the inside.
A knee to the head by The Badger.
Birchmont jumps guard but The Badger stands there with Birchmont around his waist. Birchmont gives up and drops back to his feet. We remain in the clinch.
A nice left hand lands by The Badger.
A shot in the inside from Birchmont.
Birchmont misses with the head strike.
Birchmont misses with a short punch on the inside.
Birchmont working aggressively here.
The Badger throws a head punch that misses.
The Badger softening up his opponent with strikes, against the cage.
Birchmont misses with a hook from the clinch.
A short left from The Badger.
The Badger lands a body shot in the clinch.
Birchmont misses with a short punch on the inside.
The Badger lands with a short head shot on the inside.
Birchmont is trying to pull guard but being pressed up against the cage enables The Badger to keep the fight standing.
Birchmont blocks a punch to the side of the head.
The Badger tries a body shot but Birchmont blocks it.
Birchmont tries to jump guard but he falls flat on his backside. The Badger smiles and moves away.
That's three failed takedown attempts in the round for Christian Birchmont. That's going to take a lot out of him.

That's three minutes gone in the round.
The Badger scores with a punch to the gut of his opponent.
Birchmont walks into a stiff left hand from The Badger.
Birchmont keeping a good distance there, avoiding the body shot.
The Badger swings wildly with a hook that is half blocked by Birchmont.
The Badger avoids a lazy jab quite easily.
Birchmont throws a series of punches but The Badger moves out of range.
Birchmont takes a thudding leg kick, right into the meat of the thigh.
Birchmont takes a jab on the nose there. A little bit of blood seems to be coming out. Hopefully that won't affect his breathing.
The Badger is looking to slow Birchmont down with leg kicks.
Birchmont stumbles momentarily as he takes a strong leg kick from The Badger.
A nice leg kick lands there from The Badger.
Birchmont staying out of range there.
Birchmont is hobbling a little on that front leg after taking quite a few leg kicks so far in this fight.
The Badger slips a straight right by Birchmont.
Birchmont lands a jab to the nose.
The Badger rushes Birchmont and presses him up against the cage.
The Badger blocking some punches.
Birchmont working aggressively here.

That's four minutes gone in the round.
Birchmont jumps guard but The Badger turns him against the cage and keeps the fight standing.
This has been an exciting period of action!
The Badger lands with a light punch inside.
A short right from The Badger on the inside.
The Badger works for underhooks and lands a body shot in the process.
The Badger blocking some punches.
The Badger lands a hook that snaps the head of Birchmont backwards.
The Badger wants to take the fight to the mat but Birchmont manages to get underhooks and keep the fight in the clinch.
Birchmont swings away with an uppercut that misses.
The Badger struggles to land a body shot inside as Birchmont controls his hands.
The Badger gets through Birchmont's defenses to land a nice punch to the side of the head.
A head punch blocked on the inside by The Badger.
The Badger lands a right hand.
The Badger is looking for a takedown.
Birchmont misses with a short punch on the inside.
Birchmont tries a shoulder strike but it doesn't do any damage.
The crowd are going absolutely nuts as the round comes to an end - what a fantastic round of action!
Birchmont takes an elbow to the forehead.
The Badger misses the knee to the body. Nice hip positioning from Birchmont.
The Badger lands a glancing elbow in the clinch.

Birchmont pulls The Badger into guard.
The ref warns both fighters not to hold the cage as they work up against the meshing.
Birchmont is trying to control the position but The Badger postures up.
And thats the end of the round the fighters go back to their corners.
A close round but Bucky The Badger will probably get the nod.
That's time! Back to the action!

The Badger lands a nice leg kick that just misses Birchmont's sensitive parts.
Good leg kick by The Badger there. It's the ones that make that thud noise that hurt and that was an almighty thud.
The Badger lands a nice hook to Birchmont's body. Birchmont takes it in his stride and looks to land his own strikes.
Like a baseball bat into the meat of his leg there - nice leg kick by The Badger.
The Badger thumps Birchmont with a low kick.
The Badger tries to clinch up but Birchmont circles away and keeps his distance.
Birchmont fakes high and swings low for a body shot but The Badger manages to avoid it.
Birchmont throws an overhand right that lands on The Badger's shoulder, as The Badger tries to avoid the shot.
Birchmont takes a shot right to the bread basket.
Birchmont misses with a hook. The Badger ducked under it nicely.
Birchmont misses with an uppercut. The Badger saw that one coming.
The Badger takes a shot to the body in his stride.
Birchmont dips down and scores with a jab to the body.
A right-left combo lands from Birchmont.
Fantastic stuff here - a very entertaining period of action, which has drawn cheers from the crowd.
Birchmont pushing out the jab but it's not landing.
An inside leg kick lands from The Badger.
The Badger connects with a slap. Keep your fist closed son.
Donk. The Badger catches Birchmont right on the button with a cross.
That's one minute gone in the round.
A cross from The Badger lands.
Birchmont scores with a hook.
Birchmont lands a powerful looking uppercut that connected with his opponent's jaw.
Birchmont slips a jab and a cross from The Badger.
Birchmont throws a body punch but The Badger moves out of range.
Birchmont takes a swing at The Badger's ribcage but misses.
A left lands for The Badger.
Birchmont jabs The Badger to the body, keeping him at a distance.
Birchmont has his hands up protecting his head but a hook from The Badger finds it's way round the side to connect with Birchmont's head.
Birchmont thuds a left hand into The Badger's body.
The Badger is breathing heavily.
The Badger walks into a left hand.
The crowd are loving this. Great action here.
The Badger gets a clinch.
Birchmont working aggressively here.
Birchmont lands with a quick shot inside that doesn't really do much damage.
Birchmont swings wildly with an uppercut but The Badger uses good head movement to avoid it.
Birchmont lands a hook that snaps the head of The Badger backwards.
An uppercut on the inside fails to land for Birchmont.
That's two minutes gone in the round.
The Badger blocks an uppercut.
The Badger working on landing some head shots here - that one got through nicely.
The Badger lands a nice knee to the body.
The Badger gets through Birchmont's defenses to land a nice punch to the side of the head.
Birchmont drags the fight down to the ground.

Birchmont looking for submissions from the bottom here. Moving his hips around, possibly looking for an armbar.
Birchmont is trying to control the position from the bottom.
The Badger's corner is telling him to maintain position.
Birchmont looking to hit a scissor sweep but The Badger is one step ahead there.
Birchmont being controlled here, momentarily.
That's three minutes gone in the round.
Birchmont is throwing his legs up, looking for submissions. The Badger is aware though and is defending well.
Birchmont will need to keep those long limbs tucked in whilst he's on the ground, to prevent any submissions.
Birchmont avoiding any damage from the ground and pound.
The Badger wants to control from the top but Birchmont keeps moving.
The Badger stopping the sweep attempt from Birchmont.
Birchmont is working the butterfly guard. He manages to land a nice scissor sweep and is now in half guard on the top. Nice move.
Birchmont wants to get back to his feet.
That's four minutes gone in the round.
The Badger really doesn't want to stay on the ground with Birchmont. If he can't get it back to his feet, it's only a matter of time before he'll be tapping out.
The crowd are going absolutely nuts as the round comes to an end - what a fantastic round of action!
Birchmont trying desperately to get back to his feet here but he's not having any joy at all. He's going to tire himself out if he's not careful.
And thats the end of the round the fighters go back to their corners.
Christian Birchmont dominated that second round.
That's time! Birchmont's corner gives him a slap on the ass as he gets ready to fight. This is the final round!

Boom, another hit is landed. "You're gunna get knocked out" taunts Birchmont, as that shot connected.
A slapping leg kick lands for The Badger.
A decent looking cross lands there for Birchmont.
The Badger buckles his opponent's knee momentarily with a nice leg kick.
Birchmont swings widly with a right hand
and The Badger cracks him with a counter punch right on the button.
The Badger connects with an inside leg kick.
Birchmont jabbing away but nothing is landing.
Birchmont swings for the body but The Badger moves out of range.
The Badger moves out of range as Birchmont strikes.
The Badger doesn't manage to clinch there - Birchmont circles away.
Christian Birchmont is winning the standup battle so far.
Good leg kick by The Badger there. It's the ones that make that thud noise that hurt and that was an almighty thud.
Birchmont circles away from the clinch attempt.
An inside leg kick lands from The Badger.
Wow, both these guys are really going for it!
Birchmont throws a hook but The Badger avoids it easily.
The Badger misses with a jab, cross combination.
Fantastic stuff here - a very entertaining period of action, which has drawn cheers from the crowd.
Birchmont throws a hook but The Badger blocks it.
The Badger moves into range and lands a nice leg kick.
That's one minute gone in the round.
The Badger throws a hard body shot but it just misses.
A nice leg kick lands there from The Badger.
This fight brought to you by 5M nutrition - it's mmmmm tasty. Nice jab by Birchmont.
Good leg kick by The Badger there. It's the ones that make that thud noise that hurt and that was an almighty thud.
Birchmont avoids the clinch attempt nicely.
The Badger feints with a shoulder and throws a nice leg kick to Birchmont's calf.
Birchmont stumbles momentarily as he takes a strong leg kick from The Badger.
Birchmont throws a combination. The Badger tries to block but a couple of punches get through.
The Badger misses with a body shot.
The Badger is looking to clinch.
Birchmont throws a hook to the body but it doesn't connect.
The Badger fakes with an overhand right and moves in to clinch with Birchmont, pushing him back against the cage.
The Badger throws a hook to the body. More of an arm punch but it's all scoring with the judges.
This has been an exciting period of action!
A short right from Birchmont.
Birchmont swings wildly with an uppercut but The Badger uses good head movement to avoid it.
Birchmont lands a hook to the side of the head.
The Badger lands a short shot on the inside that snaps the head of Birchmont backwards.
That's two minutes gone in the round.
The Badger lands a glancing elbow in the clinch.
Birchmont throws a punch but it's blocked by The Badger.
Birchmont on the defensive, avoiding the knees to the body.
An uppercut on the inside fails to land for Birchmont.
Birchmont tries to pull guard but The Badger forces him back to his feet, against the cage.
Birchmont misses with a punch on the inside.
The Badger throws a knee to the head but misses.
Birchmont jumps guard but The Badger turns him against the cage and keeps the fight standing.
Birchmont doesn't land with the attempted body shot.
The Badger blocks a punch to the side of the head.
Birchmont misses with a punch on the inside.
A right handed body shot lands from The Badger.
Both fighters are breathing heavily.
The Badger lands a glancing elbow in the clinch.
The Badger lands an elbow inside that Birchmont shrugs off.
Birchmont blocks a couple of punches on the inside.
A short right from The Badger.
The Badger tries to land knees in the clinch but Birchmont avoids the damage to the body.
The Badger misses the knee to the body. Nice hip positioning from Birchmont.
The Badger lands with a quick shot inside that doesn't really do much damage.
That's three minutes gone in the round.
A shot in the inside from The Badger.
Birchmont makes some space for himself and lands an uppercut.
Birchmont misses with a punch on the inside.
The Badger stays in close to his opponent and throws a right hand to the body.
The Badger tries a body shot but Birchmont blocks it.
Nice body punch from The Badger.
The Badger crunches a lovely knee into Birchmont's ribcage.
The Badger lands a nice uppercut.
The Badger lands with a short punch from the clinch.
Fantastic stuff here - a very entertaining period of action, which has drawn cheers from the crowd.
The Badger lands punches inside but they're not really causing much damage.
The Badger lands a hook to the side of the head.
A nice right hand lands inside from The Badger.
Bucky The Badger seems to be working more effectively in the clinch in the fight so far.
Birchmont takes a shot to the head.
The Badger with the Thai clinch. He's looking to land a big knee but he's not managed it this time.
The Badger presses Birchmont against the cage and delivers a mid-strength body shot.
The Badger misses the knee to the body. Nice hip positioning from Birchmont.
A right handed body shot lands from The Badger.
A nice left hand lands by Birchmont.
Birchmont is trying to pull guard but The Badger turns him against the cage and we stay in the clinch.
That's three failed takedown attempts in the round for Christian Birchmont. That's going to take a lot out of him.
That's four minutes gone in the round.
A head punch on the inside from Birchmont fails to land.
Birchmont tries to pull guard but The Badger won't allow it.
A short left from The Badger.
A nice right hand lands inside from The Badger.
Birchmont tries to take the fight to the ground by pulling guard but can't manage it.
The Badger lands with a short head shot on the inside.
Birchmont takes an elbow to the forehead.
Birchmont takes an elbow to the forehead.
Birchmont has a couple of punches blocked by The Badger.
The Badger lands an elbow that stopped Birchmont in his tracks for a moment.
Nice elbow from The Badger.
The Badger gets an overhook and lands an elbow to the side of the head.
The Badger works for underhooks and lands a body shot in the process.
The Badger misses the knee to the body. Nice hip positioning from Birchmont.
The crowd are going absolutely nuts as the round comes to an end - what a fantastic round of action!
The Badger works for underhooks and lands a body shot in the process.
Birchmont takes a shot to the head.
The Badger working Birchmont over with knees to the body.
A short right from The Badger.
The Badger working on landing some head shots here - that one got through nicely.
And that's the end of the fight!
Bucky The Badger comfortably won the final round on my scorecard.
I think The Badger has won this one but let's see whether the judges agree with me. Over to the ring announcer for the scorecards.
Ladies and gentlemen, after 3 rounds of action, we go to the scorecards for a decision.
Judge Eliza Hachem scores the fight 28:29
Judge Steve Erwin scores the fight 28:29
Judge Skip Squint scores the fight 28:29
In favor of your winner, by unanimous decision... Bucky The Badger!
Bucky The Badger took to the microphone after his victory and thanked his sponsors, Milwaukee's Best 159's - $45 for their support in the buildup to the fight.
|
|
|
|
|
|
|
|
|
|
|
|
|
|
|
|
|
|
|
|
|
|
|
| S |
C
A |
G |
S |
C
B |
G |
|
S |
C |
G |
|
energy
A | B |
|
hype
A | B |
|
pop
A | B |
|
mgr
A | B |
|
FIGHT
RATING
100% |
|
|
|
|
|
|

