|
|
PBP Commentary |
Coming up we have a light heavyweight MMA rules bout between Kenny Blankenship (ranked 0 p4p, 0 weight class) and Nick Horton (ranked 0 p4p, 0 weight class). Horton has chosen Ironman as his entrance music. Nick Horton has the power to score a knockout today if he connects clean with Kenny Blankenship's chin.
 |
|
 |
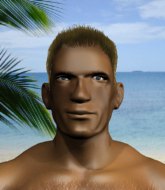
| 183 cm
18
210 lbs
2 - 1 - 0 |
|
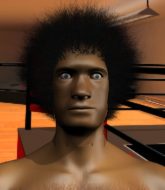
177 cm
18
210 lbs
2 - 5 - 0 |
BJJ White Belt
Brawler
KO power |
|
BJJ Blue Belt
Brawler
Granite chin |
|
| |
|
Ladies and gentlemen. This fight is 3 rounds, in the light heavyweight division.
Introducing the fighter to my left, fighting out of the red corner.
With a record of
2 - 1 - 0, fighting out of Sydney, Kenny Blankenship!
And introducing the fighter to my right, fighting out of the blue corner.
With a record of
2 - 5 - 0, fighting out of Sydney, Nick Horton!
The judges for this bout are Bruno Hogan, John Mangel and Hugh Johnson.

The bell rings for round one and we are underway!
Blankenship shoots in and drives through. Horton sprawls well.
Horton circles away from the clinch attempt

and Horton counters with a nice double leg into guard.
Horton slows down the pace of the fight for a moment. He'll need to remain active if he doesn't want to see the fight stood back up.
Horton is standing up over Blankenship. Blankenship looks to escape but Horton dives into side control.
Horton with the ground and pound but Blankenship regains half guard under the barage of strikes.

Horton stands up and beckons Blankenship to join him on the feet.
Horton stooping low to avoid any incoming strikes and then lunges in with an uppercut come cross that lands flush.

It looks like Kenny Blankenship has been cut.
The crowd are loving this. Great action here.
Blankenship attempts a leg kick but it's missed by a good margin.

That's one minute gone in the round.
Horton dips down and scores with a jab to the body.
Horton fails with the takedown.
Horton fails in his attempt to clinch.
Horton shoots in with a takedown attempt and he has Blankenship pinned against the cage. Blankenship gets the underhooks and manages to circle away.
Horton throws a hook to the body but it doesn't connect.
Horton shoots for a double leg takedown but Blankenship sprawls well. He's pushed Horton's face into the mat and manages to get back to his feet relatively easily.
Kenny Blankenship has stuffed three takedown attempts in the round now. That's going to take a lot out of Nick Horton.
Horton shoots in with a takedown attempt and he has Blankenship pinned against the cage. Blankenship gets the underhooks and manages to circle away.
Horton throws a combination but it was largely blocked by Blankenship.

That's two minutes gone in the round.

The fight moves into the clinch position.
A short uppercut from Horton.
Blankenship prevents the takedown attempt.
Horton lands a nice trip takedown into half guard.
Blankenship blocking the ground and pound attempt from Horton.
The fans in attendance giving it up for the two fighters, who have really let it all hang out in the last minute or so!
Horton uses his free foot to push down on Blankenship's thigh. Eventually he works his other foot free and he's advanced to mount - this is trouble for Blankenship.
The fighters are pressed up against the cage, both looking to find a bit of space to work.
Horton stands up from the dominant position, so we're back on the feet.
Blankenship fakes high and shoots in for a takedown but Horton avoids it really well and circles away.
No luck for Blankenship with that takedown attempt.

That's three minutes gone in the round.
Blankenship shoots in for a takedown but doesn't get it.
Horton shoots in looking for a takedown. Blankenship tries to sprawl out of it but Horton keeps driving through. The fighters are pinned against the cage. Blankenship manages to get underhooks and after a bit of a struggle, circles away and we're back to standing.
Blankenship tries to grapple but his opponent circles
and Horton counters with a straight punch to the midsection.
Horton fakes with a right hand and throws a good leg kick, right into the thigh. That had to hurt Blankenship.
Horton fails with an attempt to clinch.
The fight stays on the outside here - Horton looks like he's thinking about clinching though.

Horton clinches up with Blankenship and pushes him back against the cage.

That's four minutes gone in the round.
Horton tries to pull guard but Blankenship won't allow it.
Horton is trying to break free.
Blankenship misses with a body punch.
Horton tries to pull guard but can't drag his opponent to the mat. Blankenship just stands there and leans against the cage.
Horton tries for a takedown but Blankenship manages to get underhooks.
Horton looks gassed!
Horton drops down for a takedown but doesn't get it.
Blankenship is looking for a takedown.
As the round comes to an end the crowd are showing their appreciation for a great round of action.
Blankenship jumps guard but Horton stands there with Blankenship around his waist. Blankenship gives up and drops back to his feet. We remain in the clinch.
Blankenship has dropped down and is looking to force the takedown but it's defended by Horton after a bit of a struggle.
And thats the end of the round the fighters go back to their corners.
Nick Horton dominated that round.
The cut man is working on Kenny Blankenship's cut.
The referee calls time. The cornermen exit stage left and we're back to business.

Horton rushes Blankenship and presses him up against the cage.
Horton ties up his opponent against the cage and manages to drag the fight down to the ground. Horton no doubt will be looking to work submissions from his guard.
Horton manages to sweep nicely, so he's now on top. Blankenship manages to get himself to full guard.
Horton pushes down on Blankenship's leg and manages to get into half guard.
Blankenship tries to roll over but Horton keeps him under control.

Horton is thinking about going for an arm triangle but he can't free his leg.
Horton content to control rather than advance.
That's one minute gone in the round.
Horton is working for submissions here but there's nothing on.
Blankenship trying to get back to full guard but Horton takes advantage of the position and moves to full mount!
Horton lands a nice shot to the head.
Blankenship wants to control but Horton is having none of it.
Blankenship is squirming around, avoiding Horton's attempts to control the action.
That's two minutes gone in the round.
Horton pausing momentarily but resumes with a couple of decent strikes that do a bit of damage.
Horton controlling from mount.
Blankenship is trying to escape the mount but Horton keeps good control and instead manages to take Blankenship's back.
Blankenship trying to control the hands but Horton breaks the grip.
Horton is persistently looking for the submission but Blankenship is defending it well.
That's three minutes gone in the round.
Horton is riding his opponent, not letting Blankenship buck him off.
Blankenship holding both Horton 's hands and preventing any damage.
Horton controls the action.
Blankenship trying to control but not successfully.
Blankenship staying busy and making it hard for Horton to control.
That's four minutes gone in the round.
Horton is controlling his opponent, waiting for an opportunity to finish.
We've had a lack of effective grappling in the last minute or so, which could well see a referee standup.
Horton has his opponent's back and is working for the choke.
Horton trying to secure his dominant position for a moment - making sure Blankenship doesn't escape.
Can Blankenship hold on?! Horton is landing more strikes to his hapless foe.
As the round comes to an end the crowd are showing their appreciation for a great round of action.
Horton has his opponent's back and is working for the choke.
The crowd are loving this. Great action here.
Blankenship defending nicely against the rear naked choke attempt.
And thats the end of the round the fighters go back to their corners.
Nick Horton showed his class in that round. I'd imagine he'll take it on all the scorecards.
The cut man is working on Kenny Blankenship's cut.
Well, the break between rounds is over. Let's get back to the scrappin! So, we enter the final round. Let's see if either fighter can bring us a finish, or whether we're going to the judges scorecards.

Blankenship tries to close the distance and clinch up against the cage but Horton paws at him with a jab and circles away.
Blankenship connects with a slap. Keep your fist closed son.
Blankenship misses with a half-hearted attempt at a head kick.
Horton connects with a lovely jab that went straight through the gap between Blankenship's hands.
Nice takedown defense from Blankenship. No joy for Horton on that attempt.
Horton fakes high and shoots in for a takedown but Blankenship avoids it really well and circles away.
Horton shoots in but no luck this time.
Kenny Blankenship has stuffed three takedown attempts in the round now. That's going to take a lot out of Nick Horton.
Horton shoots in with a takedown attempt and he has Blankenship pinned against the cage. Blankenship gets the underhooks and manages to circle away.
Horton takes a big intake of breath there - he's definitely tired.
Horton slaps away a takedown attempt from Blankenship, before circling back to the center of the mat.
That's one minute gone in the round.
Blankenship throws a jab to the body, straight down the pipe. Boom. That sent Horton stumbling backwards but he manages to regain his composure quickly.
Horton displays good takedown defense there as he swats away a double leg from Blankenship.
Blankenship tries to close the distance and clinch up but Horton swats him away and circles back towards the center.
Blankenship takes one on the chin but seems OK.
Horton leaves Blankenship with his face pressed against the mat as he sprawls beautifully, defending against a solid takedown attempt.
Horton lands a jab. Then a cross. Then finally a nice hook to the body. Good work there by Horton.
Blankenship shoots in for a takedown. "Ole!" shouts Horton as he jumps to the side.
That's two minutes gone in the round.
Blankenship keeps the fight standing with a nice sprawl.
Horton scores with a nice takedown into half guard. Let's see what he's got on the ground.
This is a great period of action - very entertaining stuff!
Horton is controlling the pace.
Horton has been the more effective fighter overall so far.
Horton prevents Blankenship from improving his position.
Horton is trying to control. Blankenship wants to improve his position but can't escape this time.
That's three minutes gone in the round.
Neither fighter is being very active at the moment, with Horton in particular looking to stall.
Horton trying to control from half guard but Blankenship is working away.

The ref calls for a clean break and stands the fighters back up. Nick Horton wasn't active enough on the ground.
Blankenship tries to clinch but Horton is having none of it.
Horton shoots in for a takedown - he's clinched up with Blankenship but Blankenship pushes him off and we're back to square one.
Horton tries to score a power double leg takedown but Blankenship sees that one coming and sprawls well. That will dishearten Horton somewhat.
Blankenship tries to clinch but is not successful on this occasion.
That's four minutes gone in the round.
Horton blocks a head kick by Blankenship.
Horton shoots in for a takedown from distance. He catches Blankenship napping and manages to drive through into side control!
Horton wants to control but Blankenship is keeping him busy.
Horton is in a good position here but he's just trying to control... And he's not even managing to do that successfully.
Blankenship wants to get back to his feet but Horton is dominant here and he's now got Blankenship's back!
As the round comes to an end the crowd are showing their appreciation for a great round of action.
Even with his hooks in, Horton manages to miss with strikes from the back.
Kenny Blankenship has stepped it up - he knows he needs a finish here!
Nick Horton is fighting for a decision - hopefully he's judged it right and he's actually winning the fight.
Blankenship tries to escape but Horton has the hooks in and won't let him break free.
And that's the end of the fight!
Nick Horton comfortably won the final round on my scorecard.
Well Horton has outworked and out performed his opponent in all aspects of the game today. He was simply too good and the decision should be no more than a formality. Over to the ring announcer for the scorecards.
Ladies and gentlemen, after 3 rounds of action, we go to the scorecards for a decision.
Judge Bruno Hogan scores the fight 27:30
Judge John Mangel scores the fight 27:30
Judge Hugh Johnson scores the fight 27:30
In favor of your winner, by unanimous decision... Nick Horton!
Nick Horton opened up his post fight interview with a scream to camera that he wants a title shot! Whether he deserves the shot will be up to the management of the organization, so I guess he'll have to wait and see.
|
|
|
|
|
|
|
|
|
|
|
|
|
|
|
|
|
|
|
|
|
|
|
| S |
C
A |
G |
S |
C
B |
G |
|
S |
C |
G |
|
energy
A | B |
|
hype
A | B |
|
pop
A | B |
|
mgr
A | B |
|
FIGHT
RATING
61% |
|
|
|
|
|
|
