|
|
PBP Commentary |
Coming up we have a heavyweight MMA rules bout between Bubba KillsInWater (ranked 0 p4p, 0 weight class) and Starship Pain (ranked 0 p4p, 0 weight class). Pain is bouncing up and down as he enters the arena, backed by Decisive Battle. Fingers crossed for an exciting fight - I'm sure both fighters are looking for a nice under the table bonus!
 |
|
 |
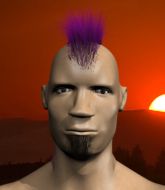
| 210 cm
29
270 lbs
31 - 8 - 0 |
|
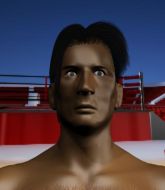
195 cm
28
277 lbs
32 - 7 - 1 |
Good wrestling
World class boxer
Insanely flexible |
|
Olympic wrestler
World class MT
Good gas tank |
|
| |
|
Ladies and gentlemen. This fight is 5 rounds, in the heavyweight division.
Introducing the fighter to my left, fighting out of the red corner.
With a record of
31 - 8 - 0, fighting out of New York, Bubba KillsInWater!
And introducing the fighter to my right, fighting out of the blue corner.
With a record of
32 - 7 - 1, fighting out of Las Vegas, Starship Pain!
The judges for this bout are , Don Winkell and Frank Antenori.

The bell rings for round one and we are underway!
KillsInWater looking to throw a kick but he's pulled out of it.
Pain fails with a takedown attempt from distance.

Pain closes the distance and after a bit of a stuggle, scores a takedown into KillsInWater's guard.
KillsInWater utilising some decent striking defenses from the guard, preventing the ground and pound.
Pain postures up to throw the ground and pound strikes but they don't connect.
KillsInWater is trying to keep Pain in close.
Pain won't allow KillsInWater to sweep him here.
Pain postures up in KillsInWater's guard and throws a big left but KillsInWater blocks it.
Pain trying to control but KillsInWater is working from the bottom.

Pain drops back for a leg! It's a sloppy attempt though and Pain jumps back into guard quickly, to retain the dominant position.
The fighters are pressed up against the cage, both looking to find a bit of space to work.

That's one minute gone in the round.
KillsInWater has momentary wrist control but Pain slips an elbow through the middle.
Pain in full guard, throwing the ground and pound. No damage this time.
Pain chips away with some ground and pound.
KillsInWater is pulling down on Pain's head. It's preventing any offense from Pain, at least for the moment.
Pain looking to pass the guard.
KillsInWater will need to keep those long limbs tucked in whilst he's on the ground, to prevent any submissions.
KillsInWater not looking particularly offensive just at the moment.
Pain throwing elbows and punches but not connecting, as KillsInWater works some decent striking defense from the bottom.
Pain throws an elbow that misses. KillsInWater uses the momentum to reverse the position. He's now in Pain's guard. Nice move by KillsInWater!

That's two minutes gone in the round.
KillsInWater content to stall in guard here.
Pain bucks up whilst keeping hold of a body lock, managing to reverse the position. Now he's in top in KillsInWater's guard.
The fans in attendance giving it up for the two fighters, who have really let it all hang out in the last minute or so!
Pain postures up in KillsInWater's guard and throws a big left but KillsInWater blocks it.
KillsInWater pulls Pain in to control the position.
The ref warns both fighters not to hold the cage as they work up against the meshing.
A big thud reverberates around the arena there as Pain accidentally thumps the mat. Hopefully he's not broken his hand.
Pain pressing down on his opponent's thigh, looking to pass guard. KillsInWater is keeping the position for now.

That's three minutes gone in the round.
Pain preventing the sweep.
Pain drops back, looking for a kneebar! KillsInWater looks panicked! The fighters roll across the mat, one looking to finish, one looking to escape. KillsInWater looks to have wriggled free... Yes, he's got his leg free and he's dived into side control! Good work there from KillsInWater!
Pain tries to bench press KillsInWater off him but KillsInWater keeps the position.
Pain is sneaking out the side here. He's bucked KillsInWater off and has taken his back!
KillsInWater is really stuck here.
Pain is striking from the back but KillsInWater escapes and manages to recover to half guard.
Pain throws a strike but KillsInWater avoids it easily and moves to full guard.

That's four minutes gone in the round.
KillsInWater seems keen to control Pain's posture.
KillsInWater manages to sweep nicely, so he's now on top. Pain manages to get himself to full guard.
KillsInWater won't allow Pain to sweep him here.
KillsInWater stands up and looks to throw the legs aside to pass to side control. Pain swivels though and keeps the full guard.
KillsInWater wants to control from the top but Pain keeps moving.
As the round comes to an end the crowd are showing their appreciation for a great round of action.
Pain looks to be working for a triangle here. Oh, it looks like he might have it! KillsInWater has picked Pain up and slammed him! Pain can't keep hold of the triangle and KillsInWater manages to pass to side control!
And thats the end of the round the fighters go back to their corners.
Starship Pain dominated that round.
That's the end of the interval. I'm sure that seemed a lot quicker than a minute for our two fighters! Back to the action.

Nice takedown defense from KillsInWater. No joy for Pain on that attempt.
KillsInWater throws a jab when Pain was well out of range.
Pain blocks a head kick by KillsInWater.
Pain throws a series of punches but KillsInWater moves out of range.
KillsInWater throws a leg kick
and Pain counters with a stiff right hand.
Pain checks a low kick from KillsInWater.
Pain throws a series of punches but KillsInWater avoids them all with ease.
Pain throws a solid leg kick but KillsInWater takes the impact on his shin and smiles at Pain.
KillsInWater showing good head movement there, avoiding the strikes from Pain.
Pain avoids the body shot from KillsInWater.
KillsInWater lands an overhand left. A wild punch that just about connected.
KillsInWater scores with a spinning back kick!
That's one minute gone in the round.
Pain shoots in for a takedown - he's clinched up with KillsInWater but KillsInWater pushes him off and we're back to square one.
Pain throws a leg kick
and KillsInWater counters with a crisp hook to the side of the head.
KillsInWater connects with a solid leg kick.
KillsInWater fakes a couple of low kicks, before throwing one on the third attempt. It connects and Pain has to reset his feet before getting ready to engage.
Boom, another hit is landed. "You're gunna get knocked out" taunts KillsInWater, as that shot connected.
KillsInWater moves into range and connects with a jab.
We've seen a great period of action over the last minute or so - credit to both fighters for going all out!
Pain moves out of range as KillsInWater strikes.
Pain tries to check the leg kick but that clearly hurt him.
KillsInWater throws a lazy right hand but Pain sees it coming a mile off and sidesteps it easily.
Pain shoots in for a takedown but doesn't get it.
Bubba KillsInWater has stuffed three takedown attempts in the round now. That's going to take a lot out of Starship Pain.
KillsInWater slips a jab from Pain.
KillsInWater jabs Pain to the body, keeping him at a distance.
Pain is breathing heavily.
That's two minutes gone in the round.
A low kick from KillsInWater is predictable there
and Pain counters with an inside leg kick.

KillsInWater moves into the clinch.
Pain can't find room to land a body shot as KillsInWater controls the action.
KillsInWater lands an elbow that stopped Pain in his tracks for a moment.
Pain throws a punch but it's blocked by KillsInWater.
Pain tries to throw a body punch but KillsInWater avoids it by throwing Pain back against the cage.
Pain lands a left hand that snaps the head of KillsInWater backwards.
KillsInWater looks to throw an elbow but misses.
Pain blocks an uppercut.
KillsInWater stalling in the clinch.
An uppercut on the inside fails to land for KillsInWater.
KillsInWater trying to stall but Pain improves his position.
KillsInWater working on landing some head shots here - that one got through nicely.
Pain gets the body lock takedown. After a quick scramble, KillsInWater regains guard.
A big thud reverberates around the arena there as Pain accidentally thumps the mat. Hopefully he's not broken his hand.
That's three minutes gone in the round.
Pain working some ground and pound from guard but it's not doing any damage.
Pain loading up with the ground and pound but he's missing more than he's landing in this flurry.
KillsInWater wants to sweep but no luck.
KillsInWater working a defensive guard here.
Pain trying to land body shots but he keeps hitting the mat.
Pain wants to pass the guard but KillsInWater is keeping the position.
Pain working some strikes from top position.
Pain postures up in KillsInWater's guard and throws a big left but KillsInWater blocks it.
KillsInWater preventing the ground and pound from doing any damage.
That's four minutes gone in the round.
Pain passes easily into side control. Nice work.
Pain tries for a kimura but KillsInWater is defending well.
You can see the frustration on KillsInWater's face, being in this tough position on the bottom.
Starship Pain has got the better of the ground game so far.
The crowd are going absolutely nuts as the round comes to an end - what a fantastic round of action!
KillsInWater is looking to regain half guard here but Pain keeps moving and retains side control.
KillsInWater stops Pain from passing to mount.
And thats the end of the round the fighters go back to their corners.
Bubba KillsInWater dominated that second round.
That's time! Back to the action!

KillsInWater avoids a low kick by using good footwork.
Pain looks for a takedown here. Will he get it? KillsInWater is fending him off so far but Pain persists. Nope, KillsInWater circles away and we're back to standing.
KillsInWater pivots as if he's going to throw a leg kick but stops half way.
The fight moves into the clinch position.
KillsInWater landing knees to the body.
KillsInWater is using his height advantage well here, landing a good percentage of his punches.
KillsInWater using the Thai clinch to land knees to the body.
KillsInWater landing some nice looking knees to the body.
Pain managing to block the knees to the body from KillsInWater.
KillsInWater tries to throw a body punch but Pain avoids it by throwing KillsInWater back against the cage.
Pain misses with a shot to the kidneys.
KillsInWater with the Thai clinch. He's looking to land a big knee but he's not managed it this time.
KillsInWater tries to land a knee to the head but misses.
The crowd are loving this. Great action here.
Pain jumps into guard, dragging KillsInWater to the mat.
That's one minute gone in the round.
Pain keeping moving, preventing KillsInWater from controlling successfully.
Pain looking for submissions from the bottom but instead KillsInWater passes into side control.
KillsInWater wants to control but Pain is keeping him busy.
KillsInWater is going to have to think about doing something other than just controlling because Pain is managing to avoid having the position dictated to him.
Pain is trying to get back to half guard.
Pain manages to work his way to half guard, despite KillsInWater's best efforts.
That's two minutes gone in the round.
Pain gets full guard.
Pain isolates an arm and boxes in a triangle. KillsInWater stacks Pain on his neck as he steps over and passes to the side. He's now in a much more dominant position where he can look to do some serious damage. Nice move by KillsInWater!
KillsInWater trying to control the position but Pain is working away.
Pain tries to get back to half guard but can't.
Pain seems a little lost for a moment, as KillsInWater dominates the positioning.
Pain is positioning himself to get back to half guard.
Pain has the superior BJJ but he's also working some ground strikes into his gameplan.
Pain gets one leg under and gets the fight to half guard.
That's three minutes gone in the round.
KillsInWater prevents Pain from improving his position.
KillsInWater tries to stand and escape but Pain is controlling the position.
KillsInWater is looking to take a break and control but Pain is keeping him honest, looking to work from the bottom.
Pain works his way to full guard. Good work.
Pain looking to hit a scissor sweep but KillsInWater is one step ahead there.
KillsInWater wants to pass the guard but Pain is keeping the position.
That's four minutes gone in the round.
Pain is working actively off his back, looking to secure an arm or perhaps work for a triangle.
KillsInWater trying to control but Pain is working from the bottom.
Pain throwing his legs up looking for a triangle.
As the round comes to an end the crowd are showing their appreciation for a great round of action.
KillsInWater seems content to control from guard here. He's going to have to remain active though if he doesn't want to get stood back up.
And thats the end of the round the fighters go back to their corners.
Bubba KillsInWater clearly takes that round.
The fighters get back to their feet, the hooter sounds and we're back to the action!

Pain misses with a looping right.
Pain throws a hook to the body but it doesn't connect.
A thudding body kick lands there by KillsInWater!
Pain moves in looking to clinch but KillsInWater pushes him off.
KillsInWater throws a head kick that misses.
KillsInWater moves into the clinch.
Pain throws a head punch that misses.
KillsInWater throws a blind hook that connects with the side of Pains head.
Pain on the defensive, avoiding the knees to the body.
Pain on the defensive, avoiding the knees to the body.
Pain is leaning against KillsInWater and scores with a nice uppercut to the body.
KillsInWater lands with a right to the head.
That's one minute gone in the round.
Good anti-grappling being displayed by Pain as KillsInWater tries to tie him up.
KillsInWater throws a blind hook that connects with the side of Pains head.
Pain throws a head punch that misses.
KillsInWater blocks a punch to the side of the head.
Bubba KillsInWater has scored more points in the clinch so far.
KillsInWater putting his Muay Thai to good use. He has Pain in a tight clinch and is doing some damage with knees to the body.
Pain is absolutely dripping with sweat - he looks exhausted.
A short right from KillsInWater.
With the fighters clinched against the cage, KillsInWater creates a bit of distance for himself and scores with a nice uppercut.
KillsInWater looks to throw an elbow but misses.
KillsInWater lands punches inside but they're not really causing much damage.

Pain is rocked!
The crowd are loving this. Great action here.
KillsInWater scores with a nice hook to the head.
Pain is still on wobbly legs! Can KillsInWater finish him?
KillsInWater scores a nice knee to the body.
KillsInWater landing some nice looking knees to the body.
KillsInWater creates a bit of space for himself and sneaks an elbow through Pain's defenses.
KillsInWater creates some distance for himselfand unleashes a massive uppercut that sends Pain's eyes rolling into the back of his head! Pain drops to his knees and KillsInWater pours it on with more strikes until the referee steps in to end the bout!
Ladies and gentlemen, after 1:57 of round 4, we have a winner by way of TKO (Strikes). Bubba KillsInWater!
Post fight, Bubba KillsInWater took to the microphone: 'Bubba no believe it! Bubba am sikick! Puno now retired and Bubba am a goat!'.
|
|
|
|
|
|
|
|
|
|
|
|
|
|
|
|
|
|
|
|
|
|
|
| S |
C
A |
G |
S |
C
B |
G |
|
S |
C |
G |
|
energy
A | B |
|
hype
A | B |
|
pop
A | B |
|
mgr
A | B |
|
FIGHT
RATING
100% |
|
|
|
|
|
|
