|
|
PBP Commentary |
Coming up we have a heavyweight MMA rules bout between Nick Horton (ranked 0 p4p, 0 weight class) and Kenny Blankenship (ranked 0 p4p, 0 weight class). Horton's ring entrance music is that housewives' favourite, Ironman. Over to our ring announcer for the fighter introductions!
 |
|
 |
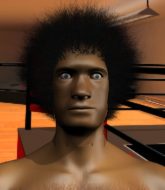
| 177 cm
19
210 lbs
8 - 9 - 0 |
|
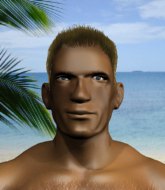
183 cm
19
210 lbs
4 - 9 - 0 |
BJJ Blue Belt
Brawler
Granite chin |
|
BJJ White Belt
Brawler
Knockout power |
|
| |
|
Ladies and gentlemen. This fight is 5 rounds, in the heavyweight division.
Introducing the fighter to my left, fighting out of the red corner.
With a record of
8 - 9 - 0, fighting out of Sydney, Nick Horton!
And introducing the fighter to my right, fighting out of the blue corner.
With a record of
4 - 9 - 0, fighting out of Sydney, Kenny Blankenship!
The judges for this bout are Steve Erwin, Eliza Hachem and Hugh Johnson.

The bell rings for round one and we are underway!
Horton takes one to the side of the head.
Horton lands a high kick!
Blankenship misses with a takedown attempt - Horton sprawls well and throws a nice strike on the way out which just misses.
Blankenship shoots in looking for a double leg takedown. Horton defends it nicely.
Blankenship tries to clinch but is not successful on this occasion.
Blankenship shoots in looking for a double leg takedown. Horton defends it nicely.
Nick Horton has stuffed three takedown attempts in the round now. That's going to take a lot out of Kenny Blankenship.
Horton shoots in looking for a takedown. Blankenship tries to sprawl out of it but Horton keeps driving through. The fighters are pinned against the cage. Blankenship manages to get underhooks and after a bit of a struggle, circles away and we're back to standing.
Blankenship fails with a takedown attempt from distance.

That's one minute gone in the round.
Blankenship shoots in for a takedown but Horton shows good takedown defense.
Horton is trying hard to land a takedown here. Blankenship sprawls well and keeps this one on the feet.
Horton fails with a takedown attempt from distance.
Horton displays good takedown defense there as he swats away a double leg from Blankenship.
Blankenship looks gassed!
Blankenship doesn't manage to clinch there - Horton circles away.

Horton scores with a nice takedown into half guard. Let's see what he's got on the ground.
Horton moves into full mount! Blankenship won't be happy about that!
Horton controlling his opponent.

That's two minutes gone in the round.
Horton prevents Blankenship from getting the reversal.
Horton controlling from the full mount.
Horton dominating with strikes here.

That's three minutes gone in the round.
Blankenship is trying to escape the mount.
Blankenship gets back to half guard.
Blankenship won't allow Horton to pass to mount.
Horton throwing shots but they're hitting the canvas more than the man.
Well, if Horton is going to just lie there, perhaps we should talk about what we're having for dinner tonight
I'm having a ham and pineapple pizza
Yum. Can't wait.
Horton is keeping good posture, landing some ground and pound.
Horton is figuring out what he wants to do next.

That's four minutes gone in the round.
Horton seems to have a rather negative gameplan on the ground. He seems keen to just score the takedown and hold down Blankenship for as long as he can get away with.

Nick Horton has forced the referee to step in and bring the fight back to the feet.
Horton throws a head kick that misses and slips in the process. He scrambles back to his feet and the fighters circle.
The crowd applaud the fighters efforts here as the round comes to an end.
Blankenship wants to clinch.
Horton dives in and scores a takedown into Blankenship's guard.
And thats the end of the round the fighters go back to their corners.
Nick Horton dominated that round.
That's time! Back to the action!

Horton circles away from the clinch attempt.
Blankenship shoots in looking for a takedown. Horton tries to sprawl out of it but Blankenship keeps driving through. The fighters are pinned against the cage. Horton manages to get underhooks and after a bit of a struggle, circles away and we're back to standing.
Horton on the wrong end of a nice jab.

Horton closes the distance and presses his opponent up against the cage.
Blankenship tries for a takedown but Horton manages to get underhooks.
Horton fails to pull the fight into his guard.
Horton is working for a takedown up against the cage. He can't get it on this occasion though.
Blankenship tries to take the fight to the ground by pulling guard but can't manage it.
Nick Horton has stuffed three takedown attempts in the round now. That's going to take a lot out of Kenny Blankenship.
Blankenship tries to pull guard but Horton holds him up against the cage and eventually Blankenship drops back down to his feet.
Horton drops to a knee looking for a takedown but Blankenship gets the underhooks and prevents it.
Both fighters are absolutely exhausted here.
That's one minute gone in the round.
Blankenship prevents a takedown attempt there.
Horton comes over the top with an elbow. That landed flush.
Good anti-grappling being displayed by Horton as Blankenship tries to tie him up.
Horton has dropped down and is looking to force the takedown but it's defended by Blankenship after a bit of a struggle.
Horton is looking for a takedown up against the cage. Blankenship gets underhooks though and prevents the takedown attempt.
Horton has dropped down and is looking to force the takedown but it's defended by Blankenship after a bit of a struggle.
Blankenship wants to break the clinch but can't.
That's two minutes gone in the round.
Horton is trying to pull guard but Blankenship has him pressed against the cage.
Horton tries to take the fight to the ground by pulling guard but can't manage it.
Horton tries to circle away but Blankenship has him pinned against the cage.
Both guys are working to get underhooks.
Blankenship wants to break free but Horton has control.
Blankenship is working on a leg, looking for a takedown but Horton is defending well.
Horton wants a takedown.
Blankenship is working for takedown but Horton is calmly controlling the position for now.
Blankenship can't break the clinch.

Blankenship escapes the clinch and we're back to striking.
Blankenship scores with a nice one two combo and darts back out of range to avoid anything coming in the opposite direction.
Nick Horton is looking to throw some combinations by the looks of things.
That's three minutes gone in the round.
Horton misses with a head kick.
Horton fails miserably with a takedown attempt.
Blankenship scores with a head kick. Horton tried to block it but didn't get his arm up in time.
Blankenship shoots for a double leg takedown but Horton sprawls well. He's pushed Blankenship's face into the mat and manages to get back to his feet relatively easily.
Blankenship keeps the fight standing with a nice sprawl.
Blankenship dives in and grabs Horton's left leg, looking for a takedown. Horton pushes down on Blankenship's head and hops out.
Blankenship gets caught flat footed, as Horton shoots in with a quick takedown into guard.
Horton trying to pass the guard but can't manage it just yet.
Horton wants to control from the top but Blankenship keeps moving.
That's four minutes gone in the round.

Horton stands up from guard. Let's bang!
Horton closes the distance, clinches up and gets a nice trip takedown into side control. Very smooth.
Fantastic stuff here - a very entertaining period of action, which has drawn cheers from the crowd.
Horton connects with a decent looking elbow from side control that caused Blankenship some visible discomfort.
Horton in side control, just content to control the action for now.
And thats the end of the round the fighters go back to their corners.
Nick Horton dominated that second round.
The corners get their ten second warning. Both fighters stand from their stools and stare eachother down, ready to get back to the action.

Blankenship lands with a nice combination. Horton backs away looking to recover.
Horton will have to do better than that with his takedown attempts.
Blankenship is trying hard to land a takedown here. Horton sprawls well and keeps this one on the feet.
Blankenship shoots in but Horton avoids the takedown attempt easily.
Blankenship shoots for a takedown but Horton saw that one coming a mile off and avoided it easily.
Nick Horton has stuffed three takedown attempts in the round now. That's going to take a lot out of Kenny Blankenship.
Blankenship takes a punch to the jaw and another one to the bread basket.
Blankenship dodges the punch combination from Horton.
Both fighters are breathing heavily.
Donk. Horton catches Blankenship right on the button with a cross.
That's one minute gone in the round.
Blankenship fails with the takedown.
Horton lands a jab-cross combination.
Horton is looking for a takedown here. He's shot in and has managed to get it, finishing up in Blankenship's half guard.
Horton seems content to maintain position for now, rather than mounting any offense.

Blankenship looking to work for a kimura from the bottom.
That's two minutes gone in the round.
Blankenship trying to hold on to Horton's head to control him but Horton postures up.
Horton is scoring with some nice ground and pound from the dominant position.

Horton is working for a submission here. He's got hold of the far side arm and he's looking for a kimura. He's cranking on the arm and he's got it! Blankenship is tapping out! Ouch, that looked like it hurt!
Ladies and gentlemen, after 2:50 of round 3, we have a winner by way of Submission (Kimura). Nick Horton!
A pretty intense looking Nick Horton took the opportunity post-fight to ask for a shot at the title.
|
|
|
|
|
|
|
|
|
|
|
|
|
|
|
|
|
|
|
|
|
|
|
| S |
C
A |
G |
S |
C
B |
G |
|
S |
C |
G |
|
energy
A | B |
|
hype
A | B |
|
pop
A | B |
|
mgr
A | B |
|
FIGHT
RATING
67% |
|
|
|
|
|
|

