|
|
PBP Commentary |
Coming up we have a heavyweight MMA rules bout between Mario Huber (ranked 0 p4p, 0 weight class) and Tyron Marshall (ranked 0 p4p, 0 weight class). Huber comes to the cage accompanied by Enter Sandman. Both fighters look fresh as a daisy as they make their way towards the cage.
 |
|
 |
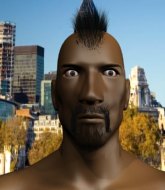
| 190 cm
19
240 lbs
3 - 2 - 0 |
|
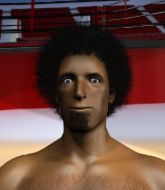
200 cm
22
240 lbs
0 - 0 - 0 |
BJJ Blue Belt
Brawler
Likes comics |
|
BJJ Blue Belt
Solid Muay Thai
Determined |
|
| |
|
Ladies and gentlemen. This fight is 3 rounds, in the heavyweight division.
Introducing the fighter to my left, fighting out of the red corner.
With a record of
3 - 2 - 0, fighting out of Amsterdam, Mario Huber!
And introducing the fighter to my right, fighting out of the blue corner.
With a record of
0 - 0 - 0, fighting out of Sydney, Tyron Marshall!
The judges for this bout are Hugh Johnson, Damien Edna and Winston Howard.

The bell rings for round one and we are underway!
Marshall keeps the fight standing with a nice sprawl.

The fight moves into the clinch position.
Huber wants a takedown but no success here.
Huber is looking to take this one to the mat.
That's three failed takedown attempts in the round for Mario Huber. That's going to take a lot out of him.

Huber is trying to trip Marshall. He has hold of a leg but Marshall is hopping around, keeping his balance for the moment. Huber persists though and gets the takedown into guard.
Huber prevents Marshall from getting back to his feet.
Huber is stalling in the full guard.
Huber throwing strikes from guard but Marshall blocks nicely.
Marshall working the defensive guard well to avoid strikes from Huber.
Huber is looking to work some ground and pound but Marshall has wrist control.
Marshall trying to control the position.
Huber trying to land body shots but he keeps hitting the mat.
Huber prevents Marshall from getting back to his feet.
Huber has been looking to land a fair amount of strikes on the ground. He might be looking to soften his opponent up in order to work for a submission.

That's one minute gone in the round.
Huber tries to free his leg and advance position but Marshall is retaining full guard.
Marshall trying to keep a closed guard but Huber is proving a slippery customer.
Huber trying to land body shots but he keeps hitting the mat.
Huber trying to move into half guard but instead Marshall has managed to sweep!
Marshall tries to stand but Huber is controlling from the bottom.
Huber is controlling Marshall's posture.
Huber looking for a sweep. Not yet Huber, not yet.
Huber keeping moving, preventing Marshall from controlling successfully.
Huber tries to land a sweep but no joy.
Huber looking to control.

The referee decides to stand the fighters back up.
Huber keeps the fight standing with a nice sprawl.
Huber shoots in for a takedown. He's persisting with it as Marshall sprawls well. Marshall wins this battle and keeps the fight standing. Huber gets slowly back to his feet.

That's two minutes gone in the round.
Marshall lands a nice looking kick to the body. Huber takes a step back to recover.
Huber is breathing heavily.
Wooooo! Give it up for these two warriors! They are putting on a show!
Huber shoots in for a takedown. He's persisting with it as Marshall sprawls well. Marshall wins this battle and keeps the fight standing. Huber gets slowly back to his feet.
Marshall rushes Huber and pushes him back against the cage in a clinch.
Marshall is trying to break the clinch but Huber has him pressed against the cage.
Huber looking for a takedown.

Marshall escapes the clinch and we're back to striking.
Nice takedown defense from Marshall. No joy for Huber on that attempt.
Marshall shoots in for a takedown but doesn't get it.
Marshall misses with a jab and misses with a cross straight after too.
Marshall's jab looks to have found its range, popping Huber under the eye.

That's three minutes gone in the round.
Huber shoots for a double leg takedown but Marshall sprawls well. He's pushed Huber's face into the mat and manages to get back to his feet relatively easily.
Marshall clinches up against the cage.
Marshall escapes the clinch and we're back to striking.
Jab, jab by Marshall - just one landing.
Marshall closes the distance and presses his opponent up against the cage.
Huber drops down for a takedown but doesn't get it.
The fighters are starting to get sweaty, which will make takedowns a bit more tricky.
Marshall lands a good knee to the midsection. Huber won't want to take too many of those.
Marshall tries for a takedown. No joy.
Marshall lands on the inside with an uppercut.
Huber drops to a knee looking for a takedown but Marshall gets the underhooks and prevents it.

Marshall has managed to pull guard. Let's see whether he can work an aggressive guard. It will also be interesting to see what tactics Huber uses from the top position.

That's four minutes gone in the round.
Marshall is trying to stand up but he's not managed so far.
Marshall has control of Huber's left arm, preventing Huber from doing any damage.
Wooooo! Give it up for these two warriors! They are putting on a show!
Marshall is working from a closed guard but he's struggling to control his opponent.
Huber is looking to work some ground and pound but Marshall has wrist control.
Huber pressing down on his opponent's thigh, looking to pass guard. Marshall is keeping the position for now.
Huber with a nice head shot there.
As the round comes to an end the crowd are showing their appreciation for a great round of action.
Huber content to strike from guard, landing some decent shots.
Huber keeps in close for a moment and lands a decent shot to the side of Marshall's head.
Huber in full guard, throwing the ground and pound. No damage this time.
And thats the end of the round the fighters go back to their corners.
A close round but Tyron Marshall will probably get the nod.
The fighters get back to their feet, the hooter sounds and we're back to the action!

Huber fails with a takedown attempt.
Huber looks frustrated there after his takedown attempt is stuffed easily.
Marshall lands a high kick!
Marshall shoots in looking for a double leg takedown. Huber defends it nicely.
Marshall leaves Huber with his face pressed against the mat as he sprawls beautifully, defending against a solid takedown attempt.
That's three failed takedown attempts in the round for Mario Huber. That's going to take a lot out of him.
Marshall takes the fight into the clinch.
Marshall stops a takedown attempt from Huber.
Both fighters are absolutely exhausted here.
Marshall makes some space for himself and lands an uppercut.
Marshall landing knees to the body. They look like they could hurt.
That's one minute gone in the round.
Marshall is working on a leg, looking for a takedown but Huber is defending well.
Marshall tries to throw a body punch but Huber avoids it by throwing Marshall back against the cage.
Huber has hold of a leg and is looking for a trip takedown. Marshall avoids it nicely though and we remain in the clinch.
Marshall changes levels and goes for a takedown here. Huber fights it off and pushes away nicely.
Huber fails miserably with a takedown attempt.
Marshall closes the distance and clinches.
Huber goes for a takedown attempt but Marshall pushes him away and we're back to fighting at a distance.
Huber closes the distance and clinches up with Marshall, looking for a takedown. Huber pushes Marshall against the cage but Marshall circles to the side and manages to break the clinch.
Marshall gets in close and instigates a clinch.
That's two minutes gone in the round.
Marshall lands a good knee to the midsection. Huber won't want to take too many of those.
Huber tries to score a body lock takedown but Marshall shows good agility there to stay on his feet.
Marshall jumps into guard, dragging Huber to the mat.
Marshall is working from a closed guard but he's struggling to control his opponent.
Huber postures up to throw the ground and pound strikes but they don't connect.
Huber looking to sit in guard and control but Marshall gets the butterfly guard and sweeps. He's now in the guard on the top.
This is a great period of action - very entertaining stuff!
A big thud reverberates around the arena there as Marshall accidentally thumps the mat. Hopefully he's not broken his hand.
Marshall works a leg free and moves into half guard.
Marshall wants to take a breather but Huber is having none of it.
The ref warns both fighters not to hold the cage as they work up against the meshing.
Marshall not throwing his punches with enough precision this time.
Marshall missing with the ground and pound from half guard.
That's three minutes gone in the round.
Huber makes his way to full guard. A much better position for Huber.
Marshall won't allow Huber to sweep him here.
Marshall wants to get up but he can't break Huber's closed guard. He needs to be careful trying to break the legs open, as he's open to submissions here.

Huber escapes his hips to the side and looks to be working for an armbar. Marshall gives him a little smile and shakes his head. No chance.
Mario Huber overall seems to be getting the better of the ground position in the fight so far.

Marshall gets to his feet. Huber looking to butt scoot but the ref puts an end to that. On your feet son!
Marshall darts in and clinches Huber up against the cage.
Huber has hold of a leg and is looking for a trip takedown. Marshall avoids it nicely though and we remain in the clinch.
Marshall decides to pull guard.
Huber trying to control the position from guard on top but Marshall is wriggling around, looking for whatever he can.
Marshall working the defensive guard well to avoid strikes from Huber.
That's four minutes gone in the round.
Marshall trying to control the position here.
Marshall not looking particularly offensive just at the moment.
Huber sneaks a leg through and gets to half guard. That was like a knife through butter how easily he passed Marshall's guard.
This is a great period of action - very entertaining stuff!
Huber working over Marshall with some ground and pound. Marshall looks like he wants out of this position, which is understandable.
Marshall is looking to escape.
Marshall is looking for a sweep. Huber is wise to his cunning plan and keeps the top position.
Huber passes the half guard and he's now in mount! Big trouble for Marshall!
Huber in mount throwing good strikes here, bouncing his opponent's head off the canvas.
As the round comes to an end the crowd are showing their appreciation for a great round of action.
Huber cracks Marshall with a nasty head shot there - the crowd let out an audible gasp there, as the noise reverberated around the arena.
BOOM! Huber connects with a massive shot to the dome!
And thats the end of the round the fighters go back to their corners.
Tyron Marshall showed his class in that round. I'd imagine he'll take it on all the scorecards.
The fighters get back to their feet, the hooter sounds and we're back to the action! This is the final round!

Huber shoots in for a takedown but doesn't get it.
Marshall closes the distance and clinches.
Marshall prevents a takedown attempt there.
Tyron Marshall seems to be working more effectively in the clinch in the fight so far.
Marshall is working hard here but doesn't seem to be able to control effectively, up against the cage.
Huber wants to take the fight to the mat but Marshall manages to get underhooks and keep the fight in the clinch.
That's three failed takedown attempts in the round for Mario Huber. That's going to take a lot out of him.
Marshall looks like he'd prefer to be striking at range right now.
Marshall pushes off and circles away, back to the middle of the mat.
Huber misses with a takedown attempt. He shot from a bit too far out.
Marshall moves into the clinch.
Marshall putting his Muay Thai to good use. He has Huber in a tight clinch and is doing some damage with knees to the body.
Marshall stops a takedown attempt from Huber.
That's one minute gone in the round.
Huber looking for a takedown.
Both fighters are breathing heavily.
Marshall is working for takedown but Huber is calmly controlling the position for now.
Marshall lands an elbow just above Huber 's eye.
Marshall is pressed up against the cage. Huber has hold of a leg and is looking to drag Marshall down to the mat. Marshall avoids the attempt though and has circled away. We're back to striking at a distance.
Huber tries to move into range but Marshall moves to the side and lands with a nice right hand.
No luck for Marshall with that takedown attempt.
Marshall gets a clinch.
Marshall breaks the clinch and we're back to striking at distance.
A combination from Marshall does no damage.
Marshall moves into the clinch successfully.
Huber can't get the takedown.
Marshall lands a nice elbow from the clinch.
That's two minutes gone in the round.
Knees to the body from Marshall.
Marshall trying to stall but Huber improves his position.
Marshall has managed to pull guard. Let's see whether he can work an aggressive guard. It will also be interesting to see what tactics Huber uses from the top position.
Fantastic stuff here - a very entertaining period of action, which has drawn cheers from the crowd.
Marshall looking for a sweep. Not yet Marshall, not yet.
Huber lands a couple of decent looking shots.
Marshall pushes Huber off and scrambles back to his feet.
Marshall misses with a wild combination.
Huber looking to score a takedown here. Marshall is defending well but Huber drives through and ends up in Marshall's guard.
Huber is stalling in the full guard.
Marshall uses the cage to get back to his feet.
That's three minutes gone in the round.
Marshall has closed the distance and engaged Huber in a clinch.
Marshall is working for a takedown up against the cage. He can't get it on this occasion though.
Marshall stops a takedown attempt from Huber.
Marshall pushes off and circles away, back to the middle of the mat.
Huber tries to shoot in for a takedown. He's got hold of a leg but Marshall swivels and escapes.
Nice sprawl there from Huber as Marshall shoots in.
Marshall swings away but doesn't land with a series of punches.
Marshall leaves Huber with his face pressed against the mat as he sprawls beautifully, defending against a solid takedown attempt.
Huber looks frustrated there after his takedown attempt is stuffed easily.
Marshall clinches up against the cage.
That's four minutes gone in the round.
Marshall is working for takedown but Huber is calmly controlling the position for now.
Huber has a body lock and is looking for a takedown. Marshall is bouncing around trying to prevent the takedown and somehow he has indeed managed to stay on his feet.
Marshall lands an elbow inside that Huber shrugs off.
Huber blocks a body shot from Marshall.
Huber wants a takedown but no success here.
Marshall lands a left hand that snaps the head of Huber backwards.
Marshall manages to pull guard.
This is a great period of action - very entertaining stuff!
Huber postures up to throw the ground and pound strikes but they don't connect.
Marshall thows some rabbit punches from the bottom but they don't do any damage.
As the round comes to an end the crowd are showing their appreciation for a great round of action.
Huber is working the ground and pound from guard. He might want to try advancing position though to get more of an impact.
Mario Huber has stepped it up - he knows he needs a finish here!
Marshall is avoiding any damage by keeping wrist control.
Tyron Marshall is fighting for a decision - hopefully he's judged it right and he's actually winning the fight.
Huber stands up over Marshall, holding his feet. He dives back in and lands a decent shot to the head.
And that's the end of the fight!
Tyron Marshall comfortably won the final round on my scorecard.
I've got Marshall winning every round here. Surely the decision will go his way and he'll pick up a well deserved decision victory. Over to the ring announcer for the scorecards.
Ladies and gentlemen, after 3 rounds of action, we go to the scorecards for a decision.
Judge Hugh Johnson scores the fight 27:30
Judge Damien Edna scores the fight 27:30
Judge Winston Howard scores the fight 27:30
In favor of your winner, by unanimous decision... Tyron Marshall!
|
|
|
|
|
|
|
|
|
|
|
|
|
|
|
|
|
|
|
|
|
|
|
| S |
C
A |
G |
S |
C
B |
G |
|
S |
C |
G |
|
energy
A | B |
|
hype
A | B |
|
pop
A | B |
|
mgr
A | B |
|
FIGHT
RATING
88% |
|
|
|
|
|
|
