|
|
PBP Commentary |
Coming up we have a light heavyweight MMA rules bout between Karl Bates (ranked 0 p4p, 0 weight class) and Adnan Mercury (ranked 0 p4p, 0 weight class). We have two fighters making their debuts here, so let's see who comes out of this one with their first professional victory.
 |
|
 |
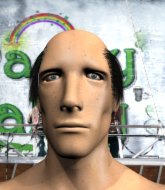
| 176 cm
22
215 lbs
0 - 0 - 0 |
|
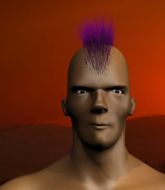
225 cm
23
200 lbs
0 - 0 - 0 |
Decent wrestler
Brawler
Cuts easily |
|
BJJ Blue Belt
Solid Muay Thai
Determined |
|
| |
|
Ladies and gentlemen. This fight is 3 rounds, in the light heavyweight division.
Introducing the fighter to my left, fighting out of the red corner.
With a record of
0 - 0 - 0, fighting out of Rio de Janeiro, Karl Bates!
And introducing the fighter to my right, fighting out of the blue corner.
With a record of
0 - 0 - 0, fighting out of Rio de Janeiro, Adnan Mercury!
The judges for this bout are Thiago Cunha, Seu Braga and Mauricio Rocha.

The bell rings for round one and we are underway!
Bates stuffs the takedown.
Mercury shoots in but doesn't get the takedown

and Bates counters with a driving takedown into guard. Nice work there by Bates.
Bates loading up with the ground and pound but he's missing more than he's landing in this flurry.
Bates has decided he wants to stand but the closed guard of Mercury is proving hard to escape from.
Bates postures up.
Mercury can't do much from the bottom at the moment, as Bates controls the pace.
Bates loading up with the ground and pound but he's missing more than he's landing in this flurry.
Bates could do with losing a few pounds - he looks very soft around the mid section, to put it politely.
Mercury looking to control but Bates passes into half guard.
Mercury tries to roll over but Bates keeps him under control.

That's one minute gone in the round.

Bates is trying for a guillotine from the top but the pressure isn't in the right place so Mercury is just riding it out for now. Bates eventually gives up the hold.
Mercury punching from the bottom.
The fighters are pressed up against the cage, both looking to find a bit of space to work.
Mercury slips a foot under and gets full guard. Nice work.
Mercury keeping full guard, as Bates tries to pass.
Bates is working Mercury over from the guard. He should look to pass the guard and do a little more damage with these strikes.
The ref warns both fighters not to hold the cage as they work up against the meshing.

That's two minutes gone in the round.
Bates slows down the pace of the fight for a moment. He'll need to remain active if he doesn't want to see the fight stood back up.
Bates stands up and looks to throw the legs aside to pass to side control. Mercury swivels though and keeps the full guard.
Bates lands a couple of decent looking shots.
Bates controls the pace of the fight for a moment.

Mercury is active off his back here, looking for submissions.
Bates showing good wrestling skills to control the position.
Bates has gone for a leg lock! Mercury slips out almost immediately though and dives into Bates's guard.

That's three minutes gone in the round.
Connects with an elbow from the bottom, proving to the judges that he's still active off his back.
Bates looking to control.

Mercury gets to his feet - Bates follows without any prompting.
Bates closes the distance and after a bit of a stuggle, scores a takedown into Mercury's guard.
Mercury has his foot on Bates's thigh. He's trying to push off and get in position for a triangle, I think. Bates works his way back into a safe position though.
Bates wants to control from the top but Mercury keeps moving.
Mercury is wriggling around but Bates manages to pass to half guard.
Mercury looks winded!
Mercury is looking for a sweep. Bates is wise to his cunning plan and keeps the top position.

That's four minutes gone in the round.
Bates seems to be taking a bit of a break to think of his next move. He lands a short punch in the meantime.
Bates is looking to pass the guard... He's managed it - he's now in full mount!
The crowd are loving this. Great action here.
Bates sitting in mount, just looking to control for the moment.
Mercury is wriggling around trying to escape.
And thats the end of the round the fighters go back to their corners.
Karl Bates dominated that round.
That's time! Back to the action!

Mercury looks to score with a jab to the body but Bates is just out of range.
Mercury tries to sprawl but Bates drives through with a takedown into half guard.
Bates is looking to advance position but Mercury won't allow it.
Mercury is trying to control but Bates passes into side control!
Mercury can't do much from the bottom here.
Mercury stops Bates from passing to mount.
Karl Bates overall seems to be getting the better of the ground position in the fight so far.
Mercury can't do much from the bottom here.
Mercury takes a couple of big shots there - the referee warns him that he has to defend himself better.
That's one minute gone in the round.
Bates in side control lands a nice looking series of punches and elbows.
Mercury tries to buck Bates off but Bates is having none of it.
Bates tries for an arm triangle. That looks pretty tight to me. Is this one over!?! Possibly, maybe, no Bates has let go of the choke. Obviously it wasn't as tight as we thought!
Mercury is looking to regain half guard here but Bates keeps moving and retains side control.

Bates decides to stand back up.
Mercury throws a leg kick but Bates moved away.
A telegraphed takedown attempt from Bates is defended easily by Mercury.
That's two minutes gone in the round.
Bates scores with a takedown into Mercury's guard.
Mercury will have to put a bit more behind his punches if he's going to do any damage from this position.
Bates advances to half guard.
The crowd cheering loudly, showing their appreciation for the quality fight we're seeing here.
Bates is controlling the pace.
Mercury is a painfully thin specimen of a man. You do wonder whether a good body kick would snap him clean in two.
Bates looking to pass the half guard. Not this time.
That's three minutes gone in the round.
Mercury is looking to improve his position.
Bates performing his best blanket impression for a moment.
Mercury is working for an escape here. He's hooked one of Bates's legs and he's managed to sneak out and take Bates's back!
Bates tries to escape but Mercury has the hooks in and won't let him break free.
Mercury is remaining active here, looking for the choke. The more discerning members of the crowd will appreciate his efforts.
Mercury is breathing heavily.
Mercury keeps control of the position as Bates tries to break free.
That's four minutes gone in the round.
Mercury patiently working for the choke. Which fighter will keep their nerve here?
Mercury misses with an elbow to the head.
Mercury keeps control of the position as Bates tries to break free.
Mercury is working hard for the rear naked choke here.
The crowd applaud the fighters efforts here as the round comes to an end.
Mercury doesn't have the hooks in and Bates manages to turn into his guard.
Bates might be looking to lock onto one of his opponent's long limbs for a submission, whilst we're on the ground.
Bates advances position into side control!
And thats the end of the round the fighters go back to their corners.
Karl Bates dominated that second round.
That's time! Back to the action! This is the final round!

Bates throws a hook but Mercury blocks it.
Bates looking for a takedown here - he's got it.
Mercury wants to stand up but Bates is controlling him.
Bates sneaks a leg through and gets to half guard. That was like a knife through butter how easily he passed Mercury's guard.
Bates is trying for a guillotine from the top but the pressure isn't in the right place so Mercury is just riding it out for now. Bates eventually gives up the hold.
Bates is pressing down on Mercury's thigh, looking to free his foot. Mercury is holding on for now.
That's one minute gone in the round.
Mercury tries to roll over but Bates keeps him under control.
Bates is stalling here. Mercury is in no mood to hang around though. He's locked up a kimura from the bottom! Bates seems to be keeping calm but he's forced to roll out of the hold and Mercury has ended up in side control on the top. Nice work.
Mercury decides to stand back up. Mercury steps back and let's Bates get back to his feet.
Mercury tries to clinch there but Bates circles away.

Bates takes the fight into the clinch.
Mercury is working on a leg, looking for a takedown but Bates is defending well.
Mercury takes a big intake of breath there - he's definitely tired.
That's two minutes gone in the round.
Mercury goes for a takedown in the clinch but Bates prevents it.
Bates is looking to break free of the clinch but Mercury has double underhooks.
Mercury goes for a takedown in the clinch but Bates prevents it.
Karl Bates has stuffed three takedown attempts in the round now. That's going to take a lot out of Adnan Mercury.

Bates's corner calls for him to break the clinch, which he does.
Bates gets a double leg takedown into Mercury's guard.
Mercury has an omoplata and is looking to use it perhaps as a submission or perhaps to transition. Bates is in a bit of discomfort here, but he's managed to free himself and has dived into side control! That didn't work out too well for Mercury.
Wooooo! Give it up for these two warriors! They are putting on a show!
Bates is trying to land an Americana. He has the arm isolated but Mercury is keeping cool and he's avoided the danger for now.
That's three minutes gone in the round.
Mercury is not in a great position here, taking some shots.
Bates connects with a decent looking elbow from side control that caused Mercury some visible discomfort.
Bates advances nicely into full mount.
Bates with some aggressive grappling here. He's looking for submissions here, rather than waiting for the opportunity to counter.
Bates putting on the heat here with some good ground and pound!
Bates fakes a shot to the body and cracks his opponent in the head. Nice ground and pound there!
That's four minutes gone in the round.
Mercury is in all sorts of trouble here.
Bates takes a little breather and maintains the position. The referee will be looking for him to stay active from such a dominant position though.
Bates is looking to secure an arm. He's managed it! He's pivoting for an armbar - that looks tight! But Mercury has managed to get out of it and now he's in a dominant position. Nice work from Mercury!
Bates is trying to control the position but Mercury postures up.
The fans in attendance giving it up for the two fighters, who have really let it all hang out in the last minute or so!
Mercury looking to sit in guard and control but Bates gets the butterfly guard and sweeps. He's now in the guard on the top.
As the round comes to an end the crowd are showing their appreciation for a great round of action.
Mercury wants to control the position but Bates says "no thanks buddy" and passes to half guard.
And that's the end of the fight!
Karl Bates showed his dominance in that final round.
Well Bates has outscored his opponent in every aspect of the fight today. Only a scarily incompetent judge or two will keep him from a well deserved win... Over to the ring announcer for the scorecards.
Ladies and gentlemen, after 3 rounds of action, we go to the scorecards for a decision.
Judge Thiago Cunha scores the fight 30:27
Judge Seu Braga scores the fight 30:27
Judge Mauricio Rocha scores the fight 30:27
In favor of your winner, by unanimous decision... Karl Bates!
|
|
|
|
|
|
|
|
|
|
|
|
|
|
|
|
|
|
|
|
|
|
|
| S |
C
A |
G |
S |
C
B |
G |
|
S |
C |
G |
|
energy
A | B |
|
hype
A | B |
|
pop
A | B |
|
mgr
A | B |
|
FIGHT
RATING
48% |
|
|
|
|
|
|
