|
|
PBP Commentary |
Coming up we have a light heavyweight MMA rules bout between AJ McKenzie (ranked 0 p4p, 0 weight class) and Young Buck (ranked 0 p4p, 0 weight class). AJ McKenzie has a significant reach advantage - let's see if he can make it count.
 |
|
 |
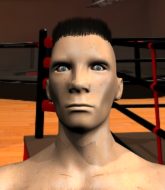
| 190 cm
18
221 lbs
1 - 0 - 0 |
|
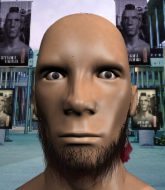
170 cm
19
218 lbs
0 - 1 - 0 |
BJJ White Belt
Solid boxing
Big right hand |
|
BJJ White Belt
Excellent boxer
Powerful |
|
| |
|
Ladies and gentlemen. This fight is 3 rounds, in the light heavyweight division.
Introducing the fighter to my left, fighting out of the red corner.
With a record of
1 - 0 - 0, fighting out of Las Vegas, AJ McKenzie!
And introducing the fighter to my right, fighting out of the blue corner.
With a record of
0 - 1 - 0, fighting out of Las Vegas, Young Buck!
The judges for this bout are Frank Dennis, George Francis and Tiny Johnson.

The bell rings for round one and we are underway!
Buck moves into range and connects with a jab.
Buck throws a hard body shot but it just misses.
McKenzie changes levels and looks for a double leg takedown. Buck tries to avoid it but McKenzie manages to keep hold of a leg and drag Buck to the ground. Buck escapes though and pops straight back up to his feet.
McKenzie ducks under a wild hook from Buck.
A swing and a miss from Buck.
McKenzie is looking to counter the offense by Buck and move into the clinch.
Buck misses with a two punch combination.
A looping hook to the body misses from McKenzie. Buck does a little dance to reset his feet.
Buck throws a hook but McKenzie avoids it easily.
Some wild striking there from Buck.
McKenzie definitely looks more muscular than last time we saw him fight.
McKenzie throws a body punch but Buck moves out of range.
As McKenzie backs off Buck throws a huge counter combo but McKenzie manages to avoid it all.
We've had a slow start to the round here - hopefully the action picks up.
Buck looks to score with a combo but nothing lands.
McKenzie is looking to counter the offense by Buck and move into the clinch.
McKenzie shoots in for a takedown. "Ole!" shouts Buck as he jumps to the side.
McKenzie throws a looping left and ducks down for a takedown. He's got his arms around Buck's waist but Buck gets an underhook and avoids the takedown by throwing McKenzie off to one side.
Buck swings away with a counter right hand but no contact made.
That's three failed takedown attempts in the round for AJ McKenzie. That's going to take a lot out of him.

That's one minute gone in the round.
McKenzie lands with a straight right. Buck didn't see that one coming.
Buck lands a jab. Then a cross. Then finally a nice hook to the body. Good work there by Buck.
Buck lands with a shot to the body.
McKenzie misses with a takedown attempt - Buck sprawls well and throws a nice strike on the way out which just misses.
Buck misses with a looping right.
Buck looks to throw the jab but McKenzie is out of range.
McKenzie appears to be looking for a big counter.
McKenzie cracks Buck with an open hand slap.
Young Buck is looking to keep the fight on the feet at all costs.
Buck throws a right and a left that McKenzie avoids nicely.

McKenzie darts in and clinches Buck up against the ropes.
Buck avoiding damage as McKenzie throws knees to the body.
Buck working hard to break the clinch.
Buck stalling in the clinch but McKenzie improves position.

That's two minutes gone in the round.
McKenzie has Buck pressed up against the ropes and is working for takedown. Buck manages to improve position though and keeps the fight standing.
McKenzie drops down for a takedown but doesn't get it.
A head punch on the inside from McKenzie fails to land.
The crowd cheering loudly, showing their appreciation for the quality fight we're seeing here.
McKenzie is looking to take this one to the mat.
McKenzie is trying to pull guard but Buck turns him against the ropes and we stay in the clinch.
McKenzie has Buck pressed up against the ropes and is working for takedown. Buck manages to improve position though and keeps the fight standing.
McKenzie misses with a punch on the inside.
Buck stops a takedown attempt from McKenzie.
Buck gets double underhooks to prevent a takedown attempt from McKenzie.

That's three minutes gone in the round.

Buck breaks the clinch and we're back to striking at distance.
Buck throws a nice looking combination but McKenzie bobs and weaves to avoid any damage.
McKenzie looked to counter that last move with a leg kick but didn't pull the trigger.
Buck has worked on his takedown defense in the runup to this fight and it is paying off so far.
McKenzie uses some good footwork to avoid the body shot by Buck.
McKenzie avoids the body shot from Buck.
Young Buck seems to be the more aggressive standup fighter in this bout.
A combination from Buck does no damage.
McKenzie darts in and clinches Buck up against the ropes.

McKenzie manages to break the clinch.
McKenzie takes a shot right to the bread basket.
Buck doesn't react quick enough there as he takes a shot to the body.
Buck rushes forward with a series of wild hooks but McKenzie moves out of range and avoids them all easily.

That's four minutes gone in the round.
McKenzie misses the shot to the body.
Buck swings away with a counter right hand but no contact made.
McKenzie misses with a leg kick.
Buck throws a shot to the body.
Buck throws a hook to the body but it doesn't connect.
Buck throws a right hand that McKenzie ducks under and follows up with a left that McKenzie also avoids with ease.
We've seen a great period of action over the last minute or so - credit to both fighters for going all out!
Buck misses with a few strikes there.
McKenzie looks frustrated there after his takedown attempt is stuffed easily.
Buck lands with a cross to side of his opponent's head.
McKenzie looks to score with a combo but nothing lands.
Buck cracks a nice hook into McKenzie's ribs.
And thats the end of the round the fighters go back to their corners.
Young Buck dominated that round.
The fighters' corners scream their final instructions, as the referee calls time. Here we go, back to the action!

Buck throws a lazy right hand but McKenzie sees it coming a mile off and sidesteps it easily.
McKenzie is on the wrong end of a nice combination from Buck.

It looks like AJ McKenzie has been cut.
McKenzie slips a jab and a cross from Buck.
Buck uses good footwork to get in and out and land a nice right hand before McKenzie has time to react.
Buck throws a right hand that McKenzie ducks under and follows up with a left that McKenzie also avoids with ease.
Buck misses with a straight right.
McKenzie seemed to be looking to counter by closing the distance.
Buck tests McKenzie's chin there with a solid looking shot.
McKenzie moves out of range of the strikes.
McKenzie ducks under a wild hook from Buck.
McKenzie seemed to be looking to counter by closing the distance.
Buck looks to land a combination but McKenzie avoids it well.
McKenzie takes a punch to the jaw and another one to the bread basket.
The fans in attendance giving it up for the two fighters, who have really let it all hang out in the last minute or so!
McKenzie swings for the body but Buck moves out of range.
Buck stuns McKenzie with a nice body shot, before stepping back out of range.
That's one minute gone in the round.
Buck scores with a sloppy punch to the body. Not much technique there but it did the business.
McKenzie ducks under a wild hook from Buck.
McKenzie seemed to be looking to counter by closing the distance.
Buck will need to tighten up his combinations if he doesn't want to gas himself out, swinging at thin air.
Buck misses with a wild combination.
McKenzie is moving around nicely and scores here with a single head shot.
Buck misses with a wild body shot.
McKenzie avoids a lazy jab quite easily.
McKenzie is looking to counter punch.
McKenzie avoids the body shot from Buck.
McKenzie has a takedown stuffed.
Buck has been the more effective fighter overall so far.
That's two minutes gone in the round.
McKenzie lands with a good body shot.
McKenzie misses with a body shot. Nice footwork from Buck.
McKenzie is looking to wear down Buck with body shots, infact he's throwing more body shots than head shots at the moment.
McKenzie steps to the side to avoid the strikes from Buck.
Buck misses with a right hand
enabling McKenzie to counter with a crisp jab.
Buck throws a hard body shot but it just misses.
Buck misses the shot to the body.
Buck misses with a hook. McKenzie ducked under it nicely.
McKenzie half commits to a counter takedown before pushing away, out of range.
McKenzie throws a body punch but Buck moves out of range.
This is a great period of action - very entertaining stuff!
This fight brought to you by 5M nutrition - it's mmmmm tasty. Nice jab by McKenzie.
Buck looks to score with a jab to the body but McKenzie is just out of range.
McKenzie tries to counter with a takedown but Buck is quick to defend against it.
Buck fakes a head shot and lands one to the body.
That's three minutes gone in the round.
McKenzie tries to clinch but is not successful on this occasion.
Buck appears to be waiting to throw a counter punch to the body.
Buck rushes in with a sloppy looking punch
and McKenzie counters with a nice uppercut.
McKenzie lands a glancing blow to the side of Buck's head.
Buck showing good head movement there, avoiding the strikes from McKenzie.
Buck feints the counter takedown.
Buck tries to bum rush McKenzie with a series of wild strikes but McKenzie uses good footwork to avoid the assault.
Buck takes a jab right on the kisser.
Buck scores with a reasonable looking shot to the body. McKenzie doesn't seem bothered though.
Buck stuffs the takedown attempt from McKenzie. McKenzie gets slowly back to his feet.
Buck is the aggressor but that punch slipped nicely by McKenzie.
Buck avoids a low kick by using good footwork.
That's four minutes gone in the round.
Buck misses with a body shot.
McKenzie appears to be looking for a big counter.
McKenzie takes a shot to the body in his stride.
McKenzie looks to land a body kick but Buck moved away.
McKenzie walks into a jab.
This is a great period of action - very entertaining stuff!
Nice straight punches there by Buck. You know Roy Jones Jr respects the hands of Buck.
Buck misses with a wild combination.
McKenzie fails with a takedown attempt from distance.
Buck throws out a counter right but McKenzie avoids it with no problem.
That's three failed takedown attempts in the round for AJ McKenzie. That's going to take a lot out of him.
Buck swings for the body but McKenzie moves out of range.
McKenzie attempts a counter takedown but Buck avoids it well and moves away.
McKenzie moves in looking to clinch but Buck pushes him off.
McKenzie is looking to clinch but Buck is avoiding it.
The fighters circling - Buck throws out the jab but it was never going to land.
And thats the end of the round the fighters go back to their corners.
Young Buck showed his class in that round. I'd imagine he'll take it on all the scorecards.
The cut man is working on AJ McKenzie's cut.
That's time! Back to the action! Let's hear some noise people - this is the final round!

Buck misses with a double jab.
Buck lands with a straight right. McKenzie didn't see that one coming.
Buck misses with a few strikes there.
A slow jab from Buck misses its intended target.
McKenzie tries to counter by moving into the clinch but Buck manages to circle out of the way.
Buck bobs and weaves well there to avoid the strikes.
McKenzie defending well as Buck loads up on a big left hand.
Buck misses the shot to the body.
Buck throws a hook but McKenzie blocks it.
McKenzie seemed to be looking to counter by closing the distance.
McKenzie scores with a body shot.
We've had a slow start to the round here - hopefully the action picks up.
Buck swings wildly with a right hand that was never going to find it's target.
Buck throws out a token jab with nothing on it.
McKenzie drives through and clinches with Buck against the ropes.
McKenzie throws an elbow that misses.
That's one minute gone in the round.
McKenzie tries to stall but Buck uses the opportunity to gain a better position.
McKenzie misses with a body punch.
A bit of stalling here from McKenzie.
McKenzie breaks from the clinch.
McKenzie ducks under a wild hook from Buck.
Buck throws out a token jab with nothing on it.
McKenzie drops down looking for a counter takedown but Buck sprawls and moves away.
Buck fakes a jab and then connects with a hook.
McKenzie shoots in for a takedown but Buck shows good takedown defense there and keeps this one on the feet.
McKenzie waving his hands out in front of him, looking to distract Buck.
Buck throws a big shot that misses.
McKenzie staying out of range there.
AJ McKenzie has stepped it up - he knows he needs a finish here!
Young Buck is fighting for a decision - hopefully he's judged it right and he's actually winning the fight.
That's two minutes gone in the round.
Buck catches McKenzie with a nice straight right. He seems pissed - ooooh, it's on now! On like donkey kong!
Buck loads up on a big right hand but McKenzie slips the punch.
Buck is moving around nicely and scores here with a single head shot.
McKenzie keeping a good distance there, avoiding the body shot.
McKenzie pushing out the jab but it's not landing.
McKenzie with a jab.
Buck rushes forward with a series of wild hooks but McKenzie moves out of range and avoids them all easily.
McKenzie fails with a takedown attempt.
We've seen a great period of action over the last minute or so - credit to both fighters for going all out!
McKenzie clinches up with Buck and pushes him back against the ropes.
McKenzie breaks from the clinch.
That's three minutes gone in the round.
McKenzie just misses with a punch to the body.
Buck looks like he wants to counter punch here.
McKenzie slips a jab and a cross from Buck.
McKenzie tries to close the distance and clinch but Buck swats him to one side with an open hand palm strike and circles away.
Buck stooping low to avoid any incoming strikes and then lunges in with an uppercut come cross that lands flush.
McKenzie tries to clinch up.
Buck appears to be waiting to throw a counter punch to the body.
McKenzie closes the distance and presses his opponent up against the ropes.
McKenzie can't find room to land a body shot as Buck controls the action.
A battle for position here, against the ropes.
McKenzie tries for a takedown. No joy.
That's three failed takedown attempts in the round for AJ McKenzie. That's going to take a lot out of him.
Buck is trying to break free.
That's four minutes gone in the round.
McKenzie tries a body shot but Buck blocks it.
A quick uppercut on the inside from McKenzie.
Buck's corner calls for him to break the clinch, which he does.
McKenzie throws a jab but it's blocked by Buck.
Buck throws a hard body shot but it just misses.
McKenzie misses with a two punch combination.
Young Buck is looking to throw some combinations by the looks of things.
McKenzie throws a jab to the body, straight down the pipe. Boom. That sent Buck stumbling backwards but he manages to regain his composure quickly.
Buck ducks down and throws a hook to the body.
McKenzie throws the left hand but Buck avoids the punch easily.
It seemed like Buck was going to counter with the hook but didn't fully commit to it.
McKenzie is using his height advantage well here, landing a good percentage of his punches.
Buck lands with a straight right. McKenzie didn't see that one coming.
Fantastic stuff here - a very entertaining period of action, which has drawn cheers from the crowd.
McKenzie throws a predictable looking body shot
and Buck counters with a crisp hook to the side of the head.
And that's the end of the fight!
Young Buck comfortably won the final round on my scorecard.
I've got Buck winning every round here. Surely the decision will go his way and he'll pick up a well deserved decision victory. Over to the ring announcer for the scorecards.
Ladies and gentlemen, after 3 rounds of action, we go to the scorecards for a decision.
Judge Frank Dennis scores the fight 27:30
Judge George Francis scores the fight 27:30
Judge Tiny Johnson scores the fight 27:30
In favor of your winner, by unanimous decision... Young Buck!
The defeated AJ McKenzie had this to say: 'Great fight thank Buck its over!'.
|
|
|
|
|
|
|
|
|
|
|
|
|
|
|
|
|
|
|
|
|
|
|
| S |
C
A |
G |
S |
C
B |
G |
|
S |
C |
G |
|
energy
A | B |
|
hype
A | B |
|
pop
A | B |
|
mgr
A | B |
|
FIGHT
RATING
51% |
|
|
|
|
|
|
