|
|
PBP Commentary |
Coming up we have a super heavyweight MMA rules bout between Motoumba Kalakoda (ranked 0 p4p, 0 weight class) and Kana Koa (ranked 0 p4p, 0 weight class). We have two fighters making their debuts here, so let's see who comes out of this one with their first professional victory.
 |
|
 |
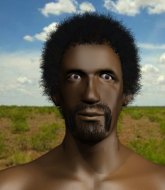
| 203 cm
25
300 lbs
0 - 0 - 0 |
|
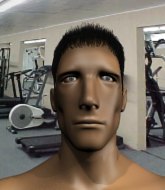
225 cm
25
300 lbs
0 - 0 - 0 |
Good wrestling
Basic striking
Good chin |
|
Decent wrestler
Brawler
Solid chin |
|
| |
|
Ladies and gentlemen. This fight is 3 rounds, in the super heavyweight division.
Introducing the fighter to my left, fighting out of the red corner.
With a record of
0 - 0 - 0, fighting out of The Island, Motoumba Kalakoda!
And introducing the fighter to my right, fighting out of the blue corner.
With a record of
0 - 0 - 0, fighting out of The Island, Kana Koa!
The judges for this bout are Dirk Anderson, Peter Branson and Daniel Franklin.

The bell rings for round one and we are underway!

Koa pushes Kalakoda up against the cage in a clinch.
Kalakoda is trying to pull guard but Koa turns him against the cage and we stay in the clinch.
Kalakoda is working on a leg, looking for a takedown but Koa is defending well.
Koa prevents a takedown attempt there.
That's three failed takedown attempts in the round for Motoumba Kalakoda. That's going to take a lot out of him.
Koa drops down looking for an ankle pick but Kalakoda pulls his leg out and moves away.
Koa tries to clinch but Kalakoda moves out of range.
Kalakoda with a lazy takedown attempt
and Koa counters by moving into the clinch.

Koa jumps guard.
Kalakoda trying to land body shots but he keeps hitting the mat.
Kalakoda postures up.
Koa is pulling down on Kalakoda's head to control his posture.
Koa is trying to keep Kalakoda in close.
We've had a slow start to the round here - hopefully the action picks up.

Kalakoda postures up as if he's going to throw some strikes but drops back for an ankle! Koa is in big trouble! He looks ready to tap! But no, he's escaped and dives on top of Kalakoda, into his guard.

The ref warns both fighters not to hold the cage as they work up against the meshing.
Kalakoda is throwing his legs up, looking for submissions. Koa is aware though and is defending well.

That's one minute gone in the round.
Koa stopping the sweep attempt from Kalakoda.
Koa avoids a guillotine attempt easily.

Koa is trying to work a guillotine from the top, or something like that? Don't know how he thinks he's going to get a finish from there.
Kalakoda is looking for a triangle here but Koa uses the submission attempt to pass into side control.
Kalakoda is trying to improve his position.
The fighters are pressed up against the cage, both looking to find a bit of space to work.

That's two minutes gone in the round.
The crowd are showing their displeasure at the lack of action as loud boos ring out around the arena.
Kalakoda is working hard here to advance position.
Kalakoda is trying to control Koa's posture but Koa avoids it.
Kalakoda gets back to half guard.
The fighters are starting to get a bit slippery now, which will make submissions a bit more difficult.
Kalakoda actively working from the bottom here.
Kalakoda actively working from the bottom here.
Koa looking to pass the half guard. Not this time.
Kalakoda tries to get to full guard but Koa has control of the leg.

That's three minutes gone in the round.
Kalakoda actively working from the bottom here.
Kalakoda with the active half guard here but Koa passes nicely into side control.
Kalakoda sneaks back into half guard.
Koa works his foot free and advances to mount.
Koa wants to finish this one by submission but Kalakoda is holding onto his waist, trying to prevent any attacks from Koa.
Kalakoda might be looking to lock onto one of his opponent's long limbs for a submission, whilst we're on the ground.

That's four minutes gone in the round.
Kalakoda is trying to escape the mount.
Kalakoda tries to lock up and control but Koa gives him a forearm to the face and pushes him away.
Kalakoda manages to regain half guard. Good work.
Kalakoda moves into full guard.
Koa wanted to stand there but Kalakoda had control of the position.
Boooooooooooooooooooo!!! God, this has been a terrible round. Come on you two, sort yourselves out!
Kalakoda throwing his legs up looking for a triangle.
And thats the end of the round the fighters go back to their corners.
Kana Koa dominated that round.
The corners get their ten second warning. Both fighters stand from their stools and stare eachother down, ready to get back to the action.

Koa tries to close the distance and clinch up against the cage but Kalakoda paws at him with a jab and circles away.

Kalakoda dives in and scores a takedown into Koa's guard.
Koa looking to hit a scissor sweep but Kalakoda is one step ahead there.
Kalakoda in full guard, throwing the ground and pound. No damage this time.
Koa wants to sweep here but Kalakoda controlling him for the moment.
Kalakoda throws an elbow that misses. Koa uses the momentum to reverse the position. He's now in Kalakoda's guard. Nice move by Koa!
We've had a slow start to the round here - hopefully the action picks up.
Kalakoda is throwing his legs up, looking for submissions. Koa is aware though and is defending well.
Kalakoda throws his legs up looking to secure a triangle. Oh, that looks pretty tight, I gotta say! Koa escapes and throws Kalakoda's legs to the side, diving into side control!
You can see the frustration on Kalakoda's face, being in this tough position on the bottom.
That's one minute gone in the round.
Kalakoda tries to bench press Koa off him but Koa keeps the position.
Kalakoda can't do much from the bottom here.
Kalakoda manages to get one leg in to regain half guard.
Kalakoda wants to sweep but Koa has passed to side control!
Kalakoda is looking to regain half guard here but Koa keeps moving and retains side control.
Koa taking a breather here.
Kalakoda manages to get one leg in to regain half guard.
Kana Koa has got the better of the ground game so far.
That's two minutes gone in the round.
Koa trying to control the action but Kalakoda is working from the bottom.
Kalakoda wants to improve his position but Koa is controlling well.
Kalakoda looking to force a kimura from the bottom here. He's concentrating on that move too much though and Koa pushes past his half guard into mount!
Kalakoda is in all sorts of trouble here.
That's three minutes gone in the round.
Kalakoda has given up his back here.
Kalakoda is very frustrated here, being controlled quite effectively by Koa.
Kalakoda just trying to survive but Koa is wriggling into a better position, looking to finish.
Kalakoda manages to reverse the position and now he's in Koa's guard. Nice work there by Kalakoda.
We get told so often about how wrestlers don't like to be on their backs. Let's see if Koa can do anything to dispel that myth.
Kalakoda preventing the sweep.
Kalakoda throws an elbow that misses. Koa uses the momentum to reverse the position. He's now in Kalakoda's guard. Nice move by Koa!
Kalakoda throwing his legs up looking for a triangle.
Koa preventing the sweep.
That's four minutes gone in the round.
There's a bit of a scramble here and now Kalakoda is on top in guard.

There's a bit of a scramble here and now Koa is on top in guard.
Kalakoda working from the bottom, still in full guard. He's managed to get a loose triangle. Koa doesn't seem to be doing much to defend here, obviously he feels comfortable in the position. Koa manages to throw the legs off his shoulder and he's back into guard - no problem.
Kalakoda can't do much from the bottom at the moment, as Koa controls the pace.
The crowd thankful this round is nearly over.
Kalakoda is throwing his legs up, looking for submissions. Koa is aware though and is defending well.
And thats the end of the round the fighters go back to their corners.
A close second round but Kana Koa will probably get the nod - 10:9.
The corners get their ten second warning. Both fighters stand from their stools and stare eachother down, ready to get back to the action. This is the final round!

Koa tries to drive through with a takedown attempt but Kalakoda defends well and Koa ends up having to push Kalakoda into the cage where they will battle it out in the clinch.
Koa rushes Kalakoda and presses him up against the cage.
Kalakoda drops to a knee looking for a takedown but Koa gets the underhooks and prevents it.
Kalakoda is looking for a takedown up against the cage. Koa gets underhooks though and prevents the takedown attempt.
Koa displaying some good clinch control by pressing Kalakoda up against the cage.
Koa gets a nice trip takedown into half guard.
Koa looks towards his corner to check for any instructions. The corner give him nothing to work with, so he cracks Kalakoda with a short hammerfist. I guess that's as good as any advice he could get in this position.
We've had a slow start to the round here - hopefully the action picks up.
Kalakoda is looking to sinch up a guillotine here but Koa pulls his head out easily.
Kalakoda looking to work for a kimura from the bottom.
Kalakoda tries to roll over but Koa keeps him under control.
That's one minute gone in the round.
Kalakoda is looking to sinch up a guillotine here but Koa pulls his head out easily.
Both fighters are breathing heavily.
Koa trying to control the action but Kalakoda is working from the bottom.
Kalakoda trying to control but Koa postures up.
Kalakoda looking for submissions from an awkward position here.
Kalakoda slips a foot under and gets full guard. Nice work.
That's two minutes gone in the round.
The crowd are showing their displeasure at the lack of action as loud boos ring out around the arena.
Kalakoda escapes his hips to the side and looks to be working for an armbar. Koa gives him a little smile and shakes his head. No chance.
Koa got a little sloppy there for a moment and Kalakoda has worked his way into a loose triangle - can he finish it?! No, Koa has managed to get both his arms back between Kalakoda's legs - danger averted.
Kalakoda throws his legs up looking to secure a triangle. Oh, that looks pretty tight, I gotta say! Koa escapes and throws Kalakoda's legs to the side, diving into side control!
Koa tries to advance to mount but can't.
Koa looking for an arm triangle but it's way too loose to do anything.
Koa connects with a decent looking elbow from side control that caused Kalakoda some visible discomfort.
That's three minutes gone in the round.
Kalakoda tries to work a leg under to get back to half guard but Koa wriggles his own leg back out and remains in side control.
Koa is working Kalakoda over with some ground and pound from side control.
Kalakoda manages to work his way to half guard, despite Koa's best efforts.
Kalakoda tries to roll over but Koa keeps him under control.
Koa tries to pass to full mount but Kalakoda defends it.
Kalakoda looking for submissions from an awkward position here.
Koa works his foot free and advances to mount.
That's four minutes gone in the round.
Koa can't quite control the action as he would like just now, as Kalakoda is looking to escape.
Kalakoda looking to escape from mount but he's given up his back!
Kalakoda trying to control the position but Koa manages to sink in the hooks.
Will Koa go for the finish here or will he try and keep control of the position?
Boooooooooooooooooooo!!! God, this has been a terrible round. Come on you two, sort yourselves out!
Kalakoda turns into Koa and is now in his guard.
Motoumba Kalakoda has stepped it up - he knows he needs a finish here!
Kana Koa is fighting for a decision - hopefully he's judged it right and he's actually winning the fight.
Kalakoda throwing strikes but missing.
And that's the end of the fight!
Kana Koa comfortably won the final round on my scorecard.
I've got Koa winning every round here. Surely the decision will go his way and he'll pick up a well deserved decision victory. Over to the ring announcer for the scorecards.
Ladies and gentlemen, after 3 rounds of action, we go to the scorecards for a decision.
Judge Dirk Anderson scores the fight 28:29
Judge Peter Branson scores the fight 27:30
Judge Daniel Franklin scores the fight 28:29
In favor of your winner, by unanimous decision... Kana Koa!
|
|
|
|
|
|
|
|
|
|
|
|
|
|
|
|
|
|
|
|
|
|
|
| S |
C
A |
G |
S |
C
B |
G |
|
S |
C |
G |
|
energy
A | B |
|
hype
A | B |
|
pop
A | B |
|
mgr
A | B |
|
FIGHT
RATING
29% |
|
|
|
|
|
|
