|
|
PBP Commentary |
Coming up we have a featherweight MMA rules bout between Terrence Beasley (ranked 0 p4p, 0 weight class) and Tom White (ranked 0 p4p, 0 weight class). Terrence Beasley has the edge in experience - let's see if he can make that count tonight.
 |
|
 |
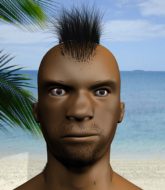
| 204 cm
21
151 lbs
1 - 4 - 0 |
|
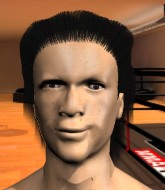
180 cm
25
155 lbs
0 - 0 - 0 |
BJJ Blue Belt
Counter fighter
Cuts easily |
|
BJJ Blue Belt
Good kicks
Tends to cut |
|
| |
|
Ladies and gentlemen. This fight is 3 rounds, in the featherweight division.
Introducing the fighter to my left, fighting out of the red corner.
With a record of
1 - 4 - 0, fighting out of Los Angeles, Terrence Beasley!
And introducing the fighter to my right, fighting out of the blue corner.
With a record of
0 - 0 - 0, fighting out of Los Angeles, Tom White!
The judges for this bout are , Don Winkell and Jack Bonds.

The bell rings for round one and we are underway!

White forces Beasley back against the cage and clinches.

White pulls guard effortlessly.

White has an active guard here but Beasley has managed to pass into half guard.
White trying to control here.
Beasley really does look like a pencil wearing a pair of gloves. Let's hope he has a gameplan to suit that ridiculous body shape.
Beasley missing with the ground and pound from half guard.
White strikes from the bottom but Beasley passes into mount!
White has the superior BJJ but he's also working some ground strikes into his gameplan.
Beasley landing strikes from the mount and White is in trouble!
We've had a slow start to the round here - hopefully the action picks up.
White wants to control but Beasley is having none of it.
Beasley takes a little breather and maintains the position. The referee will be looking for him to stay active from such a dominant position though.
White tries to lock up and control but Beasley gives him a forearm to the face and pushes him away.

That's one minute gone in the round.
Beasley lands with some strikes.
White working to try and regain half guard.
Beasley controlling his opponent.
Beasley prevents White from getting the reversal.
The ref warns both fighters not to hold the cage as they work up against the meshing.

That's two minutes gone in the round.
Beasley controlling the pace for now.
White keeping his composure momentarily, calmly looking to get back to half guard.
Beasley has his opponent pinned against the cage, landing some nasty ground and pound that is really making a bit of a mess out of White's face.
Beasley controlling from mount.
Beasley continues to stall.

That's three minutes gone in the round.
White tries to hold on but Beasley pushes him away.
Beasley controlling his opponent.
Beasley lands a couple of nice shots there from mount.
White is writhing around trying to get back to his feet.
Beasley tucks in and makes sure he doesn't lose the dominant position.
White is desperately trying to improve his position but Beasley has a good base and remains in mount.

That's four minutes gone in the round.
White wants to hold on but Beasley pushes him away.
White gets back to half guard.
Beasley prevents White from improving his position.

White kicks off Beasley and gets to his feet.
The crowd thankful this round is nearly over.
White gets a double leg takedown into Beasley's guard.
Beasley wants to sweep but no luck.
Beasley utilising some decent striking defenses from the guard, preventing the ground and pound.
And thats the end of the round the fighters go back to their corners.
Terrence Beasley dominated that round.
That's the end of the interval. I'm sure that seemed a lot quicker than a minute for our two fighters! Back to the action.

White closes the distance and gets a trip takedown into side control. Beasley quickly recovers to half guard.
Beasley is trying to get back to full guard.
Beasley is staying active underneath White, who seems content to just control the action from this position.
The fighters are pressed up against the cage, both looking to find a bit of space to work.
Beasley gets full guard.
Beasley looking to hit a scissor sweep but White is one step ahead there.
We've had a slow start to the round here - hopefully the action picks up.
White is just sitting in guard, looking to avoid any submissions.
Beasley tries to strike from the bottom.
That's one minute gone in the round.
White missing there with some ground and pound from the guard.
White stands up over Beasley, holding his feet. He dives back in and lands a decent shot to the head.
White makes a bit of distance and scores with some ground and pound, still in guard.
White throws a strike but Beasley rolls with it and manages to sweep. Now he's in guard on top.

White throws his legs up looking for a submission but Beasley uses it to pass to side control.
White tries to get back to half guard but can't.
White is looking to slip a leg under and get half guard but Beasley is one step ahead and moves to full mount!
White is writhing around trying to get back to his feet.
Beasley looking to ground and pound his opponent to a finish here.
White is looking to get to half guard.
Beasley will need to keep those long limbs tucked in whilst he's on the ground, to prevent any submissions.
That's two minutes gone in the round.
BOOM! Beasley connects with a massive shot to the dome!
White is desperately trying to improve his position but Beasley has a good base and remains in mount.
Beasley lands a shot to the body, followed up by a shot to the exposed head of his trapped opponent.
The crowd are loving this. Great action here.
White really wants to buck Beasley off and get back to his feet.
That's three minutes gone in the round.
White is trying to escape the mount.
White takes a big shot to the head but keeps on trying to improve his position.
Beasley controlling from mount.
White really trying hard to get back to half guard here.
Beasley fails to move to back control.
White is desperately trying to get back to half guard.
That's four minutes gone in the round.
White is breathing heavily.
The crowd thankful this round is nearly over.
Beasley content just to control the position here.
Beasley lands a big shot there that rocks White but he's holding on and managing to survive for now.
And thats the end of the round the fighters go back to their corners.
Terrence Beasley dominated that second round.
The corners get their ten second warning. Both fighters stand from their stools and stare eachother down, ready to get back to the action. This is the final round!

Beasley tries to sprawl but White drives through with a takedown into half guard.
White is keen to just control but Beasley is a slippery customer.
White has freed up his trapped foot and advances to mount.
White wants to stand but Beasley is holding on to him, trying to stop him posturing up.
We've had a slow start to the round here - hopefully the action picks up.
Beasley is looking to improve his position but White isn't that keen on the idea.
Beasley is working hard here to advance position.
That's one minute gone in the round.
White is trying to control here but Beasley has managed to regain half guard.
Beasley is trying to get back to full guard.
White is thinking about going for an arm triangle but he can't free his leg.
Beasley is working for an escape here. He's hooked one of White's legs and he's managed to sneak out and take White's back!
Beasley gets his hands free as White looks to control.
That's two minutes gone in the round.
White tries to escape the position.
White keeps trying to improve his position.
White is trapped and Beasley is scoring with shots to the head and body.
White tries to escape the position.
Beasley is riding his opponent, not letting White buck him off.
Beasley is working the ground and pound. Can White escape?
White wants to get back to his feet.
White tries to roll but Beasley sticks to his back.
Beasley is really dominating this fight. Is there anything that White can do to turn this around?
That's three minutes gone in the round.
White tries to escape the position - he's now mounted. Is that better or worse? Hard to tell!
White is looking to improve his position but Beasley isn't that keen on the idea.
White takes a big intake of breath there - he's definitely tired.
Beasley controlling the pace for now.
Beasley prevents White from getting the reversal.
White slips a leg in and gets back to half guard.
Beasley not doing much here.
White is looking to get back to full guard here but Beasley has managed to pass to side control instead.
That's four minutes gone in the round.
White is looking to slip a leg under and get half guard but Beasley is one step ahead and moves to full mount!
White regains half guard.
Terrence Beasley overall seems to be getting the better of the ground position in the fight so far.
Beasley is figuring out what he wants to do next.
White looking to force a kimura from the bottom here. He's concentrating on that move too much though and Beasley pushes past his half guard into mount!
The crowd thankful this round is nearly over.
Beasley controlling the pace for now.
White working to try and regain half guard.
And that's the end of the fight!
Terrence Beasley showed his dominance in that final round.
Well I reckon that's a shut out for Beasley, winning every round. Will the judges agree? They are the ones who matter, even if they are often depressingly incompetent. Over to the ring announcer for the scorecards.
Ladies and gentlemen, after 3 rounds of action, we go to the scorecards for a decision.
Judge Percy O'Donnell scores the fight 30:27
Judge Don Winkell scores the fight 30:27
Judge Jack Bonds scores the fight 30:27
In favor of your winner, by unanimous decision... Terrence Beasley!
|
|
|
|
|
|
|
|
|
|
|
|
|
|
|
|
|
|
|
|
|
|
|
| S |
C
A |
G |
S |
C
B |
G |
|
S |
C |
G |
|
energy
A | B |
|
hype
A | B |
|
pop
A | B |
|
mgr
A | B |
|
FIGHT
RATING
32% |
|
|
|
|
|
|

