|
|
PBP Commentary |
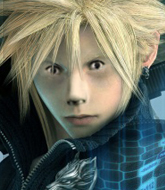
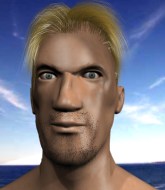
Coming up we have a heavyweight MMA rules bout between Cloud Strife (ranked 0 p4p, 0 weight class) and Francis Hooper (ranked 0 p4p, 0 weight class). The crowd giving both fighters a great reception on their way into the arena. That's good to see.
 |
|
 |
| 195 cm
25
255 lbs
5 - 1 - 0 |
|
195 cm
25
273 lbs
2 - 1 - 0 |
Decent wrestler
Solid boxing
Good chin |
|
BJJ White Belt
Excellent MT
Granite chin |
|
| |
|
Ladies and gentlemen. This fight is 3 rounds, in the heavyweight division.
Introducing the fighter to my left, fighting out of the red corner.
With a record of
5 - 1 - 0, fighting out of The Island, Cloud Strife!
And introducing the fighter to my right, fighting out of the blue corner.
With a record of
2 - 1 - 0, fighting out of The Island, Francis Hooper!
The judges for this bout are Peter Branson, Winston Alpacca and David Hoff.

The bell rings for round one and we are underway!
Strife thows a left - swing and a miss!
Francis Hooper seems to be the more aggressive standup fighter in this bout.

Hooper has taken the fight to the clinch.
Hooper misses with some punches.
Hooper swings away with an uppercut that misses.
Strife tries a shoulder strike but it doesn't do any damage.
Hooper tries to work over Strife's body with a swooping hook but it only glances the target.
Hooper blocks an uppercut.
Hooper blocks a body shot from Strife.
Strife gets through Hooper's defenses to land a nice punch to the side of the head.
Hooper throws a hook to the body. More of an arm punch but it's all scoring with the judges.
Hooper leaning his opponent against the cage.
Hooper doesn't land with the attempted body shot.
We've had a slow start to the round here - hopefully the action picks up.
Hooper lands a body shot in the clinch.
Strife misses with a shot to the kidneys.
Strife lands a body punch in the clinch.
Hooper tried to land a shot to the body but connects with Strife's elbow.
Hooper blocks an uppercut.
Hooper misses with a shot to the kidneys.
Hooper slows down the pace here.

That's one minute gone in the round.
Strife struggles to land a body shot inside as Hooper controls his hands.
Strife throws a punch but it's blocked by Hooper.
Hooper doesn't land with the attempted body shot.
Hooper trying to stall but Strife improves his position.
Strife misses with a punch to the body.
Strife definitely looks more muscular than last time we saw him fight.
Strife throws a punch but it's blocked by Hooper.
Good body shot from Hooper.
Strife swings wildly with an uppercut but Hooper uses good head movement to avoid it.
Hooper has Strife pushed against the cage.
Still in the clinch, Strife scores with a nice short uppercut.
Hooper tries a body shot but Strife blocks it.
A head punch on the inside from Strife fails to land.
Hooper fails to land with a short punch on the inside.
Strife blocks a punch to the side of the head.
Strife working aggressively here.
Strife prevents a body shot from Hooper.

That's two minutes gone in the round.
Hooper misses with a punch to the body.
Hooper lands a right uppercut that snaps the head of Strife backwards.
Strife blocks a couple of punches on the inside.
A head punch blocked on the inside by Hooper.
Strife tried to land a shot to the body but connects with Hooper's elbow.
Strife misses with the head strike.
Strife misses with the head strike.
Strife tries to throw a body punch but Hooper avoids it by throwing Strife back against the cage.
The pace really dropping off here, momentarily.
Strife working aggressively here.
Strife misses with a hook from the clinch.
A right hook to the body lands for Strife.
A short right hand to the side of the head by Strife.
Wooooo! Give it up for these two warriors! They are putting on a show!
Strife misses with a hook to the ribs.
With the fighters clinched against the cage, Hooper creates a bit of distance for himself and scores with a nice uppercut.
Strife doesn't land with the attempted body shot.
Strife throws a blind hook that connects with the side of Hoopers head.

That's three minutes gone in the round.
A right handed body shot lands from Strife.
Strife makes some space for himself and lands an uppercut.
Hooper looks winded!
A real battle for position is taking place between these two warriors.
With the fighters clinched against the cage, Hooper creates a bit of distance for himself and scores with a nice uppercut.
Good anti-grappling being displayed by Strife as Hooper tries to tie him up.
Hooper tries a shoulder strike but it doesn't do any damage.
We've been informed that Hooper has been working hard on his conditioning in the buildup to the fight.
Hooper has a couple of punches blocked by Strife.
Strife presses Hooper against the cage and delivers a mid-strength body shot.
A quick uppercut on the inside from Strife.
Hooper tries to stall but Strife uses the opportunity to gain a better position.
Strife scores with a shot to the side of Hooper's head.
Hooper can't find room to land a body shot as Strife controls the action.
A nice right hand lands inside from Strife.
Strife throws a blind hook that connects with the side of Hoopers head.
Good anti-grappling being displayed by Strife as Hooper tries to tie him up.
Strife misses with a hook to the ribs.
Strife lands a hook that snaps the head of Hooper backwards.
Hooper wants to stall.

That's four minutes gone in the round.
Strife lands with a short shot to the head.
The crowd cheering loudly, showing their appreciation for the quality fight we're seeing here.
Strife lands a left hand.
Hooper doesn't land with the attempted body shot.
Strife lands with a good tight uppercut to the head.
Still in the clinch, Strife scores with a nice short uppercut.
Strife scores with a nice hook to the head.
Strife works for underhooks and lands a body shot in the process.
Strife lands with a short head shot on the inside.
The fighters are starting to perspire pretty heavily.
Strife lands a body punch - he's looking to wear down Hooper.
Strife scores with a nice hook to the head.
Nice body punch from Strife - that landed with a thud.
Strife lands a hook that snaps the head of Hooper backwards.
Strife lands with a right to the head.
Strife makes some space for himself and lands an uppercut.
Strife lands a nice looking hook to the body, against the cage.
Strife lands with a light punch inside.
Strife lands with a short shot to the head.
Strife lands a body shot in the clinch.
Strife lands a nice looking hook to the body, against the cage.
And thats the end of the round the fighters go back to their corners.
Cloud Strife dominated that round.
The fighters get back to their feet, the hooter sounds and we're back to the action!

Strife thuds a left hand into Hooper's body.
A slow jab from Hooper misses its intended target.
Strife scores with a punch to the head.
Strife moves into range and connects with a jab.
Hooper is looking to clinch.
Hooper throws a lazy uppercut
enabling Strife to counter with a crisp jab.
Strife lands a jab to Hooper's midsection.

Strife cracks Hooper with a big right hand that sends him to the floor! Hooper looks wobbly but he's sprung back up to his feet straight away
can Strife finish him?

Hooper is rocked!
It really doesn't seem like the step up in weight is hurting Strife here at all. He's more than holding his own against the bigger man.
The crowd are loving this. Great action here.
Strife ducks down and throws a big overhand right - it lands flush on the jaw, knocking Hooper out cold! The fight is over!
Ladies and gentlemen, after 0:35 of round 2, we have a winner by way of KO (Punch). Cloud Strife!
|
|
|
|
|
|
|
|
|
|
|
|
|
|
|
|
|
|
|
|
|
|
|
| S |
C
A |
G |
S |
C
B |
G |
|
S |
C |
G |
|
energy
A | B |
|
hype
A | B |
|
pop
A | B |
|
mgr
A | B |
|
FIGHT
RATING
61% |
|
|
|
|
|
|

