|
|
PBP Commentary |
Coming up we have a middleweight MMA rules bout between Gunji Koizumi (ranked 0 p4p, 0 weight class) and Roderick Solo (ranked 0 p4p, 0 weight class). Roderick Solo has the better chin. Will he look to stand and bang today?
 |
|
 |
| 176 cm
30
193 lbs
11 - 4 - 0 |
|
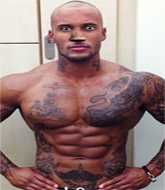
185 cm
21
202 lbs
12 - 3 - 0 |
Good wrestling
Excellent MT
Cardio machine |
|
Good wrestler
Excellent MT
Good gas tank |
|
| |
|
Ladies and gentlemen. This fight is 5 rounds, for the middleweight championship of the world!
Introducing the champion to my left, fighting out of the red corner.
With a record of
11 - 4 - 0, fighting out of New York, Gunji Koizumi!
And introducing the challenger to my right, fighting out of the blue corner.
With a record of
12 - 3 - 0, fighting out of New York, Roderick Solo!
The judges for this bout are Steven Brown, Donald Grub and Chris Edwards.

The bell rings for round one and we are underway!
Koizumi fails with the takedown.
Solo tries a head kick but it misses.
Solo misses with an uppercut.
Koizumi motions for Solo to come forward. Koizumi throws a leg kick but it misses it's target.
Koizumi lands a leg kick. The shin dug right into the meat of the thigh.
Koizumi throws a nice outside leg kick.
Koizumi throws a combination that misses
enabling Solo to counter with a crisp jab.
Koizumi steps to the side to avoid the strikes from Solo.
Koizumi changes levels looking for a counter takedown but doesn't commit.
Solo getting the better of the striking in that exchange.

Koizumi gets to the clinch - let's see what his plan is here.
Solo managing to block the knees to the body from Koizumi.
Solo tries to throw a body punch but Koizumi avoids it by throwing Solo back against the cage.
Koizumi effectively controlling the action here.
Solo scores with a shoulder strike.
Solo lands with a good tight uppercut to the head.

That's one minute gone in the round.

Solo's corner calls for him to break the clinch, which he does.
Solo ducks down and throws a hook to the body but Koizumi moves away.
Koizumi feinted there with a counter leg kick.

Koizumi shoots in for a takedown and gets it. Let's see what he's got on the mat.
Koizumi trying to control the position from guard on top but Solo is wriggling around, looking for whatever he can.
Solo bucks up whilst keeping hold of a body lock, managing to reverse the position. Now he's in top in Koizumi's guard.

Solo engaging in some classic timewasting tactics.
Solo's corner are shouting for him to control the position and he seems happy to oblige.
Solo trying to control but Koizumi is working from the bottom.
The ref warns both fighters not to hold the cage as they work up against the meshing.

That's two minutes gone in the round.
Koizumi controls Solo momentarily but Solo frees himself.

Koizumi working from the bottom, still in full guard. He's managed to get a loose triangle. Solo doesn't seem to be doing much to defend here, obviously he feels comfortable in the position. Solo manages to throw the legs off his shoulder and he's back into guard - no problem.
Solo not doing a lot at the moment. He'll have to show some more aggression or the fight will get stood up.
Solo lands a couple of elbows.
Koizumi is trying to keep Solo in close.
The fighters are pressed up against the cage, both looking to find a bit of space to work.
Solo won't allow Koizumi to sweep him here.

That's three minutes gone in the round.
Koizumi looking to control.
Solo wants to control from the top but Koizumi keeps moving.
It looks like the ref is thinking about a standup.
The fighters are starting to get a bit slippery now, which will make submissions a bit more difficult.

The referee has decided to stand the fighters back up, so we'll restart on the feet.
Roderick Solo is looking to keep the fight on the feet at all costs.
Solo misses with a wild body shot.
Solo scores with a leg kick.
Koizumi pivots as if he's going to throw a leg kick but stops half way.
Solo avoids a low kick by using good footwork.
Solo tries to check a leg kick but that clearly hurt him.
Solo looks to score with a combo but nothing lands.
Koizumi gets the takedown into side control.

That's four minutes gone in the round.

Solo throws Koizumi to one side and escapes!
The crowd cheering loudly, showing their appreciation for the quality fight we're seeing here.
Solo checks a low kick from Koizumi.
Solo swings and misses with a hook to the body.
Solo slaps away a takedown attempt from Koizumi, before circling back to the center of the mat.
Koizumi chopping away at his opponent's legs.
A head kick misses from Solo.
Koizumi throws a low kick, looking for Solo's leg but Solo calmly moves out of range.
Koizumi moves away from the strike by Solo.
Koizumi changes levels and looks for a double leg takedown. Solo tries to avoid it but Koizumi manages to keep hold of a leg and drag Solo to the ground. Solo escapes though and pops straight back up to his feet.
Solo unleashes a big counter combination but Koizumi bobs and weaves and avoids any damage.
That's three failed takedown attempts in the round for Gunji Koizumi. That's going to take a lot out of him.
Solo cracks Koizumi with a good jab.
A jab lands there for Solo.
Koizumi fails with a takedown attempt.
Solo swings away with a counter right hand but no contact made.
And thats the end of the round the fighters go back to their corners.
Roderick Solo dominated that round.
The corners get their ten second warning. Both fighters stand from their stools and stare eachother down, ready to get back to the action.

Solo throws a right and a left that Koizumi avoids nicely.
Solo throws out a loose jab but Koizumi uses good head movement to avoid it.
Koizumi avoids the head kick by Solo.
Koizumi shoots in and gets a takedown into half guard. Koizumi showed some decent athleticism there.
Koizumi tries to pass to full mount but Solo defends it.

Koizumi moves into side control, avoiding a weak kimura attempt from Solo.
We've had a slow start to the round here - hopefully the action picks up.
Koizumi wants to lay and pray for a moment but Solo keeps working.
Koizumi in side control lands a decent elbow.
That's one minute gone in the round.
Koizumi wants to take a breather but Solo manages to regain guard - a lesson learnt for Koizumi.
Solo keeping moving, preventing Koizumi from controlling successfully.
Solo wants to sweep here but Koizumi controlling him for the moment.
Koizumi stays in close to Solo's body and controls the position.
Koizumi trying to control but Solo is working from the bottom.
That's two minutes gone in the round.
The crowd are starting to boo a lack of action.
Koizumi pressing down on his opponent's thigh, looking to pass guard. Solo is keeping the position for now.
Solo looking to hit a scissor sweep but Koizumi is one step ahead there.
Koizumi pressing down on his opponent's thigh, looking to pass guard. Solo is keeping the position for now.
Koizumi trying to control the position from guard on top but Solo is wriggling around, looking for whatever he can.
Koizumi looking to pass the guard.
The referee decides to stand the fighters back up.
That's three minutes gone in the round.
Koizumi misses with a takedown attempt
and Solo cracks him with a counter punch right on the button.
Koizumi pivots, looking for a leg kick but Solo is out of range and Koizumi settles back down.
Koizumi shoots in for a takedown and gets it. Let's see what he's got on the mat.
Solo looking to hit a scissor sweep but Koizumi is one step ahead there.
Koizumi is in close to Solo's body, working some short punches and elbows.
Solo not looking particularly offensive just at the moment.
Koizumi engaging in some classic timewasting tactics.
Koizumi trying to control but Solo is working from the bottom.
Solo keeping full guard, as Koizumi tries to pass.
Gunji Koizumi overall seems to be getting the better of the ground position in the fight so far.
That's four minutes gone in the round.
Koizumi wants to control from the top but Solo keeps moving.
Solo wants to sweep here but Koizumi controlling him for the moment.
Koizumi content to strike from guard, landing some decent shots.
Solo is trying to control the position from the bottom.
Solo is in a good position here but he's just trying to control... And he's not even managing to do that successfully.
Boooooooooooooooooooo!!! God, this has been a terrible round. Come on you two, sort yourselves out!
Solo kicks Koizumi off and gets to his feet.
And thats the end of the round the fighters go back to their corners.
A close second round but Roderick Solo will probably get the nod - 10:9.
The fighters' corners scream their final instructions, as the referee calls time. Here we go, back to the action!

Koizumi shoots in for a takedown and gets it.
Koizumi seems to be working for a kimura but Solo defends the submission attempt.
Solo wants to control but Koizumi is keeping busy.
Solo felt the need to train up his defensive grappling in the buildup to the fight. Presumably he was expecting to be in a difficult position like this, so let's see if he can get out of it.
Koizumi trying to pass the guard but Solo defending well.
We've had a slow start to the round here - hopefully the action picks up.
Solo makes his way to full guard. A much better position for Solo.
Koizumi is just sitting in guard, looking to avoid any submissions.
That's one minute gone in the round.
Koizumi trying to control but Solo is working from the bottom.
Solo trying to keep a closed guard but Koizumi is proving a slippery customer.
Koizumi pushing down on Solo's thigh, trying to pass to half guard. He's managed it... Nice work.
Koizumi stalling.
Solo tries to get to full guard but Koizumi has control of the leg.
Koizumi is looking to pass the guard... He's managed it - he's now in full mount!
That's two minutes gone in the round.
Solo squirming around on the bottom, looking to escape.
Koizumi looking to control and managing it successfully.
Solo defends a decent attempt at a guillotine from Koizumi.
Solo is looking to get to half guard.
Koizumi lands a heavy elbow.
Solo tries to reverse the position but Koizumi maintains control.
Solo is bucking up trying to escape but Koizumi cracks him with another couple of good strikes.
Solo taking shots to the head.
That's three minutes gone in the round.
Solo tries to buck Koizumi off but he can't manage it.
Koizumi dominating with strikes here.
Koizumi trying to control but Solo is having none of it.
Solo is wriggling around trying to escape.
Koizumi trying to control but he's not successful this time.
Solo is trying to escape the mount.
Koizumi looking to control but Solo is working nicely, looking to advance position himself.
Koizumi is really struggling to control Solo but he's trying to hold on to the position.
That's four minutes gone in the round.
Koizumi is still in mount, landing shots to his trapped opponent. Solo can't stay in a position like this for much longer.
Solo regains half guard.
Koizumi is trying to control the action in half guard but Solo is working away on the bottom, looking perhaps to get back to full guard.
Solo won't allow Koizumi to pass to mount.
Koizumi sitting in half guard, looking to land shots. Solo defending well though.
Koizumi stalling.
Boooooooooooooooooooo!!! God, this has been a terrible round. Come on you two, sort yourselves out!
Solo tries to get to full guard but Koizumi has control of the leg.
And thats the end of the round the fighters go back to their corners.
Gunji Koizumi clearly takes that round.
That's the end of the round. The referee orders the cornermen out of the cage so we can get back down to business.

Solo scores with a big left there. The judges will like that one.
Solo keeping at a good range here, avoiding a leg kick.
Solo swings for the body but Koizumi moves out of range.
Solo connects nicely with a jab. Noted by the judges no doubt.
Solo has used his reach advantage pretty well so far tonight.
Solo lands a straight punch to the body, keeping Koizumi at a distance.
Koizumi fakes a jab and scores with a low kick.
Solo misses with a looping right.
That kick from Koizumi tenderised Solo's leg. Solo is trying to keep his angry face on.
Like a baseball bat into the meat of his leg there - nice leg kick by Koizumi.
We've had a slow start to the round here - hopefully the action picks up.
Solo keeps his opponent at a distance with a nice jab.
Solo throws out a token jab with nothing on it.
A solid leg kick lands there for Koizumi.
A nice leg kick lands there from Koizumi.
Solo's leg has a nasty welt from taking a succession of leg kicks. That must be slowing him down.
That's one minute gone in the round.
Solo finds nothing but air with that leg kick attempt.
Koizumi dives in and grabs Solo's left leg, looking for a takedown. Solo pushes down on Koizumi's head and hops out.
Solo throws a big counter head kick but Koizumi avoids it with no problem.
Solo works Koizumi's body with a nice hook.
Koizumi shoots in for a takedown. "I don't think so" says Solo as he avoids it easily.
Solo appears to be waiting to throw a counter punch to the body.
Solo takes a swing at Koizumi's ribcage but misses.
Koizumi tries to drive through with a takedown attempt but Solo defends well and Koizumi ends up having to push Solo into the cage where they will battle it out in the clinch.
That's three failed takedown attempts in the round for Gunji Koizumi. That's going to take a lot out of him.
Solo misses with a half-hearted attempt at a head kick.
Koizumi fakes with a right hand and throws a good leg kick, right into the thigh. That had to hurt Solo.
Solo throws a low kick but it's checked well by Koizumi.
Koizumi changes levels looking for a counter takedown but doesn't commit.
Koizumi fails with a takedown attempt.
Koizumi fakes with a right hand and throws a good leg kick, right into the thigh. That had to hurt Solo.
Solo checks a leg kick.
That's two minutes gone in the round.
Koizumi blocks a head kick by Solo.
Koizumi fails with a takedown attempt.
Koizumi shoots in for a double leg but Solo sprawls well. That's going to sap some energy.
Koizumi throws a quick inside leg kick.
Koizumi scores with a slapping inside leg kick.
Koizumi ducks down and throws a hook to the body but Solo moves away.
Koizumi throws a head kick that misses and slips in the process. He scrambles back to his feet and the fighters circle.
Solo was about to counter that last move with a leg kick but changes his mind.
This has been an exciting period of action!
Koizumi fakes high and shoots in for a takedown but Solo avoids it really well and circles away.
It's got to the stage where if one of these guys blows hard enough, the other might fall over.
Solo lands with an uppercut that bounces Koizumi off the cage and back into range.
That's three minutes gone in the round.
Solo ducks down and throws a hook to the body.
Solo tries a switch kick but it misses it's target.
A solid leg kick lands there for Koizumi.
Solo slaps away a takedown attempt from Koizumi, before circling back to the center of the mat.
Solo throws a leg kick which misses Koizumi's front leg but catches the back leg as Koizumi tries to avoid it.
A low kick from Solo is predictable there
and Koizumi counters with an outside leg kick.
Koizumi shoots in for a takedown. He's persisting with it as Solo sprawls well. Solo wins this battle and keeps the fight standing. Koizumi gets slowly back to his feet.
Solo tests Koizumi's chin there with a solid looking shot.
That's four minutes gone in the round.
Koizumi lands a high kick!
Koizumi tries to drive through with a takedown attempt but Solo defends well and Koizumi ends up having to push Solo into the cage where they will battle it out in the clinch.
Koizumi shoots in for a takedown. "I don't think so" says Solo as he avoids it easily.
Gunji Koizumi seems to be the more aggressive standup fighter in this bout.
Solo lands a nice looking body shot.
Koizumi throws a head kick but Solo moves out of range.
This is a great period of action - very entertaining stuff!
Koizumi uses some good footwork to avoid the body shot by Solo.
Koizumi steps to the side to avoid the strikes from Solo.
Koizumi looked to counter that last move with a leg kick but didn't pull the trigger.
Koizumi changes levels and looks for a double leg takedown. Solo tries to avoid it but Koizumi manages to keep hold of a leg and drag Solo to the ground. Solo escapes though and pops straight back up to his feet.
Roderick Solo seems to be getting the better of the standup.

Solo lands a big uppercut and Koizumi crumbles to the floor! The ref thinks about stopping the fight but Koizumi looks OK. Solo waves Koizumi back to his feet!

Koizumi is rocked!

It looks like Gunji Koizumi has been cut.
A swing and a miss from Solo.
As Solo backs away, Koizumi returns fire with a leg kick that just misses.
Oh Koizumi is still all over the place! His legs are completely gone! Will he be able to recover?!!
Koizumi rushes in with a sloppy looking punch
and Solo counters with a crisp right hand that drops Koizumi! Solo lets Koizumi back up to his feet, looking for a finish!
And thats the end of the round the fighters go back to their corners.
Roderick Solo dominated that fourth round.
The cut man is working on Gunji Koizumi's cut.
That's the end of the interval. I'm sure that seemed a lot quicker than a minute for our two fighters! Back to the action. Let's hear some noise people - this is the final round!

Solo jabs at Koizumi's body.
Koizumi has his front leg slapped to the side - a nice low kick landing there from Solo.
Solo throws a head kick but Koizumi moves out of range.
Koizumi seems to have got his legs back now.
Koizumi tries to land a leg kick but Solo saw it coming and moves away.
A slapping body kick lands there for Solo.
Solo fails to land with a series of punches.
Koizumi half commits to a counter takedown before pushing away, out of range.
Solo throws a sloppy head kick
and Koizumi counters with a slapping leg kick.
Solo misses with a head kick.
Koizumi attempts a counter takedown but Solo avoids it well and moves away.
Solo throws a shot from downtown. Koizumi moves away and avoids it.
Solo gets taken down but at least he's managed to land in guard.
Solo manages to wriggle out and sneak his way back up to his feet, so the fighters are now clinched up against the cage.
This has been an exciting period of action!
Solo is wobbling all over the place through exhaustion. Will he make it to the final bell?
Koizumi pulls guard effortlessly.
Solo trying to control but Koizumi is working from the bottom.
That's one minute gone in the round.
Solo content to stall in guard here.
Solo avoids a guillotine attempt easily.
Koizumi trying to keep a closed guard but Solo is proving a slippery customer.
Solo must be cautious of submissions here, given that his opponent has the superior Jiu Jitsu.
Koizumi working for a triangle but Solo defends it easily.
Koizumi bucks up whilst keeping hold of a body lock, managing to reverse the position. Now he's in top in Solo's guard.

That's two minutes gone in the round.
Solo tries to land a sweep but no joy.
Solo is trying to control the position but Koizumi postures up.
Koizumi lands a couple of decent looking shots.
Koizumi is just sitting in guard, looking to avoid any submissions.
Koizumi with a couple of shots to the head there. Not particularly brutal.
Koizumi wants to pass the guard but Solo is keeping the position.
Solo has a butterfly guard looking to sweep but Koizumi has passed into side control.
That's three minutes gone in the round.
Koizumi is looking to take a break and control but Solo is keeping him honest, looking to work from the bottom.
Solo tries to buck Koizumi off but Koizumi is having none of it.
Solo is trying to control Koizumi's posture but Koizumi avoids it.
Koizumi wants to control but Solo is keeping him busy.
Koizumi slows the pace down.
Solo is positioning himself to get back to half guard.
Gunji Koizumi has stepped it up - he knows he needs a finish here!
Roderick Solo is fighting for a decision - hopefully he's judged it right and he's actually winning the fight.
That's four minutes gone in the round.
Well. There's a bit of a lull in the action here and the crowd are starting to get restless.
Solo manages to work his way to half guard, despite Koizumi's best efforts.
Solo controlling the position for now.
Koizumi wants to take a breather but Solo is having none of it.
The referee wants the fighters to be more active or he's going to reset them on the feet.
Solo is looking to control Koizumi's leg but it's slowly edging free. Can Solo avoid being mounted?
The referee decides to stand the fighters back up.
Koizumi goes for a double leg but Solo avoids the attempt and the two fighters end up clinched against the cage as Solo continues to drive forward.
Koizumi doesn't succeed with the takedown
and Solo counters with a nice low kick that buckles Koizumi's knee momentarily.
The crowd thankful this round is nearly over.
Koizumi misses with a kick to the body.
Solo throws a big shot that misses.
Koizumi jinks towards his opponent looking like he wants to counter with a mid kick but doesn't commit.
And that's the end of the fight!
I would just about give that final round to Roderick Solo.
I think Solo has won this one but let's see whether the judges agree with me. Over to the ring announcer for the scorecards.
Ladies and gentlemen, after 5 rounds of action, we go to the scorecards for a decision.
Judge Steven Brown scores the fight 47:49
Judge Donald Grub scores the fight 47:49
Judge Chris Edwards scores the fight 47:49
In favor of your winner, by unanimous decision... Roderick Solo!
Roderick Solo is the new middleweight champion!
Roderick Solo seemed lost for words in his post fight interview but he remembered to thank his fans and directed everyone to his website.
|
|
|
|
|
|
|
|
|
|
|
|
|
|
|
|
|
|
|
|
|
|
|
| S |
C
A |
G |
S |
C
B |
G |
|
S |
C |
G |
|
energy
A | B |
|
hype
A | B |
|
pop
A | B |
|
mgr
A | B |
|
FIGHT
RATING
46% |
|
|
|
|
|
|

