|
|
PBP Commentary |
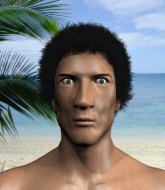
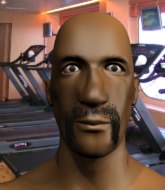
Coming up we have a heavyweight MMA rules bout between Salvatore Mendoza (ranked 25312 p4p, 0 weight class) and Takuma Sato (ranked 5945 p4p, 0 weight class). Both fighters really staring each other down here, as Takuma Sato enters the cage!
 |
|
 |
| 166 cm
18
278 lbs
3 - 2 - 0 |
|
182 cm
23
260 lbs
0 - 0 - 0 |
BJJ Blue Belt
Counter fighter
Cuts easily |
|
BJJ Blue Belt
Solid Muay Thai
Granite chin |
|
| |
|
Ladies and gentlemen. This fight is 3 rounds, in the heavyweight division.
Introducing the fighter to my left, fighting out of the red corner.
With a record of
3 - 2 - 0, fighting out of Tokyo, Salvatore Mendoza!
And introducing the fighter to my right, fighting out of the blue corner.
With a record of
0 - 0 - 0, fighting out of Tokyo, Takuma Sato!
The judges for this bout are Hirohito Nitta, Yukihiro Shimada and Yasuomi Hirokawa.

The bell rings for round one and we are underway!
Mendoza shoots in but no luck this time.

Mendoza moves into the clinch.
Mendoza is looking for a takedown.

Mendoza decides to pull guard.

Sato stands up from guard. Let's bang!
Mendoza shoots in but no luck this time.
That's three failed takedown attempts in the round for Salvatore Mendoza. That's going to take a lot out of him.
Sato fakes high and shoots in for a takedown but Mendoza avoids it really well and circles away.
Sato dives in for a single leg takedown but Mendoza sprawls and the fighters end up clinched against the cage.
We've had a slow start to the round here - hopefully the action picks up.

Sato moves into range and clinches up with Mendoza.

Sato jumps into guard, dragging Mendoza to the mat.
Mendoza stopping the sweep attempt from Sato.
Sato looking to sweep using the butterfly guard but Mendoza puts pay to that idea as he passes nicely into half guard.
The ref warns both fighters not to hold the cage as they work up against the meshing.

That's one minute gone in the round.
Sato tries to roll over but Mendoza keeps him under control.
Sato has hold of Mendoza's hands but Mendoza slips his arm to the side and lands an elbow.
Mendoza has been looking to land a fair amount of strikes on the ground. He might be looking to soften his opponent up in order to work for a submission.
Mendoza looks to score some points with some ground and pound.
The fighters are pressed up against the cage, both looking to find a bit of space to work.
Mendoza thows a wild elbow that connects with the canvas.

Mendoza is looking for an arm triangle, whilst trying to pass to side control. Sato doesn't seem that keen to cooperate though. No luck this time Mendoza.
Sato throws a sloppy strike from the bottom. He's now off balance and Mendoza manages to pass to side control.

That's two minutes gone in the round.
Sato can't do much from the bottom here.
Mendoza scoring with punches and elbows.
Sato tries to bench press Mendoza off him but Mendoza keeps the position.
Mendoza working away.
Sato is sneaking out the side here. He's bucked Mendoza off and has taken his back!

That's three minutes gone in the round.
Mendoza is trying to break free.
Sato somehow managing to miss with a strike from the back.
Sato doesn't have the hooks in and Mendoza manages to turn into his guard.
Mendoza might be looking to lock onto one of his opponent's long limbs for a submission, whilst we're on the ground.
Sato is working an open guard here, looking to improve his position. No doubt that will leave him open to counters but at least he's being more offensive.
Mendoza could do with losing a few pounds - he looks very soft around the mid section, to put it politely.
Mendoza controls from within his opponent's guard.
Mendoza trying to control the position from guard on top but Sato is wriggling around, looking for whatever he can.
Sato is trying to stand up but he's not managed so far.

That's four minutes gone in the round.
Sato avoiding any damage from the ground and pound.
Mendoza trying to control but Sato is working from the bottom.
Mendoza scoring with punches to the head and body.
Sato trying to keep a closed guard but Mendoza is proving a slippery customer.
Sato is adopting a defensive guard.
The crowd thankful this round is nearly over.
Sato trying to control the position.
And thats the end of the round the fighters go back to their corners.
Salvatore Mendoza dominated that round.
Well, the break between rounds is over. Let's get back to the scrappin!

Sato misses with a takedown attempt. He shot from a bit too far out.
The fight stays on the outside here - Mendoza looks like he's thinking about clinching though.
Nice body kick from Sato.
Mendoza takes a head kick and shrugs it off.

It looks like Salvatore Mendoza has been cut.
Mendoza clinches up against the cage.
Mendoza has hold of a leg and is looking for a trip takedown. Sato avoids it nicely though and we remain in the clinch.
We've had a slow start to the round here - hopefully the action picks up.

Sato's corner calls for him to break the clinch, which he does.
Mendoza gets his takedown attempt stuffed easily
and Sato counters with a kick to the head that grazes his opponent. Mendoza is lucky that one didn't land flush.
Sato tries to score a power double leg takedown but Mendoza sees that one coming and sprawls well. That will dishearten Sato somewhat.
That's one minute gone in the round.
Sato moves into the clinch.
Sato manages to break the clinch.
Sato instigates a clinch.
Sato gets control of Mendoza's arms and successfully pulls guard. Sato will no doubt be looking for submissions off his back.
Mendoza is trying to work a guillotine from the top, or something like that? Don't know how he thinks he's going to get a finish from there.

Sato is working actively off his back, looking to secure an arm or perhaps work for a triangle.
That's two minutes gone in the round.
Mendoza makes a bit of distance and scores with some ground and pound, still in guard.
Sato looking for a sweep. Not yet Sato, not yet.
Sato looking to control.
Mendoza landing with the ground and pound.
Sato working the defensive guard well to avoid strikes from Mendoza.
Sato looking for submissions off his back, moving his hips, looking for an opening.
That's three minutes gone in the round.
Sato tries to land a sweep but no joy.
Sato will have to put a bit more behind his punches if he's going to do any damage from this position.
Mendoza trying to land body shots but he keeps hitting the mat.
Mendoza postures up and scores with a shot to the body and a follow up elbow to the head.
Mendoza tries to free his leg and advance position but Sato is retaining full guard.
Mendoza forces his way into half guard.
Salvatore Mendoza overall seems to be getting the better of the ground position in the fight so far.
Sato is working for an escape here. He's hooked one of Mendoza's legs and he's managed to sneak out and take Mendoza's back!
Sato is breathing heavily.
Sato has the hooks in. Mendoza is trying to push off one leg but he has to do so cautiously to avoid being submitted.
That's four minutes gone in the round.
Sato trying desperately to keep hold of the dominant position.
Sato is looking cool and calm here, just waiting for a good opportunity to attack and finish the fight from this dominant position.
Sato is trying to stick to Mendoza's back but Mendoza is turning into Sato. He's managed to reverse the position - now he's in Sato's guard. Polite applause from the crowd in appreciation of some nice Jiu Jitsu by Mendoza.
And thats the end of the round the fighters go back to their corners.
Takuma Sato showed his class in that round. I'd imagine he'll take it on all the scorecards.
The cut man is working on Salvatore Mendoza's cut.
OK. That's time! The bell goes and we're back to the action. This is the final round!

Sato tries a switch kick but it misses it's target.
Salvatore Mendoza is looking to throw some combinations by the looks of things.
Sato misses with a half-hearted attempt at a head kick.
Sato looks for a takedown but Mendoza sprawls well.
Sato throws a head kick that misses and slips in the process. He scrambles back to his feet and the fighters circle.
Sato tries to score a power double leg takedown but Mendoza sees that one coming and sprawls well. That will dishearten Sato somewhat.
We've had a slow start to the round here - hopefully the action picks up.
Mendoza fails with a takedown attempt.
Mendoza fakes with an overhand right and moves in to clinch with Sato, pushing him back against the cage.
That's one minute gone in the round.
Mendoza is looking for a takedown.
Mendoza has a body lock and is looking for a takedown. Sato is bouncing around trying to prevent the takedown and somehow he has indeed managed to stay on his feet.
That's three failed takedown attempts in the round for Salvatore Mendoza. That's going to take a lot out of him.
Mendoza is trying to work for a single leg takedown but Sato pulls him back up using the underhooks.
Mendoza changes levels and goes for a takedown here. Sato fights it off and pushes away nicely.
Mendoza shoots in for a takedown. He's persisting with it as Sato sprawls well. Sato wins this battle and keeps the fight standing. Mendoza gets slowly back to his feet.
Both fighters are breathing heavily.
Sato changes levels and looks for a double leg takedown. Mendoza tries to avoid it but Sato manages to keep hold of a leg and drag Mendoza to the ground. Mendoza escapes though and pops straight back up to his feet.
Sato lands a nice shot to the body.
Sato has a takedown stuffed.
That's two minutes gone in the round.
Sato shoots in looking for a takedown. Mendoza tries to sprawl out of it but Sato keeps driving through. The fighters are pinned against the cage. Mendoza manages to get underhooks and after a bit of a struggle, circles away and we're back to standing.
Mendoza slaps away a takedown attempt from Sato, before circling back to the center of the mat.
Mendoza wants to clinch.
Sato explodes with a nice body kick and back out of range. Nice work.
That's three minutes gone in the round.
Sato rushes Mendoza and presses him up against the cage.
Sato breaks the clinch and we return to the middle of the mat.
Sato shoots in with a takedown attempt and he has Mendoza pinned against the cage. Mendoza gets the underhooks and manages to circle away.
Mendoza appears to be looking for a big counter.
Mendoza pulls out of a head kick attempt.
Mendoza gets in close and instigates a clinch.
Mendoza prevents the takedown attempt.
Sato lands a good knee to the midsection. Mendoza won't want to take too many of those.
Sato prevents a takedown attempt there.
Sato escapes the clinch and we're back to striking.
That's four minutes gone in the round.
Mendoza looking for a takedown here - he's got it.

Sato has his feet on Mendoza's hips. He pushes off and gets to his feet. Nice work.
The crowd are loving this. Great action here.
Takuma Sato seems to be the more aggressive standup fighter in this bout.
Mendoza fakes high and shoots in for a takedown but Sato avoids it really well and circles away.
Sato scores with a head kick. Mendoza tried to block it but didn't get his arm up in time.
The crowd thankful this round is nearly over.
Sato moves into the clinch successfully.
And that's the end of the fight!
Takuma Sato comfortably won the final round on my scorecard.
I think Sato has won this one but let's see whether the judges agree with me. Over to the ring announcer for the scorecards.
Ladies and gentlemen, after 3 rounds of action, we go to the scorecards for a decision.
Judge Hirohito Nitta scores the fight 28:29
Judge Yukihiro Shimada scores the fight 28:29
Judge Yasuomi Hirokawa scores the fight 28:29
In favor of your winner, by unanimous decision... Takuma Sato!
|
|
|
|
|
|
|
|
|
|
|
|
|
|
|
|
|
|
|
|
|
|
|
| S |
C
A |
G |
S |
C
B |
G |
|
S |
C |
G |
|
energy
A | B |
|
hype
A | B |
|
pop
A | B |
|
mgr
A | B |
|
FIGHT
RATING
32% |
|
|
|
|
|
|
