|
|
PBP Commentary |
Coming up we have a middleweight MMA rules bout between Thomas Hawk (ranked 201 p4p, 27 weight class) and Paddy Bateman (ranked 328 p4p, 48 weight class). Hawk's ring entrance music is that housewives' favourite, Deadwood. Paddy Bateman is staring across the cage at his opponent, tweaking his nipples.
 |
|
 |
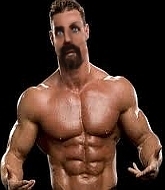
| 167 cm
37
190 lbs
35 - 18 - 1 |
|
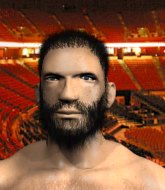
185 cm
38
195 lbs
19 - 10 - 0 |
Good wrestling
World class boxer
Cardio machine |
|
Olympic wrestler
World class MT
Good gas tank |
|
| |
|
Ladies and gentlemen. This fight is 5 rounds, for the middleweight championship of the world!
Introducing the champion to my left, fighting out of the red corner.
With a record of
35 - 18 - 1, fighting out of London, Thomas Hawk!
And introducing the challenger to my right, fighting out of the blue corner.
With a record of
19 - 10 - 0, fighting out of Las Vegas, Paddy Bateman!
The judges for this bout are Steve Smith, Dillan Fox and Robert Douchet.

The bell rings for round one and we are underway!
Bateman scores with a hook.
Hawk on the wrong end of a decent looking cross there.
Hawk walks forward and throws out a flicking leg kick. Bateman checks it nicely though, as he moves to the side.
Bateman scores with a three punch combo!
Bateman ducks under an overhand right and circles away with a smile on his face.
Hawk throws a body punch but Bateman moves out of range.
Hawk definitely looks more muscular than last time we saw him fight.
Hawk throws a leg kick that is checked
and Bateman counters with a three punch combination, finished off with a leg kick. Nice work.
Bateman darts in and out, connecting with a jab.
Bateman moves out of range of the strikes.
Bateman slips under a jab from Hawk.
The fans in attendance giving it up for the two fighters, who have really let it all hang out in the last minute or so!

Hawk moves into the clinch.
Hawk lands with a short shot to the head.

Hawk manages to pull guard.
Hawk working a defensive guard but Bateman passes into half guard.
Bateman content to control rather than advance.
It looks like Bateman might be adopting somewhat of a lay and pray gameplan here, which I'm sure won't go down too well with the paying fans in attendance... Or the ring announcers come to think of it.
Hawk wants to improve his position but Bateman is controlling well.

That's one minute gone in the round.
Bateman controlling the pace.
Hawk is trying to get back to full guard.
Bateman is looking to pass the guard... He's managed it - he's now in full mount!
Bateman fails to move to back control.
Bateman controlling from mount.
Hawk might be looking to lock onto one of his opponent's long limbs for a submission, whilst we're on the ground.

That's two minutes gone in the round.
Hawk is squirming around, avoiding Bateman's attempts to control the action.

Bateman working for a submission but Hawk is keeping him at bay.
Hawk stops Bateman from taking his back. Still, being mounted isn't any better.
Hawk really trying hard to get back to half guard here.
Hawk wants to improve position but instead he's given up his back.
Hawk tries to escape the position.
Bateman working for a choke but Hawk is defending well.
Hawk tries to escape the position.

That's three minutes gone in the round.
Hawk trying to control but not successfully.
You can see the frustration on Hawk's face
He knows he is in trouble unless he improves his position sooner rather than later.
Bateman trying to secure his dominant position for a moment - making sure Hawk doesn't escape.
Hawk tries to escape the position.
Hawk is working hard here to advance position.
Bateman trying desperately to keep hold of the dominant position.
Bateman slows the pace down here. Having a little breather whilst he's in a dominant position, looking to rest and regain some energy, ready to go for the finish.
Bateman has his hand under the chin of his opponent looking for the choke. He's nearly got it! This one could be all over! But no, Hawk has freed his hand and lives to survive another
well, another couple of seconds at least!
Hawk is defending well here and trying to improve his position.

That's four minutes gone in the round.
Hawk is very frustrated here, being controlled quite effectively by Bateman.
Bateman tries to keep control of the position but Hawk is staying busy.
Bateman has good solid back control here.
Hawk wants to escape the position.
Hawk tries to escape the position - he's now mounted. Is that better or worse? Hard to tell!
Hawk is desperately trying to get back to half guard.
Bateman looking to control and managing it successfully.
Hawk wants to hold on but Bateman pushes him away.
Bateman moves to back control.
Hawk just trying to survive but Bateman is wriggling into a better position, looking to finish.
Bateman wants to control but Hawk is keeping busy.
And thats the end of the round the fighters go back to their corners.
Paddy Bateman dominated that round.
Well, the break between rounds is over. Let's get back to the scrappin!

A telegraphed takedown attempt from Bateman is defended easily by Hawk.
Bateman moves out of range as Hawk throws a body kick.
Hawk tries to land a leg kick but Bateman saw it coming and moves away.
Bateman is using his reach advantage to land shots from outside his opponent's range.
Bateman moves into range and throws a lovely three punch combination.
Hawk throws a chopping leg kick but Bateman manages to avoid taking any serious damage.
Paddy Bateman seems to be the more aggressive standup fighter in this bout.
Bateman jabs Hawk to the body, keeping him at a distance.
Hawk misses with a looping right.
Bateman is definitely looking for the counter takedowns here.
Bateman stuffs the takedown attempt from Hawk. Hawk gets slowly back to his feet.
We've had a slow start to the round here - hopefully the action picks up.
Bateman looks frustrated there after his takedown attempt is stuffed easily.
Hawk throws a hook but Bateman blocks it.
Hawk throws a lazy uppercut
and Bateman counters with a quick right hand to the jaw.
Hawk throws a leg kick that is checked

and Bateman counters with a shoot takedown. Hawk fights it but they end up in guard.
That's one minute gone in the round.
Bateman controlling from the top position.
Bateman sneaks a leg through and gets to half guard. That was like a knife through butter how easily he passed Hawk's guard.
Hawk is trying to get back to full guard.
Bateman slows the pace down in half guard.
Hawk moves into full guard.
Bateman won't allow Hawk to sweep him here.
Bateman forces his way into half guard.
Bateman trying to control from half guard but Hawk is working away.
That's two minutes gone in the round.
Bateman performing his best blanket impression for a moment.
Bateman is continuing to stall.
Bateman has been the more effective fighter overall so far.
The fighters are pressed up against the cage, both looking to find a bit of space to work.
Hawk tries to get to full guard but Bateman has control of the leg.
Bateman is working for a kimura but Hawk is defending it quite comfortably.
Hawk slips a foot under and gets full guard. Nice work.
The ref warns both fighters not to hold the cage as they work up against the meshing.
That's three minutes gone in the round.
Bateman pushes down on Hawk's leg and manages to get into half guard.
Bateman is trying to control. Hawk wants to improve his position but can't escape this time.
Hawk slips a foot under and gets full guard. Nice work.
Bateman is intent on slowing down the pace of the fight, simply looking to control.
Bateman tries to free his leg and advance position but Hawk is retaining full guard.
Paddy Bateman has got the better of the ground game so far.
Hawk trying to keep a closed guard but Bateman is proving a slippery customer.
Bateman sitting in guard, not really doing much.

Hawk looking for submissions from the bottom here. Moving his hips around, possibly looking for an armbar.
Bateman passes easily into side control. Nice work.
That's four minutes gone in the round.
Bateman moving around in side mount but really he's just happy to control for now.
Bateman wants to control but Hawk is keeping him busy.
Hawk tries to bench press Bateman off him but Bateman keeps the position.
Hawk is not content to let Bateman control the position.
Hawk tries to get back to half guard but can't.
Bateman gets to mount! Hawk was on the offensive and wasn't defending properly.
Bateman fails to move to back control.
The crowd thankful this round is nearly over.
Hawk is trying desperately to improve position.
Bateman looking to control and managing it successfully.
And thats the end of the round the fighters go back to their corners.
Paddy Bateman showed his class in that round. I'd imagine he'll take it on all the scorecards.
The fighters get back to their feet, the hooter sounds and we're back to the action!

Hawk tries to close the distance and clinch up against the cage but Bateman paws at him with a jab and circles away.
Bateman takes one on the chin but seems OK.
Hawk is really struggling to find his range with his punches. Bateman's reach advantage is clearly causing him problems.
Hawk takes one to the side of the head.
A low kick from Hawk is predictable there
and Bateman decides to take the opportunity to score a takedown. He's landed in Hawk's guard.
Bateman avoids a guillotine attempt easily.
Bateman tries to free his leg and advance position but Hawk is retaining full guard.
Bateman stopping the sweep attempt from Hawk.
Hawk being controlled here, momentarily.
We've had a slow start to the round here - hopefully the action picks up.
Hawk controls Bateman momentarily but Bateman frees himself.
Bateman works a leg free and moves into half guard.
That's one minute gone in the round.
Bateman keeping composed on the top, looking to control the action.
Hawk is pressing down on Bateman's left leg trying to get back to full guard. He's managed it.
Bateman got a little sloppy there for a moment and Hawk has worked his way into a loose triangle - can he finish it?! No, Bateman has managed to get both his arms back between Hawk's legs - danger averted.
Hawk working a defensive guard here.
Hawk has an omoplata and is looking to use it perhaps as a submission or perhaps to transition. Bateman is in a bit of discomfort here, but he's managed to free himself and has dived into side control! That didn't work out too well for Hawk.
Both fighters are breathing heavily.
Bateman controlling from side mount.
Bateman tries for an arm triangle. That looks pretty tight to me. Is this one over!?! Possibly, maybe, no Bateman has let go of the choke. Obviously it wasn't as tight as we thought!
Hawk prevents Bateman from improving position.
That's two minutes gone in the round.
Bateman has knee on belly and moves into mount.
Hawk tries to reverse the position but Bateman maintains control.
Hawk is squirming around, avoiding Bateman's attempts to control the action.
Hawk is trying desperately to improve position.
Bateman looking to control and managing it successfully.
Hawk is looking to get to half guard.
That's three minutes gone in the round.
Bateman sitting in mount, just looking to control for the moment.
Hawk is trying desperately to improve position.
Bateman controlling his opponent.
Bateman is dominating on the ground here - he's now on his opponent's back, looking to sink in the hooks. Hawk is in real trouble.
Bateman struggling to keep hold of the position.
Bateman is remaining active here, looking for the choke. The more discerning members of the crowd will appreciate his efforts.
Bateman trying to control.
That's four minutes gone in the round.
Hawk tries to roll but Bateman sticks to his back.
Bateman is working hard for the rear naked choke here.
You can see the frustration on Hawk's face
He knows he is in trouble unless he improves his position sooner rather than later.
Will Bateman go for the finish here or will he try and keep control of the position?
Hawk rolls, trying to escape but Bateman keeps control of the position.
Bateman tries to get the hooks in deep but Hawk pushed the leg off.
The crowd thankful this round is nearly over.
Bateman is hanging on to Hawk's back as he tries to escape.
Bateman wants to control but Hawk is keeping busy.
Hawk wants to escape the position.
The crowd hopeful of a finish here - Bateman's supporters are on their feet, screaming for him to go for the rear naked choke.
And thats the end of the round the fighters go back to their corners.
Paddy Bateman really dominated that round.
That's time! Hawk's corner gives him a slap on the ass as he gets ready to fight.

Bateman lands a powerful looking uppercut that connected with his opponent's jaw.
This fight brought to you by 5M nutrition - it's mmmmm tasty. Nice jab by Hawk.
Bateman swings wildly with a hook that is half blocked by Hawk.
Bateman misses with a takedown attempt - Hawk sprawls well and throws a nice strike on the way out which just misses.
Hawk misses with a body shot.
Bateman throws a combination but comes up with nothing but fresh air.
Bateman lands a jab to the head.
A really sloppy takedown attempt there from Bateman.
We've had a slow start to the round here - hopefully the action picks up.
Hawk looks to land a right hand but Bateman moved out of range.
Bateman has used his reach advantage pretty well so far tonight.
Hawk throws out a token jab with nothing on it.
Bateman misses with a takedown attempt. He shot from a bit too far out.
Thomas Hawk has stuffed three takedown attempts in the round now. That's going to take a lot out of Paddy Bateman.
That's one minute gone in the round.
Bateman misses with a hook.
Bateman scores with a nice head shot.
Bateman swats away the attempt to clinch by Hawk.
Bateman bobs and weaves and throws out a fast jab that snaps Hawk's head backwards.
Bateman looks to land a combination. Hawk sees it coming but can only parry a couple of the shots.
Hawk gets cracked there but stands up to it.
Paddy Bateman seems to be getting the better of the standup.
Bateman lands a head shot.
Hawk stuffs a takedown. It's all about dictating where the fight takes place and Hawk wants it to stay on the feet.
Hawk throws a hook but Bateman avoids it easily.
It seemed like Bateman was going to counter with the hook but didn't fully commit to it.
Bateman throws a nice looking combination but Hawk bobs and weaves to avoid any damage.
Bateman throws a monster uppercut resembling something out of street fighter but it doesn't land.
That's two minutes gone in the round.
Hawk tries to land with a swinging hook to the body but Bateman was well out of range. Poor timing from Hawk.
Bateman throws a counter combo.
Bateman throws a shot from downtown. Hawk moves away and avoids it.
Hawk slips a straight right by Bateman.
A little feinted left hand from Hawk on the counter but he doesn't commit to it.
Bateman slips a jab from Hawk.
A little jabbing left from Bateman on the counter but it doesn't find it's target.
We've seen a great period of action over the last minute or so - credit to both fighters for going all out!
Some wild striking there from Bateman.
No joy there for Hawk, who threw a few shots but didn't land.
Hawk lands a head shot.
Bateman might want to mix his strikes up a bit more. He's just going for head shots at the moment and that can become a bit predictable.
The fighters circle momentarily. Bateman darts into range and connects with a nice straight punch.
Bateman jabbing away but nothing is landing.
Bateman shoots in from a long way out. He's driving through with the takedown attempt and he eventually gets it, landing in Hawk's guard.
Hawk is working actively off his back, looking to secure an arm or perhaps work for a triangle.
Bateman advances to half guard.
That's three minutes gone in the round.
Bateman wants to free his trapped foot but Hawk is holding on for dear life with his legs.
Hawk is looking for a sweep. Bateman is wise to his cunning plan and keeps the top position.
Bateman is working for a submission of some sort.
Bateman is just sitting in half guard, waiting for something to happen.
Hawk tries to roll over but Bateman keeps him under control.
Bateman trying to control the action but Hawk is working from the bottom.
That's four minutes gone in the round.
The crowd are getting on the fighters' backs, as the pace has dropped off in the last minute or so.
Bateman might have to switch it up a bit here because his efforts to control Hawk haven't been going to plan, at least at the current moment in time.
Hawk is looking to improve his position.
Bateman moves into full mount! Hawk won't be happy about that!
Bateman moves to take his opponent's back.
Hawk tries to roll but Bateman sticks to his back.
Hawk showing good submission defense here.
Hawk wants to escape the position.
Bateman biding his time, looking for the opening.
And thats the end of the round the fighters go back to their corners.
Paddy Bateman dominated that fourth round.
The minute break is over - no more time for sponges and pep talks - back to the action! This is the final round!

Bateman slips under a jab.
Hawk cracks the inside of Bateman's front leg.
Bateman changes levels and scores with a jab to the body.
Hawk looks to score with a jab to the body but Bateman is just out of range.
A right-left combo lands from Bateman.
Hawk misses with a looping right.
Bateman fakes a jab and then connects with a hook.
Hawk pushing out the jab but it's not landing.
Bateman uses some good footwork to avoid the body shot by Hawk.
Bateman throws an overhand right that lands on Hawk's shoulder, as Hawk tries to avoid the shot.
We've had a slow start to the round here - hopefully the action picks up.
Hawk throws a jab when Bateman was well out of range.
And Bateman tries to counter it with a takedown but Hawk pushes his down on his head and steps out.
Hawk throws an uppercut from half a mile away. Bateman sees it coming and avoids it easily.
And an attempted straight right on the counter from Bateman! But no joy.
Bateman throws a nice hook to the body that draws an oooh from the crowd.
Hawk throws a sloppy head kick
and Bateman counters with a nice double leg into side control. Hawk won't be happy with that.
That's one minute gone in the round.
Hawk is sneaking out the side here. He's bucked Bateman off and has taken his back!
Bateman tries to break free.
Hawk scores with punches to the body.
Hawk lands shots from the back.
Bateman finds himself mounted whilst avoiding strikes.
Bateman tries to lock up and control but Hawk gives him a forearm to the face and pushes him away.
Hawk is still in mount, landing shots to his trapped opponent. Bateman can't stay in a position like this for much longer.

It looks like Paddy Bateman has been cut.
A nice elbow there by Hawk.
That has opened up Paddy Bateman's cut even more.
Hawk looking to finish Bateman with some ground and pound. This is bad for Bateman!
The crowd cheering loudly, showing their appreciation for the quality fight we're seeing here.
Hawk looking to finish Bateman with some ground and pound. This is bad for Bateman!

Bateman is rocked!
The cut above Paddy Bateman's eye is starting to cause him problems now.
Hawk lands a big elbow - Bateman is in trouble! More strikes from the mount and Bateman is forced to tap out!
Ladies and gentlemen, after 2:56 of round 5, we have a winner by way of Submission (Strikes). Thomas Hawk!
Thomas Hawk retains his middleweight title!
A relieved looking Thomas Hawk thanked the fans for their support and gave the usual line about them being amazing. They seemed to believe that he actually meant it.
|
|
|
|
|
|
|
|
|
|
|
|
|
|
|
|
|
|
|
|
|
|
|
| S |
C
A |
G |
S |
C
B |
G |
|
S |
C |
G |
|
energy
A | B |
|
hype
A | B |
|
pop
A | B |
|
mgr
A | B |
|
FIGHT
RATING
58% |
|
|
|
|
|
|
