|
|
PBP Commentary |
Coming up we have a middleweight MMA rules bout between Rear Breed (ranked 642 p4p, 88 weight class) and Joey Hatton (ranked 1117 p4p, 147 weight class). Hatton has chosen deadman as his entrance music. Rear Breed is staring across the cage at his opponent, tweaking his nipples... Tweaking his own nipples that is.
 |
|
 |
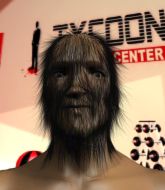
| 189 cm
29
195 lbs
12 - 3 - 0 |
|
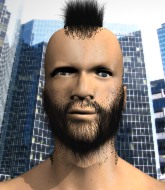
190 cm
29
190 lbs
14 - 5 - 0 |
Good wrestling
Excellent MT
Very quick |
|
Good wrestler
Decent boxing
Good gas tank |
|
| |
|
Ladies and gentlemen. This fight is 3 rounds, in the middleweight division.
Introducing the fighter to my left, fighting out of the red corner.
With a record of
12 - 3 - 0, fighting out of New York, Rear Breed!
And introducing the fighter to my right, fighting out of the blue corner.
With a record of
14 - 5 - 0, fighting out of Las Vegas, Joey Hatton!
The judges for this bout are John Mangel, Topper Green and Ben Hemmingworth.

The bell rings for round one and we are underway!
Breed thuds a left hand into Hatton's body.
Breed connects with a looping right hand.
Hatton shoots in but no luck this time.
Breed throws a jab but it's blocked by Hatton.
Hatton moves away from the strike by Breed.
Breed connects with a slap. Keep your fist closed son.
Breed cracks Hatton with a right hand to the side of the head.
We've been told by Breed's head coaches at Lovelair Muay Thai/MMA that he's been working on his takedown defense in preparation for this fight.
Breed cracks Hatton with an open hand slap.
Breed ducks under an overhand right and circles away with a smile on his face.

Hatton changes levels and drives through with a really nice takedown into side control. Breed looks really pissed at himself for not defending that better.
This has been an exciting period of action!

Hatton working hard here to secure a kimura but he's not really in the right position for it.
Breed tries to bench press Hatton off him but Hatton keeps the position.
Hatton wants to control but Breed is keeping him busy.
Both fighters have adopted an aggressive gameplan on the ground!
Hatton taking a breather here.

That's one minute gone in the round.
Breed manages to land a sweep and he's now on top! Lovely Jiu Jitsu!
Hatton is doing well to avoid being mounted. He's controlling the position at the moment.
Breed prevents Hatton from improving his position.
Hatton has no desire to be mounted, so is trying to control. Breed is working away from the top position though.
Hatton tries to roll over but Breed keeps him under control.
Breed seems very keen to just sit and control from half guard but Hatton does not like that idea so much and is remaining active off his back.

That's two minutes gone in the round.
Breed is taking a breather. Hatton says something to him but it's hard to make out. Perhaps he's telling him to get on with it and actually do something.
Breed not throwing his punches with enough precision this time.
Breed throwing shots but Hatton is blocking nicely.
Breed perhaps working for something from half guard, or maybe not. It looks like he's just sitting there.
Hatton is not content to let Breed control the position.
Hatton is positioning himself well to prevent Breed advancing to mount.
Hatton regains full guard. Nicely done.
Breed won't allow Hatton to sweep him here.
Breed seems content to control from guard here. He's going to have to remain active though if he doesn't want to get stood back up.
Hatton lands a beautiful sweep and he's now moved into his opponent's guard.

Breed wants to improve his position but instead Hatton has moved into half guard.

That's three minutes gone in the round.
Hatton tries to pass the half guard into mount. Breed knows what he's doing though and prevents the attempt.
The ref warns both fighters not to hold the cage as they work up against the meshing.
Hatton controlling the action here.
Breed wants to improve his position but Hatton is controlling well.
Hatton trying to control the action but Breed is working from the bottom.
Breed keeping control of the leg, stopping his opponent passing to mount.
Hatton is keen to just control but Breed is a slippery customer.
Hatton tries to pass the half guard into mount. Breed knows what he's doing though and prevents the attempt.
Breed wants to improve his position but Hatton is controlling well.
Hatton is looking to advance position but Breed won't allow it.
In the pre-fight buildup videos we saw Hatton working his ground and pound in the gym. He isn't landing a great percentage of his ground strikes so far though.
The fighters are pressed up against the cage, both looking to find a bit of space to work.

That's four minutes gone in the round.
There's not a lot going on here and the crowd are letting the fighters know they're not willing to tolerate a lack of action.
Breed is looking to regain full guard. Not this time though.
Hatton trying to pass the guard but Breed defending well.
Breed is trying to maintain the position but Hatton is very close to passing his half guard.
Breed trying to get back to full guard but Hatton takes advantage of the position and moves to full mount!
Hatton looking for a guillotine from mount but Breed is having none of it.
Hatton trying to control but Breed is having none of it.
Hatton sitting in mount, just looking to control for the moment.
And thats the end of the round the fighters go back to their corners.
A close round but Joey Hatton will probably get the nod.
The fighters' corners scream their final instructions, as the referee calls time. Here we go, back to the action!

Hatton misses with a looping left.
Hatton takes a swing at Breed's ribcage but misses.
Hatton throws an uppercut from half a mile away. Breed sees it coming and avoids it easily.
Breed is moving around nicely and scores here with a single head shot.
Nice uppercut lands for Breed. That snapped Hatton's head back.
Breed fakes a head shot and lands one to the body.
Hatton slips under a jab from Breed.
Breed stuns Hatton with a nice body shot, before stepping back out of range.
Hatton gets his head snapped back by a nice shot there.
Breed misses with a hook. Hatton ducked under it nicely.
We've had a slow start to the round here - hopefully the action picks up.
Hatton lands with a hook. Breed tried to avoid it but it clipped the top of his head.

It looks like Rear Breed has been cut.
Breed lands the left hand.
Breed misses with a hook

and Hatton counters by moving into the clinch.
This is a great period of action - very entertaining stuff!
Hatton blocks a punch to the side of the head.
That's one minute gone in the round.
Hatton is trying to drag Breed to the mat but Breed just about manages to keep his footing. He used the cage to his advantage there.
Breed throws a head punch that misses.
Breed misses with the head strike.
Hatton is working for a takedown up against the cage. He can't get it on this occasion though.
Breed lands with a light punch inside.
Breed is working Hatton over against the cage.
Breed misses with a hook from the clinch.
Breed throws a blind hook that connects with the side of Hattons head.
Breed tries a shoulder strike but it doesn't do any damage.
Hatton is working on a leg, looking for a takedown but Breed is defending well.
Rear Breed has stuffed three takedown attempts in the round now. That's going to take a lot out of Joey Hatton.
Hatton turns his back and goes for a hip toss. It's a bit messy but it gets the job done and Hatton manages to end up in side control.
Breed is looking to regain half guard here but Hatton keeps moving and retains side control.
Hatton working away.
Hatton in the domination position with Breed hanging on.
That's two minutes gone in the round.
Hatton wants to lay and pray for a moment but Breed keeps working.
Breed tries to bench press Hatton off him but Hatton keeps the position.
Joey Hatton has got the better of the ground game so far.

Hatton decides to stand back up. Hatton steps back and let's Breed get back to his feet.
This is a great period of action - very entertaining stuff!
Hatton swings for the body but Breed moves out of range.
Hatton throws a hook but Breed blocks it.
Breed scores with a jab to the jaw of his opponent.
Breed throws a lazy right hand but Hatton sees it coming a mile off and sidesteps it easily.
Breed takes a solid shot to the body. That one hurt him but he's trying not to show it.
Breed moves in looking to clinch but Hatton pushes him off.
Breed feints a jab promting Hatton to slip. Breed then demonstrates his capabilities by jabbing again. Hatton slips again and ducks right into an uppercut.
Breed throws out a loose jab but Hatton uses good head movement to avoid it.
Hatton misses with a straight right.
That's three minutes gone in the round.
Breed takes a jab on the nose. He smiles like he loves it and keeps coming.
Breed scores with a jab to the jaw.
Some wild striking there from Hatton.
Hatton throws a shot from downtown. Breed moves away and avoids it.
Breed misses with a body shot. Nice footwork from Hatton.
Hatton with the counter takedown but Breed avoids it easily.
Hatton takes an uppercut right on the jaw but it doesn't phase him.
Rear Breed seems to be the more aggressive standup fighter in this bout.
Hatton shoots in for a takedown but Breed shows good takedown defense there and keeps this one on the feet.
Hatton moves his head to the side to avoid a jab but walks straight into a cross.
Breed on the wrong end of a vicious looking body shot.
Breed moves into range and throws a lovely three punch combination.
Hatton shoots in for a takedown but Breed shows good takedown defense there and keeps this one on the feet.
The crowd cheering loudly, showing their appreciation for the quality fight we're seeing here.
Breed misses with a wild body shot.
That's four minutes gone in the round.
A swing and a miss from Hatton.
A telegraphed right hand from Breed misses the target.
Hatton misses with a straight right.
Breed misses with a straight left.
Hatton slips a straight right by Breed.
Hatton swings away but doesn't land with a series of punches.
Hatton takes a punch right to his stomach. That took the wind out of him momentarily.
Hatton scores with a punch to the gut of his opponent.
Nice defenses there by Breed.
Breed throws a jab but it's blocked by Hatton.

Breed closes the distance and clinches.
The pace really dropping off here, momentarily.
And thats the end of the round the fighters go back to their corners.
Rear Breed dominated that second round.
The cut man is working on Rear Breed's cut.
That's the end of the interval. I'm sure that seemed a lot quicker than a minute for our two fighters! Back to the action. This is the final round!

Breed misses with a straight left.
Breed misses with a double jab
and Hatton counters with a lovely straight right hand!
Breed is looking to take this fight into the clinch.
Breed scores with a nice head shot.
Breed avoids a lazy jab quite easily.
Breed doesn't react quick enough there as he takes a shot to the body.
We've had a slow start to the round here - hopefully the action picks up.
Breed will need to tighten up his combinations if he doesn't want to gas himself out, swinging at thin air.
Hatton lands a right hook to the body.
Both fighters are breathing heavily.
That's one minute gone in the round.
Hatton throws a shot to the body.
Hatton's corner calls for a 1-2. Hatton obliges with the 1 part as he scores the single shot and moves back out of range.
Breed is really head hunting here, hardly looking to strike to the body at all.
Hatton changes levels and looks for a double leg takedown. Breed tries to avoid it but Hatton manages to keep hold of a leg and drag Breed to the ground. Breed escapes though and pops straight back up to his feet.
Breed throws a monster uppercut resembling something out of street fighter but it doesn't land.
Hatton takes a solid shot to the body. That one hurt him but he's trying not to show it.
Breed throws out a token jab with nothing on it.
Hatton tries a counter takedown but it's more of a dummy move, and he uses it to push himself away.
Breed throws out a loose jab but Hatton uses good head movement to avoid it.
Hatton tries to counter by closing the distance.
Hatton is moving around nicely and scores here with a single head shot.
Hatton fails with the takedown.
Hatton misses the shot to the body.
Hatton tries for a takedown but Breed sees it coming a mile off and avoids it easily.
Rear Breed has stuffed three takedown attempts in the round now. That's going to take a lot out of Joey Hatton.
Breed scores with a sloppy punch to the body. Not much technique there but it did the business.
That's two minutes gone in the round.
Breed throws a combination but comes up with nothing but fresh air.
Hatton feints the counter takedown.
Hatton shoots and misses
letting Breed counter with a right hand.
Hatton misses with a looping left.
This has been an exciting period of action!
Breed throws out a loose jab but Hatton uses good head movement to avoid it.
Breed drives through and clinches with Hatton against the cage.
Breed is trying to slow down the pace of the fight but Hatton is keeping busy.
Breed lands a hook that snaps the head of Hatton backwards.
Breed prevents the takedown attempt.
Breed lands with a short head shot on the inside.
Breed tries to work over Hatton's body with a swooping hook but it only glances the target.
Hatton is looking for a takedown up against the cage. Breed gets underhooks though and prevents the takedown attempt.
Hatton is looking for a takedown.
Breed lands a right hand.
That's three minutes gone in the round.
Hatton blocking some punches.
Breed lands with a short punch from the clinch.
Both guys are working to get underhooks.
Breed misses with a punch on the inside.
Hatton has Breed pressed up against the cage and is working for takedown. Breed manages to improve position though and keeps the fight standing.
Breed has a couple of punches blocked by Hatton.
Hatton tries to score a body lock takedown but Breed shows good agility there to stay on his feet.
Hatton tries to jump guard but he falls flat on his backside. Breed smiles and moves away.
Hatton throws the left hand but Breed avoids the punch easily.
Hatton goes for a double leg but Breed avoids the attempt and the two fighters end up clinched against the cage as Breed continues to drive forward.
Breed seemed to be looking to counter by closing the distance.
Breed is really dominating this fight. Is there anything that Hatton can do to turn this around?
Breed scores with a nice looking left hook and follows it up with an uppercut!
Breed connects with a lovely jab that went straight through the gap between Hatton's hands.
Rear Breed is winning the standup battle so far.
Breed throws a wild combination but nothing lands.
Hatton tries a counter takedown but it's more of a dummy move, and he uses it to push himself away.
Breed tries to clinch but Hatton is having none of it.
That's four minutes gone in the round.
Breed with a body punch. A glancing blow.
Breed just misses with a punch to the body.
A big left from Breed misses.
Breed throws an uppercut from half a mile away. Hatton sees it coming and avoids it easily.
Hatton tries to clinch but Breed moves out of range.
Breed tries to clinch but Hatton moves out of range.
This is a great period of action - very entertaining stuff!
Breed throws a series of punches but Hatton moves out of range.
Breed connects with a lovely right hand, straight down the pipe.
Hatton tries to close the distance and clinch up but Breed swats him away and circles back towards the center.
Hatton gets a double leg takedown into Breed's guard.
Hatton is frustrating his opponent with some stalling tactics from top position.
Hatton trying to control but Breed is working from the bottom.
And that's the end of the fight!
Rear Breed showed his dominance in that final round.
I think Breed has won this one but let's see what the judges have to say. Over to the ring announcer for the scorecards.
Ladies and gentlemen, after 3 rounds of action, we go to the scorecards for a decision.
Judge John Mangel scores the fight 29:28
Judge Topper Green scores the fight 29:28
Judge Ben Hemmingworth scores the fight 29:28
In favor of your winner, by unanimous decision... Rear Breed!
|
|
|
|
|
|
|
|
|
|
|
|
|
|
|
|
|
|
|
|
|
|
|
| S |
C
A |
G |
S |
C
B |
G |
|
S |
C |
G |
|
energy
A | B |
|
hype
A | B |
|
pop
A | B |
|
mgr
A | B |
|
FIGHT
RATING
53% |
|
|
|
|
|
|
