|
|
PBP Commentary |
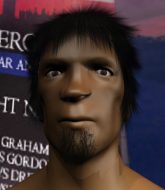
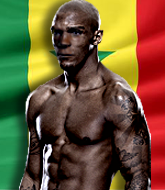
Coming up we have a light heavyweight MMA rules bout between Doctor Doolittle (ranked 1969 p4p, 295 weight class) and Adrian Shota (ranked 2185 p4p, 312 weight class). Shota is bobbing his head along to his entrance song: Black Panther Theme by Stephen James Taylor . Over to our ring announcer for the fighter introductions!
 |
|
 |
| 194 cm
44
222 lbs
43 - 31 - 0 |
|
185 cm
43
202 lbs
34 - 21 - 1 |
Good wrestling
World class boxer
Very quick |
|
Good wrestler
World class MT
Granite chin |
|
| |
|
Ladies and gentlemen. This fight is 3 rounds, in the light heavyweight division.
Introducing the fighter to my left, fighting out of the red corner.
With a record of
43 - 31 - 0, fighting out of London, Doctor Doolittle!
And introducing the fighter to my right, fighting out of the blue corner.
With a record of
34 - 21 - 1, fighting out of London, Adrian Shota!
The judges for this bout are , Jack Bonds and Timothy Bukovac.

The bell rings for round one and we are underway!
Doolittle bobs and weaves well there to avoid the strikes.
Doolittle is looking to clinch.
Shota throws a body punch but Doolittle moves out of range.
Doolittle is looking to score with low kicks.
Doolittle takes a shot right to the bread basket.
Doolittle misses with a low kick.
Doolittle throws a low kick but Shota avoids it.
Shota swings away with a counter right hand but no contact made.
Shota feints with a shoulder and throws a nice leg kick to Doolittle's calf.
An inside leg kick lands from Shota.
Doolittle slips under a jab.
An inside leg kick from Doolittle misses.
And an attempted straight right on the counter from Shota! But no joy.
Shota keeps the fight standing with a nice sprawl.
Shota throws a quick inside leg kick.
We've had a slow start to the round here - hopefully the action picks up.
Doolittle throws a lazy right hand but Shota sees it coming a mile off and sidesteps it easily.
Shota throws out a counter right but Doolittle avoids it with no problem.
Horrible takedown attempt by Doolittle or perhaps it was just good defense by Shota, which made it look bad.
Doolittle has been talking about how he's improved his wrestling in the run up to the fight so let's see if that's enough to sway the balance.
Doolittle on the wrong end of a decent looking cross there.

That's one minute gone in the round.
Shota throws a looping overhand right but Doolittle ducks down to avoid it.
Doolittle ducks under a wild hook from Shota.
Shota jabs Doolittle to the body, keeping him at a distance.
Shota moves out of range of the strikes.
Shota swings for the body but Doolittle moves out of range.
Shota rushes in with a sloppy looking punch
letting Doolittle counter with a right hand.
Adrian Shota seems to be the more aggressive standup fighter in this bout.
A solid leg kick lands there for Shota.
Shota dips to his left and cracks Doolittle with an uppercut!
Shota jabs Doolittle to the body, keeping him at a distance.
Shota throws an ugly left hook that misses
and Doolittle counters with a left to the body.
Shota motions for Doolittle to come forward. Shota throws a leg kick but it misses it's target.
Doolittle tries to score with a low kick but Shota moves his leg out of the way.
Shota avoids the clinch attempt nicely.
Shota takes a really solid shot there but just smiles back and shrugs his shoulders.
Shota is really struggling to land any decent head shots against his taller opponent.

Doolittle drives through and clinches with Shota against the cage.
We've seen a great period of action over the last minute or so - credit to both fighters for going all out!
Shota misses with the head strike.

Shota breaks from the clinch.
Shota defending well as Doolittle loads up on a big left hand.
Shota swats away the attempt to clinch by Doolittle.

That's two minutes gone in the round.
Shota jabs Doolittle to the body, keeping him at a distance.
Doolittle misses the body punch
and Shota counters with a slapping leg kick.
The fighters circling - Shota throws out the jab but it was never going to land.
Doolittle looked to counter that last move with a leg kick but didn't pull the trigger.
Shota throws a jab but it's blocked by Doolittle.
Shota throws a leg kick that is checked
and Doolittle counters with a straight right hand.
Shota scores with a slapping inside leg kick.
Shota throws an uppercut from half a mile away. Doolittle sees it coming and avoids it easily.
Doolittle went nuts there looking for a big combo counter but none of the flurry connected.
Shota throws a lazy right hand but Doolittle sees it coming a mile off and sidesteps it easily.
Doolittle avoids a low kick by using good footwork.
Shota on the wrong end of a nice jab.
Shota misses with an uppercut.
Doolittle fails to land with the punch combination there - jab, cross, hook, miss, miss, miss.
Shota is the aggressor but that punch slipped nicely by Doolittle.
Shota jabs Doolittle right on the nose. Doolittle blinks but takes it well.
Doolittle moves away from the strike by Shota.
Doolittle fakes high and swings low for a body shot but Shota manages to avoid it.
Shota avoids the clinch attempt nicely.

That's three minutes gone in the round.
Doolittle tries to clinch up against the cage, rushing in to close the distance. Shota manages to break the clinch and circles back to the middle of the mat.
Doolittle lands with a good body shot.
Doolittle takes a thudding leg kick, right into the meat of the thigh.
Doolittle thuds a left hand into Shota's body.
Shota throws a looping overhand right but Doolittle ducks down to avoid it.
Doolittle tries to clinch there but Shota circles away.
Good exchange - Shota coming out on top.
Doolittle misses the shot to the body.
Nice defenses there by Shota.
Nice jab there from Shota.
Doolittle tries to bum rush Shota with a series of wild strikes but Shota uses good footwork to avoid the assault.
Shota motions for Doolittle to come forward. Shota throws a leg kick but it misses it's target.
A looping hook to the body misses from Shota. Doolittle does a little dance to reset his feet.
Doolittle takes a shot to the eye socket. That's gotta hurt.
Adrian Shota is looking to keep the fight on the feet at all costs.
Shota throws a hook to the body but it doesn't connect.
Doolittle throws a couple of head shots and lands with the final one - a decent hook, which struck Shota on the side of the head.
Doolittle is using his height advantage well here, landing a good percentage of his punches.
This has been an exciting period of action!
Shota takes one on the chin but seems OK.
Shota pushing out the jab but it's not landing.

That's four minutes gone in the round.
Shota throws a jab when Doolittle was well out of range.
Shota throws a hook but Doolittle avoids it easily.
Shota looks to score with a jab to the body but Doolittle is just out of range.
Shota throws out a loose jab but Doolittle uses good head movement to avoid it.
Doolittle keeping a good distance there, avoiding the body shot.
Shota throws out a token jab with nothing on it.
A swing and a miss from Doolittle.
Doolittle on the wrong end of a nice jab.
Shota staying out of range there.
Doolittle swings wildly with a hook that is half blocked by Shota.
Doolittle avoids a lazy jab quite easily.
Doolittle went nuts there looking for a big combo counter but none of the flurry connected.
Doolittle defending well as Shota loads up on a big left hand.
An inside leg kick from Shota misses.
Shota throws the left hand but Doolittle avoids the punch easily.
Doolittle lands a jab.
The crowd applaud the fighters' efforts here as the round comes to an end.
Doolittle lets loose with a powerful body kick. Shota will feel that in the morning.
And thats the end of the round the fighters go back to their corners.
Adrian Shota dominated that round.
Well, the break between rounds is over. Let's get back to the scrappin!

Doolittle bobs and weaves well there to avoid the strikes.
Shota throws a looping overhand right but Doolittle ducks down to avoid it.
Doolittle loads up on a big right hand but Shota slips the punch.
Shota slaps away a takedown attempt from Doolittle, before circling back to the center of the mat.
A clash of legs there as Shota blocks the low kick.
Shota throws out a counter right but Doolittle avoids it with no problem.
Doolittle looks to score with a jab to the body but Shota is just out of range.
Shota throws a jab to the body, straight down the pipe. Boom. That sent Doolittle stumbling backwards but he manages to regain his composure quickly.
Nice defenses there by Shota.
Shota dips down and scores with a jab to the body.
Shota takes a step towards his opponent and connects with a left hand, before circling away.
Shota misses with a lunging right hand
and Doolittle cracks him with a counter punch right on the button.
Doolittle throws a body punch but Shota moves out of range.
We've had a slow start to the round here - hopefully the action picks up.
Shota misses with a looping left.
Shota lands with a hook. Doolittle tried to avoid it but it clipped the top of his head.
Shota fakes a jab and throws a low kick but Doolittle checks it well.
Doolittle throws a hook but Shota avoids it easily.
Shota misses with a telegraphed body shot
and Doolittle counters with a lovely straight right hand!
Shota has been the more effective fighter overall so far.
We've seen a great period of action over the last minute or so - credit to both fighters for going all out!

Doolittle gets a takedown into half guard.
That's one minute gone in the round.
Doolittle is keen to just control but Shota is a slippery customer.
Doolittle works his way into side control.
Shota is looking to work his way out of this bad position but Doolittle is controlling him well.

Shota sneaks out the side door and pushes Doolittle away - he's back to his feet. The crowd show their appreciation for the escape.
Doolittle uses some good footwork to avoid the body shot by Shota.
Shota displays some good footwork, moving neatly out of range as Doolittle throws out the jab.
A big right from Doolittle misses.
Shota stooping low to avoid any incoming strikes and then lunges in with an uppercut come cross that lands flush.
Shota comes forward and lands a shot to the body, then darts back out of range.
Doolittle takes a nice looking leg kick right on the meat of his thigh there.
Doolittle looking to score a takedown here. Shota is defending well but Doolittle drives through and ends up in Shota's guard.
This has been an exciting period of action!
Doolittle passes easily into side control. Nice work.
That's two minutes gone in the round.
Shota is trying to get back to his feet.
Doolittle trying to control the position but Shota is working away.
Shota sneaks out the side door and pushes Doolittle away - he's back to his feet. The crowd show their appreciation for the escape.
Shota lunges in with an uppercut that skims his opponent's chin.
Shota lands a right hook to the body.
Shota misses with a body shot. Nice footwork from Doolittle.
Doolittle slips a straight right by Shota.
Doolittle doesn't manage to clinch there - Shota circles away.
Decent striking displayed by Doolittle there.
Shota throws a decent looking leg kick but it doesn't land clean.
Shota connects with a body shot that sends Doolittle's belly button to the back.
Shota moves into range and connects with a jab.
Doolittle cracks Shota with a good jab.
That's three minutes gone in the round.
Shota swings and misses with a hook to the body.
An inside leg kick lands from Shota.
Doolittle lands a right hook to the body.
Good leg kick by Doolittle there. It's the ones that make that thud noise that hurt and that was an almighty thud.
This fight brought to you by 5M nutrition - it's mmmmm tasty. Nice jab by Doolittle.
Doolittle throws a jab when Shota was well out of range.
Shota moves away from the strike by Doolittle.
Shota appeared to try and counter that last move with a leg kick.
Adrian Shota seems to be getting the better of the standup.
Doolittle moving in and out of range nicely, whilst landing the scoring shot.
Shota lands with a nice low kick. That'll leave a bruise.
Shota connects with the punch.
Doolittle avoids the body shot from Shota.
Shota misses with a hook.
Doolittle moves out of range of the strikes.
Shota turns his hip over beautifully as he lands a nice leg kick.
Doolittle fails with a takedown attempt from distance.
Shota looked like he wanted to counter with a punch but didn't throw it.
This is a great period of action - very entertaining stuff!
Doolittle keeping a good distance there, avoiding the body shot.
Like a baseball bat into the meat of his leg there - nice leg kick by Doolittle.
Doolittle is hobbling a little on that front leg after taking quite a few leg kicks so far in this fight.
That's four minutes gone in the round.
Doolittle fakes a head punch and goes low to the body. Nicely done.
Shota throws out a token jab with nothing on it.
Shota throws a body shot but no joy.
Shota throws a sloppy body shot
and Doolittle counters with a body kick that stops Shota in his tracks momentarily.
Shota is breathing heavily.
Shota throws a leg kick
and Doolittle counters with a crisp hook to the side of the head.
Shota throws a hook to the side of Doolittle's head but Doolittle sees it coming and ducks under it beautifully.
Doolittle uses good head movement to avoid the hook from Shota.
A jab from Shota misses.
Doolittle tried to counter with a leg kick but Shota avoided it.
Shota lands a nice looking body shot.
Doolittle takes a shot right to the bread basket.
Shota checks a leg kick.
Doolittle uses some good footwork to avoid the body shot by Shota.
Shota loads up on a big right hand but Doolittle slips the punch.
The crowd applaud the fighters' efforts here as the round comes to an end.
Shota swings for the body but Doolittle moves out of range.
Doolittle misses with a body kick.
Doolittle stumbles momentarily as he takes a strong leg kick from Shota.
Doolittle digs a good hook to Shota's body.
And thats the end of the round the fighters go back to their corners.
A close second round but Adrian Shota will probably get the nod - 10:9.
The fighters' corners scream their final instructions, as the referee calls time. Here we go, back to the action! This is the final round!

Doolittle on the wrong end of a vicious looking body shot.
Shota misses the jab.
Shota fakes with the hands and throws a leg kick but Doolittle is out of range.
Doolittle slips under a jab from Shota.
Shota swings and misses with a hook to the body.
The fight stays on the outside here - Doolittle looks like he's thinking about clinching though.
No luck with that takedown attempt from Doolittle.
Shota misses with a body shot.
Doolittle moves out of range of the leg kick from Shota.
Doolittle defending well as Shota loads up on a big left hand.
We've had a slow start to the round here - hopefully the action picks up.
Shota displays good takedown defense there as he swats away a double leg from Doolittle.
Shota avoids a low kick by using good footwork.
It seemed like Shota was going to counter with the hook but didn't fully commit to it.
Doolittle tries a switch kick but it misses it's target.
Shota swings away with a counter right hand but no contact made.
Shota misses with a wild body shot.
Doolittle tries a low kick but Shota avoids it.
That's one minute gone in the round.
Doolittle keeping his hands up high there, blocking the jab from Shota.
Doolittle throws a sloppy head kick and Shota moves out of range easily.
Shota just misses with a punch to the body.
Shota finds nothing but air with that leg kick attempt.
And Doolittle counters with a quick kick to the body but Shota blocks it.
Shota cracks the inside of Doolittle's front leg.
Doolittle keeping at a good range here, avoiding a leg kick.
Good exchange - Doolittle coming out on top.
Shota misses with a body shot.
Doolittle tries to land with a swinging hook to the body but Shota was well out of range. Poor timing from Doolittle.
A clash of legs there as Doolittle blocks the low kick.
Doolittle lands a powerful looking uppercut that connected with his opponent's jaw.
Shota swings away with a leg kick that misses.
Shota throws the left hand but Doolittle avoids the punch easily.
Shota uses some good footwork to avoid the body shot by Doolittle.
Shota flicks out a counter leg kick but Doolittle steps away.
Shota looks to score with a jab to the body but Doolittle is just out of range.
Doolittle slips a straight right by Shota.
Doctor Doolittle has stepped it up - he knows he needs a finish here!
That's two minutes gone in the round.
Doolittle keeping a good distance there, avoiding the body shot.
Doolittle connects with a slap. Keep your fist closed son.
Shota stuffs a takedown. It's all about dictating where the fight takes place and Shota wants it to stay on the feet.
That's three failed takedown attempts in the round for Doctor Doolittle. That's going to take a lot out of him.
Shota fakes a couple of low kicks, before throwing one on the third attempt. It connects and Doolittle has to reset his feet before getting ready to engage.
A looping hook to the body misses from Shota. Doolittle does a little dance to reset his feet.
Fantastic stuff here - a very entertaining period of action, which has drawn cheers from the crowd.
A looping hook to the body misses from Shota. Doolittle does a little dance to reset his feet.
Shota blocks a jab.
Doolittle keeping at a good range here, avoiding a leg kick.
Doolittle checks a leg kick.
An inside leg kick lands from Shota.
Doolittle on the wrong end of an overhand right that came out of nowhere.
Shota stuffs a takedown. It's all about dictating where the fight takes place and Shota wants it to stay on the feet.
Shota defending well as Doolittle loads up on a big left hand.
A nice side step and Shota releases a counter shot to the body, but it doesn't find it's home.
Shota lands with a shot to the body.
Shota throws a poor cross that misses
and Doolittle counters with a straight right hand.
Shota throws a jab when Doolittle was well out of range.
As Shota looks to move away, Doolittle throws a big counter combo but Shota just gets out of the way.
Shota tries to score with an inside leg kick but telegraphs it and Doolittle is able to avoid easily.
That's three minutes gone in the round.
Doolittle throws the kick towards the body but Shota avoids it.
A slapping leg kick lands for Shota.
Shota looks to score with a jab to the body but Doolittle is just out of range.
Doolittle slips a jab from Shota.
Jab, jab by Doolittle - just one landing.
Shota lands a straight punch to the body, keeping Doolittle at a distance.
Doolittle lunges at Shota with a hook that half lands and is half blocked by Shota's hand.
Shota lands a slapping body shot.
Shota throws a sloppy body shot
and Doolittle counters with a nice uppercut.
Shota throws out a token jab with nothing on it.
Shota scores with a sloppy punch to the body. Not much technique there but it did the business.
Doolittle steps to the side to avoid the strikes from Shota.
Doolittle looks for the body kick but Shota saw that one coming.
Like a baseball bat into the meat of his leg there - nice leg kick by Doolittle.
Doolittle tries to clinch but Shota is having none of it.
We've seen a great period of action over the last minute or so - credit to both fighters for going all out!
Doolittle slips under a jab from Shota.
Shota has a pretty nasty looking mouse under his right eye.
That's four minutes gone in the round.
Doolittle scores with a sloppy punch to the body. Not much technique there but it did the business.
Doolittle will have to do better than that with his takedown attempts.
Shota was about to counter that last move with a leg kick but changes his mind.
Both fighters are breathing heavily.
Shota pushing out the jab but it's not landing.
Shota misses the shot to the body.
Doolittle swings and misses with a hook to the body.
An inside leg kick lands from Shota.
Shota cracks Doolittle with a good shot that sees him stumbling back into the cage.
Shota throws a leg kick which misses Doolittle's front leg but catches the back leg as Doolittle tries to avoid it.
Doolittle throws the kick towards the body but Shota avoids it.
A nice side step and Shota releases a counter shot to the body, but it doesn't find it's home.
Shota slips under a jab.
Doolittle tries to clinch there but Shota circles away.
Doolittle slips a jab from Shota.
Nice uppercut there from Shota.
Doolittle tries to close the distance and clinch up against the cage but Shota paws at him with a jab and circles away.
Shota lands a jab to Doolittle's midsection.
Doolittle doesn't react quick enough there as he takes a shot to the body.
And that's the end of the fight!
Adrian Shota comfortably won the final round on my scorecard.
I've got Shota winning every round here. Surely the decision will go his way and he'll pick up a well deserved decision victory. Over to the ring announcer for the scorecards.
Ladies and gentlemen, after 3 rounds of action, we go to the scorecards for a decision.
Judge Percy O'Donnell scores the fight 27:30
Judge Jack Bonds scores the fight 27:30
Judge Timothy Bukovac scores the fight 27:30
In favor of your winner, by unanimous decision... Adrian Shota!
An out of breath and clearly excited Adrian Shota thanked King of Fists for their help and support (and free stuff they sent him).
|
|
|
|
|
|
|
|
|
|
|
|
|
|
|
|
|
|
|
|
|
|
|
| S |
C
A |
G |
S |
C
B |
G |
|
S |
C |
G |
|
energy
A | B |
|
hype
A | B |
|
pop
A | B |
|
mgr
A | B |
|
FIGHT
RATING
74% |
|
|
|
|
|
|
