|
|
PBP Commentary |
Coming up we have a super heavyweight MMA rules bout between Dragan Hozdic (ranked 3879 p4p, 80 weight class) and More IsMore Ii (ranked 3069 p4p, 65 weight class). There are an array of beautiful celebrities at ringside tonight! I wonder if any of them paid for their tickets.
 |
|
 |
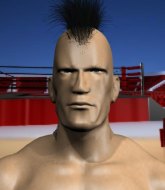
| 193 cm
32
245 lbs
4 - 5 - 0 |
|
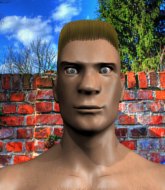
180 cm
27
245 lbs
12 - 10 - 0 |
BJJ Red Belt
World class boxer
Insanely flexible |
|
Excellent grappler
World class boxer
Good gas tank |
|
| |
|
Ladies and gentlemen. This fight is 3 rounds, in the super heavyweight division.
Introducing the fighter to my left, fighting out of the red corner.
With a record of
4 - 5 - 0, fighting out of New York, Dragan Hozdic!
And introducing the fighter to my right, fighting out of the blue corner.
With a record of
12 - 10 - 0, fighting out of Helsinki, More IsMore Ii!
The judges for this bout are Dean Styles, Anthony Taglia and Jorge Garcia.

The bell rings for round one and we are underway!
Hozdic ducks low and lands a nice hook to the body of his opponent.

Hozdic forces IsMore Ii back against the cage and clinches.
Hozdic blocks a body shot from IsMore Ii.
Hozdic lands a short shot on the inside that snaps the head of IsMore Ii backwards.

It looks like More IsMore Ii has been cut.
Hozdic blocks an uppercut.
Hozdic tries for a takedown but IsMore Ii manages to get underhooks.

IsMore Ii escapes the clinch and we're back to striking.
Hozdic tries to clinch up against the cage, rushing in to close the distance. IsMore Ii manages to break the clinch and circles back to the middle of the mat.
And an attempted straight right on the counter from IsMore Ii! But no joy.
Nice uppercut there from IsMore Ii.

It looks like Dragan Hozdic has been cut.
Hozdic tries to close the distance and clinch but IsMore Ii swats him to one side with an open hand palm strike and circles away.
Hozdic moves out of range as IsMore Ii strikes.
IsMore Ii's coach down at Helsinki private Gym was telling us pre-fight that they have been working on IsMore Ii's balance. Obviously they view that as a key factor in the outcome of this fight.
Hozdic fails in his attempt to clinch.
IsMore Ii is looking for the big counter here.
Hozdic clinches up with IsMore Ii and pushes him back against the cage.

Hozdic breaks from the clinch.
Hozdic just misses with a punch to the body.
IsMore Ii looked like he wanted to counter with a punch but didn't throw it.
Hozdic closes the distance and clinches.
The fans in attendance giving it up for the two fighters, who have really let it all hang out in the last minute or so!
IsMore Ii works for underhooks and lands a body shot in the process.
IsMore Ii pushes Hozdic back against the cage and lands a hook to the side of the head.
IsMore Ii stalling in the clinch.

That's one minute gone in the round.
IsMore Ii breaks the clinch.
Hozdic tries to clinch there but IsMore Ii circles away.
A jab from IsMore Ii misses.
IsMore Ii misses with a body shot. Nice footwork from Hozdic.

IsMore Ii clinches.
Hozdic goes for a takedown in the clinch but IsMore Ii prevents it.
IsMore Ii breaks the clinch and we're back to striking at distance.
IsMore Ii tries to close the distance and clinch but Hozdic swats him to one side with an open hand palm strike and circles away.
Hozdic scores with a nice right hand.
Hozdic shakes his hands off, looking to compose himself, but takes a jab to the jaw whilst he does it.
IsMore Ii misses with a looping right.
IsMore Ii digs a good hook to Hozdic's body.
IsMore Ii throws a right hand that misses
and Hozdic counters with a stiff right hand.
IsMore Ii tries to clinch but fails miserably
and Hozdic counters with a stiff right hand.
We've seen a great period of action over the last minute or so - credit to both fighters for going all out!
IsMore Ii wants to clinch up but Hozdic keeps it at a distance.
More IsMore Ii is looking to keep the fight on the feet at all costs.

That's two minutes gone in the round.
IsMore Ii takes a shot to the body in his stride.
IsMore Ii tries to clinch up.
Hozdic fakes and then throws a beautiful body shot. IsMore Ii looks a bit winded and takes a step backwards to take a breath.
Hozdic clinches up against the cage.
IsMore Ii stalls.
IsMore Ii pushes off and fires off an elbow that misses, before clinching up again, against the cage.
The pace really dropping off here, momentarily.
Hozdic breaks the clinch and we return to the middle of the mat.
IsMore Ii takes a swing at Hozdic's ribcage but misses.
IsMore Ii moves in looking to clinch but Hozdic pushes him off.
IsMore Ii rushes Hozdic and pushes him back against the cage in a clinch.
Hozdic letting IsMore Ii take a breather here.

Hozdic has IsMore Ii pressed up against the cage. He's trying to work for a single leg takedown. Hozdic pulls back from the cage and twists to the side, sending IsMore Ii tumbling to the mat - Hozdic dives into IsMore Ii's guard.

That's three minutes gone in the round.
Hozdic slips nicely into half guard.
IsMore Ii wants to improve his position but Hozdic is controlling well.
Hozdic tries to pass the half guard into mount. IsMore Ii knows what he's doing though and prevents the attempt.
Hozdic passes the half guard and he's now in mount! Big trouble for IsMore Ii!
IsMore Ii tries to lock up and control but Hozdic gives him a forearm to the face and pushes him away.
IsMore Ii tries to get back to half guard but can't.
Hozdic wants to take his opponent's back but he's not managed it.

Hozdic wants to finish this one by submission but IsMore Ii is holding onto his waist, trying to prevent any attacks from Hozdic.
We've been hearing good reports from Hozdic's training camp. Apparently he has been rolling around with some good quality BJJ practitioners and has been sharpening his skills. Let's see if that has an impact on the fight today.
Hozdic is dominating on the ground here - he's now on his opponent's back, looking to sink in the hooks. IsMore Ii is in real trouble.

That's four minutes gone in the round.
Hozdic is working really hard to secure the rear naked choke. IsMore Ii defends successfully for a significant amount of time. Both fighters are looking very determined.
IsMore Ii trying to control the action but Hozdic just sinks the hooks in.
Hozdic controlling well, preventing IsMore Ii from escaping the position.
Hozdic working for a choke but IsMore Ii is defending well.
Hozdic keeps control of the position as IsMore Ii tries to break free.
Hozdic is persistently looking for the submission but IsMore Ii is defending it well.
IsMore Ii wants to get back to his feet.
Hozdic looking to break IsMore Ii's wrist control so he can sink in the choke. IsMore Ii remaining controlled and patient though - he really has to keep calm otherwise Hozdic will wrap this one up with the rear naked choke!
And thats the end of the round the fighters go back to their corners.
Dragan Hozdic dominated that round.
Both fighters have cut men working on them during the interval.
The minute break is over - no more time for sponges and pep talks - back to the action!

Hozdic takes a shot to the eye socket. That's gotta hurt.
IsMore Ii scores with a sloppy punch to the body. Not much technique there but it did the business.
Hozdic darts in trying to clinch
and IsMore Ii counters with a left and a right that stings Hozdic.
Hozdic tries to land a leg kick but IsMore Ii saw it coming and moves away.
Hozdic tries to clinch up but IsMore Ii circles away and keeps his distance.
IsMore Ii scores with a jab to the jaw of his opponent.
IsMore Ii misses with a two punch combination.
IsMore Ii wants to clinch up but Hozdic keeps it at a distance.
IsMore Ii misses with a series of wild punches.
More IsMore Ii seems to be getting the better of the standup.
IsMore Ii scores with a sloppy punch to the body. Not much technique there but it did the business.
IsMore Ii scores with a jab.
This is a great period of action - very entertaining stuff!
IsMore Ii circles away from the clinch attempt.
That's one minute gone in the round.
IsMore Ii keeping his hands up high there, blocking the jab from Hozdic.
Dragan Hozdic seems to be the more aggressive standup fighter in this bout.
IsMore Ii on the receiving end of a decent leg kick there by Hozdic. Hozdic obviously looking to wear him down.
IsMore Ii tries to clinch up against the cage, rushing in to close the distance. Hozdic manages to break the clinch and circles back to the middle of the mat.
The fight stays on the outside here - IsMore Ii looks like he's thinking about clinching though.
Hozdic jabs IsMore Ii right on the nose. IsMore Ii blinks but takes it well.
IsMore Ii tries to clinch up against the cage, rushing in to close the distance. Hozdic manages to break the clinch and circles back to the middle of the mat.
IsMore Ii throws a wild combination but nothing lands.
IsMore Ii misses with a body shot.
Hozdic takes one on the button.
Hozdic tries to clinch but is not successful on this occasion.
IsMore Ii misses with a double jab.
A decent looking cross lands there for IsMore Ii.
Hozdic clinches.
That's two minutes gone in the round.
IsMore Ii misses with a hook to the ribs.
Hozdic lands a body punch in the clinch.
Hozdic has hold of a leg and is looking for a trip takedown. IsMore Ii avoids it nicely though and we remain in the clinch.
Hozdic misses with a shot to the kidneys.
We've seen a great period of action over the last minute or so - credit to both fighters for going all out!
Hozdic dodges an elbow strike from IsMore Ii.
IsMore Ii lands with a quick shot inside that doesn't really do much damage.
Hozdic is looking for a takedown up against the cage. IsMore Ii gets underhooks though and prevents the takedown attempt.
IsMore Ii stalling.
Hozdic breaks the clinch and we're back to striking at distance.
Hozdic gets a takedown into half guard.
Hozdic is working for submissions here but there's nothing on.
Dragan Hozdic overall seems to be getting the better of the ground position in the fight so far.

IsMore Ii looking for submissions off his back.
Hozdic moves nicely into side control.
That's three minutes gone in the round.
Hozdic working hard here to secure a kimura but he's not really in the right position for it.
IsMore Ii is trying to get back to half guard.
Hozdic tries for a kimura but IsMore Ii is defending well.
Hozdic thinks about going for a far side armbar but bails out and retains the dominant position instead.
IsMore Ii tries to buck Hozdic off but Hozdic is having none of it.
Hozdic tries for a kimura. Not really close to a finish though.
IsMore Ii is working hard to escape and get back to his feet. After a battle for position, Hozdic asserts his dominance and retains side control.
That's four minutes gone in the round.
A few boos can be heard. I'm sure they will multiply if the fighters don't pick up the pace.
Hozdic tries for an arm triangle. That looks pretty tight to me. Is this one over!?! Possibly, maybe, no Hozdic has let go of the choke. Obviously it wasn't as tight as we thought!
Hozdic goes for an armbar! This could be all over! Wait, no, IsMore Ii rolls with the submission and now he's on top in Hozdic's guard! Nice work there by IsMore Ii!
IsMore Ii passes Hozdic's right leg, so he's now in half guard.
IsMore Ii working Hozdic over with strikes.
IsMore Ii is looking to pass the guard... He's managed it - he's now in full mount!
The fighters are pressed up against the cage, both looking to find a bit of space to work.
BOOM! IsMore Ii connects with a massive shot to the dome!
IsMore Ii tries to control but Hozdic wriggling away.
And thats the end of the round the fighters go back to their corners.
More IsMore Ii showed his class in that round. I'd imagine he'll take it on all the scorecards.
Both fighters have cut men working on them during the interval.
The minute break is over - no more time for sponges and pep talks - back to the action! This is the final round!

IsMore Ii clinches up against the cage.
IsMore Ii cracks Hozdic with a nice body shot.
Hozdic is working on a leg, looking for a takedown but IsMore Ii is defending well.
IsMore Ii misses with a punch on the inside.
IsMore Ii breaks the clinch and we return to the middle of the mat.
IsMore Ii checks a leg kick.
IsMore Ii fails to land with the punch combination there - jab, cross, hook, miss, miss, miss.
IsMore Ii drives through and clinches with Hozdic against the cage.
IsMore Ii gets underhooks to prevent Hozdic's takedown attempt.
Hozdic takes an elbow to the temple.
We've had a slow start to the round here - hopefully the action picks up.
Hozdic can't get the takedown.
That's three failed takedown attempts in the round for Dragan Hozdic. That's going to take a lot out of him.
Hozdic breaks the clinch and we're back to striking at distance.
A combination from IsMore Ii does no damage.
Hozdic tries to clinch up
and IsMore Ii counters with a straight right hand.

Hozdic is rocked!
That's one minute gone in the round.
Hozdic fakes high and swings low for a body shot but IsMore Ii manages to avoid it.
Hozdic swats away the attempt to clinch by IsMore Ii.
Hozdic lands with an uppercut that bounces IsMore Ii off the cage and back into range.
IsMore Ii rushes forward with a series of wild hooks but Hozdic moves out of range and avoids them all easily.
Hozdic forces IsMore Ii back against the cage and clinches.
Hozdic breaks the clinch and we return to the middle of the mat.
Hozdic lands with a cross.
Hozdic moves into the clinch.
IsMore Ii slows down the pace here.
IsMore Ii blocks a body shot from Hozdic.
Hozdic drops to a knee looking for a takedown but IsMore Ii gets the underhooks and prevents it.
That's two minutes gone in the round.
Hozdic tries for a takedown but IsMore Ii manages to get underhooks.
The pace slowing considerably in the clinch, as IsMore Ii takes a break from that fighting nonsense to think about the finer things in life.
Hozdic is trying to drag IsMore Ii to the mat but IsMore Ii just about manages to keep his footing. He used the cage to his advantage there.
IsMore Ii prevents the takedown attempt.
Hozdic keeps the fight in the clinch, despite IsMore Ii's efforts to push away.
IsMore Ii creates a bit of space for himself and sneaks an elbow through Hozdic's defenses.
IsMore Ii misses with some punches.
IsMore Ii's corner calls for him to break the clinch, which he does.
IsMore Ii tries to close the distance and clinch but Hozdic swats him to one side with an open hand palm strike and circles away.
We've seen a great period of action over the last minute or so - credit to both fighters for going all out!
IsMore Ii moves into the clinch.
That's three minutes gone in the round.
Hozdic tries a shoulder strike but it doesn't do any damage.
Hozdic is looking for a takedown.
IsMore Ii trying to control the position but instead, Hozdic has worked for underhooks and has pushed IsMore Ii into the cage.
Hozdic can't get the takedown.
IsMore Ii taking a break, stalling in the clinch.
Hozdic is working on a leg, looking for a takedown but IsMore Ii is defending well.
IsMore Ii lands a glancing elbow in the clinch.
Hozdic is using his height advantage well here, landing a good percentage of his punches.
IsMore Ii's corner calls for him to break the clinch, which he does.
Hozdic moves forwards but IsMore Ii connects with a nice, crisp jab.
IsMore Ii drives through and clinches with Hozdic against the cage.
Hozdic tries to score a body lock takedown but IsMore Ii shows good agility there to stay on his feet.
Both fighters are breathing heavily.
Hozdic blocks a couple of punches on the inside.
IsMore Ii misses with the head strike.
Hozdic drops down looking for an ankle pick but IsMore Ii pulls his leg out and moves away.
IsMore Ii throws a hook but Hozdic avoids it easily.
That's four minutes gone in the round.
Hozdic tries to close the distance and clinch up against the cage but IsMore Ii paws at him with a jab and circles away.
IsMore Ii scores with a reasonable looking shot to the body. Hozdic doesn't seem bothered though.
IsMore Ii is looking to clinch but Hozdic is avoiding it.
Hozdic shoots in with a takedown attempt and he has IsMore Ii pinned against the cage. IsMore Ii gets the underhooks and manages to circle away.
A punch lands to the side of Hozdic 's head but he takes it in his stride.
IsMore Ii moves into range and clinches up with Hozdic.
The fans in attendance giving it up for the two fighters, who have really let it all hang out in the last minute or so!
IsMore Ii taking a breather.
IsMore Ii lands with a short shot to the head.
Oh Hozdic is still all over the place! His legs are completely gone! Will he be able to recover?!!
IsMore Ii lands a body punch.
IsMore Ii creates a bit of space for himself and sneaks an elbow through Hozdic's defenses.
Hozdic misses with some punches.
IsMore Ii lands a big right hand that drops Hozdic! The killer instinct kicks in and IsMore Ii finishes his opponent with a series of strikes from mount. A dominating finish by IsMore Ii!
Ladies and gentlemen, after 4:58 of round 3, we have a winner by way of TKO (Strikes). More IsMore Ii!
Our winner, More IsMore Ii, made sure he spent some time buttering up the crowd during his post fight interview, which will no doubt bring him a few more fans.
|
|
|
|
|
|
|
|
|
|
|
|
|
|
|
|
|
|
|
|
|
|
|
| S |
C
A |
G |
S |
C
B |
G |
|
S |
C |
G |
|
energy
A | B |
|
hype
A | B |
|
pop
A | B |
|
mgr
A | B |
|
FIGHT
RATING
71% |
|
|
|
|
|
|

