|
Play
by Play - Fighter's Fight Commentary
|
Event:
TWGC 20 (145lbs, D4): Finals - Round 1
Date: Feb 20, 2018 |
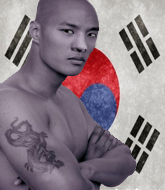
Coming up we have a featherweight Tycoon World Grappling Championship rules bout between Sung Miyamoto (ranked 0 p4p, 0 weight class) and AJ Lyons (ranked 6959 p4p, 0 weight class). Miyamoto comes to the cage accompanied by Placebo - Kitty Litter. Both fighters look fresh as a daisy as they make their way towards the cage.
This TWGC bout is 1 fifteen minute round in the featherweight division. Introducing today's competitors. In the red corner, competing out of Tokyo, with a TWGC record of 3 wins and 1 losses; Sung Miyamoto! And in the blue corner, fighting out of London, with a TWGC record of 2 wins and 0 losses; AJ Lyons!
The judges for this bout are Daniel Bishop, Paul Tew and James Glass.
The fighters bow as they face eachother in the middle of the mat and we are under way.
Miyamoto wants to clinch up but Lyons keeps it at a distance.
Lyons fakes high and shoots in for a takedown but Miyamoto avoids it really well and circles away.
Miyamoto tries to clinch but Lyons is having none of it.

Miyamoto instigates a clinch.

Lyons drags the fight down to the ground.
Lyons wants to sweep but no luck.
Lyons is working the butterfly guard. He manages to land a nice scissor sweep and is now in half guard on the top. Nice move. Score +2 for sweep to guard / half guard: Miyamoto (0) vs (2) Lyons
Miyamoto wants to improve his position but Lyons is controlling well.
Lyons content to control rather than advance.
We've had a slow start to the round here - hopefully the action picks up.
Lyons is looking to advance position but Miyamoto won't allow it.
Lyons controlling the pace.
We've been hearing good reports from Miyamoto's training camp. Apparently he has been rolling around with some good quality BJJ practitioners and has been sharpening his skills. Let's see if that has an impact on the fight today.

That's one minute gone in the round.
Miyamoto is working for an escape here. He's hooked one of Lyons's legs and he's managed to sneak out and take Lyons's back! Score +4 for clean sweep to past guard: Miyamoto (4) vs (2) Lyons

Miyamoto working for a choke but Lyons is defending well.
Lyons just trying to survive but Miyamoto is wriggling into a better position, looking to finish.
Miyamoto is hanging on to Lyons's back as he tries to escape.
Miyamoto doesn't have the hooks in and Lyons manages to turn into his guard.
Score +2 for sweep to guard / half guard: Miyamoto (4) vs (4) Lyons
Lyons is just sitting in guard, looking to avoid any submissions.
Lyons's corner are shouting for him to control the position and he seems happy to oblige.

That's two minutes gone in the round.
Miyamoto had isolated an arm as going for a kimura. Lyons defends it easily.
Lyons sitting in guard here, content to control.
Miyamoto has a loose triangle. He'll be looking to tighten that up but Lyons can see exactly what he's planning and manages to posture up and free himself.
Miyamoto throws his legs up looking to secure a triangle. Oh, that looks pretty tight, I gotta say! Lyons escapes and throws Miyamoto's legs to the side, diving into side control! Score +3 for passing guard: Miyamoto (4) vs (7) Lyons

That's three minutes gone in the round.
The referee tells the fighters to keep busy.
It looks like Lyons might be adopting somewhat of a lay and pray gameplan here, which I'm sure won't go down too well with the paying fans in attendance... Or the ring announcers come to think of it.
Lyons is continuing to stall.
Miyamoto tries to bench press Lyons off him but Lyons keeps the position.
Miyamoto really does look like a pencil wearing a pair of gloves. Let's hope he has a gameplan to suit that ridiculous body shape.
Lyons moving around in side mount but really he's just happy to control for now.

That's four minutes gone in the round.
The adventures of Lyons the control monster continue. Boring.
Miyamoto tries to work a leg under to get back to half guard but Lyons wriggles his own leg back out and remains in side control.
Lyons is maintaining the dominant position - no doubt Miyamoto will start to get frustrated soon if he's not already.

Lyons looking for an arm triangle but it's way too loose to do anything.
Miyamoto trying to remain calm as Lyons controls from the top position.
Miyamoto tries to get back to half guard but can't.

That's five minutes gone in the round.
Lyons works to advance to full mount. Miyamoto defends for a few seconds but eventually he succumbs. Score +2 for reaching mount: Miyamoto (4) vs (9) Lyons
Lyons content just to control the position here.
Lyons fails to advance to Miyamoto's back.
Lyons looking to control and managing it successfully.
Miyamoto really trying hard to get back to half guard here.
Lyons content just to control the position here.

That's six minutes gone in the round.
Lyons has hold of Miyamoto's left arm, perhaps looking for a submission. The two fighters tussle over control of the isolated limb and Miyamoto manages to get his arm back to his side and away from danger.
Lyons takes a little breather and maintains the position. The referee will be looking for him to stay active from such a dominant position though.
Miyamoto tries to lock up and control but Lyons gives him a forearm to the face and pushes him away.
Miyamoto is looking to improve his position but Lyons isn't that keen on the idea.

That's seven minutes gone in the round.
Lyons controlling from mount.
Miyamoto tries to get back to half guard but can't.
Lyons looking to control and managing it successfully.
Miyamoto is looking to get to half guard.
Lyons controlling from the full mount.
Lyons tries to take Miyamoto's back but instead Miyamoto uses the opportunity to regain half guard.
Miyamoto looking to work for a kimura from the bottom.

That's eight minutes gone in the round.
Well, if Lyons is going to just lie there, perhaps we should talk about what we're having for dinner tonight
I'm having a ham and pineapple pizza
Yum. Can't wait.
Lyons is looking to pass the guard... He's managed it - he's now in full mount! Score +3 for passing guard: Miyamoto (4) vs (12) Lyons

That's nine minutes gone in the round.
Lyons controlling from the full mount.
Miyamoto tries to lock up and control but Lyons gives him a forearm to the face and pushes him away.
Lyons controlling the position easily from mount.
Lyons seems to be looking to move to his opponent's back but Miyamoto is holding on tight.
Lyons is still trying to improve position.
Lyons looking to control and managing it successfully.
Miyamoto tries to reverse the position but Lyons maintains control.
Lyons tucks in and makes sure he doesn't lose the dominant position.

That's ten minutes gone in the round.
Miyamoto can't escape the position.
Lyons controlling the pace for now.
Miyamoto keeping his composure momentarily, calmly looking to get back to half guard.
Lyons content just to control the position here.
Miyamoto working to try and regain half guard.
Miyamoto is writhing around trying to get back to his feet.
Lyons works his way to his opponent's back.
Score +3 for taking back: Miyamoto (4) vs (15) Lyons
Lyons controls the position.

That's eleven minutes gone in the round.
Lyons keeps control of the position as Miyamoto tries to break free.
Lyons is riding his opponent, not letting Miyamoto buck him off.
Lyons looking for the choke from the back.
The fighters are pressed up against the cage, both looking to find a bit of space to work.
Lyons gets his hands free as Miyamoto looks to control.
Good control from Lyons.
Miyamoto wants to escape the position.
Lyons looking for the choke but no joy.
Lyons keeps control of the position as Miyamoto tries to break free.

That's twelve minutes gone in the round.
Lyons is riding his opponent, not letting Miyamoto buck him off.
Miyamoto is trying to break free.
Lyons is riding his opponent, not letting Miyamoto buck him off.
The ref warns both fighters not to hold the cage as they work up against the meshing.
Miyamoto is really stuck here.
Lyons just keeping the dominant position. He can't wait too long though, otherwise the referee will stand them back up.

That's thirteen minutes gone in the round.
Miyamoto trying to control the hands but Lyons breaks the grip.
Lyons is controlling his opponent, waiting for an opportunity to finish.
Miyamoto is in bad spot here.
Lyons slows the pace down here. Having a little breather whilst he's in a dominant position, looking to rest and regain some energy, ready to go for the finish.
More stalling from Lyons.

That's fourteen minutes gone in the round.
Lyons with more of the same as he continues to hold on.
Miyamoto tries to escape but he's let his defenses down in doing so and Lyons has slipped in the rear naked choke! Oh, that's tiiiiiiiiight! Miyamoto is tapping! This one is aaaaaaaaaaaall over!
Ladies and gentlemen, after 14:29 of round 1, we have a winner by way of Submission (RNC). AJ Lyons! |
|
|
|
Event:
TWGC 20 (145lbs, D4): Tokyo Qualifier - Round 2
Date: Feb 12, 2018 |
Coming up we have a featherweight Tycoon World Grappling Championship rules bout between Leon Derrwas (ranked 7034 p4p, 0 weight class) and Sung Miyamoto (ranked 0 p4p, 0 weight class). Miyamoto comes into a darkened arena with his song building. Placebo - Kitty Litter kicks in, the lights come on and the crowd goes wild! What a showman! Both fighter's entrance songs getting the crowd jumping here.
This TWGC bout is 1 fifteen minute round in the featherweight division. Introducing today's competitors. In the red corner, competing out of Las Vegas, with a TWGC record of 1 wins and 0 losses; Leon Derrwas! And in the blue corner, fighting out of Tokyo, with a TWGC record of 2 wins and 1 losses; Sung Miyamoto!
The judges for this bout are Ren Mimura, Shigeki Sano and Kenichi Hosakawa.
The fighters bow as they face eachother in the middle of the mat and we are under way.

Derrwas dives in and scores a takedown into Miyamoto's guard. Score +2 for takedown into guard / half guard: Derrwas (2) vs (0) Miyamoto
Miyamoto had isolated an arm as going for a kimura. Derrwas defends it easily.
Miyamoto looking for a guillotine here but Derrwas defends easily.
Derrwas knows he needs to get back to his feet asap. He's simply no match for Miyamoto on the ground.
Miyamoto looking for submissions from the bottom here. Moving his hips around, possibly looking for an armbar.
Derrwas really does look like a pencil wearing a pair of gloves. Let's hope he has a gameplan to suit that ridiculous body shape.
Miyamoto throwing his legs up looking for a triangle.
Miyamoto has his foot on Derrwas's thigh. He's trying to push off and get in position for a triangle, I think. Derrwas works his way back into a safe position though.
Derrwas controls the pace of the fight for a moment.
Derrwas is sitting in close to Miyamoto's body. Miyamoto has gone for a guillotine from the bottom. Oh damn, that looks pretty tight! Derrwas is panicking - it looks like this one could be all over! Yes, Derrwas is tapping! That was a very nice submission by Miyamoto.
Ladies and gentlemen, after 1:56 of round 1, we have a winner by way of Submission (Guillotine). Sung Miyamoto! |
|
|
|
Event:
TWGC 20 (145lbs, D4): Tokyo Qualifier - Round 1
Date: Feb 11, 2018 |
Coming up we have a featherweight Tycoon World Grappling Championship rules bout between Kevin Jason (ranked 21749 p4p, 0 weight class) and Sung Miyamoto (ranked 0 p4p, 0 weight class). Jason comes to the cage accompanied by G-Eazy - I Mean It ft. Remo. Miyamoto is bouncing up and down as he enters the arena, backed by Placebo - Kitty Litter. Both fighters look fresh as a daisy as they make their way towards the cage.
This TWGC bout is 1 fifteen minute round in the featherweight division. Introducing today's competitors. In the red corner, competing out of London, with a TWGC record of 0 wins and 4 losses; Kevin Jason! And in the blue corner, fighting out of Tokyo, with a TWGC record of 1 wins and 1 losses; Sung Miyamoto!
The judges for this bout are Yasuomi Hirokawa, Hirohito Nitta and Shigeki Sano.
The fighters bow as they face eachother in the middle of the mat and we are under way.

Miyamoto moves into the clinch.
Miyamoto gets the body lock takedown. After a quick scramble, Jason regains guard.
Score +2 for takedown into guard / half guard: Jason (0) vs (2) Miyamoto
Jason has a loose triangle. He'll be looking to tighten that up but Miyamoto can see exactly what he's planning and manages to posture up and free himself.
Jason is trying to control the position from the bottom.
Jason knows he needs to get back to his feet asap. He's simply no match for Miyamoto on the ground.
Miyamoto trying to control but Jason is working from the bottom.
Jason is trying to keep Miyamoto in close.
We've had a slow start to the round here - hopefully the action picks up.
Miyamoto wants to control from the top but Jason keeps moving.
Miyamoto engaging in some classic timewasting tactics.
The fighters are pressed up against the cage, both looking to find a bit of space to work.
That's one minute gone in the round.
Miyamoto has gone for a leg lock! Jason slips out almost immediately though and dives into Miyamoto's guard. Score +2 for sweep to guard / half guard: Jason (2) vs (2) Miyamoto
Miyamoto is working actively from the bottom, looking for submissions. He's escaped his hips to the side and he's going for an armbar! Jason has his hands clasped together but Miyamoto extends and breaks Jason's desperate grasp, forcing a tap out due to armbar! Nice BJJ displayed there by Miyamoto.
Ladies and gentlemen, after 1:35 of round 1, we have a winner by way of Submission (Armbar). Sung Miyamoto! |
|
|
|
Event:
KAMIKAZE 69: My Battle
Date: Dec 30, 2017 |
#R1#
Miyamoto getting the better of the striking in that exchange.
Johnson has been talking about how he's improved his wrestling in the run up to the fight so let's see if that's enough to sway the balance.
Johnson throws a sloppy head kick and Miyamoto moves out of range easily.
Miyamoto is trying to avoid his opponent's strikes and get into the clinch.
Miyamoto dodges the punch combination from Johnson.
Miyamoto misses with a looping right.
Johnson slips under a jab from Miyamoto.
Johnson throwing a counter right hand but Miyamoto manages to avoid it.
Johnson could do with losing a few pounds - he looks very soft around the mid section, to put it politely.
A telegraphed right hand from Miyamoto misses the target.
No joy there for Johnson, who threw a few shots but didn't land.
Johnson loads up on a big right hand but Miyamoto slips the punch.
Sung Miyamoto seems to be the more aggressive standup fighter in this bout.
Miyamoto ducks under a wild hook from Johnson.
Miyamoto sizes up Johnson with a pawing jab and scores with a straight right down the middle.
Miyamoto tries to bum rush Johnson with a series of wild strikes but Johnson uses good footwork to avoid the assault.
Johnson slips under a jab from Miyamoto.
Miyamoto walks straight into an uppercut. Luckily it didn't land flush.
Miyamoto is a painfully thin specimen of a man. You do wonder whether a good body kick would snap him clean in two.
This has been an exciting period of action!
A jab from Johnson misses.
Johnson connects with the punch.
Miyamoto throws a head kick that misses.
Johnson scores with a jab to the head.
Miyamoto lands a head kick. Johnson smiles back at him and beckons him forward.
Nice defenses there by Johnson.
Miyamoto displays some good footwork, moving neatly out of range as Johnson throws out the jab.
Miyamoto swings away with a counter right hand but no contact made.
Miyamoto slips in close and lands a nice hook before moving back out of range.
Johnson uses good head movement to avoid the hook from Miyamoto.#T1#
Miyamoto throws a shot from downtown. Johnson moves away and avoids it.
An attempted straight right counter from Johnson misses the target.
Johnson thows a left - swing and a miss! #TD#
Johnson drives through with a takedown into Miyamoto's guard. Let's see what he can do from the top position.#SUB2#
Johnson got a little sloppy there for a moment and Miyamoto has worked his way into a loose triangle - can he finish it?! No, Johnson has managed to get both his arms back between Miyamoto's legs - danger averted.#SU#
Johnson stands up and waves to Miyamoto to follow him.
A swing and a miss from Johnson.
Miyamoto throws a sloppy head kick and Johnson moves out of range easily.
Johnson thuds a left hand into Miyamoto's body.
Wow, both these guys are really going for it!
Johnson scores with a jab to the jaw of his opponent.
Johnson throws a hook but Miyamoto blocks it.
Miyamoto showing good head movement there, avoiding the strikes from Johnson.
Miyamoto has been spending a lot of time sparring his boxing in the run up to the fight, trying to sharpen up those hands and look for a knockout.
Miyamoto ducks down and throws a hook to the body but Johnson moves away.
Johnson is really head hunting here, hardly looking to strike to the body at all.
We've seen a great period of action over the last minute or so - credit to both fighters for going all out!
Miyamoto closes the distance and takes a jab right on the nose as he does so.
Johnson moves forwards but Miyamoto connects with a nice, crisp jab.
Miyamoto lands a jab.
Miyamoto steps to the side to avoid the strikes from Johnson.
Johnson moves out of range of the strikes.
Johnson misses with a straight right. #T2#
Johnson listening to his corner there, landing a nice uppercut.
Johnson throws a combination but comes up with nothing but fresh air.
Johnson throws a hook to the body but it doesn't connect.
Miyamoto throws a jab when Johnson was well out of range.#TD#
Miyamoto gets caught napping as Johnson dives in and scores a takedown. Miyamoto manages to retain guard.
Miyamoto looking for a sweep. Not yet Miyamoto, not yet.
Johnson sitting in guard here, content to control.
Johnson's ground tactics aren't going to win him many fans. Let's hope he's got fireworks for us if he gets back to his feet because he's not doing much on the ground.
Johnson might be looking to lock onto one of his opponent's long limbs for a submission, whilst we're on the ground.
Johnson would like to get this fight back to the feet but can't get free from the closed guard.
Johnson trying to control but Miyamoto is working from the bottom. #T3#
Miyamoto looking to control.
Johnson won't allow Miyamoto to sweep him here.
Johnson is frustrating his opponent with some stalling tactics from top position.#REF3#
The referee has decided to stand the fighters back up, so we'll restart on the feet.
Johnson takes a really solid shot there but just smiles back and shrugs his shoulders.
Miyamoto connects with a lovely right hand, straight down the pipe. #CL#
Johnson has Miyamoto up against the cage in a clinch.
#BC#
Johnson breaks the clinch and we're back to striking at distance.
Johnson missing with a left hand there. Miyamoto was out of range so wasted energy throwing that one.
Miyamoto swings away with a counter right hand but no contact made.#CL2#
Miyamoto clinches with his opponent.
Miyamoto changes levels and goes for a takedown here. Johnson fights it off and pushes away nicely.
Miyamoto dodges the punch combination from Johnson.
#CL#
Miyamoto tries to keep at a distance but Johnson has taken the fight into the clinch.
Johnson lands a right hand. #T4##BC#
Johnson pushes off and circles away, back to the middle of the mat.#CL#
Johnson has taken the fight to the clinch.
Wooooo! Give it up for these two warriors! They are putting on a show!#BC#
Johnson breaks the clinch and we return to the middle of the mat.
Miyamoto throws a sloppy head kick and Johnson moves out of range easily.
Johnson tests Miyamoto's chin there with a solid looking shot.
Johnson ducks right into an uppercut from Miyamoto. #TD#
Miyamoto gets caught flat footed, as Johnson shoots in with a quick takedown into guard.
Johnson sitting in guard here, content to control. #SUB2#
Miyamoto working for a triangle but Johnson defends it easily.
Johnson controlling from the top position.
The crowd applaud the fighters' efforts here as the round comes to an end.
Johnson has controlled the position for a good 20 seconds, which will no doubt be starting to frustrate his opponent.
And thats the end of the round the fighters go back to their corners.
Ben Johnson dominated that round.
The corners get their ten second warning. Both fighters stand from their stools and stare eachother down, ready to get back to the action.
#R2#
Nice defenses there by Miyamoto.
Miyamoto loads up on a big right hand but Johnson slips the punch.
Miyamoto moves out of range of the strikes.
Miyamoto tries to land with a swinging hook to the body but Johnson was well out of range. Poor timing from Miyamoto.
Johnson cracks Miyamoto with a hook to the jaw. Both fighters smile at eachother and high-five before getting back down to business.
Miyamoto ducks under an overhand right and circles away with a smile on his face.#CL#
Johnson moves into the clinch successfully.
Johnson is defending well against a takedown attempt.#BC#
Johnson escapes the clinch and we're back to striking.
Ben Johnson is winning the standup battle so far.
Johnson drops his hands and takes a jab to the jaw for his troubles.
Johnson swings away but doesn't land with a series of punches.
Miyamoto connects with a crisp jab.
Johnson misses with a few strikes there.
A jab lands there for Miyamoto.
This is a great period of action - very entertaining stuff!
Miyamoto scores with a big left there. The judges will like that one.
Johnson tries to close the distance and clinch but Miyamoto swats him to one side with an open hand palm strike and circles away. #KD2#
Miyamoto cracks Johnson with a big right hand and Johnson goes down!#ROC2#
Johnson is rocked!
Johnson is looking to stand up but Miyamoto isn't so interested in that idea.
Oh Johnson is still in real trouble! Will he be able to recover?!!
Miyamoto keeps in close for a moment and lands a decent shot to the side of Johnson's head.
Johnson wants to stand and escape but Miyamoto is having none of it. #T1#
Miyamoto wants to stand but Johnson has a closed guard, so he can't escape.
Johnson seems to have got his legs back now.
Miyamoto scoring with some ground and pound. #ES#
Johnson has managed to wall walk up one of the corner posts to get back to his feet. Miyamoto is pushing him up against the cage, looking to control the position.
Johnson prevents a takedown attempt there.
Miyamoto is trying to drag Johnson to the mat but Johnson just about manages to keep his footing. He used the cage to his advantage there.
Ben Johnson has stuffed three takedown attempts in the round now. That's going to take a lot out of Sung Miyamoto.
Miyamoto jumps guard but Johnson turns him against the cage and keeps the fight standing. #BC#
Johnson breaks from the clinch.
Johnson scores with a big left there. The judges will like that one.
Miyamoto darts in and out, connecting with a jab.
Miyamoto keeps his opponent at a distance with a nice jab.
Johnson slips in close and lands a nice hook before moving back out of range.#ROC#
Miyamoto is rocked!
Miyamoto lands with a cross to side of his opponent's head.
Miyamoto is still on wobbly legs! Can Johnson finish him?
The crowd cheering loudly, showing their appreciation for the quality fight we're seeing here.
Johnson throws a monster uppercut resembling something out of street fighter but it doesn't land.
Johnson looks to land a right hand but Miyamoto moved out of range.
Miyamoto looks like he wants to counter punch here.#T2#
Miyamoto avoids the head kick by Johnson.
Miyamoto changes levels for a counter takedown but doesn't follow through with his attempt.
Miyamoto seems to have recovered his senses.
Miyamoto moves out of range of the strikes.
Johnson takes an uppercut right on the button but keeps his composure.
Miyamoto connects with a looping left hand that seems like it dazed Johnson momentarily.
#CL#
Johnson moves into the clinch successfully.
#BC2#
Miyamoto escapes the clinch and we're back to striking.
Johnson throws a good cross that connects.
Johnson throws out a loose jab but Miyamoto uses good head movement to avoid it.
Miyamoto throws an overhand right that lands on Johnson's shoulder, as Johnson tries to avoid the shot.
Johnson lands a beauty of a right hand that gets the crowd cheering.
Johnson pulls out of a head kick attempt.
Miyamoto is clearly trying to counter these attacks from Johnson with a body shot.
Johnson's jab looks to have found its range, popping Miyamoto under the eye.
Miyamoto cracks a nice hook into Johnson's ribs.
Johnson throws a big shot that misses.
Miyamoto connects with a slap. Keep your fist closed son.#CL#
Johnson pushes Miyamoto up against the cage in a clinch.
Miyamoto is working on a leg, looking for a takedown but Johnson is defending well.
Johnson is defending well against a takedown attempt.#BC#
Johnson breaks the clinch.
Johnson swings wildly with a right hand that was never going to find it's target.
Miyamoto swings away with a counter right hand but no contact made.#T3##CL#
Johnson closes the distance and pushes Miyamoto back into the cage.
Miyamoto blocks a body shot from Johnson.
A short left from Johnson. #BC#
Johnson manages to break the clinch.
Miyamoto takes a swing at Johnson's ribcage but misses.
Miyamoto tries a switch kick but it misses it's target.
Miyamoto is using his reach advantage to land shots from outside his opponent's range.
The fighters circle momentarily. Johnson darts into range and connects with a nice straight punch.
The fight stays on the outside here - Johnson looks like he's thinking about clinching though.
Miyamoto throws a head kick that Johnson semi-blocks.
Johnson misses with a hook. Miyamoto ducked under it nicely.
Johnson on the wrong end of a nice jab.
Miyamoto staying out of range there.
A big right from Johnson misses. #CL#
Johnson clinches up with Miyamoto and pushes him back against the cage.
The crowd cheering loudly, showing their appreciation for the quality fight we're seeing here.
Johnson is defending well against a takedown attempt.
Johnson lands a right hand.
Miyamoto is trying to pull guard but being pressed up against the cage enables Johnson to keep the fight standing.#T4##BC#
Johnson breaks from the clinch.
Johnson takes one on the chin but seems OK.
Miyamoto fails with the takedown
and Miyamoto takes a counter punch right on the button for his troubles.
Johnson looks like he's developed a pretty tasty lump over his left eye. He'll need to avoid taking much more damage to that.
Miyamoto scores with a big left there. The judges will like that one.
Johnson catches Miyamoto with a nice straight right. He seems pissed - ooooh, it's on now! On like donkey kong!
Miyamoto defending well as Johnson loads up on a big left hand.
Miyamoto darts in and out, connecting with a jab.
Miyamoto is the aggressor but that punch slipped nicely by Johnson.
Miyamoto takes one on the button.
Miyamoto misses with an uppercut.
Miyamoto waving his hands out in front of him, looking to distract Johnson.
Johnson takes one on the chin but seems OK.
Johnson walks forward and throws a big overhand right! Miyamoto drops to the floor like a sack of potatoes! Johnson swarms on him with more punches until the referee wrestles him away from Miyamoto's unconscious body! Wow, that was brutal!
Ladies and gentlemen, after 4:48 of round 2, we have a winner by way of TKO (Strikes). Ben Johnson!
|
|
|
|
Event:
KAMIKAZE 67: Fuck The System
Date: Dec 22, 2017 |
#R1#
Roman throws a leg kick which misses Miyamoto's front leg but catches the back leg as Miyamoto tries to avoid it.
Miyamoto throws a monster uppercut resembling something out of street fighter but it doesn't land.
Miyamoto throws an ugly left hook that misses
and Roman counters with a shot to the ribs. That looked like it hurt.
Roman lands a nice shot that snaps Miyamoto's head back.
A looping hook to the body misses from Miyamoto. Roman does a little dance to reset his feet.
Roman defending well as Miyamoto loads up on a big left hand.
Roman clobbers Miyamoto with an overhand right that has the crowd gasping. That made a horrendous noise.
Sung Miyamoto seems to be the more aggressive standup fighter in this bout.
Miyamoto swings wildly with a right hand that was never going to find it's target.
It seemed like Roman was going to counter with the hook but didn't fully commit to it.
Roman lands a slapping body shot.
Roman moves out of range as Miyamoto strikes.
The fighters circling - Miyamoto throws out the jab but it was never going to land.
Miyamoto throws a monster uppercut resembling something out of street fighter but it doesn't land.
Miyamoto swings widly with a right hand
and Roman counters with a lovely straight right hand!#ROC2#
Miyamoto is rocked!
This is a great period of action - very entertaining stuff!
Roman slips a straight right by Miyamoto.
Miyamoto throws out a loose jab but Roman uses good head movement to avoid it.
Roman slips under a jab.#TD2#
Roman closes the distance and gets a trip takedown into side control. Miyamoto quickly recovers to half guard.
Oh Miyamoto is still in real trouble! Will he be able to recover?!!
Roman works his way into full mount!
Roman putting on the heat here with some good ground and pound!#T1#
Roman tucks in and makes sure he doesn't lose the dominant position.
Let's hope that Roman has the urge to step up the pace any second now because for the last 15 or 20 seconds he's just been holding on tight.
Miyamoto seems to have got his legs back now.#SUB2#
Roman working for a submission but Miyamoto is keeping him at bay.
Roman prevents Miyamoto from getting the reversal.
Roman content just to control the position here.
Miyamoto really does look like a pencil wearing a pair of gloves. Let's hope he has a gameplan to suit that ridiculous body shape.
It looks like Roman might be adopting somewhat of a lay and pray gameplan here, which I'm sure won't go down too well with the paying fans in attendance... Or the ring announcers come to think of it.
Roman dominating with strikes here.
Miyamoto tries to reverse the position but Roman maintains control.
Roman really doesn't want to stay on the ground with Miyamoto. If he can't get it back to his feet, it's only a matter of time before he'll be tapping out.#SUB2#
Roman looks like he's working for a submission but he's not found anything just yet.#T2#
Roman is landing with some decent strikes but Miyamoto is trying to advance his position so the referee is letting the fight continue.
Roman controlling from the full mount.
Miyamoto tries to reverse the position but Roman maintains control.
The fighters are going at a pretty good pace and they're both starting to sweat now.
Roman working the ground and pound effectively.
This has been an exciting period of action!
Roman controlling from the full mount.
Miyamoto really trying hard to get back to half guard here.
#T3#
Roman breaks from Miyamoto's wrist control and lands an elbow.
Miyamoto swinging wildly from the bottom but he's not landing.
Roman controlling from mount.
Roman connects with a couple of good shots from mount.
Roman controlling from the full mount.
Roman lands with some strikes.#SUB2#
Roman is in full mount, looking to secure a guillotine but Miyamoto is surviving well by controlling Roman's body position as best he can.
The fighters are pressed up against the cage, both looking to find a bit of space to work.
Roman lands a shot to the body, followed up by a shot to the exposed head of his trapped opponent.
Miyamoto keeping his composure momentarily, calmly looking to get back to half guard.
We've been hearing good reports from Miyamoto's training camp. Apparently he has been rolling around with some good quality BJJ practitioners and has been sharpening his skills. Let's see if that has an impact on the fight today.
Roman loads up on a couple of big shots to the head that have Miyamoto scrambling to escape. He can't get free though and several more unanswered shots from Roman land to the head. The referee has no choice but to stop the fight. Roman stands and salutes the crowd.
Ladies and gentlemen, after 4:56 of round 1, we have a winner by way of TKO (Strikes). Dante Gael Roman!
A victorious Dante Gael Roman thanked his army of followers in his post fight interview, telling people to make sure they follow him on Twitter.
|
|
|
|
Event:
KAMIKAZE 62: Punk
Date: Nov 04, 2017 |
#R1#
Miyamoto missing with a left hand there. Nice was out of range so wasted energy throwing that one.
Miyamoto stooping low to avoid any incoming strikes and then lunges in with an uppercut come cross that lands flush.
Miyamoto really does look like a pencil wearing a pair of gloves. Let's hope he has a gameplan to suit that ridiculous body shape.
Nice takes one on the chin but seems OK.
#TD2#
Nice throws the overhand right but ducks down into a quick takedown attempt. Miyamoto was covering up waiting for the punch and Nice finishes the takedown easily into guard. #SUB#
Miyamoto had isolated an arm as going for a kimura. Nice defends it easily.
Miyamoto throws a couple of weedy looking strikes off his back.
Nice controlling from the top position.
We've had a slow start to the round here - hopefully the action picks up.#SUB#
Miyamoto looks to be working for a triangle here. Oh, it looks like he might have it! Nice has picked Miyamoto up and slammed him! Miyamoto can't keep hold of the triangle and Nice manages to pass to side control!
Nice advances nicely into full mount.
Miyamoto can't escape the position.
Miyamoto's coaches at Blackscar Fitness have been working on his defensive grappling in preparation for this fight so let's see if he can get out of this tricky position.#T1#
Miyamoto is trying to reverse the position but instead Nice has taken his back - oops!
Miyamoto tries to escape the position.
Nice not allowing Miyamoto to control his hands. #SUB2#
Nice is working for the choke. It looks like he might have got it... has he...? Yes! Miyamoto is tapping out! This one is all over!
Ladies and gentlemen, after 1:39 of round 1, we have a winner by way of Submission (RNC). Jimbo Nice!
|
|
|
|
Event:
KAMIKAZE 60: Sweet Blood
Date: Oct 27, 2017 |
#R1#
Tash takes a shot to the eye socket. That's gotta hurt.
Miyamoto throws a lazy head kick
and Tash counters with a good right hand that lands right on the jaw.
Miyamoto throws an ugly left hook that misses
and Tash counters with a left to the body.
Miyamoto scores with a straight right hand, right through his opponent's guard.
Tash gets cracked there but stands up to it.
Miyamoto gets his head snapped back by a nice shot there.
Tash misses with a double jab.
It looked like Miyamoto wanted to counter with a hook but didn't fully commit.
Miyamoto steps to the side to avoid the strikes from Tash.
Miyamoto scores with a hook.
This has been an exciting period of action!
Miyamoto throws a right hand that misses
and Tash counters with a stiff right hand.
Miyamoto tests Tash's chin there with a solid looking shot.
Miyamoto misses with a left hand
and Tash connects with a straight left hand counter down the middle.
Nice shot lands for Tash.#ROC2#
Miyamoto is rocked!
Miyamoto pushing out the jab but it's not landing.
Oh Miyamoto is still all over the place! His legs are completely gone! Will he be able to recover?!!
Tash doesn't react quick enough there as he takes a shot to the body.
Miyamoto with a poor takedown
and Tash counters with a stiff right hand.
Tash scores with a reasonable looking shot to the body. Miyamoto doesn't seem bothered though.
Miyamoto misses with a head kick.
And an attempted straight right on the counter from Tash! But no joy.
Miyamoto seems to have got his legs back now.#T1#
A cross from Miyamoto lands.
Miyamoto paws at his opponent with the jab and then lunges in with a straight, right on the button.
Miyamoto misses with a takedown attempt - Tash sprawls well and throws a nice strike on the way out which just misses.
Tash is loading up here, looking for a big counter of his own.
The fighters circling - Miyamoto throws out the jab but it was never going to land.
Tash now looks to counter with a shot at the body.#TD#
Tash gets caught napping as Miyamoto dives in and scores a takedown. Tash manages to retain guard.
We've been hearing good reports from Miyamoto's training camp. Apparently he has been rolling around with some good quality BJJ practitioners and has been sharpening his skills. Let's see if that has an impact on the fight today.
Miyamoto postures up to throw the ground and pound strikes but they don't connect.
Tash working the defensive guard well to avoid strikes from Miyamoto.
Tash avoiding any damage from the ground and pound.
Tash trying to keep a closed guard but Miyamoto is proving a slippery customer.
Tash keeping moving, preventing Miyamoto from controlling successfully.
Miyamoto's corner is telling him to maintain position.#T2#
Miyamoto is looking to work some ground and pound but Tash has wrist control.
Miyamoto throwing strikes but missing. #SUB#
Miyamoto drops back for a leg but he's not going to get it - he lets go and Tash dives on top into guard.#REVB#
The ref warns both fighters not to hold the cage as they work up against the meshing.#SUB#
Miyamoto working for a triangle but Tash defends it easily.
We've seen a great period of action over the last minute or so - credit to both fighters for going all out!
Miyamoto throws some sloppy strikes off his back.
Miyamoto trying to control the position.
Miyamoto is working an open guard here, looking to improve his position. No doubt that will leave him open to counters but at least he's being more offensive.#T3##SUB#
Miyamoto has a loose triangle. He'll be looking to tighten that up but Tash can see exactly what he's planning and manages to posture up and free himself.
Tash stopping the sweep attempt from Miyamoto.#SUB#
Miyamoto has a loose triangle. He'll be looking to tighten that up but Tash can see exactly what he's planning and manages to posture up and free himself.
Miyamoto looking for a sweep. Not yet Miyamoto, not yet. #SUB#
Miyamoto has a loose triangle. He'll be looking to tighten that up but Tash can see exactly what he's planning and manages to posture up and free himself.
Miyamoto looking to hit a scissor sweep but Tash is one step ahead there. #T4##SUB#
Miyamoto has his feet on Tash's thighs here. He's pushed Tash off and worked for a very quick armbar from the bottom! He's flipped onto his stomach and he's cranking hard on the arm! Tash screams in pain and taps out! This one is all over!
Ladies and gentlemen, after 4:28 of round 1, we have a winner by way of Submission (Armbar). Sung Miyamoto!
|
|
|
|
Event:
KAMIKAZE 55: Just Fight
Date: Sep 30, 2017 |
#R1#
Larsen throws a series of punches but Miyamoto moves out of range.
Miyamoto throws the left hand but Larsen avoids the punch easily.
Miyamoto lands a really nice looking cross but Larsen seems unphased.
Miyamoto has been talking about how he's improved his wrestling in the run up to the fight so let's see if that's enough to sway the balance.
Miyamoto tries a head kick but it misses.
#CL#
Miyamoto has taken the fight to the clinch.
Larsen displaying some good clinch control by pressing Miyamoto up against the cage.
A short right from Larsen on the inside.
Miyamoto drops down for a takedown but doesn't get it.
Miyamoto wants a takedown.
We've had a slow start to the round here - hopefully the action picks up.
Larsen with the Thai clinch, lands a knee to the head.
Miyamoto wants a takedown.
That's three failed takedown attempts in the round for Sung Miyamoto. That's going to take a lot out of him.#TD2#
Larsen manages to pull guard. Let's see whether he can land a sub off his back. #SUB#
Miyamoto drops back looking for a leg! Larsen is in trouble here! The fighters roll with the hold and Larsen manages to kick Miyamoto off! Miyamoto jumps back into Larsen's guard. #SUB#
Miyamoto thinks about going for a leg but decides against it, in order to maintain the position. #T1#
Miyamoto wants to control from the top but Larsen keeps moving.
Miyamoto working in close now, lands a nice elbow to the side of Larsen's head.
Larsen is trying to stand up but he's not managed so far.
Miyamoto trying to control but Larsen is working from the bottom. #SU#
Miyamoto stands up and waves to Larsen to follow him.
Miyamoto takes a head kick and shrugs it off.
Larsen ducks under a wild hook from Miyamoto.#T2#
A head kick misses from Miyamoto.
Larsen fakes the leg kick and cracks Miyamoto in the body.
Larsen misses with a body kick.
Miyamoto throws a hook but Larsen blocks it.
Sung Miyamoto seems to be the more aggressive standup fighter in this bout.
Larsen keeps the fight on the outside.
Miyamoto takes a swing at Larsen's ribcage but misses.
Miyamoto misses with a looping right.
Larsen takes a punch right to his stomach. That took the wind out of him momentarily.
Larsen throws a nice looking combination but Miyamoto bobs and weaves to avoid any damage.
Larsen loads up on a big right hand but Miyamoto slips the punch.
Miyamoto misses with a head kick.
Wooooo! Give it up for these two warriors! They are putting on a show!
Larsen takes a shot to the eye socket. That's gotta hurt.
A big right from Miyamoto misses.
Nice uppercut there from Miyamoto.
Larsen throws a mid kick that lands with a slap.
Miyamoto misses with a hook
#TD2#
and Larsen counters with a nice double leg into side control. Miyamoto won't be happy with that.
Miyamoto scores with a shot to the body.
#T3#
Miyamoto is trying to buck Larsen off.
Larsen tries to cartwheel into mount but he doesn't manage it.
Miyamoto tries to bench press Larsen off him but Larsen keeps the position.
Miyamoto wants to control but Larsen postures up.
You can see the frustration on Miyamoto's face as Larsen controls the position.
Miyamoto can't do much from the bottom here.
Larsen looks more muscular than last time we saw him. He must have been on the weights.
Miyamoto tries to work a leg under to get back to half guard but Larsen wriggles his own leg back out and remains in side control.
Miyamoto throws a couple of strikes even though he's not really in a good position to do so.
Miyamoto wants to control but Larsen postures up.#T4#
The crowd are showing their displeasure at the lack of action as loud boos ring out around the arena.
Miyamoto is trying to get back to half guard.
Miyamoto is sneaking out the side here. He's bucked Larsen off and has taken his back!#SUB#
Miyamoto working for a RNC but it's not happening just yet. #SUB#
Miyamoto looking for the choke but no joy.
Miyamoto has Larsen flattened out and is raining down punches.
Miyamoto is hanging on to Larsen's back as he tries to escape.
The ref warns both fighters not to hold the cage as they work up against the meshing.
Miyamoto lands a punch that was close to the back of the head but the ref thinks it's OK. #SUB#
Miyamoto is working really hard to secure the rear naked choke. Larsen defends successfully for a significant amount of time. Both fighters are looking very determined.
And thats the end of the round the fighters go back to their corners.
Sung Miyamoto dominated that round.
The fighters get back to their feet, the hooter sounds and we're back to the action!
#R2#
Larsen misses with a half-hearted attempt at a head kick.
Miyamoto scores with a sloppy right hand. Larsen should have avoided that one.
Miyamoto tries to clinch but is not successful on this occasion.
Sung Miyamoto is winning the standup battle so far.
Miyamoto misses with a head kick.
Larsen throws a counter combo.
Miyamoto tests Larsen's chin there with a solid looking shot.
Miyamoto misses with a body shot. Nice footwork from Larsen.
Miyamoto looks to land a left hand but Larsen moved out of range nicely.
Larsen blocks a jab.
Miyamoto scores with a nice head shot.#ROC#
Larsen is rocked!
Martin Larsen is looking to throw some combinations by the looks of things.
Larsen goes for a high kick. It partially lands.
Larsen is still on wobbly legs! Can Miyamoto finish him?
Larsen throws a head kick but Miyamoto moves out of range.
Larsen seems to have recovered his senses.
Miyamoto is really head hunting here, hardly looking to strike to the body at all.
Miyamoto lands with an overhand left.
Larsen fakes the leg kick and cracks Miyamoto in the body.
We've seen a great period of action over the last minute or so - credit to both fighters for going all out!
Miyamoto shoots for a double leg takedown but Larsen sprawls well. He's pushed Miyamoto's face into the mat and manages to get back to his feet relatively easily.
Larsen is trying to counter with his kicks.
Miyamoto keeping a good distance there, avoiding the body shot.
A cross from Larsen lands.
Larsen misses with the combination.
#T1#
Miyamoto lands a glancing blow to the side of Larsen's head.
Miyamoto stooping low to avoid any incoming strikes and then lunges in with an uppercut come cross that lands flush.
Larsen moves forwards but Miyamoto connects with a nice, crisp jab.
Miyamoto connects with a jab.
Larsen gets clipped by a big right hand and goes down spinning to the canvas! Miyamoto gets the back mount and begins to drop bombs on his rocked foe! Larsen is too out of it to defend against the strikes and the referee jumps in to save him from the beatdown!
Ladies and gentlemen, after 1:30 of round 2, we have a winner by way of TKO (Strikes). Sung Miyamoto!
|
|
|
|
Event:
KAMIKAZE 45: Born To Fight
Date: Aug 12, 2017 |
#R1#
Miyamoto's corner calls for a 1-2. Miyamoto obliges with the 1 part as he scores the single shot and moves back out of range.
Saar slips a straight right by Miyamoto.
Saar tries a quick counter leg kick but Miyamoto is wise to it.
Saar takes one to the side of the head.
#KD#
Miyamoto cracks Saar with an uppercut from hell and Saar crumples to the canvas, he's out! Oh no, he's recovered and he's grabbed one of Miyamoto's legs and pulled him into guard. The ref thought about stopping it there but he's let it go - good reffing!
#ROC#
Saar is rocked!
The fighters are pressed up against the cage, both looking to find a bit of space to work.
The fans in attendance giving it up for the two fighters, who have really let it all hang out in the last minute or so!#SUB2#
Saar has a loose triangle. He'll be looking to tighten that up but Miyamoto can see exactly what he's planning and manages to posture up and free himself.
Miyamoto wanted to stand there but Saar had control of the position.
Miyamoto not doing a lot at the moment. He'll have to show some more aggression or the fight will get stood up. #SUB2#
Saar looking for submissions off his back, moving his hips, looking for an opening.
Miyamoto with a couple of shots to the head there. Not particularly brutal.
Miyamoto has to be careful here, sitting in the guard of a superior BJJ player.
Miyamoto postures up and scores with a shot to the body and a follow up elbow to the head.#SUB2#
Saar looking for submissions off his back, moving his hips, looking for an opening.
Miyamoto content to strike from guard, landing some decent shots. #T1#
Miyamoto is just sitting in guard, looking to avoid any submissions.
Miyamoto landing some decent shots from guard.
Miyamoto trying to control the position from guard on top but Saar is wriggling around, looking for whatever he can.
Miyamoto is working Saar over from the guard. He should look to pass the guard and do a little more damage with these strikes.
Miyamoto scores with a decent looking elbow strike.
Miyamoto wants to control from the top but Saar keeps moving.
Miyamoto scores with a decent looking elbow strike.
Saar is still in real trouble! Can Miyamoto finish him?
Miyamoto trying to control the position from guard on top but Saar is wriggling around, looking for whatever he can.
Saar seems to have recovered his senses.
Miyamoto showing good wrestling skills to control the position.
Miyamoto content to strike from guard, landing some decent shots. #SUB2#
The fighters are going at a pretty good pace and they're both starting to sweat now.
Saar escapes his hips to the side and looks to be working for an armbar. Miyamoto gives him a little smile and shakes his head. No chance. #SUB#
Miyamoto drops back looking for a leg! Saar is in trouble here! The fighters roll with the hold and Saar manages to kick Miyamoto off! Miyamoto jumps back into Saar's guard. #T2#
Miyamoto connects with a couple of short punches.#SUB#
Miyamoto thinks about going for a leg but decides against it, in order to maintain the position.
Miyamoto lands a couple of digs.#SUB#
Miyamoto thinks about going for a leg but decides against it, in order to maintain the position. #SUB#
Miyamoto is trying to work a guillotine from the top, or something like that? Don't know how he thinks he's going to get a finish from there.
Miyamoto with a couple of shots to the head there. Not particularly brutal.
Miyamoto landing some decent shots from guard.
Miyamoto trying to control the position from guard on top but Saar is wriggling around, looking for whatever he can.
Miyamoto controls the pace of the fight for a moment.#T3#
Saar wants to sweep here but Miyamoto controlling him for the moment.
Saar being controlled here, momentarily. #SUB2#
Saar looking for a guillotine here but Miyamoto defends easily.
Miyamoto scoring with some ground and pound.
Miyamoto's corner is telling him to maintain position.
Miyamoto chips away with some ground and pound.
Miyamoto trying to control but Saar is working from the bottom.
Miyamoto is in close to Saar's body, working some short punches and elbows.
Hammerfist, elbow! yells Miyamoto's corner. There ya go! There ya go! #T4#
Miyamoto distracts Saar with his right hand and drops a big elbow with his other arm.
Miyamoto trying to stand up but can't free himself from Saar's guard.#SUB2#
Saar escapes his hips to the side and looks to be working for an armbar. Miyamoto gives him a little smile and shakes his head. No chance. #SUB#
Miyamoto is trying to work a guillotine from the top, or something like that? Don't know how he thinks he's going to get a finish from there.
Miyamoto content to strike from guard, landing some decent shots.
The ref warns both fighters not to hold the cage as they work up against the meshing.
Miyamoto lands a nice shot whilst sitting in his opponent's guard.
Miyamoto postures up and lands some nice ground and pound.
Miyamoto is in close to Saar's body, working some short punches and elbows.#SUB#
Miyamoto drops back looking for a leg! Saar is in trouble here! The fighters roll with the hold and Saar manages to kick Miyamoto off! Miyamoto jumps back into Saar's guard. #SUB#
Miyamoto drops back looking for a leg! Saar is in trouble here! The fighters roll with the hold and Saar manages to kick Miyamoto off! Miyamoto jumps back into Saar's guard.
And thats the end of the round the fighters go back to their corners.
Sung Miyamoto dominated that round.
The minute break is over - no more time for sponges and pep talks - back to the action!
#R2#
Miyamoto bobbing and weaving, closes the distance and lands a hook to the side of Saar's head.
Saar circles away from the clinch attempt.
Miyamoto connects with a lovely jab that went straight through the gap between Saar's hands.
Saar avoids the head kick by Miyamoto.
Saar only half commits to the counter leg kick.
A slow jab from Miyamoto misses its intended target.
And Saar tries to counter it with a takedown but Miyamoto pushes his down on his head and steps out.
Miyamoto fails with a rather predictable takedown attempt.
Saar was about to counter that last move with a leg kick but changes his mind.
Sung Miyamoto is winning the standup battle so far.
We've had a slow start to the round here - hopefully the action picks up.
A really sloppy takedown attempt there from Miyamoto.
Saar only half commits to the counter leg kick.
Miyamoto throws out a loose jab but Saar uses good head movement to avoid it.
Saar was about to counter that last move with a leg kick but changes his mind.#T1#
Miyamoto lands an overhand left. A wild punch that just about connected.
Miyamoto really does look like a pencil wearing a pair of gloves. Let's hope he has a gameplan to suit that ridiculous body shape.
Miyamoto looks to land a left hand but Saar moved out of range nicely.
Jab from Miyamoto.
Miyamoto with a poor takedown #TD2#
and Saar counters with a nice double leg into half guard.
Miyamoto is trying to escape back to his feet but Saar uses the scramble to pass into side control.
That's three failed takedown attempts in the round for Sung Miyamoto. That's going to take a lot out of him.#SUB2#
Saar in side control, working for a kimura. He's got hold of an arm and he's torquing it... Miyamoto is tapping! That's the end of the fight!
Ladies and gentlemen, after 1:42 of round 2, we have a winner by way of Submission (Kimura). Cyric Saar!
Cyric Saar decided to thank the fans in attendance for making a great atmosphere. It seemed to go down pretty well.
|
|
|
|
Event:
TWGC 17 (135lbs, D4): Finals - Round 1
Date: Jul 11, 2017 |
Coming up we have a bantamweight Tycoon World Grappling Championship rules bout between Sung Miyamoto and Tristan Lancier. Miyamoto comes into the arena with Placebo - Kitty Litter blaring out of the sound system. Tristan Lancier acknowledges the crowd's support as he enters the cage.
This TWGC bout is 1 fifteen minute round in the bantamweight division. Introducing today's competitors. In the red corner, competing out of London, with a TWGC record of 1 wins and 0 losses; Sung Miyamoto! And in the blue corner, fighting out of Los Angeles, with a TWGC record of 2 wins and 2 losses; Tristan Lancier!
The judges for this bout are Chris Edwards, Richard Clark and Colin Fotheringham.
Let's get this grappling contest under way! Who will be victorious?
Miyamoto tries to close the distance and clinch up but Lancier swats him away and circles back towards the center.
Miyamoto fails in his attempt to clinch.
Nice takedown defense from Lancier. No joy for Miyamoto on that attempt.
Lancier wants to counter with a clinch but Miyamoto pushes him away.
Lancier closes the distance and after a bit of a stuggle, scores a takedown into Miyamoto's guard. Score +2 for takedown into guard / half guard: Miyamoto (0) vs (2) Lancier
Lancier trying to control but Miyamoto is working from the bottom.
Miyamoto working from the bottom, still in full guard. He's managed to get a loose triangle. Lancier doesn't seem to be doing much to defend here, obviously he feels comfortable in the position. Lancier manages to throw the legs off his shoulder and he's back into guard - no problem.
Lancier is trying to work a guillotine from the top, or something like that? Don't know how he thinks he's going to get a finish from there.
Miyamoto really does look like a pencil wearing a pair of gloves. Let's hope he has a gameplan to suit that ridiculous body shape.
Lancier wants to pass the guard but Miyamoto is keeping the position.
We've had a slow start to the round here - hopefully the action picks up.
Lancier drops back for a leg! It's a sloppy attempt though and Lancier jumps back into guard quickly, to retain the dominant position.
Lancier got a little sloppy there for a moment and Miyamoto has worked his way into a loose triangle - can he finish it?! No, Lancier has managed to get both his arms back between Miyamoto's legs - danger averted.
That's one minute gone in the round.
Lancier stopping the sweep attempt from Miyamoto.
Miyamoto isolates an arm and boxes in a triangle. Lancier stacks Miyamoto on his neck as he steps over and passes to the side. He's now in a much more dominant position where he can look to do some serious damage. Nice move by Lancier! Score +3 for passing guard: Miyamoto (0) vs (5) Lancier
Miyamoto is trying to improve his position.
Lancier wants to work for a kimura but he's foiled early by Miyamoto, who protects the arm well.
Lancier advances nicely into full mount. Score +2 for reaching mount: Miyamoto (0) vs (7) Lancier
Miyamoto is wriggling around trying to escape.
Miyamoto wants to control but Lancier is having none of it.
That's two minutes gone in the round.
Miyamoto sneaks a leg back under and regains half guard and is working straight away to try and get back to guard. He hasn't managed just yet though.
Lancier moves into full mount! Miyamoto won't be happy about that! Score +3 for passing guard: Miyamoto (0) vs (10) Lancier
Miyamoto is looking to improve his position but Lancier isn't that keen on the idea.
Lancier looking to secure an arm triangle but Miyamoto defends it well.
Lancier has control of Miyamoto's right arm, working for a kimura. It's a bit of a token attempt though and Miyamoto regains control of the situation pretty easily.
Miyamoto is desperately trying to get back to half guard.
The fighters are pressed up against the cage, both looking to find a bit of space to work.
That's three minutes gone in the round.
Miyamoto wants to control but Lancier is having none of it.
Lancier working from mount. He moves in close and looks like he might be going for an arm triangle... He's hopped off to the side and he's transitioned into an Anaconda choke. Miyamoto turning a nasty shade of purple. He's refusing to tap but he's gone! He's out! The ref rips Lancier off and cradles Miyamoto's limp body as Lancier celebrates with his corner.
Ladies and gentlemen, after 3:45 of round 1, we have a winner by way of Submission (Anaconda Choke). Tristan Lancier! |
|
|
|
Event:
TWGC 17 (135lbs, D4): Tokyo Qualifier - Round 1
Date: Jul 02, 2017 |
Coming up we have a bantamweight Tycoon World Grappling Championship rules bout between Sung Miyamoto and Mike Bikermann. Miyamoto's entrance music is Placebo - Kitty Litter. A fine choice. Bikermann has chosen Metallica - Whiskey in the jar as his entrance music, which hasn't gone down very well with the crowd. Mike Bikermann is the more experienced fighter, so let's see if that makes a difference tonight.
This TWGC bout is 1 fifteen minute round in the bantamweight division. Introducing today's competitors. In the red corner, competing out of Tokyo, with a TWGC record of 0 wins and 0 losses; Sung Miyamoto! And in the blue corner, fighting out of London, with a TWGC record of 0 wins and 0 losses; Mike Bikermann!
The judges for this bout are Shirou Masuda, Yukihiro Yamamoto and Kenichi Hosakawa.
Let's get this grappling contest under way! Who will be victorious?
The fight stays on the outside here - Miyamoto looks like he's thinking about clinching though.
Miyamoto pushes Bikermann up against the cage in a clinch.
Miyamoto lands a takedown into guard.
Score +2 for takedown into guard / half guard: Miyamoto (2) vs (0) Bikermann
Bikermann keeping moving, preventing Miyamoto from controlling successfully.
Miyamoto is going to have to think about doing something other than just controlling because Bikermann is managing to avoid having the position dictated to him.
Bikermann throwing his legs up looking for a triangle.
Bikermann really doesn't want to stay on the ground with Miyamoto. If he can't get it back to his feet, it's only a matter of time before he'll be tapping out.
Miyamoto drops back looking for a leg! Bikermann is in trouble here! The fighters roll with the hold and Bikermann manages to kick Miyamoto off! Miyamoto jumps back into Bikermann's guard.
Miyamoto really does look like a pencil wearing a pair of gloves. Let's hope he has a gameplan to suit that ridiculous body shape.
Miyamoto is holding a leg here, probably looking for an ankle lock - he drops back and goes for it! Bikermann is in trouble! Is it all over??? No! Bikermann has escaped and now he's on top! Score +2 for sweep to guard / half guard: Miyamoto (2) vs (2) Bikermann
We've had a slow start to the round here - hopefully the action picks up.
Miyamoto had isolated an arm as going for a kimura. Bikermann defends it easily.
That's one minute gone in the round.
Miyamoto escapes his hips to the side and looks to be working for an armbar. Bikermann gives him a little smile and shakes his head. No chance.
Bikermann trying to control but Miyamoto is working from the bottom.
Bikermann drops back looking for a leg! Miyamoto is in trouble here! The fighters roll with the hold and Miyamoto manages to kick Bikermann off! Bikermann jumps back into Miyamoto's guard.
The ref warns both fighters not to hold the cage as they work up against the meshing.
Bikermann trying to control the position from guard on top but Miyamoto is wriggling around, looking for whatever he can.
The fighters are pressed up against the cage, both looking to find a bit of space to work.
Bikermann thinks about going for a leg but decides against it, in order to maintain the position.
The fighters are starting to perspire pretty heavily.
Bikermann trying to control but Miyamoto is working from the bottom.
Bikermann drops back looking for a leg! Miyamoto is in trouble here! The fighters roll with the hold and Miyamoto manages to kick Bikermann off! Bikermann jumps back into Miyamoto's guard.
That's two minutes gone in the round.
Miyamoto is working actively off his back, looking to secure an arm or perhaps work for a triangle.
Bikermann not doing a lot at the moment. He'll have to show some more aggression or the fight will get stood up.
Miyamoto looking for a guillotine here but Bikermann defends easily.
Miyamoto has his foot on Bikermann's thigh. He's trying to push off and get in position for a triangle, I think. Bikermann works his way back into a safe position though.
Bikermann thinks about going for a leg but decides against it, in order to maintain the position.
Miyamoto manages to sweep nicely, so he's now on top. Bikermann manages to get himself to full guard.
Score +2 for sweep to guard / half guard: Miyamoto (4) vs (2) Bikermann
Miyamoto drops back for a leg! It's a sloppy attempt though and Miyamoto jumps back into guard quickly, to retain the dominant position.
That's three minutes gone in the round.
Miyamoto is trying to work a guillotine from the top, or something like that? Don't know how he thinks he's going to get a finish from there.
Bikermann is active off his back here, looking for submissions.
Miyamoto trying to control the position from guard on top but Bikermann is wriggling around, looking for whatever he can.
Miyamoto is frustrating his opponent with some stalling tactics from top position.
Miyamoto drops back for a leg! It's a sloppy attempt though and Miyamoto jumps back into guard quickly, to retain the dominant position.
Miyamoto is trying to work a guillotine from the top, or something like that? Don't know how he thinks he's going to get a finish from there.
Miyamoto wants to control from the top but Bikermann keeps moving.
That's four minutes gone in the round.
Miyamoto drops back, looking for a kneebar! Bikermann looks panicked! The fighters roll across the mat, one looking to finish, one looking to escape. Bikermann looks to have wriggled free... Yes, he's got his leg free and he's dived into side control! Good work there from Bikermann! Score +4 for clean sweep to past guard: Miyamoto (4) vs (6) Bikermann
Miyamoto is looking for a sweep.
Miyamoto is working hard here to advance position.
Miyamoto is not content to let Bikermann control the position.
Bikermann is looking for a kimura. He might have it! No, Miyamoto has escaped the position, nice work there.
That's five minutes gone in the round.
Miyamoto is trying to get back to half guard.
Miyamoto can't do much from the bottom here.
Miyamoto is positioning himself to get back to half guard.
Miyamoto is not content to let Bikermann control the position.
You can see the frustration on Miyamoto's face, being in this tough position on the bottom.
That's six minutes gone in the round.
Miyamoto is trying to improve his position.
Bikermann is trying to land an Americana. He has the arm isolated but Miyamoto is keeping cool and he's avoided the danger for now.
Miyamoto is positioning himself to get back to half guard.
You can see the frustration on Miyamoto's face, being in this tough position on the bottom.
Bikermann is trying to get an arm triangle but Miyamoto is defending well.
Miyamoto is looking to regain half guard here but Bikermann keeps moving and retains side control.
Bikermann working away.
That's seven minutes gone in the round.
Miyamoto tries to improve position but can't.
Miyamoto manages to get one leg in to regain half guard.
Miyamoto is looking to sinch up a guillotine here but Bikermann pulls his head out easily.
Bikermann looking for a kimura but he'll have to free his other leg if he wants to finish that. Perhaps he's just using it as a distraction technique.
Miyamoto looking to work for a kimura from the bottom.
Miyamoto looking to work for a kimura from the bottom.
Miyamoto wants to control but Bikermann is keeping busy.
That's eight minutes gone in the round.
Bikermann is looking for an arm triangle, whilst trying to pass to side control. Miyamoto doesn't seem that keen to cooperate though. No luck this time Bikermann.
Miyamoto is looking to improve his position.
Miyamoto is looking to sinch up a guillotine here but Bikermann pulls his head out easily.
Miyamoto is working for an escape here. He's hooked one of Bikermann's legs and he's managed to sneak out and take Bikermann's back! Score +4 for clean sweep to past guard: Miyamoto (8) vs (6) Bikermann
Miyamoto tightening his grip on Bikermann, looking for the choke.
Bikermann tries to escape but Miyamoto has the hooks in and won't let him break free.
That's nine minutes gone in the round.
Miyamoto patiently working for the choke. Which fighter will keep their nerve here?
Miyamoto looking for the choke from the back.
Miyamoto looking for the choke but no joy.
Bikermann rolls and manages to get back to half guard. Nicely done.
Bikermann is looking to sinch up a guillotine here but Miyamoto pulls his head out easily.
Miyamoto is looking for a kimura. It's going to be difficult to finish that from half guard though and Bikermann defends it well.
Bikermann is looking for a sweep. Miyamoto is wise to his cunning plan and keeps the top position.
Bikermann looks winded!
Miyamoto seems to be looking for submissions.
Miyamoto seems to be looking for submissions.
That's ten minutes gone in the round.
Miyamoto is sneakily working for an arm triangle but Bikermann sees it coming and defends easily.
Miyamoto is trying to work for a kimura. This could be trouble! No, Bikermann has managed to free his arm - good work.
Miyamoto is trying a forearm choke
I don't think that's going to do much at this level of the game.
Bikermann wants to get back to full guard.
Miyamoto wants to control but Bikermann is keeping him busy.
Miyamoto seems to be looking for submissions.
Miyamoto seems to be looking for submissions.
That's eleven minutes gone in the round.
Miyamoto is looking for a kimura but he's never going to get it from there.
Miyamoto is sneakily working for an arm triangle but Bikermann sees it coming and defends easily.
Bikermann actively working from the bottom here.
Bikermann looking for submissions off his back.
Miyamoto wants to control but Bikermann is keeping him busy.
Bikermann is looking to control Miyamoto's leg but it's slowly edging free. Can Bikermann avoid being mounted?
Bikermann tries to get to full guard but Miyamoto has control of the leg.
That's twelve minutes gone in the round.
Bikermann is looking to sinch up a guillotine here but Miyamoto pulls his head out easily.
Bikermann is defending against the submission attempts here by Miyamoto.
Miyamoto is trying a forearm choke
I don't think that's going to do much at this level of the game.
Miyamoto is trying to work for a kimura. This could be trouble! No, Bikermann has managed to free his arm - good work.
Bikermann looking for submissions from an awkward position here.
Miyamoto is trying for a kimura here. Bikermann looks like he's in a lot of pain... and he's tapping out! Miyamoto wins by kimura!
Ladies and gentlemen, after 13:56 of round 1, we have a winner by way of Submission (Kimura). Sung Miyamoto! |
|
|
|
|
|
|