|
|
PBP Commentary |
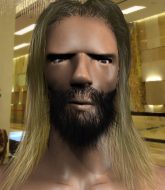
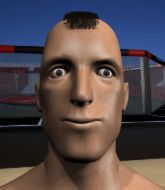
Coming up we have a middleweight MMA rules bout between Tom Breedon (ranked 1924 p4p, 0 weight class) and Cal Robbins (ranked 4636 p4p, 0 weight class). Breedon comes to the cage accompanied by Quiet Riot - Come On Feel The Noise. Tom Breedon has the better chin. Will he look to stand and bang today?
 |
|
 |
| 183 cm
23
200 lbs
2 - 0 - 0 |
|
185 cm
30
196 lbs
8 - 20 - 0 |
Good wrestling
Excellent boxer
Very quick |
|
Good wrestler
Decent boxing
Powerful |
|
| |
|
Ladies and gentlemen. This fight is 3 rounds, in the middleweight division.
Introducing the fighter to my left, fighting out of the red corner.
With a record of
2 - 0 - 0, fighting out of London, Tom Breedon!
And introducing the fighter to my right, fighting out of the blue corner.
With a record of
8 - 20 - 0, fighting out of London, Cal Robbins!
The judges for this bout are Chris Edwards, Colin Fotheringham and James Atkins.

The bell rings for round one and we are underway!
Breedon fails to land with a series of punches.

Breedon closes the distance and scores a nice trip takedown into half guard. Robbins did well to prevent Breedon getting side control.
Robbins tries to roll over but Breedon keeps him under control.

Breedon seems to be working for a kimura but Robbins defends the submission attempt.
Robbins is trying to maintain the position but Breedon is very close to passing his half guard.
Robbins is looking to regain full guard. Not this time though.

Robbins looking for submissions from an awkward position here.
We've had a slow start to the round here - hopefully the action picks up.
Robbins tries to roll over but Breedon keeps him under control.
Breedon is working for a submission of some sort.
Robbins is looking to improve his position.

That's one minute gone in the round.
Robbins moves into full guard.
Breedon thinks about going for a leg but decides against it, in order to maintain the position.
Breedon looking to sit in guard and control but Robbins gets the butterfly guard and sweeps. He's now in the guard on the top.

Breedon looking to hit a scissor sweep but Robbins is one step ahead there.
The fighters are pressed up against the cage, both looking to find a bit of space to work.
There's a bit of a scramble here and now Breedon is on top in guard.

Robbins working from the bottom, still in full guard. He's managed to get a loose triangle. Breedon doesn't seem to be doing much to defend here, obviously he feels comfortable in the position. Breedon manages to throw the legs off his shoulder and he's back into guard - no problem.

That's two minutes gone in the round.
The fighters are starting to perspire pretty heavily.
Breedon trying to pass the guard. He's being very persistent here but Robbins manages to land a sweep and now he's on top!
Breedon is working an open guard here, looking to improve his position. No doubt that will leave him open to counters but at least he's being more offensive.
Robbins with a flurry of punches that miss.
Robbins postures up.
Breedon tries to land a sweep but no joy.
Breedon is trying to control the position but Robbins postures up.
Breedon is controlling Robbins's posture.
Breedon preventing the ground and pound from doing any damage.
Robbins landing some decent shots from guard.

That's three minutes gone in the round.
Breedon throwing his legs up looking for a triangle.
Robbins throwing strikes from guard but Breedon blocks nicely.
Robbins thinks about going for a leg but decides against it, in order to maintain the position.
Breedon being controlled here, momentarily.
Robbins got a little sloppy there for a moment and Breedon has worked his way into a loose triangle - can he finish it?! No, Robbins has managed to get both his arms back between Breedon's legs - danger averted.
Robbins missing there with some ground and pound from the guard.

That's four minutes gone in the round.
The crowd are getting on the fighters' backs, as the pace has dropped off in the last minute or so.
Breedon keeping moving, preventing Robbins from controlling successfully.
Breedon working the defensive guard well to avoid strikes from Robbins.
Breedon bucks up whilst keeping hold of a body lock, managing to reverse the position. Now he's in top in Robbins's guard.
Robbins has the superior BJJ but he's also working some ground strikes into his gameplan.
Robbins is throwing his legs up, looking for submissions. Breedon is aware though and is defending well.
Breedon stands and throws Robbins's legs to the side, diving into side control.
Breedon trying to control the action but Robbins is working from the bottom.
Breedon working hard here to secure a kimura but he's not really in the right position for it.
The crowd thankful this round is nearly over.
Breedon trying to control the action but Robbins is working from the bottom.
And thats the end of the round the fighters go back to their corners.
Tom Breedon dominated that round.
The referee calls time. The cornermen exit stage left and we're back to business.

Robbins shoots in for a takedown but Breedon shows good takedown defense.
Robbins shoots in for a takedown. "Ole!" shouts Breedon as he jumps to the side.
A quick step to the side and Breedon tries to counter with a shot to the body but it doesn't connect.
Breedon getting the better of the striking in that exchange.
Robbins shoots in looking for a double leg takedown. Breedon defends it nicely.
Tom Breedon has stuffed three takedown attempts in the round now. That's going to take a lot out of Cal Robbins.
Robbins takes a solid shot to the body. That one hurt him but he's trying not to show it.
We've had a slow start to the round here - hopefully the action picks up.

Robbins throws a loose over hand right and dives in with a double leg takedown. Breedon tries to sprawl but it's too late and the fighters hit the mat. Robbins is in Breedon's guard.
My spies in Shut Up & Train! {$1000} inform me that Robbins has been getting involved in the gym's BJJ sparring sessions. Let's see whether that pays dividends!
Breedon is looking for a triangle but Robbins pushes his legs off easily.
Robbins throwing strikes from guard but Breedon blocks nicely.
Robbins drops back looking for a leg! Breedon is in trouble here! The fighters roll with the hold and Breedon manages to kick Robbins off! Robbins jumps back into Breedon's guard.
That's one minute gone in the round.
Robbins postures up.
Robbins is looking to work some ground and pound but Breedon has wrist control.
Robbins trying to control the position from guard on top but Breedon is wriggling around, looking for whatever he can.
Robbins drops back for a leg but he's not going to get it - he lets go and Breedon dives on top into guard.
Robbins is looking for a guillotine. You can't force these things though and Breedon defends well.
Robbins looking for submissions from the bottom but instead Breedon passes into half guard.
Robbins wants to sweep but Breedon has passed to side control!
That's two minutes gone in the round.
Robbins is trying to improve his position.
Robbins gets one leg under and gets the fight to half guard.
Robbins is not content to let Breedon control the position.
Tom Breedon overall seems to be getting the better of the ground position in the fight so far.
The ref warns both fighters not to hold the cage as they work up against the meshing.
Robbins punching from the bottom.
Breedon is trying a forearm choke
I don't think that's going to do much at this level of the game.
Robbins slips a foot under and gets full guard. Nice work.
That's three minutes gone in the round.
Robbins looking to hit a scissor sweep but Breedon is one step ahead there.
Breedon stands and throws Robbins's legs to the side, diving into side control.
Robbins tries to buck Breedon off but Breedon is having none of it.
Breedon is trying to land an Americana. He has the arm isolated but Robbins is keeping cool and he's avoided the danger for now.
Robbins is trying to control Breedon's posture but Breedon avoids it.
That's four minutes gone in the round.
The crowd are getting on the fighters' backs, as the pace has dropped off in the last minute or so.
Robbins tries to work a leg under to get back to half guard but Breedon wriggles his own leg back out and remains in side control.
Robbins wants to control but Breedon postures up.
Breedon tries for a kimura but Robbins is defending well.
Breedon is looking to take a break and control but Robbins is keeping him honest, looking to work from the bottom.
Robbins manages to land a sweep and he's now on top! Lovely Jiu Jitsu!
Breedon has no desire to be mounted, so is trying to control. Robbins is working away from the top position though.
The crowd thankful this round is nearly over.
Breedon is trying to get back to full guard.
And thats the end of the round the fighters go back to their corners.
Tom Breedon dominated that second round.
OK. That's time! The bell goes and we're back to the action. This is the final round!

Robbins tries for a takedown but Breedon circles away easily
and Breedon decides to take the opportunity to score a takedown. He's landed in Robbins's guard.
Breedon drops back, looking for a kneebar! Robbins looks panicked! The fighters roll across the mat, one looking to finish, one looking to escape. Robbins looks to have wriggled free... Yes, he's got his leg free and he's dived into side control! Good work there from Robbins!
Breedon is moving his hips around well on the bottom and has managed to get back to half guard.
Robbins is working for a submission of some sort.
Robbins is looking for a kimura. It's going to be difficult to finish that from half guard though and Breedon defends it well.
We've had a slow start to the round here - hopefully the action picks up.
Robbins wants to lay and pray for a moment but Breedon keeps working.
That's one minute gone in the round.
Breedon slips a foot under and gets full guard. Nice work.
Robbins won't allow Breedon to sweep him here.
Robbins with a couple of shots to the head there. Not particularly brutal.
Robbins is fighting to break Breedon's control of his arms but Breedon is doing a good job of controlling the position at the moment.
Robbins is looking to work some ground and pound but Breedon has wrist control.
Robbins trying to control the position from guard on top but Breedon is wriggling around, looking for whatever he can.
Robbins avoids a guillotine attempt easily.
Robbins trying to control but Breedon is working from the bottom.
That's two minutes gone in the round.
My god... these two guys really need to pick up the pace or everyone will leave to go get a beer.
Breedon tries to land a sweep but no joy.
Breedon escapes his hips to the side and looks to be working for an armbar. Robbins gives him a little smile and shakes his head. No chance.
Robbins trying to control but Breedon is working from the bottom.
Breedon looking to sweep here. No luck so far.
Robbins got a little sloppy there for a moment and Breedon has worked his way into a loose triangle - can he finish it?! No, Robbins has managed to get both his arms back between Breedon's legs - danger averted.
Robbins scoring with some ground and pound.
Breedon escapes his hips to the side and looks to be working for an armbar. Robbins gives him a little smile and shakes his head. No chance.
Tom Breedon is fighting for a decision here - he's started to take the cautious approach.
That's three minutes gone in the round.
Robbins landing some decent shots from guard.
Breedon has his hands on Robbins's head, controlling the position.
Robbins keeps in close for a moment and lands a decent shot to the side of Breedon's head.
Breedon is working actively off his back, looking to secure an arm or perhaps work for a triangle.
Robbins throwing strikes from guard but Breedon blocks nicely.
Robbins won't allow Breedon to sweep him here.
That's four minutes gone in the round.
Neither fighter has done anything of merit for a good minute or two here and the crowd are not happy about it.
Breedon working the defensive guard well to avoid strikes from Robbins.
Robbins stands up over Breedon, holding his feet. He dives back in and lands a decent shot to the head.
Robbins postures up as if he's going to throw some strikes but drops back for an ankle! Breedon is in big trouble! He looks ready to tap! But no, he's escaped and dives on top of Robbins, into his guard.
Cal Robbins has stepped it up - he knows he needs a finish here!
Breedon slows down the pace of the fight for a moment. He'll need to remain active if he doesn't want to see the fight stood back up.
Robbins is working actively off his back, looking to secure an arm or perhaps work for a triangle.
Robbins wants to sweep but no luck.
Boooooooooooooooooooo!!! God, this has been a terrible round. Come on you two, sort yourselves out!
Robbins has an omoplata and is looking to use it perhaps as a submission or perhaps to transition. Breedon is in a bit of discomfort here, but he's managed to free himself and has dived into side control! That didn't work out too well for Robbins.
And that's the end of the fight!
That was a close round. You could make an argument for either fighter but I would give it to Tom Breedon.
Well Breedon has outscored his opponent in every aspect of the fight today. Only a scarily incompetent judge or two will keep him from a well deserved win... Over to the ring announcer for the scorecards.
Ladies and gentlemen, after 3 rounds of action, we go to the scorecards for a decision.
Judge Chris Edwards scores the fight 30:27
Judge Colin Fotheringham scores the fight 30:27
Judge James Atkins scores the fight 30:27
In favor of your winner, by unanimous decision... Tom Breedon!
|
|
|
|
|
|
|
|
|
|
|
|
|
|
|
|
|
|
|
|
|
|
|
| S |
C
A |
G |
S |
C
B |
G |
|
S |
C |
G |
|
energy
A | B |
|
hype
A | B |
|
pop
A | B |
|
mgr
A | B |
|
FIGHT
RATING
28% |
|
|
|
|
|
|
