|
|
PBP Commentary |
Coming up we have a lightweight MMA rules bout between Nick Holey (ranked 4061 p4p, 23420 weight class) and Blinko Felly (ranked 462 p4p, 606 weight class). Blinko Felly will no doubt be trying to keep this one on the feet, where he has a distinct advantage.
 |
|
 |
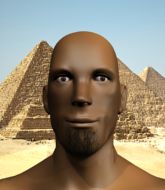
| 150 cm
41
130
16 - 23 - 0 |
|
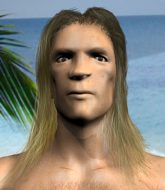
174 cm
23
144
7 - 9 - 0 |
BJJ Purple Belt
Brawler
KO power |
|
Good takedowns
Decent boxing
Heavy handed |
|
| |
|
Ladies and gentlemen. This fight is 3 rounds, in the lightweight division.
Introducing the fighter to my left, fighting out of the red corner.
With a record of 16 - 23 - 0, fighting out of Tokyo, Nick Holey!
And introducing the fighter to my right, fighting out of the blue corner.
With a record of 7 - 9 - 0, fighting out of Rio de Janeiro, Blinko Felly!
The judges for this bout are Trevor Gratis, Yves DeLean and Steve Smith.

The bell rings for round one and we are underway!

Holey throws a loose over hand right and dives in with a double leg takedown. Felly tries to sprawl but it's too late and the fighters hit the mat. Holey is in Felly's guard.

Felly looking for submissions from the bottom but instead Holey passes into half guard.
Holey sitting in half guard, looking to land shots. Felly defending well though.
Felly works his way to full guard. Good work.
Holey could do with losing a few pounds - he looks very soft around the mid section, to put it politely.
Holey got a little sloppy there for a moment and Felly has worked his way into a loose triangle - can he finish it?! No, Holey has managed to get both his arms back between Felly's legs - danger averted.
Holey looking to control the position here, rather than advance.
Felly working for submissions but it's allowed Holey to get to half guard.
Felly looking for submissions off his back.
We've had a slow start to the round here - hopefully the action picks up.
Felly actively working from the bottom here.
Felly is looking to sinch up a guillotine here but Holey pulls his head out easily.

That's one minute gone in the round.
Holey controlling the action here.
Nice strikes from Holey there.
Felly looking for submissions off his back.
Holey is trying to control. Felly wants to improve his position but can't escape this time.
Holey looks towards his corner to check for any instructions. The corner give him nothing to work with, so he cracks Felly with a short hammerfist. I guess that's as good as any advice he could get in this position.
Felly looking to force a kimura from the bottom here. He's concentrating on that move too much though and Holey pushes past his half guard into mount!
Holey breaks from Felly's wrist control and lands an elbow.
Holey content just to control the position here.
BOOM! Holey connects with a massive shot to the dome!
Felly tries to reverse the position but Holey maintains control.
The fighters are pressed up against the cage, both looking to find a bit of space to work.

That's two minutes gone in the round.
Holey can't quite control the action as he would like just now, as Felly is looking to escape.
Holey with good strikes from the mount here!
Felly tries to get back to half guard but can't.
Holey fakes a shot to the body and cracks his opponent in the head. Nice ground and pound there!
Holey tries to control but Felly wriggling away.
Felly really trying hard to get back to half guard here.
Holey controlling from mount.
The fans in attendance giving it up for the two fighters, who have really let it all hang out in the last minute or so!
Felly is wriggling around trying to escape.

Holey has hold of Felly's left arm, perhaps looking for a submission. The two fighters tussle over control of the isolated limb and Felly manages to get his arm back to his side and away from danger.
Felly is wriggling around trying to escape.

That's three minutes gone in the round.
Holey working the ground and pound effectively.
Holey can't quite control the action as he would like just now, as Felly is looking to escape.
Felly manages to regain half guard. Good work.
Holey trying to control from half guard but Felly is working away.
Felly actively working from the bottom here.
Felly looking to work for a kimura from the bottom.
Felly looking for submissions from an awkward position here.

That's four minutes gone in the round.
Felly tries to roll over but Holey keeps him under control.
Felly actively working from the bottom here.
Holey is looking for an arm triangle, whilst trying to pass to side control. Felly doesn't seem that keen to cooperate though. No luck this time Holey.
Holey wants to pass to mount but Felly is defending the position.
Holey wants to lay and pray for a moment but Felly keeps working.
The crowd thankful this round is nearly over.
Felly looking for submissions off his back.
Felly is not content to let Holey control the position.
And that is the end of the round. The fighters go back to their corners.
Nick Holey dominated that round.
OK. That's time! The bell goes and we're back to the action.

Felly scores with a decent looking hook.

Holey clinches up against the cage.
Felly is trying to pull guard but Holey has him pressed against the cage.
Felly is trying to pull guard but Holey has him pressed against the cage.
Felly fails to pull guard.
Nick Holey has stuffed three takedown attempts in the round now. That's going to take a lot out of Blinko Felly.
Felly fails to pull the fight into his guard.

Felly pulls Holey into guard.
Felly keeping moving, preventing Holey from controlling successfully.
Felly is working actively off his back, looking to secure an arm or perhaps work for a triangle.
Felly keeping moving, preventing Holey from controlling successfully.
We've had a slow start to the round here - hopefully the action picks up.

Holey stands up from Felly's guard - Holey perhaps looking for a knockout.
Holey needs to keep his hands up - Felly had a free shot at his head there.
That's one minute gone in the round.
Holey ducks under a wild hook from Felly.
Felly just misses with a punch to the body.
Felly connects with a good right hand that stumbles Holey. Holey circles away out of range and recomposes himself.
Felly takes a swing at Holey's ribcage but misses.
Holey shoots in for a takedown and gets it.
Felly actively working from the bottom here.
Felly is breathing heavily.
Felly looking to force a kimura from the bottom here. He's concentrating on that move too much though and Holey pushes past his half guard into mount!
Holey raining down hammerfists from mount.
Holey manages to capitalize on a mistake by Felly to take his back!
Holey has his opponent trapped and is landing shots. Not a good position for Felly.
Holey is really dominating this fight. Is there anything that Felly can do to turn this around?
Holey is punishing Felly with some ground and pound.
Felly felt the need to train up his defensive grappling in the buildup to the fight. Presumably he was expecting to be in a difficult position like this, so let's see if he can get out of it.
This is a great period of action - very entertaining stuff!
Felly turns into Holey and is now in his guard.
Holey has thrown up a leg looking for a triangle. Felly doesn't defend quickly enough and Holey has managed to lock this one up! Can Felly escape?! NO! He's tapping out! Damn, that was a quick submission - congrats to Holey on a fantastic submission victory.
Ladies and gentlemen, after 2:58 of round 2, we have a winner by way of Submission (Triangle). Nick Holey!
|
|
|
|
|
|
|
|
|
|
|
|
|
|
|
|
|
|
|
|
|
|
|
| S |
C
A |
G |
S |
C
B |
G |
|
S |
C |
G |
|
energy
A | B |
|
hype
A | B |
|
pop
A | B |
|
mgr
A | B |
|
FIGHT
RATING
43% |
|
|
|
|
|
|
