|
|
PBP Commentary |
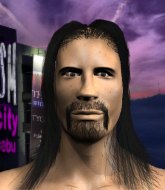
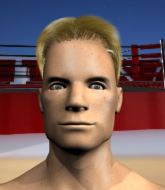
Coming up we have a lightweight MMA rules bout between Luke Ridley (ranked 3088 p4p, 5105 weight class) and Shin Haraguchi (ranked 0 p4p, 0 weight class). Both fighters look pumped up here. Let's hope this is a good fight!
 |
|
 |
| 175 cm
25
165
1 - 0 - 0 |
|
168 cm
25
160
0 - 1 - 0 |
Decent wrestler
Basic striking
Cuts easily |
|
Decent wrestler
Brawler
Solid chin |
|
| |
|
Ladies and gentlemen. This fight is 3 rounds, in the lightweight division.
Introducing the fighter to my left, fighting out of the red corner.
With a record of 1 - 0 - 0, fighting out of The Island, Luke Ridley!
And introducing the fighter to my right, fighting out of the blue corner.
With a record of 0 - 1 - 0, fighting out of The Island, Shin Haraguchi!
The judges for this bout are Sandra Marshall, Dirk Anderson and Santiago Holmes.

The bell rings for round one and we are underway!
Jab by Ridley.
Ridley lands a jab, followed by a cross and another cross, as Haraguchi backs up against the cage.
Haraguchi takes an uppercut right on the jaw but it doesn't phase him.
Haraguchi blocks a jab.
Ridley catches Haraguchi with a nice straight right. He seems pissed - ooooh, it's on now! On like donkey kong!
Haraguchi fails with a takedown attempt.
Haraguchi throws a combination but comes up with nothing but fresh air.
Haraguchi tries to close the distance and clinch up against the cage but Ridley paws at him with a jab and circles away.
Haraguchi displays some good footwork, moving neatly out of range as Ridley throws out the jab.

Haraguchi looking to score a takedown here. Ridley is defending well but Haraguchi drives through and ends up in Ridley's guard.
The crowd are loving this. Great action here.

Ridley looking for submissions from the bottom here. Moving his hips around, possibly looking for an armbar.
Ridley keeping moving, preventing Haraguchi from controlling successfully.
In the pre-fight buildup videos we saw Haraguchi working his ground and pound in the gym. He isn't landing a great percentage of his ground strikes so far though.
Ridley not looking particularly offensive just at the moment.

That's one minute gone in the round.
Haraguchi trying to control the position from guard on top but Ridley is wriggling around, looking for whatever he can.
Ridley definitely looks more muscular than last time we saw him fight.
The ref warns both fighters not to hold the cage as they work up against the meshing.
A big thud reverberates around the arena there as Haraguchi accidentally thumps the mat. Hopefully he's not broken his hand.
Ridley on his back here. We all know that wrestlers don't like being on their back so let's see if Ridley tries to get out of the position.
Ridley is looking for a triangle but Haraguchi pushes his legs off easily.
Haraguchi passes into half guard.
Ridley actively working from the bottom here.

Haraguchi looking for a kimura but he'll have to free his other leg if he wants to finish that. Perhaps he's just using it as a distraction technique.

That's two minutes gone in the round.
A lull in the action here being met with boos from the crowd.
Ridley looking for submissions off his back.
Ridley looking for submissions from an awkward position here.
Haraguchi is working hard to pass the guard. He's done it - he's now in full mount! Trouble for Ridley!
Haraguchi prevents Ridley from getting the reversal.

That's three minutes gone in the round.
Ridley is squirming around, avoiding Haraguchi's attempts to control the action.
Ridley working to try and regain half guard.
Ridley tries to hold on but Haraguchi postures up.
Haraguchi working away from the top, dropping strikes.
Ridley is wriggling around trying to escape.
Haraguchi raining down shots from the mount!
Ridley sneaks a leg under to get to half guard.

That's four minutes gone in the round.
Ridley is looking to regain full guard. Not this time though.
Haraguchi is keen to just control but Ridley is a slippery customer.
Haraguchi wants to work for an arm triangle but Ridley is really keeping half guard well and defending the submission attempt.
Haraguchi wants to control but Ridley is keeping him busy.
The fighters are battling for position here. Ridley manages to regain full guard. Nice work.
Haraguchi trying to control the position from guard on top but Ridley is wriggling around, looking for whatever he can.
The crowd thankful this round is nearly over.
Ridley wants to sweep here but Haraguchi controlling him for the moment.
Haraguchi avoids a guillotine attempt easily.
And that is the end of the round. The fighters go back to their corners.
That was a close round but I would say that Luke Ridley will probably get the nod.
The minute break is over - no more time for sponges and pep talks - back to the action!

Haraguchi throws a nice looking combination but Ridley bobs and weaves to avoid any damage.
Haraguchi fails in his attempt to clinch.
Ridley misses with a body shot. Nice footwork from Haraguchi.
Haraguchi misses with a takedown attempt - Ridley sprawls well and throws a nice strike on the way out which just misses.
Haraguchi takes a jab on the nose there. A little bit of blood seems to be coming out. Hopefully that won't affect his breathing.
Haraguchi shoots and misses
and Ridley cracks him with a counter punch right on the button.
Haraguchi takes a jab on the nose there. A little bit of blood seems to be coming out. Hopefully that won't affect his breathing.
Ridley's corner calls for a 1, 2 combination and Ridley duly obliges.
Ridley keeps the fight on the outside.
Ridley looks to land a combination but Haraguchi avoids it well.
Nice straight punches there by Ridley. You know Roy Jones Jr respects the hands of Ridley.
We've seen a great period of action over the last minute or so - credit to both fighters for going all out!
Ridley lands an overhand right.
Ridley lands a jab to the head.
Ridley dips down and scores with a jab to the body.
That's one minute gone in the round.
Haraguchi walks into a left hand.
Ridley bobs and weaves and throws out a fast jab that snaps Haraguchi's head backwards.
Luke Ridley is looking to keep the fight on the feet at all costs.
Haraguchi throws a right hand that Ridley ducks under and follows up with a left that Ridley also avoids with ease.
Ridley keeps the fight standing with a nice sprawl.
Luke Ridley has stuffed three takedown attempts in the round now. That's going to take a lot out of Shin Haraguchi.
Haraguchi tries to score a power double leg takedown but Ridley sees that one coming and sprawls well. That will dishearten Haraguchi somewhat.
Ridley is really dominating this fight. Is there anything that Haraguchi can do to turn this around?
Haraguchi is breathing heavily.
Ridley dips down and scores with a jab to the body.
Ridley scores with a punch to the head.
Ridley jabbing away but nothing is landing.
Ridley scores with a nice strike.
Ridley lands a slapping body shot.
That's two minutes gone in the round.
Haraguchi tries to close the distance and clinch up against the cage but Ridley paws at him with a jab and circles away.
Luke Ridley seems to be the more aggressive standup fighter in this bout.
Ridley scores with the left hand. Haraguchi knows he should have avoided that one.
The crowd are loving this. Great action here.
Ridley connects with a lovely jab that went straight through the gap between Haraguchi's hands.
Ridley is using his height advantage well here, landing a good percentage of his punches.
Ridley jabs. That one connects to the head of his opponent.
Ridley looks to score with a combo but nothing lands.
Ridley ducks under an overhand right and circles away with a smile on his face.
Ridley moves into range and throws a combination. A nice jab followed by a hook to the body.
Ridley scores with the left hand. Haraguchi knows he should have avoided that one.
Ridley misses with a hook
enabling Haraguchi to counter with a crisp jab.
A jab from Ridley misses.
Haraguchi shoots in looking for a single leg takedown. Ridley is trying to defend but Haraguchi finishes it well and ends up in half guard. Let's see if he can advance position further.
Shin Haraguchi has got the better of the ground game so far.
Ridley wants to control but Haraguchi is keeping busy and won't allow it.
That's three minutes gone in the round.
Ridley trying to get back to full guard but Haraguchi takes advantage of the position and moves to full mount!
Ridley is desperately trying to get back to half guard.
Ridley taking shots to the head.
Ridley swinging wildly from the bottom but he's not landing.
Haraguchi in mount throwing good strikes here, bouncing his opponent's head off the canvas.
Ridley wants to hold on but Haraguchi pushes him away.
Haraguchi raining down hammerfists from mount.
Haraguchi landing punches.
Ridley is desperately trying to improve his position but Haraguchi has a good base and remains in mount.
Haraguchi looking to control but Ridley is working nicely, looking to advance position himself.
Ridley is writhing around trying to get back to his feet.
That's four minutes gone in the round.
Haraguchi looking to control and managing it successfully.
Haraguchi throwing strikes here but Ridley is writhing around nicely and avoiding any serious damage.
Haraguchi looking to control but Ridley is working nicely, looking to advance position himself.
Ridley gets back to half guard.
Haraguchi keeping composed on the top, looking to control the action.
Ridley controlling the position for now.
Ridley is looking for a sweep. Haraguchi is wise to his cunning plan and keeps the top position.
Haraguchi looking for a kimura but he'll have to free his other leg if he wants to finish that. Perhaps he's just using it as a distraction technique.
And that is the end of the round. The fighters go back to their corners.
Luke Ridley dominated that second round.
Well, the break between rounds is over. Let's get back to the scrappin! This is the final round!

Ridley lands a nice hook to Haraguchi's body. Haraguchi takes it in his stride and looks to land his own strikes.
The crowd cheers as Ridley lands an impressive looking overhand right. Haraguchi doesn't seem phased though.
Haraguchi throws the overhand right but ducks down into a quick takedown attempt. Ridley was covering up waiting for the punch and Haraguchi finishes the takedown easily into guard.
Ridley controls Haraguchi momentarily but Haraguchi frees himself.
We've had a slow start to the round here - hopefully the action picks up.
Ridley seems keen to control Haraguchi's posture.
Ridley has his foot on Haraguchi's thigh. He's trying to push off and get in position for a triangle, I think. Haraguchi works his way back into a safe position though.
That's one minute gone in the round.
Haraguchi being controlled here momentarily.
Haraguchi looking to pass the guard.
Ridley working from the bottom, still in full guard. He's managed to get a loose triangle. Haraguchi doesn't seem to be doing much to defend here, obviously he feels comfortable in the position. Oh but Ridley is tightening it up a little... Haraguchi has to be careful here... He's got his foot tucked under now, this looks tight! Haraguchi reacted too slowly and this one could be over in a matter of seconds! YES! Haraguchi taps out! Nice BJJ there by Ridley!
Ladies and gentlemen, after 1:44 of round 3, we have a winner by way of Submission (Triangle Choke). Luke Ridley!
Our winner, Luke Ridley, made sure he spent some time buttering up the crowd during his post fight interview, which will no doubt bring him a few more fans.
|
|
|
|
|
|
|
|
|
|
|
|
|
|
|
|
|
|
|
|
|
|
|
| S |
C
A |
G |
S |
C
B |
G |
|
S |
C |
G |
|
energy
A | B |
|
hype
A | B |
|
pop
A | B |
|
mgr
A | B |
|
FIGHT
RATING
56% |
|
|
|
|
|
|

