|
|
PBP Commentary |
Coming up we have a welterweight MMA rules bout between Rick James (ranked 0 p4p, 0 weight class) and Shingo Takeda (ranked 0 p4p, 0 weight class). Rick James could well score a knockout today. He has the power to get to Shingo Takeda's chin.
 |
|
 |
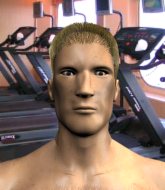
| 175 cm
22
172 lbs
7 - 2 - 0 |
|
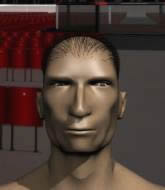
170 cm
21
175 lbs
7 - 6 - 0 |
BJJ Brown Belt
Solid boxing
Granite chin |
|
BJJ Blue Belt
Counter striker
Knockout power |
|
| |
|
Ladies and gentlemen. This fight is 3 rounds, in the welterweight division.
Introducing the fighter to my left, fighting out of the red corner.
With a record of
7 - 2 - 0, fighting out of Tokyo, Rick James!
And introducing the fighter to my right, fighting out of the blue corner.
With a record of
7 - 6 - 0, fighting out of Tokyo, Shingo Takeda!
The judges for this bout are Ren Mimura, Yukihiro Yamamoto and Yukihiro Shimada.

The bell rings for round one and we are underway!
James shoots in for a takedown. "I don't think so" says Takeda as he avoids it easily.
James looks for a takedown but Takeda sprawls well.
James avoids the clinch attempt nicely.
James shoots in for a takedown but doesn't get it.
That's three failed takedown attempts in the round for Rick James. That's going to take a lot out of him.
James shoots for a double leg takedown but Takeda sprawls well. He's pushed James's face into the mat and manages to get back to his feet relatively easily.
James fails with a takedown attempt from distance.
James fails miserably with a takedown attempt.
Takeda is looking to take this fight into the clinch.
We've had a slow start to the round here - hopefully the action picks up.
Takeda is looking to clinch.

That's one minute gone in the round.
Takeda leaves James with his face pressed against the mat as he sprawls beautifully, defending against a solid takedown attempt.
James fails with a takedown attempt.
James shoots in for a takedown but Takeda shows good takedown defense.
Takeda stuffs the takedown attempt from James. James gets slowly back to his feet.
James tries to shoot in for a takedown. He's got hold of a leg but Takeda swivels and escapes.
James shoots in for a takedown. "I don't think so" says Takeda as he avoids it easily.

Takeda moves into the clinch.

That's two minutes gone in the round.
Takeda lands a shot to the body.
The two fighters are working to gain dominance in the clinch.
Takeda digs a right hand underneath James's ribcage. James let out a lung full of air as it connected.
James is breathing heavily.
James has hold of a leg and is looking for a trip takedown. Takeda avoids it nicely though and we remain in the clinch.
Takeda works on James's body with a couple of short punches.
Takeda holding his opponent close, against the cage.
Takeda lands on the inside with an uppercut.
James tries to take the fight to the ground by pulling guard but can't manage it.
Takeda makes some space for himself and lands an uppercut.
Takeda lands a damaging elbow.

It looks like Rick James has been cut.
Takeda connects with a knee to the head.
Takeda crunches a lovely knee into James's ribcage.
Takeda taking a break, stalling in the clinch.
Takeda crunches a lovely knee into James's ribcage.
We've seen a great period of action over the last minute or so - credit to both fighters for going all out!
A short body shot lands from Takeda as the two fighters clinch.
Takeda landing some nice looking knees to the body.
Takeda stalls.
Takeda utilising his Muay Thai to score with a knee to the body.
Takeda lands a body shot in the clinch.
James takes a knee to the side of the body.
Takeda lands a hook to the body. It's hard to tell if that hurt James or not.
Nice body punch from Takeda.
Takeda scores with a hook to the body.

That's three minutes gone in the round.
A right hook to the body lands for Takeda.
Takeda digs a right hand into James's ribs. Those have got to be taking their toll on James's gas tank.
Takeda scores a nice knee to the body.
A right handed body shot lands from Takeda.
Takeda putting his Muay Thai to good use. He has James in a tight clinch and is doing some damage with knees to the body.
Takeda slowing the pace effectively.
Takeda unloads a knee to the mid-section. James lets out a prehistoric sounding urrrrgh.
Takeda slowing the pace effectively.
An uppercut to the body lands inside from Takeda.
Takeda landing some nice looking knees to the body.
Nice body punch from Takeda.
A hook to the body from Takeda.
Takeda lands a nice shot to the body.
James takes a knee to the side of the body.
We've seen a great period of action over the last minute or so - credit to both fighters for going all out!
Takeda lands a body punch in the clinch.
Takeda scores with a knee to the head.
Takeda is leaning against James and scores with a nice uppercut to the body.
Takeda lands a good knee to the midsection. James won't want to take too many of those.
Takeda digs a right hand underneath James's ribcage. James let out a lung full of air as it connected.
Kneeeeees! The crowd are calling for knees to the body. Takeda obliges.
Takeda makes some space for himself and lands an uppercut.
Takeda scores with a hook to the body.
A body shot lands from Takeda.
James fails to pull guard.
The pace slowing considerably in the clinch, as Takeda takes a break from that fighting nonsense to think about the finer things in life.
Takeda digs a right hand underneath James's ribcage. James let out a lung full of air as it connected.

That's four minutes gone in the round.
Takeda pushes James back against the cage and unloads with a body punch.
Takeda stalling.
Takeda cracks James with a nice body shot.
Takeda leaning his opponent against the cage.
A knee to the head by Takeda.

James has double underhooks and is working for a body lock takedown. He's got it. The fighters land in half guard but Takeda regains guard immediately.
Takeda lands a beautiful switch and he's in full mount! That could spell trouble for James!
James is in a horrible position here, under a barrage of strikes, he's managing to avoid any damage.
As the round comes to an end the crowd are showing their appreciation for a great round of action.
James is trying desperately to improve position.
James avoids a series of strikes thrown by Takeda.
And thats the end of the round the fighters go back to their corners.
Shingo Takeda dominated that round.
The cut man is working on Rick James's cut.
Well, the break between rounds is over. Let's get back to the scrappin!

James looks frustrated there after his takedown attempt is stuffed easily.
James shoots for a takedown but Takeda saw that one coming a mile off and avoided it easily.
James keeps the fight on the outside.
James shoots in for a takedown. He's persisting with it as Takeda sprawls well. Takeda wins this battle and keeps the fight standing. James gets slowly back to his feet.
That's three failed takedown attempts in the round for Rick James. That's going to take a lot out of him.
James fails with a takedown attempt from distance.
We've had a slow start to the round here - hopefully the action picks up.
James shoots in looking for a single leg takedown. Takeda is trying to defend but James finishes it well and ends up in half guard. Let's see if he can advance position further.
Both fighters are absolutely exhausted here.
That's one minute gone in the round.
James trying to control from half guard but Takeda is working away.
Takeda trying to control from the bottom.

The fighters are starting to perspire pretty heavily.
James wants to work for an arm triangle but Takeda is really keeping half guard well and defending the submission attempt.
James blocks the strikes from Takeda.
James is trying for a guillotine from the top but the pressure isn't in the right place so Takeda is just riding it out for now. James eventually gives up the hold.
Takeda regains full guard. Nicely done.
That's two minutes gone in the round.
The crowd are getting on the fighters' backs, as the pace has dropped off in the last minute or so.
Takeda tries to strike from the bottom.
Takeda wants to get back to his feet but James is in a dominant position and won't allow it.
James trying to control the position from guard on top but Takeda is wriggling around, looking for whatever he can.
Takeda looking to hit a scissor sweep but James is one step ahead there.
James trying to control but Takeda is working from the bottom.
That's three minutes gone in the round.

Well, the referee has seen enough. Neither fighter is active enough on the ground so he's stood them back up.
James misses with a takedown attempt. He shot from a bit too far out.
James tries for a takedown but Takeda sees it coming a mile off and avoids it easily.
Takeda slaps away a takedown attempt from James, before circling back to the center of the mat.
James shoots in for a takedown. He's persisting with it as Takeda sprawls well. Takeda wins this battle and keeps the fight standing. James gets slowly back to his feet.
That's four minutes gone in the round.
Neither fighter has done anything of merit for a good minute or two here and the crowd are not happy about it.
James shoots in for a takedown. He's persisting with it as Takeda sprawls well. Takeda wins this battle and keeps the fight standing. James gets slowly back to his feet.
Takeda clinches up against the cage.
Takeda scores a nice knee to the body.
Knees in the clinch landing for Takeda.
The crowd thankful this round is nearly over.
A right hook to the body lands for Takeda.
Takeda lands a body punch in the clinch.
Shingo Takeda seems to be working more effectively in the clinch in the fight so far.
Takeda lands a hook to the side of the head.
Takeda unloads a knee to the mid-section. James lets out a prehistoric sounding urrrrgh.
Takeda landing knees to the body.
Takeda scores with an uppercut up the middle.
Takeda leaning against his opponent.
And thats the end of the round the fighters go back to their corners.
Shingo Takeda showed his class in that round. I'd imagine he'll take it on all the scorecards.
The cut man is working on Rick James's cut.
The corners get their ten second warning. Both fighters stand from their stools and stare eachother down, ready to get back to the action. This is the final round!

Takeda has managed to clinch.
Takeda crunches a lovely knee into James's ribcage.
Takeda lands a hook to the side of the head.
Takeda lands a glancing elbow in the clinch.
Knees to the body from Takeda.
James is working for a takedown up against the cage. He can't get it on this occasion though.
Takeda scores with a hook to the body.
Takeda scores with a hook to the body.
Takeda using the Thai clinch to land knees to the body.
Takeda will no doubt start fighting again in a minute but for now he's just having a little rest, leaning James up against the cage.
Takeda lands a shot to the body.
Takeda landing some nice looking knees to the body.
Takeda lands a knee to the head.
Takeda lands a nice uppercut.
An uppercut to the body lands inside from Takeda.
Takeda lands a shot to the body.
Takeda has been the more effective fighter overall so far.
Takeda has James pushed against the cage.
Takeda lands a knee to the head.
Takeda lands a knee to the body.
Takeda tries a knee to the head but he's missed.
Both fighters are breathing heavily.
Nice body punch from Takeda - that landed with a thud.
James letting Takeda take a breather here.
That's one minute gone in the round.
Takeda crunches a lovely knee into James's ribcage.
Takeda scores a nice knee to the body.
Good body shot from Takeda.
Takeda works for underhooks and lands a body shot in the process.
Takeda softening up his opponent with strikes, against the cage.
The pace slowing considerably in the clinch, as Takeda takes a break from that fighting nonsense to think about the finer things in life.
Takeda lands a nice looking hook to the body, against the cage.
James tries for a takedown but Takeda manages to get underhooks.
Takeda landing knees to the body. They look like they could hurt.
Takeda trying to stall but James improves his position.
A quick uppercut on the inside from Takeda.
Takeda misses with an elbow strike.
James goes for a takedown attempt but Takeda pushes him away and we're back to fighting at a distance.
That's three failed takedown attempts in the round for Rick James. That's going to take a lot out of him.
Nice takedown defense from Takeda. No joy for James on that attempt.
That's two minutes gone in the round.
The crowd are getting on the fighters' backs, as the pace has dropped off in the last minute or so.
James shoots for a double leg takedown but Takeda sprawls well. He's pushed James's face into the mat and manages to get back to his feet relatively easily.
James throws a looping left and ducks down for a takedown. He's got his arms around Takeda's waist but Takeda gets an underhook and avoids the takedown by throwing James off to one side.
James tries to keep at a distance but Takeda has taken the fight into the clinch.
Takeda landing knees to the body. They look like they could hurt.
Takeda lands with a quick shot inside that doesn't really do much damage.
Takeda putting his Muay Thai to good use. He has James in a tight clinch and is doing some damage with knees to the body.
Takeda landing knees to the body. They look like they could hurt.
A right hand to the body from Takeda.
An uppercut to the body lands inside from Takeda.
Good body shot from Takeda.
The pace slowing considerably in the clinch, as Takeda takes a break from that fighting nonsense to think about the finer things in life.
Takeda scores with a knee to the head.
Takeda stops a takedown attempt from James.
James being controlled against the cage.
James tries to jump guard but he falls flat on his backside. Takeda smiles and moves away.
Rick James has stepped it up - he knows he needs a finish here!
That's three minutes gone in the round.
James has a takedown stuffed.
Takeda takes the fight into the clinch.
The two fighters are working to gain dominance in the clinch.
Takeda gets through James's defenses to land a nice punch to the side of the head.
Nice body punch from Takeda - that landed with a thud.
Takeda digs a right hand underneath James's ribcage. James let out a lung full of air as it connected.
James gets a nice trip takedown into half guard.
Takeda is staying active underneath James, who seems content to just control the action from this position.
That's four minutes gone in the round.
James not throwing his punches with enough precision this time.
Takeda slips a foot under and gets full guard. Nice work.
James looking to pass the guard.
Takeda manages to land a sweep and now he's in mount on top!
James tries to reverse the position but Takeda maintains control.
Shingo Takeda is fighting for a decision here - he's started to take the cautious approach.
Takeda controlling his opponent.
And that's the end of the fight!
Shingo Takeda comfortably won the final round on my scorecard.
I've got Takeda winning every round here. Surely the decision will go his way and he'll pick up a well deserved decision victory. Over to the ring announcer for the scorecards.
Ladies and gentlemen, after 3 rounds of action, we go to the scorecards for a decision.
Judge Ren Mimura scores the fight for Shingo Takeda!
Judge Yukihiro Yamamoto scores the fight for Shingo Takeda!
Judge Yukihiro Shimada scores the fight for Shingo Takeda!
Shingo Takeda wins by unanimous decision!
|
|
|
|
|
|
|
|
|
|
|
|
|
|
|
|
|
|
|
|
|
|
|
| S |
C
A |
G |
S |
C
B |
G |
|
S |
C |
G |
|
energy
A | B |
|
hype
A | B |
|
pop
A | B |
|
mgr
A | B |
|
FIGHT
RATING
66% |
|
|
|
|
|
|
