|
|
PBP Commentary |
Coming up we have a light heavyweight MMA rules bout between Brad Brown (ranked 0 p4p, 0 weight class) and Raymon Carter (ranked 0 p4p, 0 weight class). Both fighters look fresh as a daisy as they make their way towards the ring.
 |
|
 |
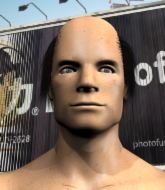
| 185 cm
23
210 lbs
6 - 11 - 0 |
|
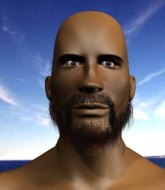
183 cm
20
195 lbs
0 - 2 - 0 |
BJJ Blue Belt
Brawler
Granite chin |
|
BJJ Blue Belt
Brawler
Solid chin |
|
| |
|
Ladies and gentlemen. This fight is 3 rounds, in the light heavyweight division.
Introducing the fighter to my left, fighting out of the red corner.
With a record of
6 - 11 - 0, fighting out of Tokyo, Brad Brown!
And introducing the fighter to my right, fighting out of the blue corner.
With a record of
0 - 2 - 0, fighting out of Tokyo, Raymon Carter!
The judges for this bout are Ren Mimura, Yukihiro Shimada and Hirohito Nitta.

The bell rings for round one and we are underway!
Brown just misses with a punch to the body.

Carter clinches with his opponent.
Carter tries to take the fight to the ground by pulling guard but can't manage it.
Carter jumps guard but Brown stands there with Carter around his waist. Carter gives up and drops back to his feet. We remain in the clinch.
Brown wants to break free but Carter has control.
Brown is trying to break the clinch but Carter has him pressed against the ropes.

Carter manages to break the clinch.
A big left from Brown misses.
Brown avoids the body shot from Carter.
Brown cracks a nice hook into Carter's ribs.
A combination from Brown does no damage.

Brown gets caught on his heels momentarily as he allows Carter to score an easy takedown into full guard.
Carter trying to control but Brown is working from the bottom.
Brown wants to stand and escape but Carter is having none of it.
The fighters are trapped in the ropes so we're going to have a reposition here. The ref calls for a break and repositions the fighters in the center of the ring.

That's one minute gone in the round.
Carter throwing strikes but missing.
Brown is looking to get back to his feet but can't, whilst Carter is controlling him.

Brown pushes Carter off and scrambles back to his feet.
Brad Brown is looking to keep the fight on the feet at all costs.
Brown throws a hook but Carter avoids it easily.
Brown throws a head kick that misses and slips in the process. He scrambles back to his feet and the fighters circle.
Brown throws a body kick but he was well out of range there.
Brown throws a head kick that misses and slips in the process. He scrambles back to his feet and the fighters circle.
Carter rushes Brown and presses him up against the ropes.
Nice elbow from Carter.

It looks like Brad Brown has been cut.
Carter breaks the clinch and we're back to striking at distance.
Carter tries to clinch up but Brown circles away and keeps his distance.
Brad Brown seems to be the more aggressive standup fighter in this bout.
Brown tries to keep at a distance but Carter has taken the fight into the clinch.
Carter fails to pull guard.
Brad Brown has stuffed three takedown attempts in the round now. That's going to take a lot out of Raymon Carter.

That's two minutes gone in the round.
Carter's corner calls for him to break the clinch, which he does.
Brown swinging wilding here.
Brown is breathing heavily.
Carter throws a quick head kick that skims the top of Brown's head.
Carter gets a clinch.
This is a great period of action - very entertaining stuff!
Carter creates a bit of distance and throws an elbow that only just misses.
Carter has hold of a leg and is looking for a trip takedown. Brown avoids it nicely though and we remain in the clinch.
Carter fails to pull guard.
Carter leaning against his opponent.
Carter can't get the takedown.
Brown wants to break the clinch but can't.
Carter is trying to work for a single leg takedown but Brown pulls him back up using the underhooks.
Brown prevents the takedown attempt.

That's three minutes gone in the round.
Carter tries to take the fight to the ground by pulling guard but can't manage it.
Carter manages to pull guard. Let's see whether he can land a sub off his back.
Carter working a defensive guard here.
Brown preventing the sweep.
Brown wants to stand but Carter is controlling his posture from full guard.
Brown wants to stand and escape but instead Carter has hit a sweep and he's now on top in guard.
Carter works over Brown with some ground and pound from guard.
Carter working in close now, lands a nice elbow to the side of Brown's head.
Carter works a leg free and moves into half guard.

That's four minutes gone in the round.
Brown is looking to escape.
Carter seems very keen to just sit and control from half guard but Brown does not like that idea so much and is remaining active off his back.
Carter is just sitting in half guard, waiting for something to happen.
The fighters are going at a pretty good pace and they're both starting to sweat now.
Carter decides to stand and escape the position.
Carter has managed to clinch.
Carter's corner calls for him to break the clinch, which he does.
Carter shoots in for a takedown and gets it. Let's see what he's got on the mat.
The crowd applaud the fighters efforts here as the round comes to an end.
Brown preventing the ground and pound from doing any damage.
Brown wants to get back to his feet but Carter is in a dominant position and won't allow it.
Carter chips away with some ground and pound.
And thats the end of the round the fighters go back to their corners.
Raymon Carter dominated that round.
The cut man is working on Brad Brown's cut.
That's time! Brown's corner gives him a slap on the ass as he gets ready to fight.

A telegraphed right hand from Brown misses the target.
Carter closes the distance and presses his opponent up against the ropes.
Carter breaks the clinch.
Brown will need to tighten up his combinations if he doesn't want to gas himself out, swinging at thin air.
A left and a right from Brown both land. Nice combination.
No joy there for Brown, who threw a few shots but didn't land.
Carter shoots in and scores a nice double leg takedown into half guard.
Ground and pound from Carter.
Both fighters are absolutely exhausted here.
Carter stops Brown from getting back to his feet.
Carter is scoring with some nice ground and pound from the dominant position.
Brown wants to get back to his feet.
Brown is staying active underneath Carter, who seems content to just control the action from this position.
That's one minute gone in the round.
Carter moves nicely into side control.
Brown tries to get back to his feet but has found himself mounted instead. Damn, that's gotta suck.
Brown squirming around on the bottom, looking to escape.
Carter tucks in and makes sure he doesn't lose the dominant position.
Brown really wants to buck Carter off and get back to his feet.
Carter is standing up, even though he is in mount.
Carter closes the distance and clinches.
That's two minutes gone in the round.
Carter jumps guard but Brown stands there with Carter around his waist. Carter gives up and drops back to his feet. We remain in the clinch.
Carter tries to pull guard but Brown won't allow it.
Brown gets double underhooks to prevent a takedown attempt from Carter.
Brad Brown has stuffed three takedown attempts in the round now. That's going to take a lot out of Raymon Carter.
Carter fails to pull guard.
Carter manages to break the clinch.
Carter scores a trip takedown into side control. Nice.
Brown wants to get back to his feet but Carter drags him back down.
Carter landing strikes.
That's three minutes gone in the round.
Carter advances to full mount.
Brown is not a happy chappy
he wants out of there.
Brown is in a horrible position here. Carter smacks him with another shot as he tries to escape the position.
Brown's corner are shouting for him to stand up but that's bad cornering - how is he meant to stand up when he's mounted? He should be looking to improve his position on the ground before trying to stand back up.
Brown has given up his back, trying to stand up. Not clever.
Carter trying to control momentarily.
That's four minutes gone in the round.
The crowd are starting to boo a lack of action.
Brown is trying to stand back up.
Carter has the hooks sunk in and you can see the will to fight slowly draining out of Brown's body.
Brown is trying to get back to his feet but Carter has full control of the position and if anything, Brown has just worked his way into a worse spot.
Carter biding his time, looking for the opening.
The fighters are tangled up in the ropes here. We might need a restart if the fighters can't break free themselves.
Carter is looking to control Brown but Brown is wriggling around and keeping busy.
And thats the end of the round the fighters go back to their corners.
Raymon Carter showed his class in that round. I'd imagine he'll take it on all the scorecards.
The cut man is working on Brad Brown's cut.
That's time! Back to the action! This is the final round!

Carter gets a takedown into half guard.
Brown pushes Carter off and gets back to his feet.
Carter shoots in from a long way out. He's driving through with the takedown attempt and he eventually gets it, landing in Brown's guard.
Carter stops Brown from standing up.
Carter passes Brown's right leg, so he's now in half guard.
Carter stands up and beckons Brown to join him on the feet.
Brown misses with a two punch combination.
The step up in weight doesn't seem to be a problem for Carter. He's performing admirably here against the bigger man.
Carter shoots in but no luck this time.
Both fighters are breathing heavily.
Brown swinging wilding here.
Brown showing good head movement there, avoiding the strikes from Carter.
Brown uses some good footwork to avoid the body shot by Carter.
That's one minute gone in the round.
Carter drops his hands momentarily and Brown takes advantage with a crisp shot to the head.
Excellent takedown into side control there by Carter.
Carter trying to control the position but Brown is working away.
Brown tries to escape but Carter is in control.
Carter lands an elbow.
That's two minutes gone in the round.
Carter happy to just control the position for now.

It looks like we're going to have a standup here. Neither fighter is doing enough on the ground.
Brown misses with a wild body shot.
Carter bobs and weaves into range and then changes levels and scores with a nice takedown into side control.

Carter is looking to finish here, going for an Americana. Brown knows the correct defense though, so he's OK.
Brown wants to escape from the position here - easier said than done!
You can see the frustration on Brown's face as Carter controls the position.
Carter working hard here to secure a kimura but he's not really in the right position for it.
That's three minutes gone in the round.
Brown is trying to stand back up. He's worked his way up against the ropes but Carter has just dragged him back down to the mat.
Carter trying to control the position but Brown is working away.
Brown is working hard to escape and get back to his feet. After a battle for position, Carter asserts his dominance and retains side control.
The referee has ruled that neither fighter is active enough on the ground and has stood them back up.
Brown throws a hook to the side of Carter's head but Carter sees it coming and ducks under it beautifully.
Carter takes the fight into the clinch.
Carter jumps guard and drags Brown to the mat. He's obviously going to be looking for submissions off his back.
That's four minutes gone in the round.
A lull in the action here being met with boos from the crowd.
Carter wriggles free and stands up.
Brown looks to score with a jab to the body but Carter is just out of range.
Carter misses with a few strikes there.
Brown misses with a double jab.
Brown scores with a nice looking left hook and follows it up with an uppercut!
Carter shoots in looking for a takedown. Brown tries to sprawl out of it but Carter keeps driving through. The fighters are pinned against the ropes. Brown manages to get underhooks and after a bit of a struggle, circles away and we're back to standing.
Brown rushes forward with a series of wild hooks but Carter moves out of range and avoids them all easily.
Brown throws a right and a left that Carter avoids nicely.
Brown looks to land a right hand but Carter moved out of range.
Carter shoots in looking for a single leg takedown. Brown is trying to defend but Carter finishes it well and ends up in half guard. Let's see if he can advance position further.
Brad Brown has stepped it up - he knows he needs a finish here!
Raymon Carter is fighting for a decision here - he's started to take the cautious approach.
Carter moves into side control, avoiding a weak kimura attempt from Brown.
And that's the end of the fight!
Raymon Carter comfortably won the final round on my scorecard.
Well Carter has outworked and out performed his opponent in all aspects of the game today. He was simply too good and the decision should be no more than a formality. Over to the ring announcer for the scorecards.
Ladies and gentlemen, after 3 rounds of action, we go to the scorecards for a decision.
Judge Ren Mimura scores the fight 27:30
Judge Yukihiro Shimada scores the fight 27:30
Judge Hirohito Nitta scores the fight 27:30
In favor of your winner, by unanimous decision... Raymon Carter!
|
|
|
|
|
|
|
|
|
|
|
|
|
|
|
|
|
|
|
|
|
|
|
| S |
C
A |
G |
S |
C
B |
G |
|
S |
C |
G |
|
energy
A | B |
|
hype
A | B |
|
pop
A | B |
|
mgr
A | B |
|
FIGHT
RATING
61% |
|
|
|
|
|
|
