|
|
PBP Commentary |
Coming up we have a welterweight MMA rules bout between Tray Beaston (ranked 0 p4p, 0 weight class) and Christopher Hero (ranked 0 p4p, 0 weight class). Christopher Hero has the better chin. Will he look to stand and bang today?
 |
|
 |
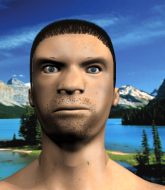
| 180 cm
21
174 lbs
1 - 2 - 0 |
|
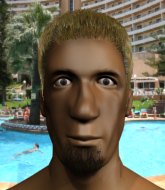
177 cm
18
180 lbs
0 - 0 - 0 |
BJJ White Belt
Decent elbows
KO power |
|
BJJ Blue Belt
Basic striking
Granite chin |
|
| |
|
Ladies and gentlemen. This fight is 3 rounds, in the welterweight division.
Introducing the fighter to my left, fighting out of the red corner.
With a record of
1 - 2 - 0, fighting out of Los Angeles, Tray Beaston!
And introducing the fighter to my right, fighting out of the blue corner.
With a record of
0 - 0 - 0, fighting out of Los Angeles, Christopher Hero!
The judges for this bout are Frank Antenori, Timothy Bukovac and .

The bell rings for round one and we are underway!

Hero drives through with a really nice takedown into side control.
The fighters are pressed up against the cage, both looking to find a bit of space to work.
The strikes coming from Hero are missing the target in this wave of attacks.
Beaston is working hard to escape and get back to his feet. After a battle for position, Hero asserts his dominance and retains side control.
Hero tries to score with some ground and pound. Beaston controls his posture well this time though and the shots don't do any damage.
Hero slows the pace down.
Beaston taking a bit of punishment here - Hero scoring with strikes.
Hero throws an elbow but Beaston slips to the side and avoids it well.
Beaston managing to avoid any damage from the strikes thrown by Hero.
Hero creates some space and throws a big elbow, but Beaston sees it coming and moves his head just enough to avoid the strike.

That's one minute gone in the round.
Beaston wants to get back to his feet.
Hero working the head and body with strikes.
Hero wants to control but Beaston is keeping him busy.
Hero misses with the ground and pound.
Hero tries to score with some ground and pound. Beaston controls his posture well this time though and the shots don't do any damage.
Hero working the head and body with strikes.
Beaston managing to avoid any damage from the strikes thrown by Hero.
Hero tries to score with some ground and pound. Beaston controls his posture well this time though and the shots don't do any damage.
Hero sitting in side control, looking to soften his opponent up with elbows and hammerfists but Beaston is avoiding damage well and looking to escape the position.

That's two minutes gone in the round.
Beaston wants to escape from the position here - easier said than done!
Hero throwing strikes but missing, from side control.
Hero has knee on belly and moves into mount.
Hero raining down shots from the mount!
Beaston is looking to get back to his feet - it's going to be hard from this position.
Hero has the superior BJJ but he's also working some ground strikes into his gameplan.
The crowd growing excited in anticipation of a finish here! Right on cue, Hero cracks his opponent with a massive right hand that draws loud cheers!
Hero thowing strikes but they're hitting the gloves, not doing any damage.

That's three minutes gone in the round.
Hero is in the full mount, landing strikes.
Hero landing shots from mount.
Hero fakes a shot to the body and cracks his opponent in the head. Nice ground and pound there!
The ref warns both fighters not to hold the cage as they work up against the meshing.
The fighters are starting to perspire pretty heavily.
Hero scoring with some good ground and pound from mount here. Will he manage to finish Beaston?
Hero throws some wild stikes that Beaston manages to avoid easily.
Beaston knows he needs to get back to his feet asap. He's simply no match for Hero on the ground.
Beaston is breathing heavily.
Poor strikes thrown by Hero there. More accuracy and less frantic strikes would help!
Hero lands with some vicious ground and pound - can Beaston hang on?
Beaston wriggling around on the bottom manages to avoid the strikes thrown by Hero.
Beaston wants to use the cage to get back to his feet here.

That's four minutes gone in the round.
Poor strikes thrown by Hero there. More accuracy and less frantic strikes would help!
Hero throwing strikes here but Beaston is writhing around nicely and avoiding any serious damage.
Hero misses with a series of strikes from mount. He'll no doubt be working on his ground and pound when he gets back to the gym.
Hero lands a nice shot to the head.
Hero controlling the position easily from mount.
Hero thowing strikes but they're hitting the gloves, not doing any damage.
Hero controlling the pace for now.
And thats the end of the round the fighters go back to their corners.
Christopher Hero dominated that round.
That's the end of the round. The referee orders the cornermen out of the cage so we can get back down to business.

Hero feints and then dives in with a takedown. That was a long way out but the feint bought him enough time to close the distance and complete the takedown. Now we'll play guard for a bit and see who can get the better of that position.
Hero loading up with the ground and pound but he's missing more than he's landing in this flurry.
Hero passes easily into side control. Nice work.
Beaston prevents Hero from moving into mount.
Hero landing strikes.
Hero in side control lands a nice looking series of punches and elbows.
Hero misses with the ground and pound.
Hero looking to punish the body of his opponent here but Beaston is avoiding damage well.
Hero working the ground and pound but Beaston is defending the strikes.
That's one minute gone in the round.

Hero is trying to land an Americana. He has the arm isolated but Beaston is keeping cool and he's avoided the danger for now.
Hero lands a knee to the body and a forearm to the face.
Hero creates some space and throws a big elbow, but Beaston sees it coming and moves his head just enough to avoid the strike.
The strikes coming from Hero are missing the target in this wave of attacks.
Beaston regains half guard, as Hero was trying to land strikes.
The two fighters exchange a few words. I couldn't hear what they were saying but maybe it's more fun if you make it up yourself. Hero connects with a nice short shot to Beaston's temple.
That's two minutes gone in the round.
Beaston keeping his head moving to avoid the ground and pound.
Hero throwing shots but they're hitting the canvas more than the man.
Beaston avoiding damage under a succession of punches from Hero.
Hero throwing shots but Beaston is blocking nicely.
Hero missing with some ground and pound from the half guard.
Both fighters are absolutely exhausted here.
Hero throwing shots but Beaston is blocking nicely.
Hero missing with the ground and pound from half guard.

The referee decides to stand the fighters back up.
Hero swats away the attempt to clinch by Beaston.
Beaston fails to land with a series of punches.
That's three minutes gone in the round.
Hero shoots in but Beaston avoids the takedown attempt easily.
Hero shoots in looking for a takedown. Beaston tries to sprawl out of it but Hero keeps driving through. The fighters are pinned against the cage. Beaston manages to get underhooks and after a bit of a struggle, circles away and we're back to standing.
Hero tries to score a power double leg takedown but Beaston sees that one coming and sprawls well. That will dishearten Hero somewhat.
Tray Beaston has stuffed three takedown attempts in the round now. That's going to take a lot out of Christopher Hero.
Beaston tries to close the distance and clinch but Hero swats him to one side with an open hand palm strike and circles away.
Beaston slaps away a takedown attempt from Hero, before circling back to the center of the mat.
Tray Beaston is looking to throw some combinations by the looks of things.
Beaston connects with a body shot.
Jab by Beaston.
Beaston tries to close the distance and clinch up but Hero swats him away and circles back towards the center.
Beaston tries to close the distance and clinch but Hero swats him to one side with an open hand palm strike and circles away.

Beaston moves into the clinch.
Hero pulls guard.
Hero tries to land a sweep but no joy.
That's four minutes gone in the round.
Hero throwing strikes off his back to little effect.
Hero tries to strike from the bottom.
Hero throwing some rather feeble looking strikes off his back.
Hero is working the butterfly guard. He manages to land a nice scissor sweep and is now in half guard on the top. Nice move.
Hero is looking for a kimura. It's going to be difficult to finish that from half guard though and Beaston defends it well.
Hero missing with the ground and pound from half guard.
Hero thows a wild elbow that connects with the canvas.
And thats the end of the round the fighters go back to their corners.
Christopher Hero showed his class in that round. I'd imagine he'll take it on all the scorecards.
OK. That's time! The bell goes and we're back to the action. The crowd applaud as we get ready to start the final round!

Beaston tries to close the distance and clinch up but Hero swats him away and circles back towards the center.
The fight stays on the outside here - Beaston looks like he's thinking about clinching though.
Hero fails with a rather predictable takedown attempt.
Hero circles away from the clinch attempt.
Hero shoots in for a takedown and gets it. Let's see what he's got on the mat.
Hero missing there with some ground and pound from the guard.
Hero chips away with some ground and pound.
Beaston wants to stand and escape but Hero is having none of it.
Hero tries to free his leg and advance position but Beaston is retaining full guard.
Beaston can't keep his opponent in guard - Hero advances to half guard, no doubt looking to mount.
Christopher Hero has got the better of the ground game so far.
Both fighters are breathing heavily.
Hero not throwing his punches with enough precision this time.
That's one minute gone in the round.
Hero not landing any meaningful shots this time.
Hero takes advantage of the dominant position to land a couple of big hammer fists.
Hero throwing punches and elbows but they're not doing any damage.
The two fighters exchange a few words. I couldn't hear what they were saying but maybe it's more fun if you make it up yourself. Hero connects with a nice short shot to Beaston's temple.
Hero throwing shots but they're hitting the canvas more than the man.
Beaston blocking the ground and pound attempt from Hero.
Hero looks towards his corner to check for any instructions. The corner give him nothing to work with, so he cracks Beaston with a short hammerfist. I guess that's as good as any advice he could get in this position.
Beaston blocking the ground and pound attempt from Hero.
Hero is trying to control. Beaston wants to improve his position but can't escape this time.
That's two minutes gone in the round.
Hero not landing any meaningful shots this time.
Hero not landing any meaningful shots this time.
Beaston blocking the ground and pound attempt from Hero.
Neither fighter is doing enough for the referee's liking and he's decided to stand them back up.
Hero lands a leg kick. The shin dug right into the meat of the thigh.
Hero moves into range and clinches up with Beaston.
Hero has clasped his hands together around Beaston's back... aaand, he's got a takedown into side control. Nicely done.
Hero working the ground and pound but he's contacting the mat, not the fighter.
The strikes coming from Hero are missing the target in this wave of attacks.
Hero working away diligently from side control. Landing strikes effectively there - that will score him some points on the judges scorecards.
Hero scoring with punches and elbows.
That's three minutes gone in the round.
Hero working the head with strikes.
Hero working the ground and pound but Beaston is defending the strikes.
An elbow from Hero crashes against the mat.
Hero tries to score with some ground and pound. Beaston controls his posture well this time though and the shots don't do any damage.
Hero lands a nice forearm strike.
Hero scoring with punches from side control.
Hero looking to punish the body of his opponent here but Beaston is avoiding damage well.
Hero in side control, trying to ground and pound but not landing this time.
Hero connects with a decent looking elbow from side control that caused Beaston some visible discomfort.
Tray Beaston has stepped it up - he knows he needs a finish here!
That's four minutes gone in the round.
A lull in the action here being met with boos from the crowd.
Hero lands a nice forearm strike.
Hero landing a few strikes.
Hero scoring with punches and elbows.
An elbow from Hero crashes against the mat.
Beaston parries the strikes from Hero easily there. Hero is wary of posturing up too much because it might enable Beaston to escape.
Beaston managing to avoid any damage from the strikes thrown by Hero.
The ground and pound from Hero seems to be hitting the mat more than his opponent.
Hero tries to land with some ground and pound but misses.
Christopher Hero is fighting for a decision here - he's started to take the cautious approach.
Hero cracks Beaston with a big elbow.
And that's the end of the fight!
Christopher Hero comfortably won the final round on my scorecard.
I've got Hero winning every round here. Surely the decision will go his way and he'll pick up a well deserved decision victory. Over to the ring announcer for the scorecards.
Ladies and gentlemen, after 3 rounds of action, we go to the scorecards for a decision.
Judge Frank Antenori scores the fight 26:30
Judge Timothy Bukovac scores the fight 26:30
Judge Suge Night scores the fight 26:30
In favor of your winner, by unanimous decision... Christopher Hero!
|
|
|
|
|
|
|
|
|
|
|
|
|
|
|
|
|
|
|
|
|
|
|
| S |
C
A |
G |
S |
C
B |
G |
|
S |
C |
G |
|
energy
A | B |
|
hype
A | B |
|
pop
A | B |
|
mgr
A | B |
|
FIGHT
RATING
47% |
|
|
|
|
|
|
