|
|
PBP Commentary |
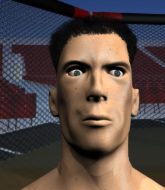
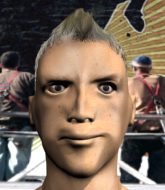
Coming up we have a bantamweight MMA rules bout between Will Hutchins (ranked 0 p4p, 0 weight class) and Anderson Mir (ranked 0 p4p, 0 weight class). These two fighters really are very evenly matched on the feet - it will be fascinating to see who can assert themselves in that aspect of the fight.
 |
|
 |
| 180 cm
19
135 lbs
2 - 0 - 0 |
|
190 cm
20
130 lbs
2 - 0 - 0 |
BJJ Blue Belt
Basic striking
Good chin |
|
BJJ Blue Belt
Counter striker
Very confident |
|
| |
|
Ladies and gentlemen. This fight is 3 rounds, in the bantamweight division.
Introducing the fighter to my left, fighting out of the red corner.
With a record of
2 - 0 - 0, fighting out of London, Will Hutchins!
And introducing the fighter to my right, fighting out of the blue corner.
With a record of
2 - 0 - 0, fighting out of London, Anderson Mir!
The judges for this bout are Chris Edwards, James Ackerman and Richard Clark.

The bell rings for round one and we are underway!
Mir fails in his attempt to clinch.

Hutchins scores a takedown into full mount!
Hutchins wants to control the pace but Mir is squirming around nicely.
Hutchins looking to ground and pound his opponent to a finish here.
Mir is desperately trying to get back to half guard.
Mir is persisting with the attempt to improve his position.
Mir is trying to stand up.
Mir is using up a lot of energy trying to get back to his feet. Perhaps he should improve his position first.
Hutchins is still in mount, landing shots to his trapped opponent. Mir can't stay in a position like this for much longer.
Hutchins really does look like a pencil wearing a pair of gloves. Let's hope he has a gameplan to suit that ridiculous body shape.
Mir tries to get back to half guard but can't.

Hutchins is standing up out of mount! Strange tactic there - he must really want this one on the feet!
Hutchins shoots in for a takedown - he's clinched up with Mir but Mir pushes him off and we're back to square one.
Hutchins tries to shoot in for a takedown. He's got hold of a leg but Mir swivels and escapes.
Will Hutchins seems to be the more aggressive standup fighter in this bout.

That's one minute gone in the round.
Mir fails with an attempt to clinch.
Mir stuffs the takedown attempt from Hutchins. Hutchins gets slowly back to his feet.
That's three failed takedown attempts in the round for Will Hutchins. That's going to take a lot out of him.
Hutchins is breathing heavily.
Hutchins looks to clinch

and Mir holds on and brings the fighters into a clinch.
Mir stalling the fight.
Hutchins changes levels and goes for a takedown here. Mir fights it off and pushes away nicely.
Mir clinches up with Hutchins and pushes him back against the cage.

Mir breaks the clinch and we're back to striking at distance.
Mir has Hutchins up against the cage in a clinch.
Mir throws a knee to the head but misses.
Mir breaks the clinch and we're back to striking at distance.

That's two minutes gone in the round.
Mir tries to clinch but Hutchins is having none of it.
Hutchins has closed the distance and engaged Mir in a clinch.
Hutchins managing to block the knees to the body from Mir.
Mir looking to throw knees to the head but Hutchins is blocking nicely.
Mir landing knees to the body. They look like they could hurt.
Hutchins lands a right uppercut that snaps the head of Mir backwards.
Mir wants a takedown but no success here.
Hutchins has had enough of the clinch but Mir keeps him there for the moment.
Hutchins manages to pull guard.

Hutchins looking for submissions from the bottom here. Moving his hips around, possibly looking for an armbar.
Mir wants to pass the guard but Hutchins is keeping the position.

That's three minutes gone in the round.
Mir thinks about going for a leg but decides against it, in order to maintain the position.
Hutchins keeping full guard, as Mir tries to pass.
Hutchins looking to control.
The ref warns both fighters not to hold the cage as they work up against the meshing.
Mir stands up from guard. Let's bang!
Hutchins with a poor takedown
and Mir counters by clinching up.
Mir scores with a knee to the head.
Mir throws a vicious knee straight up the middle but Hutchins blocks it with crossed arms.
Hutchins tries to pull guard but Mir holds him up against the cage and eventually Hutchins drops back down to his feet.
Hutchins successfully pulls guard.
Hutchins looking for submissions off his back, moving his hips, looking for an opening.

That's four minutes gone in the round.
Hutchins is working actively off his back, looking to secure an arm or perhaps work for a triangle.
Hutchins controls Mir momentarily but Mir frees himself.
Hutchins working from the bottom, still in full guard. He's managed to get a loose triangle. Mir doesn't seem to be doing much to defend here, obviously he feels comfortable in the position. Mir manages to throw the legs off his shoulder and he's back into guard - no problem.
Mir gets to his feet and steps away from his opponent.
Hutchins feints and then dives in with a takedown. That was a long way out but the feint bought him enough time to close the distance and complete the takedown. Now we'll play guard for a bit and see who can get the better of that position.
Hutchins passes Mir's left leg - he's now in half guard.
The fans in attendance giving it up for the two fighters, who have really let it all hang out in the last minute or so!
Mir wants to get back to full guard.
The crowd applaud the fighters efforts here as the round comes to an end.
Mir is trying to stand up here but Hutchins is controlling him well.
Mir is pressing down on Hutchins's left leg trying to get back to full guard. He's managed it.
Mir is working the butterfly guard. He manages to land a nice scissor sweep and is now in half guard on the top. Nice move.
Mir wants to get back to his feet.
And thats the end of the round the fighters go back to their corners.
Will Hutchins dominated that round.
That's the end of the interval. I'm sure that seemed a lot quicker than a minute for our two fighters! Back to the action.

Mir will have to do better than that with his takedown attempts.
Hutchins tries to clinch
so Mir counters with a double leg into guard. Good agility.
Mir tries to stand but Hutchins is controlling from the bottom.
Hutchins not looking particularly offensive just at the moment.
Mir pushing down on Hutchins's thigh, trying to pass to half guard. He's managed it... Nice work.
Hutchins looking to work for a kimura from the bottom.
Mir seems to have lost interest with the ground game and is thinking about standing back up.
Mir wants to pass to mount but Hutchins is defending the position.
Hutchins is trying to maintain the position but Mir is very close to passing his half guard.
Both fighters are absolutely exhausted here.
Mir wants to control but Hutchins is keeping him busy.

It looks like we're going to have a standup here. Neither fight is doing enough on the ground.
Hutchins misses with a double jab
and Mir counters with a single leg into guard. Hutchins didn't expect that.
That's one minute gone in the round.
Mir gets to his feet. Hutchins looking to butt scoot but the ref puts an end to that. On your feet son!
Hutchins jabbing away but nothing is landing.
Hutchins swings wildly with a couple of big hooks
and Mir decides to take the opportunity to score a takedown. He's landed in Hutchins's guard.
Mir stands up from Hutchins's guard - Mir perhaps looking for a knockout.
Mir is looking to take this fight into the clinch.
Mir gets his head snapped back by a nice shot there.
Will Hutchins is looking to throw some combinations by the looks of things.
Mir fails with an attempt to clinch.
Mir moves in looking to clinch but Hutchins pushes him off.
Hutchins throws a left and a right that both miss
and Mir moves into the clinch.
Mir with the Thai clinch. He's looking to land a big knee but he's not managed it this time.
Hutchins has picked Mir up - he's going for a ride! Hutchins dumps his opponent to the mat with a thud and settles into half guard.
That's two minutes gone in the round.
Hutchins is keen to just control but Mir is a slippery customer.
Mir looks like he's trying to stand up.
Mir manages to escape and get back to his feet!
Mir is looking to take this fight into the clinch.
Hutchins shoots and misses
so Mir counters with a double leg into guard. Good agility.
The crowd are loving this. Great action here.
Hutchins controls Mir momentarily but Mir frees himself.
Mir stands up from Hutchins's guard - Mir perhaps looking for a knockout.
Hutchins gets his takedown attempt stuffed easily
and Mir moves into the clinch.
Mir using the Thai plumb to throw knees but Hutchins has his back arched nicely, preventing the strike.
Hutchins tries to break the clinch but Mir is controlling the position.
Mir lands a knee to the head.
Mir scores with a knee to the head.

It looks like Will Hutchins has been cut.
That's three minutes gone in the round.
Hutchins lands a left hand.
Hutchins is trying to work for a single leg takedown but Mir pulls him back up using the underhooks.
That's three failed takedown attempts in the round for Will Hutchins. That's going to take a lot out of him.
Mir scores with a knee to the head.
Mir blocks a couple of punches on the inside.
Mir breaks the clinch.
Hutchins swats away the attempt to clinch by Mir.
Hutchins closes the distance but Mir moves to the side
and Mir counters with a shoot takedown. Hutchins fights it but they end up in guard.
Mir stands up from Hutchins's guard - Mir perhaps looking for a knockout.
Hutchins wants to clinch
and Mir counters with a nice double leg into guard.
Mir with a couple of shots to the head there. Not particularly brutal.
Mir stands and steps away. Hutchins gets to his feet too and we're back to the striking game.
That's four minutes gone in the round.
This has been an exciting period of action!
Hutchins misses with a takedown
and Mir counters by moving into the clinch.
A knee to the head by Mir.
Mir successfully pulls guard.
Hutchins pushes down on Mir's leg and manages to get into half guard.
Mir wants to improve his position but Hutchins is controlling well.
Hutchins trying to control from half guard but Mir is working away.
Mir looks like he's trying to stand up.
Mir is trying to escape back to his feet but Hutchins uses the scramble to pass into side control.
As the round comes to an end the crowd are showing their appreciation for a great round of action.
Hutchins wants to work for a kimura but he's foiled early by Mir, who protects the arm well.
Mir tries to escape but Hutchins is in control.
And thats the end of the round the fighters go back to their corners.
Anderson Mir showed his class in that round. I'd imagine he'll take it on all the scorecards.
The cut man is working on Will Hutchins's cut.
The corners get their ten second warning. Both fighters stand from their stools and stare eachother down, ready to get back to the action. This is the final round!

Hutchins misses with a hook
and Mir counters with a driving takedown into guard. Nice work there by Mir.
Mir wants to control from the top but Hutchins keeps moving.
Mir gets to his feet - Hutchins follows without any prompting.
Hutchins looks to clinch
and Mir counters into the clinch. Nicely done.
Hutchins tries to pull guard but Mir won't allow it.
Hutchins goes for a takedown attempt but Mir pushes him away and we're back to fighting at a distance.
Hutchins tries to clinch but Mir moves away
and Mir counters with a nice shoot takedown that brings the fighters to the ground.
Mir stands up and waves to Hutchins to follow him.
The crowd cheering loudly, showing their appreciation for the quality fight we're seeing here.
Mir has Hutchins up against the cage in a clinch.
Come on Hutchins - let's have some action - none of this stalling nonsense.
Both fighters are breathing heavily.
Mir misses with a knee to the head.
That's one minute gone in the round.
Mir tries a knee to the head but he's missed.
Mir breaks the clinch and we're back to striking at distance.
The fighters circling - Hutchins throws out the jab but it was never going to land.
Mir closes the distance and clinches.
Mir has Hutchins pressed against the cage.
Hutchins lands punches inside but they're not really causing much damage.
Hutchins lands punches inside but they're not really causing much damage.
Mir manages to break the clinch.
Hutchins closes the distance looking to clinch
and Mir counters with a single leg into guard. Hutchins didn't expect that.
That's two minutes gone in the round.
Mir wants to stand but Hutchins is controlling his posture from full guard.
Hutchins bucks up whilst keeping hold of a body lock, managing to reverse the position. Now he's in top in Mir's guard.
Mir is edging up against the cage. He's using the cage to get back to his feet. Nice work there - the fighters are clinched.
Mir looking to throw knees to the head but Hutchins is blocking nicely.
Mir gets double underhooks to prevent a takedown attempt from Hutchins.
That's three failed takedown attempts in the round for Will Hutchins. That's going to take a lot out of him.
Mir tries to land a knee to the head but misses.
That's three minutes gone in the round.
Hutchins is working for a takedown up against the cage. He can't get it on this occasion though.
Mir breaks the clinch.
Hutchins looks to clinch
and Mir holds on and brings the fighters into a clinch.
Hutchins goes for a takedown attempt but Mir pushes him away and we're back to fighting at a distance.
Mir drives through and clinches with Hutchins against the cage.
Hutchins tries to jump guard but he falls flat on his backside. Mir smiles and moves away.
Hutchins tries to clinch up
and Mir counters by moving into the clinch. Good anticipation by Mir.
Mir manages to break the clinch.
Hutchins throws a left and a right that both miss
and Mir counters with a driving takedown into guard. Nice work there by Mir.
Mir decides he's had enough of playing guard and decides to stand. Come on Hutchins, up you get!
That's four minutes gone in the round.
Hutchins throws a poor cross that misses
and Mir moves into the clinch.
Mir landing knees to the head.
Mir manages to break the clinch.
Hutchins tries to clinch
and Mir holds on and brings the fighters into a clinch.
Mir misses with a knee to the head.
Hutchins fails to pull guard.
Hutchins takes a knee right on the jaw!
Mir tries to land a knee to the head but Hutchins blocks with his arms.
Mir breaks the clinch.
As the round comes to an end the crowd are showing their appreciation for a great round of action.
Hutchins tries to clinch
and Mir counters by moving into the clinch.
The crowd are loving this. Great action here.
Mir with an attempt at a knee that misses.
A head punch on the inside from Hutchins fails to land.
And that's the end of the fight!
Anderson Mir comfortably won the final round on my scorecard.
Well Mir has outworked and out performed his opponent in all aspects of the game today. He was simply too good and the decision should be no more than a formality. Over to the ring announcer for the scorecards.
Ladies and gentlemen, after 3 rounds of action, we go to the scorecards for a decision.
Judge Chris Edwards scores the fight 27:29
Judge James Ackerman scores the fight 27:29
Judge Richard Clark scores the fight 27:29
In favor of your winner, by unanimous decision... Anderson Mir!
|
|
|
|
|
|
|
|
|
|
|
|
|
|
|
|
|
|
|
|
|
|
|
| S |
C
A |
G |
S |
C
B |
G |
|
S |
C |
G |
|
energy
A | B |
|
hype
A | B |
|
pop
A | B |
|
mgr
A | B |
|
FIGHT
RATING
91% |
|
|
|
|
|
|
