|
|
PBP Commentary |
Coming up we have a welterweight MMA rules bout between Charles Stryker (ranked 0 p4p, 0 weight class) and Saikosis Killzie (ranked 0 p4p, 0 weight class). The atmosphere really building for this one as we go over to our ring announcer for the fighter introductions!
 |
|
 |
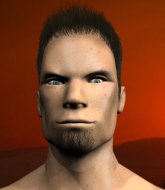
| 188 cm
18
185 lbs
1 - 0 - 0 |
|
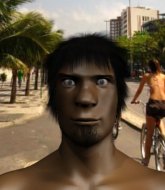
180 cm
18
180 lbs
0 - 1 - 0 |
BJJ Blue Belt
Basic striking
Good in bed |
|
BJJ White Belt
Solid Muay Thai
Intelligent |
|
| |
|
Ladies and gentlemen. This fight is 3 rounds, in the welterweight division.
Introducing the fighter to my left, fighting out of the red corner.
With a record of
1 - 0 - 0, fighting out of Hilo, Charles Stryker!
And introducing the fighter to my right, fighting out of the blue corner.
With a record of
0 - 1 - 0, fighting out of Hilo, Saikosis Killzie!
The judges for this bout are , and .

The bell rings for round one and we are underway!
Killzie wants to clinch up but Stryker keeps it at a distance.
Killzie throws a hook to the side of Stryker's head but Stryker sees it coming and ducks under it beautifully.

Stryker gets taken down but at least he's managed to land in guard.
Killzie trying to control but Stryker is working from the bottom.
Stryker tries to strike from the bottom.
Stryker utilising some decent striking defenses from the guard, preventing the ground and pound.
Stryker has been looking to land a fair amount of strikes on the ground. He might be looking to soften his opponent up in order to work for a submission.
Killzie trying to control the position from guard on top but Stryker is wriggling around, looking for whatever he can.
Killzie looking to pass the guard.
The fighters are trapped in the ropes so we're going to have a reposition here. The ref calls for a break and repositions the fighters in the center of the ring.
Killzie controlling from the guard. I say controlling but really, he's stalling.
Stryker working a defensive guard here.

That's one minute gone in the round.
Stryker throwing strikes off his back to little effect.

Neither fighter is doing enough for the referee's liking and he's decided to stand them back up.
Stryker fails with a takedown attempt from distance.
Killzie looks to score with a combo but nothing lands.
Killzie lands a head kick!
Killzie moves in looking to clinch but Stryker pushes him off.
Stryker avoids the clinch attempt nicely.
Stryker connects with a hook to the side of his opponent's head.
Stryker blocks a head kick by Killzie.

The fight moves into the clinch position.
Killzie tries to jump guard but he falls flat on his backside. Stryker smiles and moves away.

That's two minutes gone in the round.
Stryker fakes with an overhand right and moves in to clinch with Killzie, pushing him back against the ropes.
Stryker pulls guard successfully.
Killzie wants to stand but Stryker is controlling his posture from full guard.

Stryker is working actively off his back, looking to secure an arm or perhaps work for a triangle.
Killzie really doesn't want to stay on the ground with Stryker. If he can't get it back to his feet, it's only a matter of time before he'll be tapping out.
Killzie won't allow Stryker to sweep him here.
Killzie tries to free his leg and advance position but Stryker is retaining full guard.

That's three minutes gone in the round.
Killzie trying to control the position from guard on top but Stryker is wriggling around, looking for whatever he can.
Stryker controlling the position.
Stryker tries to land a sweep but no joy.
Killzie wants to stand but Stryker has a closed guard, so he can't escape.
Stryker is working an open guard here, looking to improve his position. No doubt that will leave him open to counters but at least he's being more offensive.
Well, the referee has seen enough. Neither fighter is active enough on the ground so he's stood them back up.
Stryker shoots in but no luck this time.

That's four minutes gone in the round.
A lull in the action here being met with boos from the crowd.
Stryker tries to score a power double leg takedown but Killzie sees that one coming and sprawls well. That will dishearten Stryker somewhat.
That's three failed takedown attempts in the round for Charles Stryker. That's going to take a lot out of him.
Killzie is the aggressor but that punch slipped nicely by Stryker.
Stryker rushes Killzie and presses him up against the ropes.
Killzie misses with a knee to the head.
Stryker tries to take the fight to the ground by pulling guard but can't manage it.
Stryker fails to pull the fight into his guard.
A real battle for position is taking place between these two warriors.
Killzie jumps guard but his hands slip and he falls flat on his back. Well, he's made himself look a right mug there, as Stryker walks away with a smile on his face. Killzie gets slowly back to his feet and shakes his head.
Stryker tries to clinch up.
Killzie clinches but Stryker breaks the clinch
and he gets countered with a snapping leg kick.
Stryker shoots in but no luck this time.
Stryker fails with a takedown attempt.
And thats the end of the round the fighters go back to their corners.
Saikosis Killzie dominated that round.
The referee calls time. The cornermen exit stage left and we're back to business.

Stryker drives through and clinches with Killzie against the ropes.
Stryker fails to pull guard.
Killzie doesn't land with the attempted body shot.
Stryker tries to jump guard but he falls flat on his backside. Killzie smiles and moves away.
Killzie tries to close the distance and clinch up against the ropes but Stryker paws at him with a jab and circles away.
Killzie tries to land a front kick but Stryker steps back. That was a bit too telegraphed.
Stryker tries to clinch but Killzie moves out of range.
Killzie wants to clinch
and Stryker counters by moving into the clinch.
We've had a slow start to the round here - hopefully the action picks up.
Killzie tries a knee to the head but Stryker blocks it.
Killzie prevents a takedown attempt there.
That's three failed takedown attempts in the round for Charles Stryker. That's going to take a lot out of him.
Stryker on the defensive, avoiding the knees to the body.
That's one minute gone in the round.
Killzie tries to pull guard but Stryker holds him up against the ropes and eventually Killzie drops back down to his feet.
Stryker fails to pull guard.
Killzie fails to pull guard.
Stryker pulls guard.
Killzie pressing down on his opponent's thigh, looking to pass guard. Stryker is keeping the position for now.
Stryker looking to control.
Killzie wanted to stand there but Stryker had control of the position.
Killzie trying to move into half guard but instead Stryker has managed to sweep!
Killzie keeping moving, preventing Stryker from controlling successfully.
That's two minutes gone in the round.
The crowd are hurling abuse towards the fighters... You can hardly blame them though because there isn't a lot going on in the fight.
Stryker trying to pass the guard but can't manage it just yet.
Killzie keeping moving, preventing Stryker from controlling successfully.
It looks like we're going to have a standup here. Neither fighter is doing enough on the ground.
Stryker shoots in but Killzie avoids the takedown attempt easily.
Killzie fails miserably with a takedown attempt.
Stryker pushes Killzie up against the ropes in a clinch.
Stryker tries to jump guard but he falls flat on his backside. Killzie smiles and moves away.
Charles Stryker seems to be the more aggressive standup fighter in this bout.
That's three minutes gone in the round.
Killzie fakes and then throws a beautiful body shot. Stryker looks a bit winded and takes a step backwards to take a breath.
Killzie leaves Stryker with his face pressed against the mat as he sprawls beautifully, defending against a solid takedown attempt.
Both fighters are absolutely exhausted here.
Killzie wants to clinch
and Stryker counters with a quick right hand to the jaw.
Stryker swings wildly with a hook that is half blocked by Killzie.
No luck for Stryker with that takedown attempt.
The fight stays on the outside here - Stryker looks like he's thinking about clinching though.
Charles Stryker is looking to throw some combinations by the looks of things.
Killzie thuds his right hand into Stryker's forehead from close range. That could be painful for both fighters.
Stryker ducks under a wild hook from Killzie.
Killzie tries to clinch
and Stryker counters with a nice shoot takedown that brings the fighters to the ground.
Killzie avoiding any damage from the ground and pound.
Stryker is holding a leg here, probably looking for an ankle lock - he drops back and goes for it! Killzie is in trouble! Is it all over??? No! Killzie has escaped and now he's on top!
That's four minutes gone in the round.
Stryker not looking particularly offensive just at the moment.
Killzie trying to stand up but can't free himself from Stryker's guard.
Stryker manages to sweep nicely, so he's now on top. Killzie manages to get himself to full guard.
Stryker trying to pass the guard but can't manage it just yet.
And thats the end of the round the fighters go back to their corners.
Charles Stryker dominated that second round.
The referee calls time. The cornermen exit stage left and we're back to business. Ladies and gentlemen, this is the final round!

Killzie throws a head kick but Stryker moves out of range.
Stryker moves into range and connects with a jab.
Killzie wants to clinch but Stryker slips to the side
and Stryker counters by moving into the clinch.
Stryker fails to pull guard.
Killzie has Stryker pressed up against the ropes and is working for takedown. Stryker manages to improve position though and keeps the fight standing.
Killzie has managed to pull guard. Let's see whether he can work an aggressive guard. It will also be interesting to see what tactics Stryker uses from the top position.
Stryker drops back looking for a leg! Killzie is in trouble here! The fighters roll with the hold and Killzie manages to kick Stryker off! Stryker jumps back into Killzie's guard.
Stryker advances position into side control!
Both fighters are breathing heavily.
Stryker is looking to finish here, going for an Americana. Killzie knows the correct defense though, so he's OK.
That's one minute gone in the round.
Stryker throws a strike aimed at the side of Killzie's head but Killzie avoids it well.
Stryker trying to control the action but Killzie is working from the bottom.
Stryker throwing strikes but missing, from side control.
That's two minutes gone in the round.
The crowd are getting on the fighters' backs, as the pace has dropped off in the last minute or so.
Stryker working hard here to secure a kimura but he's not really in the right position for it.
Stryker working the ground and pound.
Stryker goes for an armbar here - this could be all over! But no, Killzie has escaped beautifully and is now on top in side control! Oh, that's unlucky for Stryker but great work by Killzie.
Killzie wants to lay and pray for a moment but Stryker keeps working.
Killzie controlling the position from side mount.
That's three minutes gone in the round.
Stryker defending against the ground and pound.
Stryker is trying to control Killzie's posture but Killzie avoids it.
Killzie is looking to take a break and control but Stryker is keeping him honest, looking to work from the bottom.
Killzie tries to get to his feet but he's trapped momentarily.
Stryker wants to control but Killzie postures up.
That's four minutes gone in the round.
A lull in the action here being met with boos from the crowd.
Killzie wants to stand but Stryker has his arm trapped.
The referee has ruled that neither fighter is active enough on the ground and has stood them back up.
Killzie wants to clinch but Stryker slips to the side
and Stryker holds on and brings the fighters into a clinch.
Killzie is looking to score with knees to the body. Maybe he'll change it up and go body then head. Stryker is defending well for now.
Stryker tries to pull guard but Killzie holds him up against the ropes and eventually Stryker drops back down to his feet.
Stryker pulls guard successfully.
Stryker looking for submissions from the bottom here. Moving his hips around, possibly looking for an armbar.
Killzie trying to pass the guard. He's being very persistent here but Stryker manages to land a sweep and now he's on top!
The crowd thankful this round is nearly over.
Stryker stands up and looks to throw the legs aside to pass to side control. Killzie swivels though and keeps the full guard.
And that's the end of the fight!
Charles Stryker showed his dominance in that final round.
I think Stryker has won this one but let's see what the judges have to say. Over to the ring announcer for the scorecards.
Ladies and gentlemen, after 3 rounds of action, we go to the scorecards for a decision.
Judge Andi Peters scores the fight 29:28
Judge Gordon Ramsey scores the fight 29:28
Judge Frank Skinner scores the fight 29:28
In favor of your winner, by unanimous decision... Charles Stryker!
|
|
|
|
|
|
|
|
|
|
|
|
|
|
|
|
|
|
|
|
|
|
|
| S |
C
A |
G |
S |
C
B |
G |
|
S |
C |
G |
|
energy
A | B |
|
hype
A | B |
|
pop
A | B |
|
mgr
A | B |
|
FIGHT
RATING
35% |
|
|
|
|
|
|

