|
|
PBP Commentary |
Coming up we have a light heavyweight MMA rules bout between Baek Do San (ranked 0 p4p, 0 weight class) and Tim Horton (ranked 0 p4p, 0 weight class). Baek Do San has the edge in experience - let's see if he can make that count tonight.
 |
|
 |
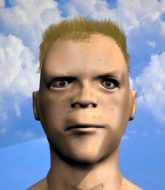
| 180 cm
22
198 lbs
1 - 4 - 0 |
|
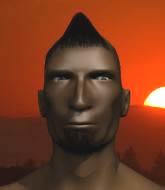
200 cm
21
200 lbs
0 - 0 - 0 |
BJJ White Belt
Solid Muay Thai
Good chin |
|
BJJ Blue Belt
Nice elbows
Intelligent |
|
| |
|
Ladies and gentlemen. This fight is 3 rounds, in the light heavyweight division.
Introducing the fighter to my left, fighting out of the red corner.
With a record of
1 - 4 - 0, fighting out of Rio de Janeiro, Baek Do San!
And introducing the fighter to my right, fighting out of the blue corner.
With a record of
0 - 0 - 0, fighting out of Rio de Janeiro, Tim Horton!
The judges for this bout are Daniel Cesar, Edson Gomes and Leandro Rodrigues.

The bell rings for round one and we are underway!

Do San closes the distance, clinches up and gets a nice trip takedown into side control. Very smooth.
Do San working away.

Do San is trying to land an Americana. He has the arm isolated but Horton is keeping cool and he's avoided the danger for now.
Do San trying to control the action but Horton is working from the bottom.
Do San knows he needs to get back to his feet asap. He's simply no match for Horton on the ground.
Do San staying calm.
Horton manages to get back to half guard.

That's one minute gone in the round.
Horton is trying to get back to full guard.
The fighters are pressed up against the cage, both looking to find a bit of space to work.
Horton punching from the bottom.
Horton makes his way to full guard. A much better position for Horton.
Do San stands up and looks to throw the legs aside to pass to side control. Horton swivels though and keeps the full guard.
Horton not looking particularly offensive just at the moment.
Horton keeping full guard, as Do San tries to pass.
Do San looking to control the position here, rather than advance.

That's two minutes gone in the round.
A lull in the action here being met with boos from the crowd.
Horton wants to control but instead he gets his guard passed and Do San is now in half guard.
Horton tries to roll over but Do San keeps him under control.
Horton lands one or two decent shots to the body here. Although from his own half guard, he's not going to be causing too much damage.
Horton trying to control but Do San postures up.
Horton tries to get to full guard but Do San has control of the leg.
The fighters are starting to perspire pretty heavily.
Do San wants to advance to full mount but Horton doesn't think that's going to happen and regains full guard instead.

That's three minutes gone in the round.
Do San content to stall in guard here.
Horton working for a triangle but Do San defends it easily.
Horton looks gassed!
Horton keeping moving, preventing Do San from controlling successfully.
Horton is trying to control the position but Do San postures up.

That's four minutes gone in the round.
The crowd are hurling abuse towards the fighters... You can hardly blame them though because there isn't a lot going on in the fight.
Do San wants to control from the top but Horton keeps moving.
Horton wants to stand and escape but Do San is having none of it.

The referee has ruled that neither fighter is active enough on the ground and has stood them back up.
Horton gets taken down but at least he's managed to land in guard.
Do San wants to control from the top but Horton keeps moving.
Do San is just sitting in guard, looking to avoid any submissions.
Horton is looking to get back to his feet but can't, whilst Do San is controlling him.
The crowd thankful this round is nearly over.
Do San showing good wrestling skills to control the position.
Do San's ground tactics aren't going to win him many fans. Let's hope he's got fireworks for us if he gets back to his feet because he's not doing much on the ground.
And thats the end of the round the fighters go back to their corners.
Baek Do San dominated that round.
The fighters' corners scream their final instructions, as the referee calls time. Here we go, back to the action!

Horton has his takedown stuffed
and Do San counters with a nice double leg into guard.
The ref warns both fighters not to hold the cage as they work up against the meshing.
Do San controls from within his opponent's guard.
Horton keeping moving, preventing Do San from controlling successfully.
Horton throws his legs up looking for a submission but Do San uses it to pass to side control.
Do San trying to control the action but Horton is working from the bottom.
Horton is trying to control Do San's posture but Do San avoids it.
Do San tries to move into full mount but can't pass Horton's legs.
Horton is breathing heavily.
That's one minute gone in the round.
You can see the frustration on Horton's face, being in this tough position on the bottom.
Do San tries for an arm triangle. That looks pretty tight to me. Is this one over!?! Possibly, maybe, no Do San has let go of the choke. Obviously it wasn't as tight as we thought!
Horton being controlled for a moment.
Do San wants to lay and pray for a moment but Horton keeps working.
Horton being controlled for a moment.
Neither fighter is doing enough for the referee's liking and he's decided to stand them back up.
Horton tries for a takedown but Do San circles away easily
and Do San counters with a nice double leg into side control. Horton won't be happy with that.
That's two minutes gone in the round.
Do San happy to just control the position for now.
Horton is positioning himself to get back to half guard.
Horton can't do much from the bottom here.
Horton is trying to get back to half guard.
That's three minutes gone in the round.
Do San trying to control the position but Horton is working away.
Horton tries to escape but Do San is in control.
Neither fighter is doing enough for the referee's liking and he's decided to stand them back up.
Horton tries to clinch but fails miserably
and Do San counters with a single leg into guard. Horton didn't expect that.
Do San pressing down on his opponent's thigh, looking to pass guard. Horton is keeping the position for now.
Do San might be looking to lock onto one of his opponent's long limbs for a submission, whilst we're on the ground.
Horton wants to stand but Do San is controlling the position.
Do San preventing the sweep.
Do San stands up and looks to throw the legs aside to pass to side control. Horton swivels though and keeps the full guard.
Do San avoids a guillotine attempt easily.
Horton wants to stand and escape but Do San is having none of it.
That's four minutes gone in the round.
Do San slows down the pace of the fight for a moment. He'll need to remain active if he doesn't want to see the fight stood back up.
Horton wants to sweep here but Do San controlling him for the moment.
The referee has ruled that neither fighter is active enough on the ground and has stood them back up.
Do San looks for a takedown here. Will he get it? Horton is fending him off so far but Do San persists. Nope, Horton circles away and we're back to standing.
Horton tries to grapple but his opponent circles
and Do San counters with a single leg into guard. Horton didn't expect that.
Horton trying to control the position.
Horton manages to land a sweep and now he's in mount on top!
This is a great period of action - very entertaining stuff!
The crowd applaud the fighters efforts here as the round comes to an end.
Horton looking to finish Do San with some ground and pound. This is bad for Do San!
Horton looking to control and managing it successfully.
And thats the end of the round the fighters go back to their corners.
Baek Do San dominated that second round.
The minute break is over - no more time for sponges and pep talks - back to the action! This is the final round!

Horton doesn't succeed with the takedown
and Do San counters with a nice double leg into half guard.
Horton keeping control of the position.
Do San is keen to just control but Horton is a slippery customer.
Horton is looking to improve his position.
Horton is persisting with the attempt to improve his position.
Horton is trying to stand.
Do San slows the pace down in half guard.
Do San looking for a kimura but he'll have to free his other leg if he wants to finish that. Perhaps he's just using it as a distraction technique.
Both fighters are breathing heavily.
That's one minute gone in the round.
Neither fighter is doing enough for the referee's liking and he's decided to stand them back up.
Do San gets the takedown into side control.
Horton tries to buck Do San off but Do San is having none of it.
Horton sneaks out the side door and pushes Do San away - he's back to his feet. The crowd show their appreciation for the escape.
Horton throws a leg kick but Do San checks it.
Do San circles away from the clinch attempt
and Do San counters with a nice double leg into side control. Horton won't be happy with that.
Horton wants to control but Do San postures up.
Do San controlling from side mount.
Horton wants to control but Do San postures up.
Tim Horton has stepped it up - he knows he needs a finish here!
That's two minutes gone in the round.
Horton is trying to escape and get back to his feet.
You can see the frustration on Horton's face, being in this tough position on the bottom.
Horton sneaks a leg under to get back to half guard.
Horton has no desire to be mounted, so is trying to control. Do San is working away from the top position though.
Horton is trying to stand up here but Do San is controlling him well.
It looks like we're going to have a standup here. Neither fight is doing enough on the ground.
Do San closes the distance and looks for a trip takedown... aaaand he's got it - Do San lands in his opponent's guard.
That's three minutes gone in the round.
Do San stays in close to Horton's body and controls the position.
Horton working from the bottom, still in full guard. He's managed to get a loose triangle. Do San doesn't seem to be doing much to defend here, obviously he feels comfortable in the position. Do San manages to throw the legs off his shoulder and he's back into guard - no problem.
Horton punching from the bottom.
Do San passes Horton's left leg - he's now in half guard.
Still in half guard, Do San seems content to control.
Horton tries to roll over but Do San keeps him under control.
Do San sitting and controlling from the half guard.
Do San passes into side control, despite Horton's attempt to control the position.
That's four minutes gone in the round.
Do San working hard here to secure a kimura but he's not really in the right position for it.
Do San is looking to take a break and control but Horton is keeping him honest, looking to work from the bottom.
Horton is looking to reverse the position.
Horton gets back to half guard.
And that's the end of the fight!
Baek Do San showed his dominance in that final round.
Well I reckon that's a shut out for Do San, winning every round. Will the judges agree? They are the ones who matter, even if they are often depressingly incompetent. Over to the ring announcer for the scorecards.
Ladies and gentlemen, after 3 rounds of action, we go to the scorecards for a decision.
Judge Daniel Cesar scores the fight 30:27
Judge Edson Gomes scores the fight 30:27
Judge Leandro Rodrigues scores the fight 30:27
In favor of your winner, by unanimous decision... Baek Do San!
|
|
|
|
|
|
|
|
|
|
|
|
|
|
|
|
|
|
|
|
|
|
|
| S |
C
A |
G |
S |
C
B |
G |
|
S |
C |
G |
|
energy
A | B |
|
hype
A | B |
|
pop
A | B |
|
mgr
A | B |
|
FIGHT
RATING
45% |
|
|
|
|
|
|

