|
|
PBP Commentary |
Coming up we have a heavyweight MMA rules bout between Matt Claremont (ranked 0 p4p, 0 weight class) and Thyre Wilkins (ranked 0 p4p, 0 weight class). Wilkins is bouncing up and down as he enters the arena, backed by Combichrist - Deathbed. Well, the cameraman is lingering on a pretty young lady for a bit too long there. Keep your eyes on the fighters buddy or you'll miss the fighter intros!
 |
|
 |
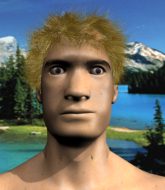
| 195 cm
26
265 lbs
9 - 5 - 0 |
|
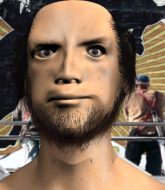
187 cm
24
245 lbs
9 - 4 - 0 |
BJJ Blue Belt
Brawler
Granite chin |
|
BJJ White Belt
Decent boxing
Solid chin |
|
| |
|
Ladies and gentlemen. This fight is 3 rounds, in the heavyweight division.
Introducing the fighter to my left, fighting out of the red corner.
With a record of
9 - 5 - 0, fighting out of Las Vegas, Matt Claremont!
And introducing the fighter to my right, fighting out of the blue corner.
With a record of
9 - 4 - 0, fighting out of Las Vegas, Thyre Wilkins!
The judges for this bout are George Francis, Robert Twigg and Cecil Peabody.

The bell rings for round one and we are underway!
Claremont doesn't manage to clinch there - Wilkins circles away.
Claremont fails with a takedown attempt.
Wilkins misses with a jab and misses with a cross straight after too.

Claremont has taken the fight to the clinch.
Claremont missing with knees to the body.

Claremont escapes the clinch and we're back to striking.
Claremont tries to clinch but Wilkins moves out of range.
Wilkins shoots in looking for a double leg takedown. Claremont defends it nicely.
Jab, cross, leg kick. Nice combination by Wilkins!

It looks like Matt Claremont has been cut.
Wilkins tries to bum rush Claremont with a series of wild strikes but Claremont uses good footwork to avoid the assault.
Wilkins misses with a double jab.
Claremont tries to clinch up but Wilkins circles away and keeps his distance.
Wilkins just misses with a punch to the body.
Wilkins throws out a token jab with nothing on it.
Claremont darts in and clinches Wilkins up against the cage.
Wilkins has had enough of the clinch and is looking to separate.
Wilkins can't break the clinch.
Claremont with a knee to the head.
It looks like Thyre Wilkins has been cut.
Claremont pushes off and circles away, back to the middle of the mat.
Wilkins slips a jab and a cross from Claremont.

That's one minute gone in the round.
Claremont steps to the side to avoid the strikes from Wilkins.
Wilkins swings wildly with a couple of big hooks
and Claremont counters with a nice body kick.
Wilkins looks gassed!
Wilkins steps to his left, right into the path of a big body kick from Claremont. That one must have hurt.
The fans in attendance giving it up for the two fighters, who have really let it all hang out in the last minute or so!

Claremont darts in and lands a nice takedown into half guard.
Claremont missing with some ground and pound from the half guard.
Claremont throwing punches and elbows but they're not doing any damage.
Claremont with a momentary lay and pray from half guard.

That's two minutes gone in the round.

Claremont is looking for a kimura but Wilkins is holding onto that half guard position, so it's hard for Claremont to get the leverage.
The ref warns both fighters not to hold the cage as they work up against the meshing.
Claremont trying to control the action but Wilkins is working from the bottom.
Claremont is working for a kimura but Wilkins is defending it quite comfortably.
Claremont tries to stand but can't do so whilst Wilkins controls his leg.

That's three minutes gone in the round.

Claremont decides to stand and escape the position.
Wilkins misses with a looping left.
Thyre Wilkins seems to be the more aggressive standup fighter in this bout.
Claremont connects with a looping right hand.
A nice leg kick lands there from Claremont.
Claremont is looking to clinch but Wilkins is avoiding it.
Wilkins throws a series of punches but Claremont moves out of range.
Claremont wants to clinch up but Wilkins keeps it at a distance.

That's four minutes gone in the round.
Claremont closes the distance and clinches.
Claremont wants to stall.
Claremont works for underhooks and lands a body shot in the process.
Fantastic stuff here - a very entertaining period of action, which has drawn cheers from the crowd.
Claremont scores with a nice hook to the head.
Wilkins tries to break the clinch but Claremont is controlling the position.
Wilkins tries to break free but Claremont pushes him back against the cage.
Claremont gets a nice trip takedown into half guard.
Wilkins is looking to regain full guard. Not this time though.
Claremont trying to control from half guard but Wilkins is working away.
As the round comes to an end the crowd are showing their appreciation for a great round of action.
Claremont throwing punches and elbows but they're not doing any damage.
And thats the end of the round the fighters go back to their corners.
Matt Claremont dominated that round.
Both fighters have cut men working on them during the interval.
That's the end of the interval. I'm sure that seemed a lot quicker than a minute for our two fighters! Back to the action.

Claremont takes the fight into the clinch.
Claremont lands a knee to the head.
The pace really dropping off here, momentarily.
Claremont prevents the takedown attempt.
Wilkins avoiding damage as Claremont throws knees to the body.
A right hook to the body lands for Claremont.
Claremont lands a knee to the head.
Claremont holding his opponent close, against the cage.
Claremont breaks from the clinch.
Claremont takes the fight into the clinch.
Wilkins wants to break free. God knows he wants to breaaaak freeee.
Claremont's corner calls for him to break the clinch, which he does.
Wilkins throws a combination that misses
and Claremont counters with a driving takedown into guard. Nice work there by Claremont.
This is a great period of action - very entertaining stuff!
Claremont content to stall in guard here.
Both fighters are absolutely exhausted here.
That's one minute gone in the round.
Claremont with a nice head shot there.
Claremont trying to control but Wilkins is working from the bottom.
That's two minutes gone in the round.
The crowd are starting to boo a lack of action.
Wilkins working the defensive guard well to avoid strikes from Claremont.
Wilkins keeping full guard, as Claremont tries to pass.
Wilkins working the defensive guard well to avoid strikes from Claremont.
That's three minutes gone in the round.
Claremont is just sitting in guard, looking to avoid any submissions.
Claremont sneaks a leg through and gets to half guard. That was like a knife through butter how easily he passed Wilkins's guard.
Claremont is trying to control the action in half guard but Wilkins is working away on the bottom, looking perhaps to get back to full guard.
Wilkins tries to roll over but Claremont keeps him under control.
Claremont looks over to his corner - he wants some instructions but his corner are not responding.
Claremont wants to lay and pray for a moment but Wilkins keeps working.
That's four minutes gone in the round.
The crowd are hurling abuse towards the fighters... You can hardly blame them though because there isn't a lot going on in the fight.

The referee stands the fighters back up. Matt Claremont just wasn't active enough from the dominant position.
Wilkins leaves Claremont with his face pressed against the mat as he sprawls beautifully, defending against a solid takedown attempt.
Wilkins takes a thudding leg kick, right into the meat of the thigh.
Wilkins keeping a good distance there, avoiding the body shot.
Claremont tries to clinch but Wilkins is having none of it.
Wilkins swings wildly with a couple of big hooks
and Claremont counters into the clinch. Nicely done.
Wilkins gets double underhooks to prevent a takedown attempt from Claremont.
Claremont pushes off and circles away, back to the middle of the mat.
Claremont cracks the inside of Wilkins's front leg.
The crowd applaud the fighters efforts here as the round comes to an end.
Wilkins misses with a hook.
Claremont misses with a double jab.
And thats the end of the round the fighters go back to their corners.
Matt Claremont dominated that second round.
Both fighters have cut men working on them during the interval.
OK. That's time! The bell goes and we're back to the action. Let's get this one finished - here comes the final round!

Claremont takes a hook to the side of the head. I wonder if that's got his ears ringing.
Claremont is really dominating this fight. Is there anything that Wilkins can do to turn this around?
Left hook, right uppercut from Wilkins.
Claremont misses with the combination.
Wilkins lands a jab.
Horrible takedown by Claremont or perhaps it was just good defense by Wilkins which made him look bad.
Claremont misses with a takedown attempt - Wilkins sprawls well and throws a nice strike on the way out which just misses.
Wilkins misses with a jab, cross combination.
Wilkins throws a hard body shot but it just misses.
A jab from Wilkins does it's job there.
Matt Claremont is looking to throw some combinations by the looks of things.
This is a great period of action - very entertaining stuff!
Wilkins darts in and out, connecting with a jab.
Claremont moves his head to the side to avoid a jab but walks straight into a cross.
Both fighters are breathing heavily.
A low kick from Wilkins misses
and Claremont counters into the clinch. Nicely done.
Wilkins wants to break free. God knows he wants to breaaaak freeee.
That's one minute gone in the round.
Claremont goes for a takedown attempt but Wilkins pushes him away and we're back to fighting at a distance.
That's three failed takedown attempts in the round for Matt Claremont. That's going to take a lot out of him.
Wilkins lands with a cross to side of his opponent's head.
Jab, cross, leg kick. Nice combination by Wilkins!
Matt Claremont's cut is getting worse.
Wilkins scores with a sloppy right hand. Claremont should have avoided that one.
Wilkins might want to mix his strikes up a bit more. He's just going for head shots at the moment and that can become a bit predictable.
Wilkins smiles there as he lands a nice right hand right on the button.
Claremont slips a jab and a cross from Wilkins.
Wilkins goes to the watering hole and comes back with a big thumbs up from the judges as he scores a three punch combo.
Nice shot lands for Wilkins.
A head kick from Claremont lands but Wilkins takes it in his stride.
The fans in attendance giving it up for the two fighters, who have really let it all hang out in the last minute or so!
Wilkins lands a jab to Claremont's midsection.
Claremont fails in his attempt to clinch.
Claremont moves into the clinch successfully.
The referee is keeping an eye on Claremont - much more stalling and he will separate the fighters.
Wilkins tries to break the clinch but Claremont is controlling the position.
That's two minutes gone in the round.
Claremont manages to break the clinch.
Claremont walks straight into a jab right on the nose. That one stung - he's blinking and trying to clear his head.
Claremont moves out of range of the strikes.
Wilkins throws a leg kick but Claremont sees it coming and moves out of range.
Claremont drops down and drives through with a powerful takedown into guard.
Claremont throwing strikes but missing.
Claremont lands a nice shot whilst sitting in his opponent's guard.
Claremont is looking to advance position but Wilkins has hit a scissor sweep - now he's on top in mount!
Claremont is wriggling around trying to escape.
That's three minutes gone in the round.
Wilkins landing shots from mount.
Claremont is bucking up trying to escape but Wilkins cracks him with another couple of good strikes.
Claremont takes a big shot to the head but keeps on trying to improve his position.
Claremont really trying hard to get back to half guard here.
Wilkins punishing his opponent with strikes.
Claremont is looking to improve his position but Wilkins isn't that keen on the idea.
Claremont is writhing around trying to get back to his feet.
Wilkins scoring with some good ground and pound from mount here. Will he manage to finish Claremont?
Claremont is working to get back to half guard.
A nice elbow there by Wilkins.
That's four minutes gone in the round.
Wilkins fakes a shot to the body and cracks his opponent in the head. Nice ground and pound there!
Wilkins lands a heavy elbow.
Claremont is working to get back to half guard.
Matt Claremont is fighting for a decision here - he's started to take the cautious approach.
Wilkins lands a shot to the body, followed up by a shot to the exposed head of his trapped opponent.
Claremont tries to lock up and control but Wilkins gives him a forearm to the face and pushes him away.
Wilkins with good strikes from the mount here!
Wilkins looking to finish Claremont with some ground and pound. This is bad for Claremont!
As the round comes to an end the crowd are showing their appreciation for a great round of action.
Wilkins controlling the pace for now.
And that's the end of the fight!
Thyre Wilkins comfortably won the final round on my scorecard.
I think Claremont has won this one but let's see what the judges have to say. Over to the ring announcer for the scorecards.
Ladies and gentlemen, after 3 rounds of action, we go to the scorecards for a decision.
Judge George Francis scores the fight 29:28
Judge Robert Twigg scores the fight 29:28
Judge Cecil Peabody scores the fight 29:27
In favor of your winner, by unanimous decision... Matt Claremont!
|
|
|
|
|
|
|
|
|
|
|
|
|
|
|
|
|
|
|
|
|
|
|
| S |
C
A |
G |
S |
C
B |
G |
|
S |
C |
G |
|
energy
A | B |
|
hype
A | B |
|
pop
A | B |
|
mgr
A | B |
|
FIGHT
RATING
94% |
|
|
|
|
|
|
