|
|
PBP Commentary |
Coming up we have a super heavyweight MMA rules bout between Cloud Strife (ranked 0 p4p, 0 weight class) and John Malcovich (ranked 0 p4p, 0 weight class). Strife comes to the ring accompanied by One Winged Angel by The Black Mages. There are an array of beautiful celebrities at ringside tonight! I wonder if any of them paid for their tickets.
 |
|
 |
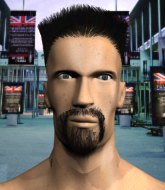
| 201 cm
25
290 lbs
8 - 3 - 0 |
|
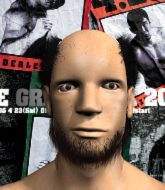
200 cm
24
300 lbs
6 - 1 - 0 |
Powerful takedowns
Excellent boxer
Very strong |
|
Decent wrestler
Excellent boxer
Powerful |
|
| |
|
Ladies and gentlemen. This fight is 5 rounds, for the super heavyweight championship of the world!
Introducing the champion to my left, fighting out of the red corner.
With a record of
8 - 3 - 0, fighting out of London, Cloud Strife!
And introducing the challenger to my right, fighting out of the blue corner.
With a record of
6 - 1 - 0, fighting out of London, John Malcovich!
The judges for this bout are Chris Edwards, Richard Clark and Daniel Bishop.

The bell rings for round one and we are underway!
Malcovich misses with a body shot. Nice footwork from Strife.
Strife is looking to clinch but Malcovich is avoiding it.
Malcovich throws a wild combination but nothing lands.
Malcovich misses with a wild combination.
Malcovich throws a jab but it's blocked by Strife.
Malcovich misses with a hook.
Malcovich throws a series of punches but Strife moves out of range.
Malcovich misses the jab.

Strife throws the overhand right but ducks down into a quick takedown attempt. Malcovich was covering up waiting for the punch and Strife finishes the takedown easily into guard.
Strife works a leg free and moves into half guard.

Strife wants to work for an arm triangle but Malcovich is really keeping half guard well and defending the submission attempt.
Strife is sneakily working for an arm triangle but Malcovich sees it coming and defends easily.

That's one minute gone in the round.
Malcovich is looking for a sweep. Strife is wise to his cunning plan and keeps the top position.
Strife wants to pass to mount but Malcovich is defending the position.
The fighters are battling for position here. Malcovich manages to regain full guard. Nice work.
Strife pressing down on his opponent's thigh, looking to pass guard. Malcovich is keeping the position for now.
The fighters are tangled up in the ropes here. We might need a restart if the fighters can't break free themselves.
Strife stopping the sweep attempt from Malcovich.
The fighters are trapped in the ropes so we're going to have a reposition here. The ref calls for a break and repositions the fighters in the center of the ring.

The referee decides to stand the fighters back up.
Strife shoots in for a takedown! He's got it and he's managed to land in full mount! That's better than Strife was expecting from the takedown attempt, I'm sure!

That's two minutes gone in the round.
Malcovich regains half guard.
Strife tries to pass to full mount but Malcovich defends it.
Strife is working hard here to advance position.
Malcovich controlling the leg, holding on to half guard.
Malcovich won't allow Strife to pass to mount.

That's three minutes gone in the round.

Malcovich kicks Strife off and gets back to his feet.
Strife shoots in looking for a takedown. Malcovich tries to sprawl out of it but Strife keeps driving through. The fighters are pinned against the ropes. Malcovich manages to get underhooks and after a bit of a struggle, circles away and we're back to standing.
Malcovich tries to bum rush Strife with a series of wild strikes but Strife uses good footwork to avoid the assault.
Malcovich lands a jab to Strife's midsection.
Strife is breathing heavily.

Malcovich clinches up against the ropes.
Strife jumps guard but his hands slip and he falls flat on his back. Well, he's made himself look a right mug there, as Malcovich walks away with a smile on his face. Strife gets slowly back to his feet and shakes his head.
A shot to de liver by Malcovich. Beautiful body shot.
Wooooo! Give it up for these two warriors! They are putting on a show!
Malcovich throws a hard body shot but it just misses.

That's four minutes gone in the round.
Malcovich misses with a hook. Strife ducked under it nicely.
Malcovich throws a combination but it was largely blocked by Strife.
Malcovich misses with the combination.
Strife misses with a takedown attempt - Malcovich sprawls well and throws a nice strike on the way out which just misses.
That's three failed takedown attempts in the round for Cloud Strife. That's going to take a lot out of him.
A combination from Malcovich does no damage.
Malcovich tries to bum rush Strife with a series of wild strikes but Strife uses good footwork to avoid the assault.
The crowd applaud the fighters efforts here as the round comes to an end.

Malcovich lands a left and a right that send Strife crashing to the mat, dazed. Malcovich thinks about following him to the mat but decides to wave him back up to his feet!

It looks like Cloud Strife has been cut.
Malcovich lands a big uppercut and Strife crumbles to the floor! The ref thinks about stopping the fight but Strife looks OK. Malcovich waves Strife back to his feet!
And thats the end of the round the fighters go back to their corners.
John Malcovich dominated that round.
The cut man is working on Cloud Strife's cut.
That's the end of the round. The referee orders the cornermen out of the ring so we can get back down to business.

Malcovich throws a big shot that misses.
Malcovich throws a jab but it's blocked by Strife.
Malcovich misses the shot to the body.
Malcovich misses with a body shot. Nice footwork from Strife.
Strife avoids the body shot from Malcovich.
Strife shoots in with a takedown attempt and he has Malcovich pinned against the cage. Malcovich gets the underhooks and manages to circle away.
Malcovich lands a with a good body shot.
Malcovich dips down and scores with a jab to the body.
John Malcovich seems to be the more aggressive standup fighter in this bout.
Both fighters are absolutely exhausted here.
Fantastic stuff here - a very entertaining period of action, which has drawn cheers from the crowd.
Malcovich misses with a series of wild punches.
That's one minute gone in the round.
Malcovich swinging wilding here.
Strife avoids a punch combination nicely.
Strife slips under a jab.
Malcovich misses with a wild body shot.
Strife avoids a punch combination nicely.
Malcovich swings for the body but Strife moves out of range.
That's two minutes gone in the round.
A lull in the action here being met with boos from the crowd.
Strife takes one on the chin but seems OK.
Jab by Malcovich.
John Malcovich is looking to throw some combinations by the looks of things.
Malcovich misses with a few strikes there.
Strife showing good head movement there, avoiding the strikes from Malcovich.
Malcovich throws a hook to the body but it doesn't connect.
John Malcovich seems to be getting the better of the standup.
Strife uses good head movement to avoid the hook from Malcovich.
Malcovich throws a looping overhand right but Strife ducks down to avoid it.
Malcovich misses the shot to the body.
Malcovich ducks down and throws a hook to the body but Strife moves away.
Malcovich is throwing a lot of body shots here, looking to wear down Strife rather than just go for the knockout.
That's three minutes gone in the round.
Malcovich misses with a double jab.
Malcovich throws a series of punches but Strife avoids them all with ease.
Strife feints and then dives in with a takedown. That was a long way out but the feint bought him enough time to close the distance and complete the takedown. Now we'll play guard for a bit and see who can get the better of that position.
Malcovich keeping full guard, as Strife tries to pass.
Strife works a leg free and moves into half guard.
That's four minutes gone in the round.
Strife trying to mount his opponent but Malcovich defends it.
Strife is looking for a kimura. It's going to be difficult to finish that from half guard though and Malcovich defends it well.
Neither fighter is doing enough for the referee's liking and he's decided to stand them back up.
Malcovich stuffs the takedown.
Strife shoots in with a takedown attempt and he has Malcovich pinned against the cage. Malcovich gets the underhooks and manages to circle away.
That's three failed takedown attempts in the round for Cloud Strife. That's going to take a lot out of him.
The crowd applaud the fighters efforts here as the round comes to an end.
Malcovich throws an overhand right that lands on Strife's shoulder, as Strife tries to avoid the shot.
And thats the end of the round the fighters go back to their corners.
John Malcovich showed his class in that round. I'd imagine he'll take it on all the scorecards.
The cut man is working on Cloud Strife's cut.
That's time! Back to the action!

Malcovich connects with a lovely jab that went straight through the gap between Strife's hands.
Malcovich throws a combination but it was largely blocked by Strife.
Strife shoots in for a takedown - he's clinched up with Malcovich but Malcovich pushes him off and we're back to square one.
Strife is looking to clinch.
Malcovich throws a combination but it was largely blocked by Strife.
A looping hook to the body misses from Malcovich. Strife does a little dance to reset his feet.
Malcovich misses with a straight left.
Malcovich throws a hook to the body but it doesn't connect.
Malcovich throws a lazy right hand but Strife sees it coming a mile off and sidesteps it easily.
Strife avoids a lazy jab quite easily.
That's one minute gone in the round.
Strife displays some good footwork, moving neatly out of range as Malcovich throws out the jab.
Strife fakes with an overhand right and moves in to clinch with Malcovich, pushing him back against the ropes.
Malcovich is pressed up against the ropes. Strife has hold of a leg and is looking to drag Malcovich down to the mat. Malcovich avoids the attempt though and has circled away. We're back to striking at a distance.
Malcovich throws a big shot that misses.
Strife scores a takedown into full mount!
Strife moves into side control, trying to work for a kimura. That looks painful! Will he finish!!?? No, Malcovich has worked his arm free - good work by Malcovich!
Malcovich prevents Strife from moving into mount.
Malcovich is positioning himself to get back to half guard.
Strife goes for an armbar! This could be all over! Wait, no, Malcovich rolls with the submission and now he's on top in Strife's guard! Nice work there by Malcovich!
Both fighters are breathing heavily.
That's two minutes gone in the round.
Malcovich passes easily into side control. Nice work.
Strife is looking to slip a leg under and get half guard but Malcovich is one step ahead and moves to full mount!
Strife keeping his composure momentarily, calmly looking to get back to half guard.
Malcovich can't quite control the action as he would like just now, as Strife is looking to escape.
Strife keeping his composure momentarily, calmly looking to get back to half guard.
That's three minutes gone in the round.
Poor strikes thrown by Malcovich there. More accuracy and less frantic strikes would help!
Strife is in all sorts of trouble here.
Malcovich sitting in mount, just looking to control for the moment.
Malcovich thowing strikes but they're hitting the gloves, not doing any damage.
Strife gets back to half guard.
Strife slips a foot under and gets full guard. Nice work.
Malcovich won't allow Strife to sweep him here.
That's four minutes gone in the round.
The crowd are getting on the fighters' backs, as the pace has dropped off in the last minute or so.
There's a bit of a scramble here and now Strife is on top in guard.
Strife stands up and looks to throw the legs aside to pass to side control. Malcovich swivels though and keeps the full guard.
Strife preventing the sweep.
Malcovich has Strife pulled in close to control his posture.
Strife stands and throws Malcovich's legs to the side, diving into side control.
Malcovich has been the more effective fighter overall so far.
Strife looking for an arm triangle but it's way too loose to do anything.
Both fighters take a look at the clock.
And thats the end of the round the fighters go back to their corners.
A close third round but John Malcovich just about did enough to take it.
The cut man is working on Cloud Strife's cut.
The referee calls time. The cornermen exit stage left and we're back to business.

Malcovich misses with a two punch combination.
Strife shoots in for a double leg but Malcovich sprawls well. That's going to sap some energy.
Malcovich lands a body shot.
A combination from Malcovich does no damage.
Malcovich fails to land with a series of punches.
Malcovich throws a combination but it was largely blocked by Strife.
Malcovich throws a combination but comes up with nothing but fresh air.
Strife ducks under a wild hook from Malcovich.
That's one minute gone in the round.
Strife blocks a jab.
Malcovich swings away but doesn't land with a series of punches.
Malcovich throws a hook to the side of Strife's head but Strife sees it coming and ducks under it beautifully.
Strife showing good head movement there, avoiding the strikes from Malcovich.
Malcovich is absolutely dripping with sweat - he looks exhausted.
No joy there for Malcovich, who threw a few shots but didn't land.
Malcovich misses with a jab and misses with a cross straight after too.
Malcovich lunges in with swinging rights and lefts but Strife circles away quickly and effectively.
Strife closes the distance and scores a nice trip takedown into half guard. Malcovich did well to prevent Strife getting side control.
Strife tries to pass the half guard into mount. Malcovich knows what he's doing though and prevents the attempt.
That's two minutes gone in the round.
Strife has freed up his trapped foot and advances to mount.
Strife fails to move to back control.
We get told so often about how wrestlers don't like to be on their backs. Let's see if Malcovich can do anything to dispel that myth.
Malcovich working to try and regain half guard.
That's three minutes gone in the round.
Strife fails to move to back control.
Malcovich is in all sorts of trouble here.
Strife wants to take his opponent's back but he's not managed it.
Strife looking to take Malcovich's back but Malcovich rolls and after a scramble, Malcovich ends up on top in guard. Nice escape there from Malcovich to escape a tricky position.
Malcovich trying to control the position from guard on top but Strife is wriggling around, looking for whatever he can.
Malcovich must be cautious of submissions here, given that his opponent has the superior Jiu Jitsu.
That's four minutes gone in the round.
The crowd are showing their displeasure at the lack of action as loud boos ring out around the arena.
Well, the referee has seen enough. Neither fighter is active enough on the ground so he's stood them back up.
Strife misses with a takedown attempt. He shot from a bit too far out.
Strife displays some good footwork, moving neatly out of range as Malcovich throws out the jab.
Strife ducks under an overhand right and circles away with a smile on his face.
Malcovich just misses with a punch to the body.
Malcovich moves into range and clinches up with Strife.
The crowd thankful this round is nearly over.

Malcovich's corner calls for him to break the clinch, which he does.
Strife fails miserably with a takedown attempt.
That's three failed takedown attempts in the round for Cloud Strife. That's going to take a lot out of him.
Malcovich jabbing away but nothing is landing.
And thats the end of the round the fighters go back to their corners.
John Malcovich dominated that fourth round.
The cut man is working on Cloud Strife's cut.
The fighters get back to their feet, the hooter sounds and we're back to the action! This is the final round!

Malcovich throws out a loose jab but Strife uses good head movement to avoid it.
Malcovich throws a body punch but Strife moves out of range.
Malcovich tries to land with a swinging hook to the body but Strife was well out of range. Poor timing from Malcovich.
Malcovich misses with a two punch combination.
Malcovich throws a hook to the body but it doesn't connect.
Strife uses some good footwork to avoid the body shot by Malcovich.
Malcovich throws a right and a left that Strife avoids nicely.
We've had a slow start to the round here - hopefully the action picks up.
Malcovich tries to clinch up
and Strife counters with a nice double leg into half guard.
That's one minute gone in the round.
Strife trying to mount his opponent but Malcovich defends it.
Strife is looking to pass the guard... He's managed it - he's now in full mount!
Malcovich is wobbling all over the place through exhaustion. Will he make it to the final bell?
Strife goes for an armbar but Malcovich turns quickly into his guard - lovely anticipation from Malcovich.
Strife looking for a sweep. Not yet Strife, not yet.
Malcovich wants to control from the top but Strife keeps moving.
Strife wants to sweep here but Malcovich controlling him for the moment.
Strife looking for submissions from the bottom but instead Malcovich passes into half guard.
That's two minutes gone in the round.
Malcovich prevents Strife from improving his position.
Strife wants to get back to full guard but Malcovich has passed into side control.
Cloud Strife has stepped it up - he knows he needs a finish here!
Malcovich working away from the top, dropping strikes.
Strife working to try and regain half guard.
Malcovich tries to control but Strife wriggling away.
Strife can't escape the position.
That's three minutes gone in the round.
Malcovich can't quite control the action as he would like just now, as Strife is looking to escape.
Malcovich looking to control and managing it successfully.
Malcovich scores with a couple of good head shots there.
Strife is in all sorts of trouble here.
Malcovich wants to control the pace but Strife is squirming around nicely.
Strife is trying to escape the mount.
That's four minutes gone in the round.
There's not a lot going on here and the crowd are letting the fighters know they're not willing to tolerate a lack of action.
Malcovich looking to control and managing it successfully.
Strife is trying to escape the mount.
John Malcovich is fighting for a decision here - he's started to take the cautious approach.
Strife sneaks a leg back under and regains half guard and is working straight away to try and get back to guard. He hasn't managed just yet though.
Strife tries to roll over but Malcovich keeps him under control.
Strife tries to regain full guard. Instead though, Malcovich has advanced to mount. Uh oh.
Strife regains half guard.
And that's the end of the fight!
That was a close round. You could make an argument for either fighter but I would give it to Cloud Strife.
I think Malcovich has won this one but let's see whether the judges agree with me. Over to the ring announcer for the scorecards.
Ladies and gentlemen, after 5 rounds of action, we go to the scorecards for a decision.
Judge Chris Edwards scores the fight 46:49
Judge Richard Clark scores the fight 46:49
Judge Daniel Bishop scores the fight 46:49
In favor of your winner, by unanimous decision... John Malcovich! John Malcovich retains his super heavyweight title!
|
|
|
|
|
|
|
|
|
|
|
|
|
|
|
|
|
|
|
|
|
|
|
| S |
C
A |
G |
S |
C
B |
G |
|
S |
C |
G |
|
energy
A | B |
|
hype
A | B |
|
pop
A | B |
|
mgr
A | B |
|
FIGHT
RATING
89% |
|
|
|
|
|
|
