|
|
PBP Commentary |
Coming up we have a super heavyweight MMA rules bout between Jon Starsmore (ranked 0 p4p, 0 weight class) and Edmond Honda (ranked 0 p4p, 0 weight class). Honda is bobbing his head along to his entrance song: Edmond Honda's Theme. Both fighters look fresh as a daisy as they make their way towards the ring.
 |
|
 |
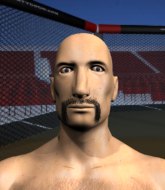
| 195 cm
20
300 lbs
8 - 1 - 0 |
|
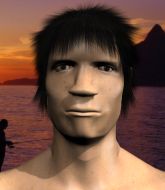
184 cm
20
312 lbs
5 - 0 - 0 |
BJJ Blue Belt
Excellent boxer
Cardio machine |
|
Good wrestler
Decent boxing
Good gas tank |
|
| |
|
Ladies and gentlemen. This fight is 5 rounds, for the super heavyweight championship of the world!
Introducing the champion to my left, fighting out of the red corner.
With a record of
8 - 1 - 0, fighting out of Hilo, Jon Starsmore!
And introducing the challenger to my right, fighting out of the blue corner.
With a record of
5 - 0 - 0, fighting out of Hilo, Edmond Honda!
The judges for this bout are , and .

The bell rings for round one and we are underway!

The fight moves into the clinch position.
Honda doesn't land with the attempted body shot.
Honda lands a shot to the body.
With the two fighters working up against the ropes, Honda just misses with a elbow thrown towards Starsmore's brow.
A right hand to the body from Starsmore.
With the fighters clinched against the ropes, Honda creates a bit of distance for himself and scores with a nice uppercut.
Honda creates a bit of space for himself and sneaks an elbow through Starsmore's defenses.

It looks like Jon Starsmore has been cut.
Honda drops down looking for an ankle pick but Starsmore pulls his leg out and moves away.
Honda takes a shot to the body in his stride.
We've seen a great period of action over the last minute or so - credit to both fighters for going all out!
Honda throws a nice head kick!
Starsmore throws a combination but comes up with nothing but fresh air.
Honda punishes Starsmore's body with a nice straight punch.
Honda has taken the fight to the clinch.
Honda gets through Starsmore's defenses to land a nice punch to the side of the head.
Starsmore throws a blind hook that connects with the side of Hondas head.
It looks like Edmond Honda has been cut.
Honda drops down looking for an ankle pick but Starsmore pulls his leg out and moves away.
Wow, both these guys are really going for it!
A lazy left from Starsmore finds it's target.
Honda lands with a cross.
Honda rushes Starsmore and presses him up against the ropes.
Honda blocks a punch to the side of the head.
An uppercut to the body lands inside from Honda.

That's one minute gone in the round.
Starsmore on the defensive, avoiding the knees to the body.
Honda lands an elbow just above Starsmore 's eye.
An uppercut on the inside fails to land for Starsmore.
Honda lands a right hand that snaps the head of Starsmore backwards.
Starsmore has a couple of punches blocked by Honda.
Starsmore lands a nice looking hook to the body, against the ropes.
Honda lands on the inside with an uppercut.
Honda cracks Starsmore with a nice body shot.
Starsmore is breathing heavily.
Honda using the Thai clinch to land knees to the body.
Honda blocks an uppercut.
Honda tries to land knees in the clinch but Starsmore avoids the damage to the body.
Honda looking to throw knees to the head but Starsmore is blocking nicely.
Honda pushes Starsmore back against the ropes and unloads with a body punch.
Starsmore throws a punch but it's blocked by Honda.
Honda lands a body punch in the clinch.
Fantastic stuff here - a very entertaining period of action, which has drawn cheers from the crowd.
Starsmore takes a knee to the side of the body.
Honda lands a nice elbow from the clinch.
Honda tries to land a knee to the head but Starsmore blocks with his arms.
Honda misses the knee to the body. Nice hip positioning from Starsmore.
Honda scores a nice knee to the body.
Starsmore throws a head punch that misses.
Honda lands a knee to the body.
Honda landing knees to the body. They look like they could hurt.
Nice body punch from Honda.

That's two minutes gone in the round.
A right hand to the body from Honda.
Honda using the Thai clinch to land knees to the body.
Honda connects with a knee to the head.
Honda stays in close to his opponent and throws a right hand to the body.
Honda is working Starsmore over against the ropes.
Honda throws a hook to the body. More of an arm punch but it's all scoring with the judges.
Starsmore takes an elbow to the temple.
Honda landing knees to the body.
Honda lands a body shot in the clinch.
Honda lands a nice elbow.
Honda is working for takedown but Starsmore is calmly controlling the position for now.
Jon Starsmore has stuffed three takedown attempts in the round now. That's going to take a lot out of Edmond Honda.
Honda lands a good knee to the midsection. Starsmore won't want to take too many of those.

Honda is trying to trip Starsmore. He has hold of a leg but Starsmore is hopping around, keeping his balance for the moment. Honda persists though and gets the takedown into guard.
Honda tries to free his leg and advance position but Starsmore is retaining full guard.
Honda is looking to advance position but Starsmore has hit a scissor sweep - now he's on top in mount!
Starsmore takes Honda's back.

That's three minutes gone in the round.
Honda is in bad spot here.
The fighters are tangled up in the ropes here. We might need a restart if the fighters can't break free themselves.
Starsmore will need to keep those long limbs tucked in whilst he's on the ground, to prevent any submissions.
Honda turns into Starsmore and is now in his guard.
Starsmore knows he needs to get back to his feet asap. He's simply no match for Honda on the ground.

Honda postures up as if he's going to throw some strikes but drops back for an ankle! Starsmore is in big trouble! He looks ready to tap! But no, he's escaped and dives on top of Honda, into his guard.
Starsmore wants to control from the top but Honda keeps moving.

That's four minutes gone in the round.
The crowd are hurling abuse towards the fighters... You can hardly blame them though because there isn't a lot going on in the fight.
Starsmore is looking to stand up but Honda won't let him.
Honda is working the butterfly guard. He manages to land a nice scissor sweep and is now in half guard on the top. Nice move.
Honda lands strikes from half guard.
Honda sitting in half guard, looking to land shots. Starsmore defending well though.
Honda uses his free foot to push down on Starsmore's thigh. Eventually he works his other foot free and he's advanced to mount - this is trouble for Starsmore.
Starsmore is working to get back to half guard.

That's five minutes gone in the round.
Starsmore in a bad spot here, taking shots to the head.
Honda jumps to the side looking to secure the arm triangle
. Ooooh, that looks tight
Starsmore is gargling but he's managed to escape! Nice work there by Starsmore and Honda has given up the dominant position trying to land that submission.
Starsmore prevents Honda from moving into mount.
Starsmore tries to get back to half guard but can't.
Starsmore can't do much from the bottom here.
Honda creates a bit of distance and throws down some hard shots.

That's six minutes gone in the round.
Honda tries for a kimura. Not really close to a finish though.
You can see the frustration on Starsmore's face, being in this tough position on the bottom.
Honda tries for a kimura but Starsmore is defending well.
Honda throws a strike aimed at the side of Starsmore's head but Starsmore avoids it well.

That's seven minutes gone in the round.
Honda tries to move to mount but Starsmore blocks the move with his legs.
Honda working the ground and pound.
Honda scores with a couple of short elbows.
Honda scores with a couple of nice shots to the head there. The referee takes a look at Starsmore to see if he's OK.
Honda misses with an attempted head punch from side control.
Starsmore takes a big shot right to the temple there but he's taken it well.
Honda is trying to land an Americana. He has the arm isolated but Starsmore is keeping cool and he's avoided the danger for now.
Honda goes for an armbar here - this could be all over! But no, Starsmore has escaped beautifully and is now on top in side control! Oh, that's unlucky for Honda but great work by Starsmore.

That's eight minutes gone in the round.
Starsmore tries to stand but Honda is controlling his head.
The fighters are trapped in the ropes so we're going to have a reposition here. The ref calls for a break and repositions the fighters in the center of the ring.
Starsmore tries to advance to mount but Honda denies him.
Honda is trying to get back to half guard.
Honda regains half guard.
Wooooo! Give it up for these two warriors! They are putting on a show!
Starsmore moves nicely into side control.
Starsmore wants to stand but Honda has his arm trapped.

That's nine minutes gone in the round.
Honda regains half guard.
Honda tries to roll over but Starsmore keeps him under control.
Starsmore tries to stand and escape but Honda is controlling the position.
Honda is looking to sinch up a guillotine here but Starsmore pulls his head out easily.
As the round comes to an end the crowd are showing their appreciation for a great round of action.
Honda tries to get to full guard but Starsmore has control of the leg.
And thats the end of the round the fighters go back to their corners.
Edmond Honda dominated that round.
Both fighters have cut men working on them during the interval.
That's the end of the round. The referee orders the cornermen out of the ring so we can get back down to business.

Starsmore lands a jab.
Honda closes the distance, clinches up and gets a nice trip takedown into side control. Very smooth.
Honda working away.
Honda throwing ground and pound but whilst doing so, he forgets to control position and Starsmore works his way back to half guard. Good composure under pressure.
Honda is working for submissions here but there's nothing on.
Honda is looking for a kimura but Starsmore is holding onto that half guard position, so it's hard for Honda to get the leverage.
Starsmore regains full guard, whilst avoiding punches from Honda.
Edmond Honda has got the better of the ground game so far.
Honda is breathing heavily.
Honda stops Starsmore from standing up.
That's one minute gone in the round.
Starsmore keeping full guard, as Honda tries to pass.
Starsmore wants to sweep here but Honda controlling him for the moment.
Starsmore is working the butterfly guard. He manages to land a nice scissor sweep and is now in half guard on the top. Nice move.
Honda is looking to get full guard. It looks like he might be successful but at the last minute Starsmore jumps into side control!
That's two minutes gone in the round.
The crowd are starting to boo a lack of action.
Honda is trying to improve his position.
Honda has the superior BJJ but he's also working some ground strikes into his gameplan.
Honda is moving his hips around well on the bottom and has managed to get back to half guard.
Honda wants to get back to full guard.
Honda is persisting with the attempt to improve his position.
Honda manages to get to full guard.
That's three minutes gone in the round.
Honda looking for submissions from the bottom but instead Starsmore passes into half guard.
Starsmore prevents Honda from improving his position.
Honda is looking to get back to full guard here but Starsmore has managed to pass to side control instead.
Honda keeping his composure momentarily, calmly looking to get back to half guard.
That's four minutes gone in the round.
The crowd are hurling abuse towards the fighters... You can hardly blame them though because there isn't a lot going on in the fight.
Starsmore looking to control but Honda is working nicely, looking to advance position himself.
Starsmore is really struggling to control Honda but he's trying to hold on to the position.
Honda really trying hard to get back to half guard here.
Honda looking to escape from mount but he's given up his back!
That's five minutes gone in the round.
Starsmore struggling to keep hold of the position.
Honda tries to escape but Starsmore has the hooks in and won't let him break free.
Honda tries to escape the position - he's now mounted. Is that better or worse? Hard to tell!
Honda is trying to escape the mount.
Starsmore looking to control but Honda is working nicely, looking to advance position himself.
Honda can't escape the position.
That's six minutes gone in the round.
My god... these two guys really need to pick up the pace or everyone will leave to go get a beer.
Honda regains half guard.
The referee calls for the fighters to work.
Honda tries to get to full guard but Starsmore has control of the leg.
Honda is pressing down on Starsmore's left leg trying to get back to full guard. He's managed it.
Honda is working the butterfly guard. He manages to land a nice scissor sweep and is now in half guard on the top. Nice move.
Honda is sneakily working for an arm triangle but Starsmore sees it coming and defends easily.
That's seven minutes gone in the round.
Honda is thinking about going for an arm triangle but he can't free his leg.
Honda tries to pass the half guard into mount. Starsmore knows what he's doing though and prevents the attempt.
Starsmore has no desire to be mounted, so is trying to control. Honda is working away from the top position though.
Starsmore is trying is best to control the position here.
Honda working to pass to mount. He's got his hand pressing down on Starsmore's thigh. Starsmore counters though and makes it back to full guard.
That's eight minutes gone in the round.
A few boos can be heard. I'm sure they will multiply if the fighters don't pick up the pace.
Honda postures up and lands some nice ground and pound.
Honda looking to pass the guard.
Honda connects with a couple of short punches.
Honda stopping the sweep attempt from Starsmore.
Starsmore on his back here. We all know that wrestlers don't like being on their back so let's see if Starsmore tries to get out of the position.
Honda throws and elbow that misses. Starsmore uses the momentum to reverse the position. He's now in Honda's guard. Nice move by Starsmore!
Starsmore has a momentary lapse of concentration, allowing Honda to throw up a leg and lock on what appears to be a pretty tight triangle! Starsmore is fighting it off but it's all too little too late - Honda pulls down on the head and he's put Starsmore to sleep! This one is all over!
Ladies and gentlemen, after 9:04 of round 2, we have a winner by way of Submission (Triangle). Edmond Honda!
Edmond Honda is the new super heavyweight champion!
|
|
|
|
|
|
|
|
|
|
|
|
|
|
|
|
|
|
|
|
|
|
|
| S |
C
A |
G |
S |
C
B |
G |
|
S |
C |
G |
|
energy
A | B |
|
hype
A | B |
|
pop
A | B |
|
mgr
A | B |
|
FIGHT
RATING
62% |
|
|
|
|
|
|
