|
|
PBP Commentary |
Coming up we have a lightweight MMA rules bout between Kaz Hayabusa (ranked 0 p4p, 0 weight class) and Jason Handcock (ranked 0 p4p, 0 weight class). Hayabusa comes into the arena with Sandstorm - Darude blaring out of the sound system. This should be a great matchup!
 |
|
 |
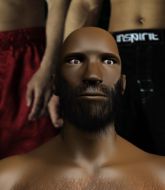
| 180 cm
26
155 lbs
7 - 1 - 0 |
|
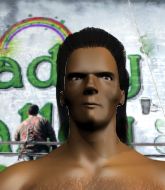
181 cm
22
155 lbs
8 - 0 - 0 |
BJJ Brown Belt
Basic striking
Experienced |
|
BJJ Blue Belt
Decent boxing
Powerful |
|
| |
|
Ladies and gentlemen. This fight is 5 rounds, for the lightweight championship of the world!
Introducing the champion to my left, fighting out of the red corner.
With a record of
7 - 1 - 0, fighting out of Hilo, Kaz Hayabusa!
And introducing the challenger to my right, fighting out of the blue corner.
With a record of
8 - 0 - 0, fighting out of Hilo, Jason Handcock!
The judges for this bout are , and .

The bell rings for round one and we are underway!
Handcock misses with a two punch combination.
Handcock misses with a two punch combination.
Hayabusa shoots in for a takedown. He's persisting with it as Handcock sprawls well. Handcock wins this battle and keeps the fight standing. Hayabusa gets slowly back to his feet.
Handcock tries to clinch but Hayabusa moves out of range.
Hayabusa shoots in for a takedown. "I don't think so" says Handcock as he avoids it easily.
No luck for Hayabusa with that takedown attempt.
That's three failed takedown attempts in the round for Kaz Hayabusa. That's going to take a lot out of him.

The fight moves into the clinch position.
A short right from Handcock on the inside.
An uppercut to the body lands inside from Handcock.
Hayabusa tries to pull guard but can't drag his opponent to the mat. Handcock just stands there and leans against the cage.
Hayabusa tries to pull guard but Handcock won't allow it.
The pace really dropping off here, momentarily.
Handcock lands with a short punch from the clinch.
Hayabusa has Handcock pressed up against the cage and is working for takedown. Handcock manages to improve position though and keeps the fight standing.
Hayabusa is breathing heavily.
Handcock lands a body punch in the clinch.
Hayabusa fails to pull the fight into his guard.
Hayabusa tries to score a body lock takedown but Handcock shows good agility there to stay on his feet.
Hayabusa looking for a takedown.
Handcock stalls.

That's one minute gone in the round.
A short body shot lands from Handcock as the two fighters clinch.
Handcock lands a nice shot to the body.
Handcock lands a right hand.

It looks like Kaz Hayabusa has been cut.

Handcock escapes the clinch and we're back to striking.
Handcock gets a clinch.
Handcock lands a body punch - he's looking to wear down Hayabusa.
Handcock's corner calls for him to break the clinch, which he does.
Handcock lands a nice shot that snaps Hayabusa's head back.
Handcock throws out a powerful jab.
Handcock closes the distance and clinches.
Handcock breaks from the clinch.
Handcock fakes and then throws a beautiful body shot. Hayabusa looks a bit winded and takes a step backwards to take a breath.
Hayabusa tries to move into range but Handcock moves to the side and lands with a nice right hand.
We've seen a great period of action over the last minute or so - credit to both fighters for going all out!
Handcock scores with a one two! Hayabusa had his feet all tangled up there and couldn't avoid the strikes.

Handcock lands a left and a right that send Hayabusa crashing to the mat, dazed. Handcock thinks about following him to the mat but decides to wave him back up to his feet!

Hayabusa is rocked!
Handcock has managed to clinch.
Oh Hayabusa is still all over the place! His legs are completely gone! Will he be able to recover?!!
A right handed body shot lands from Handcock.
Hayabusa seems to have got his legs back now.
Handcock lands a body punch - he's looking to wear down Hayabusa.
A short uppercut from Handcock.

That's two minutes gone in the round.
Handcock's corner calls for him to break the clinch, which he does.
Handcock gets in close and instigates a clinch.
A short left from Handcock.
Handcock pushes off and circles away, back to the middle of the mat.
Handcock fails to land with a series of punches.
Handcock moves out of range as Hayabusa throws a body kick.
Hayabusa has his head slapped from side to side by a 3 punch combination. That must have hurt him.
Kaz Hayabusa's cut is getting worse.
Handcock lands a jab followed by a nice looking cross.
Handcock takes the fight into the clinch.
Hayabusa goes for a takedown attempt but Handcock pushes him away and we're back to fighting at a distance.
Handcock misses with a jab and misses with a cross straight after too.
Handcock moves into the clinch.
This is turning into a torrid day at the office for Hayabusa. He's trying desperately to land a takedown but he's failing miserably and getting slapped silly on the feet to compound his misery.
Handcock breaks the clinch and we're back to striking at distance.
Hayabusa pulls out of a head kick attempt.
Hayabusa gets his head snapped back by a nice shot there.
Handcock gets to the clinch - let's see what his plan is here.

That's three minutes gone in the round.
Handcock breaks from the clinch.
Handcock tries to close the distance and clinch up but Hayabusa swats him away and circles back towards the center.
Hayabusa fails with a takedown attempt.
The fight moves into the clinch position.
Hayabusa tries to pull guard but Handcock holds him up against the cage and eventually Hayabusa drops back down to his feet.
Handcock lands a body shot in the clinch.
Handcock lands a left hand.
Handcock's corner calls for him to break the clinch, which he does.
Handcock instigates a clinch.
Handcock lands a nice shot to the body.
Handcock lands a left hand.
Hayabusa tries to pull guard but can't drag his opponent to the mat. Handcock just stands there and leans against the cage.
Handcock lands a nice uppercut.
Hayabusa tries to pull guard but can't drag his opponent to the mat. Handcock just stands there and leans against the cage.
Hayabusa takes a shot to the head.
Hayabusa fails to pull guard.

That's four minutes gone in the round.
Hayabusa is trying to work for a single leg takedown but Handcock pulls him back up using the underhooks.
Handcock lands with a left to the head.
Handcock escapes the clinch and we're back to striking.
Handcock changes levels and scores with a jab to the body.
Handcock gets in close and instigates a clinch.
Handcock lands a body punch - he's looking to wear down Hayabusa.
A short right from Handcock.
Handcock lands a nice shot to the body.
A shot in the inside from Handcock.
Handcock lands a hook to the side of the head.
Hayabusa jumps guard but Handcock stands there with Hayabusa around his waist. Hayabusa gives up and drops back to his feet. We remain in the clinch.
Handcock lands a body punch - he's looking to wear down Hayabusa.
Wooooo! Give it up for these two warriors! They are putting on a show!
Handcock softening up his opponent with strikes, against the cage.
Handcock lands with a quick shot inside that doesn't really do much damage.
The referee is keeping an eye on Handcock - much more stalling and he will separate the fighters.
A short body shot lands from Handcock as the two fighters clinch.
The crowd are going absolutely nuts as the round comes to an end - what a fantastic round of action!
Handcock breaks the clinch and we're back to striking at distance.
Handcock wants to clinch up but Hayabusa keeps it at a distance.
Handcock gets in close and instigates a clinch.
The referee calls for Handcock to work.
And thats the end of the round the fighters go back to their corners.
Jason Handcock dominated that round.
The cut man is working on Kaz Hayabusa's cut.
That's time! Back to the action!

Hayabusa takes a shot right to the bread basket.
Nice shot by Handcock.
Handcock clinches with his opponent.
Hayabusa tries to pull guard but Handcock holds him up against the cage and eventually Hayabusa drops back down to his feet.
Hayabusa tries to score a body lock takedown but Handcock shows good agility there to stay on his feet.
Hayabusa tries to pull guard but can't drag his opponent to the mat. Handcock just stands there and leans against the cage.
That's three failed takedown attempts in the round for Kaz Hayabusa. That's going to take a lot out of him.
Handcock digs a right hand into Hayabusa's ribs. Those have got to be taking their toll on Hayabusa's gas tank.
Handcock is working Hayabusa over against the cage.
Handcock works on Hayabusa's body with a couple of short punches.
Handcock lands a body shot in the clinch.
Jason Handcock seems to be working more effectively in the clinch in the fight so far.
Handcock lands a shot to the body.
Handcock lands a hook to the side of the head.
Handcock lands with a short punch from the clinch.
Handcock breaks the clinch and we return to the middle of the mat.
Both fighters are absolutely exhausted here.
Hayabusa takes a big uppercut there. He seems a bit wobbly but no, he's OK.
A combination from Handcock does no damage.
A telegraphed takedown attempt from Hayabusa is defended easily by Handcock.
Handcock has been the more effective fighter overall so far.
A shot to de liver by Handcock. Beautiful body shot.
That's one minute gone in the round.
Handcock works over Hayabusa's head and body with a nice combination.
Kaz Hayabusa's cut is bleeding quite badly. He's got to try and protect it.
Handcock tries to clinch up.
Handcock closes the distance and clinches.
Handcock lands a nice shot to the body.
A short right hand to the side of the head by Handcock.
The referee calls for Handcock to work.
Handcock lands a hook that snaps the head of Hayabusa backwards.
Hayabusa jumps guard but Handcock stands there with Hayabusa around his waist. Hayabusa gives up and drops back to his feet. We remain in the clinch.
Handcock slows down the pace here.
Handcock breaks the clinch and we're back to striking at distance.
Handcock moves in looking to clinch but Hayabusa pushes him off.
Handcock connects with a slap. Keep your fist closed son.
Hayabusa shoots in for a takedown - he's clinched up with Handcock but Handcock pushes him off and we're back to square one.
Handcock lands a two punch combo.
That's two minutes gone in the round.
Handcock rushes Hayabusa and presses him up against the cage.
Handcock lands a left hand that snaps the head of Hayabusa backwards.
Handcock stalling here - the referee won't stand for too much of that.
Hayabusa tries to take the fight to the ground by pulling guard but can't manage it.
The fighters are going at a pretty good pace and they're both starting to sweat now.
Handcock lands a left hand that snaps the head of Hayabusa backwards.
The pace slowing considerably in the clinch, as Handcock takes a break from that fighting nonsense to think about the finer things in life.
Handcock lands a shot to the body.
Hayabusa jumps guard but Handcock stands there with Hayabusa around his waist. Hayabusa gives up and drops back to his feet. We remain in the clinch.
Handcock will no doubt start fighting again in a minute but for now he's just having a little rest, leaning Hayabusa up against the cage.
Hayabusa tries for a takedown. No joy.
Handcock lands with a right to the head.
The crowd are loving this. Great action here.
Handcock's corner are urging him to control the action in the clinch for a moment, rather than mount any serious offense. I'm sure the crowd appreciate those instructions... not.
Handcock escapes the clinch and we're back to striking.
Handcock lands a jab to Hayabusa's midsection.
Handcock connects with a slap. Keep your fist closed son.
That's three minutes gone in the round.
Handcock scores with a body shot.
Jason Handcock seems to be getting the better of the standup.
Handcock clinches with his opponent.
Handcock pushes off and circles away, back to the middle of the mat.
Handcock takes a step back and watches a body kick go sailing past his mid section.
A really sloppy takedown attempt there from Hayabusa.
Handcock tests Hayabusa's chin there with a solid looking shot.
Handcock scores with a hook to the body. Hayabusa takes a step back and tries to catch his breath.
Good exchange - Handcock coming out on top.
Handcock darts in and clinches Hayabusa up against the cage.
Handcock will no doubt start fighting again in a minute but for now he's just having a little rest, leaning Hayabusa up against the cage.
Hayabusa drops down looking for an ankle pick but Handcock pulls his leg out and moves away.
Handcock scores with a nice one two combo and darts back out of range to avoid anything coming in the opposite direction.
That's four minutes gone in the round.
Hayabusa tries to keep at a distance but Handcock has taken the fight into the clinch.
Hayabusa is working for takedown but Handcock is calmly controlling the position for now.
Handcock content to slow the pace in the clinch.
Handcock works for underhooks and lands a body shot in the process.
Handcock pushes off and circles away, back to the middle of the mat.
A jab from Handcock does it's job there.
Hayabusa doesn't react quick enough there as he takes a shot to the body.
Wooooo! Give it up for these two warriors! They are putting on a show!
Handcock moves into range and clinches up with Hayabusa.
A nice right hand lands inside from Handcock.
Handcock lands an uppercut.
Handcock lands a nice shot to the body.
Handcock scores with an uppercut up the middle.
Jeez, Kaz Hayabusa's cut is really nasty now. The referee must be thinking about getting that checked.
As the round comes to an end the crowd are showing their appreciation for a great round of action.
Handcock's corner calls for him to break the clinch, which he does.
Handcock closes the distance and clinches.
Hayabusa is looking for a takedown up against the cage. Handcock gets underhooks though and prevents the takedown attempt.
Handcock lands a shoulder strike that jolts his opponent's head backwards.
Handcock lands with a left to the head.
Handcock manages to break the clinch.
And thats the end of the round the fighters go back to their corners.
Jason Handcock showed his class in that round. I'd imagine he'll take it on all the scorecards.
The cut man is working on Kaz Hayabusa's cut.
The minute break is over - no more time for sponges and pep talks - back to the action!

Handcock closes the distance and clinches.
Handcock is clearly stalling here... Pick up the pace son.
Handcock lands a body punch.
Handcock lands with a short head shot on the inside.
Handcock leaning his opponent against the cage.

Hayabusa gets control of Handcock's arms and successfully pulls guard. Hayabusa will no doubt be looking for submissions off his back.
Hayabusa is working the butterfly guard. He manages to land a nice scissor sweep and is now in half guard on the top. Nice move.
Hayabusa is stalling here. Handcock is in no mood to hang around though. He's locked up a kimura from the bottom! Hayabusa seems to be keeping calm but he's forced to roll out of the hold and Handcock has ended up in side control on the top. Nice work.
Hayabusa can't do much from the bottom here.
That's one minute gone in the round.
Hayabusa is going to have to think about doing something other than just controlling because Handcock is managing to avoid having the position dictated to him.
Both fighters are breathing heavily.
Hayabusa is trying to improve his position.
Handcock is pausing for a moment. What's he doing? It looks like he's clearing his nose. Oh dude! He's shot a load of snot all down Hayabusa's shoulder. That is not cool.
Let's hope that Handcock has the urge to step up the pace any second now because for the last 15 or 20 seconds he's just been holding on tight.
Hayabusa tries to buck Handcock off but Handcock is having none of it.
That's two minutes gone in the round.
Well. There's a bit of a lull in the action here and the crowd are starting to get restless.

Well, the referee has seen enough. Neither fighter is active enough on the ground so he's stood them back up.
Hayabusa circles away from the clinch attempt.
Jason Handcock is looking to keep the fight on the feet at all costs.
Hayabusa misses with a takedown attempt - Handcock sprawls well and throws a nice strike on the way out which just misses.
Handcock doesn't manage to clinch there - Hayabusa circles away.
Hayabusa has his head slapped from side to side by a 3 punch combination. That must have hurt him.
Handcock tries to close the distance and clinch up against the cage but Hayabusa paws at him with a jab and circles away.
Handcock lands a slapping body shot.
Handcock is looking to take this fight into the clinch.
Handcock gets to the clinch - let's see what his plan is here.
Handcock cracks Hayabusa with a nice body shot.
Handcock lands a right hand that snaps the head of Hayabusa backwards.
Handcock scores with an uppercut up the middle.
Handcock's corner calls for him to break the clinch, which he does.
Handcock clinches with his opponent.
Hayabusa tries to pull guard but Handcock won't allow it.
That's three minutes gone in the round.
Handcock's corner calls for him to break the clinch, which he does.
Handcock is looking to clinch.
Handcock tries to clinch up but Hayabusa circles away and keeps his distance.
Handcock tries to clinch up.
Handcock tries to clinch but is not successful on this occasion.
A combination from Handcock does no damage.
Handcock drives through and clinches with Hayabusa against the cage.
Handcock lands a left hand.
Hayabusa fails to pull the fight into his guard.
That's three failed takedown attempts in the round for Kaz Hayabusa. That's going to take a lot out of him.
Hayabusa can't get the takedown.
Handcock throws a blind hook that connects with the side of Hayabusas head.
Handcock lands a right hand that snaps the head of Hayabusa backwards.
Handcock is working Hayabusa over against the cage.
Handcock content to slow the pace in the clinch.
Handcock lands a left hand.
Handcock's corner calls for him to break the clinch, which he does.
Hayabusa swats away the attempt to clinch by Handcock.
Handcock lands with a right hand.
That's four minutes gone in the round.
Handcock closes the distance and lands a one-two.
Hayabusa throws the overhand right but ducks down into a quick takedown attempt. Handcock was covering up waiting for the punch and Hayabusa finishes the takedown easily into guard.
Handcock is avoiding any damage by keeping wrist control.
Hayabusa wants to control from the top but Handcock keeps moving.
Hayabusa pressing down on his opponent's thigh, looking to pass guard. Handcock is keeping the position for now.
And thats the end of the round the fighters go back to their corners.
Jason Handcock really dominated that round.
The cut man is working on Kaz Hayabusa's cut.
The corners get their ten second warning. Both fighters stand from their stools and stare eachother down, ready to get back to the action.

Handcock gets a clinch.
Handcock manages to break the clinch.
Hayabusa tries to shoot in for a takedown. He's got hold of a leg but Handcock swivels and escapes.
Handcock fakes a head shot and lands one to the body.
Hayabusa keeps the fight on the outside.
Handcock drives through and clinches with Hayabusa against the cage.
Handcock lands a hook to the body. It's hard to tell if that hurt Hayabusa or not.
Handcock lands on the inside with an uppercut.
An uppercut to the body lands inside from Handcock.
A short right from Handcock on the inside.
A right handed body shot lands from Handcock.
Handcock lands a hook to the body. It's hard to tell if that hurt Hayabusa or not.
A nice left hand lands by Handcock.
Handcock throws a blind hook that connects with the side of Hayabusas head.
It's got to the stage where if one of these guys blows hard enough, the other might fall over.
Handcock's corner calls for him to break the clinch, which he does.
Hayabusa misses with a double jab
and Handcock counters with a nice body shot.
Handcock tries to clinch up but Hayabusa circles away and keeps his distance.
Hayabusa takes a punch to the jaw and another one to the bread basket.
That's one minute gone in the round.
Handcock tries to clinch there but Hayabusa circles away.
Handcock scores with the left hand. Hayabusa knows he should have avoided that one.
Kaz Hayabusa seems to be the more aggressive standup fighter in this bout.
Hayabusa takes a body punch but keeps moving.
Handcock throws a good cross that connects.
A left lands for Handcock.
Hayabusa closes the distance and clinches up with Handcock, looking for a takedown. Hayabusa pushes Handcock against the cage but Handcock circles to the side and manages to break the clinch.
Hayabusa on the wrong end of a vicious looking body shot.
Hayabusa showing good head movement there, avoiding the strikes from Handcock.
Hayabusa misses with a takedown attempt
and Hayabusa takes a counter punch right on the button for his troubles.
That's three failed takedown attempts in the round for Kaz Hayabusa. That's going to take a lot out of him.
Handcock closes the distance and clinches.
Handcock breaks the clinch and we return to the middle of the mat.
Hayabusa misses with a takedown attempt. He shot from a bit too far out.
Kaz Hayabusa is looking to throw some combinations by the looks of things.
Handcock scores with a one two! Hayabusa had his feet all tangled up there and couldn't avoid the strikes.
Hayabusa shoots and misses
and Handcock counters by moving into the clinch.
That's two minutes gone in the round.
Hayabusa is working for takedown but Handcock is calmly controlling the position for now.
A nice right hand lands inside from Handcock.
Handcock lands a nice uppercut.
Handcock leaning his opponent against the cage.
Hayabusa tries to pull guard but Handcock holds him up against the cage and eventually Hayabusa drops back down to his feet.
Handcock lands an uppercut.
Handcock works on Hayabusa's body with a couple of short punches.
A body shot lands from Handcock.
Hayabusa looking for a takedown.
Handcock throws a blind hook that connects with the side of Hayabusas head.
Handcock breaks the clinch and we return to the middle of the mat.
Hayabusa fails with a takedown attempt.
Handcock is looking to clinch.
Handcock tries to clinch there but Hayabusa circles away.
Hayabusa shoots and misses
and Handcock counters with a quick right hand to the jaw.
Handcock moves into the clinch.
That's three minutes gone in the round.
Handcock stalling the fight.
Hayabusa tries for a takedown. No joy.
A bit of stalling here from Handcock.
Hayabusa fails to pull the fight into his guard.
Hayabusa tries to pull guard but can't drag his opponent to the mat. Handcock just stands there and leans against the cage.
Handcock holding his opponent close, against the cage.
Handcock's corner calls for him to break the clinch, which he does.
Hayabusa fails with a takedown attempt.
Hayabusa shoots in for a takedown but Handcock shows good takedown defense.
Handcock throws a one two combo.
Hayabusa shoots in for a takedown. "I don't think so" says Handcock as he avoids it easily.
Handcock lands a jab followed by a nice looking cross.
Hayabusa looking to shoot here. He's gone for it and he's landed a takedown into mount! Oh, that's bad for Handcock!
Hayabusa looking to control but Handcock is working nicely, looking to advance position himself.
That's four minutes gone in the round.

Hayabusa goes for an armbar but he's not got it
Handcock turns into him and now he's in Hayabusa's guard.
Hayabusa working away from the bottom but not quite defensive enough there because Handcock has passed into half guard!
The crowd applaud the fighters efforts here as the round comes to an end.
Hayabusa tries to roll over but Handcock keeps him under control.
And thats the end of the round the fighters go back to their corners.
Jason Handcock dominated that fourth round.
The cut man is working on Kaz Hayabusa's cut.
The fighters' corners scream their final instructions, as the referee calls time. Here we go, back to the action! This is the final round!

Hayabusa takes a jab right on the kisser.
Handcock is pinned up against the cage taking some big shots here. The referee is looking closely deciding whether he should stop the fight.
Hayabusa avoids the body shot from Handcock.
Handcock will need to tighten up his combinations if he doesn't want to gas himself out, swinging at thin air.
Hayabusa tries to score with a leg kick but it misses it's target.
Hayabusa shoots for a takedown but Handcock saw that one coming a mile off and avoided it easily.
Hayabusa shoots in for a takedown - he's clinched up with Handcock but Handcock pushes him off and we're back to square one.
Handcock looks to score with a combo but nothing lands.
We've had a slow start to the round here - hopefully the action picks up.
Handcock connects with a body shot.
Handcock darts in and clinches Hayabusa up against the cage.
Handcock pushes off and circles away, back to the middle of the mat.
Hayabusa shoots in looking for a double leg takedown. Handcock defends it nicely.
That's three failed takedown attempts in the round for Kaz Hayabusa. That's going to take a lot out of him.
Both of our modern day gladiators look out of it here - an gruelling 5 rounds of action taking it's toll on them, no doubt.
Handcock moves in looking to clinch but Hayabusa pushes him off.
That's one minute gone in the round.
A punch combination from Handcock misses.
Handcock tries to clinch but is not successful on this occasion.
Handcock is looking to clinch.
Handcock moves in looking to clinch but Hayabusa pushes him off.
Handcock punishes Hayabusa's body with a nice straight punch.
Hayabusa closes this distance looking for a takedown but Handcock circles away.
Handcock tries to clinch up.
Handcock rushes forward with a series of wild hooks but Hayabusa moves out of range and avoids them all easily.
Hayabusa looks for a takedown here. Will he get it? Handcock is fending him off so far but Hayabusa persists. Nope, Handcock circles away and we're back to standing.
Handcock scores with a reasonable looking shot to the body. Hayabusa doesn't seem bothered though.
Handcock bobbing and weaving, closes the distance and lands a hook to the side of Hayabusa's head.
Handcock closes the distance and presses his opponent up against the cage.
Hayabusa tries to jump guard but he falls flat on his backside. Handcock smiles and moves away.
Hayabusa gets his takedown attempt stuffed easily
and Handcock counters with a three punch combo that has Hayabusa backing up. Hayabusa nods at Handcock to acknowledge the strikes.
That's two minutes gone in the round.
Handcock drives through and clinches with Hayabusa against the cage.
Hayabusa jumps guard but Handcock stands there with Hayabusa around his waist. Hayabusa gives up and drops back to his feet. We remain in the clinch.
Hayabusa tries to pull guard but Handcock won't allow it.
Handcock gets underhooks to prevent Hayabusa's takedown attempt.
Handcock lands with a light punch inside.
Handcock lands a right hand.
A shot in the inside from Handcock.
Hayabusa wants a takedown.
Hayabusa tries for a takedown but Handcock manages to get underhooks.
Handcock breaks from the clinch.
Handcock rushes Hayabusa and pushes him back against the cage in a clinch.
Hayabusa tries to pull guard but Handcock won't allow it.
Hayabusa tries to take the fight to the ground by pulling guard but can't manage it.
Handcock throws a blind hook that connects with the side of Hayabusas head.
Handcock breaks from the clinch.
Handcock clinches.
Handcock stalling against the cage.
Hayabusa drops to a knee looking for a takedown but Handcock gets the underhooks and prevents it.
Handcock gets through Hayabusa's defenses to land a nice punch to the side of the head.
That's three minutes gone in the round.
Handcock lands a right uppercut that snaps the head of Hayabusa backwards.
Handcock breaks from the clinch.
Handcock clinches with his opponent.
Hayabusa jumps guard but Handcock stands there with Hayabusa around his waist. Hayabusa gives up and drops back to his feet. We remain in the clinch.
Hayabusa can't get the takedown.
Hayabusa takes a shot to the head.
Handcock manages to break the clinch.
Handcock tries to clinch up.
Handcock pushes Hayabusa up against the cage in a clinch.
A quick uppercut on the inside from Handcock.
Handcock throws a blind hook that connects with the side of Hayabusas head.
A left hand lands to the body for Handcock.
Handcock scores with an uppercut up the middle.
A short right hand to the side of the head by Handcock.
Handcock lands a hook that snaps the head of Hayabusa backwards.
Hayabusa gets control of Handcock's arms and successfully pulls guard. Hayabusa will no doubt be looking for submissions off his back.
Hayabusa throwing his legs up looking for a triangle.
That's four minutes gone in the round.
Hayabusa is looking to sweep but instead, Handcock has passed into half guard.
Hayabusa has a hand on Handcock's thigh, trying to get back to full guard. Handcock takes advantage of the position though and mounts him!
Handcock controlling the position easily from mount.
Handcock avoids the attempt from Hayabusa to control.
And that's the end of the fight!
Jason Handcock comfortably won the final round on my scorecard.
I've got Handcock winning every round here. Surely the decision will go his way and he'll pick up a well deserved decision victory. Over to the ring announcer for the scorecards.
Ladies and gentlemen, after 5 rounds of action, we go to the scorecards for a decision.
Judge Andi Peters scores the fight 43:50
Judge Gordon Ramsey scores the fight 43:50
Judge Frank Skinner scores the fight 43:50
In favor of your winner, by unanimous decision... Jason Handcock! Jason Handcock retains his lightweight title!
|
|
|
|
|
|
|
|
|
|
|
|
|
|
|
|
|
|
|
|
|
|
|
| S |
C
A |
G |
S |
C
B |
G |
|
S |
C |
G |
|
energy
A | B |
|
hype
A | B |
|
pop
A | B |
|
mgr
A | B |
|
FIGHT
RATING
100% |
|
|
|
|
|
|
