|
|
PBP Commentary |
Coming up we have a super heavyweight MMA rules bout between Bobba Sapp (ranked 0 p4p, 0 weight class) and Cloud Strife (ranked 0 p4p, 0 weight class). Sapp comes to the ring accompanied by SHAFT- Isaac hayes. Strife has chosen One Winged Angel by The Black Mages as his entrance music. Bobba Sapp could well score a knockout today. He has the power to get to Cloud Strife's chin.
 |
|
 |
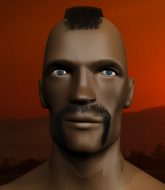
| 225 cm
19
300 lbs
4 - 1 - 0 |
|
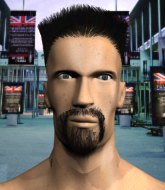
201 cm
25
290 lbs
8 - 4 - 0 |
BJJ Blue Belt
Excellent boxer
Very strong |
|
Powerful takedowns
Excellent boxer
Powerful |
|
| |
|
Ladies and gentlemen. This fight is 3 rounds, in the super heavyweight division.
Introducing the fighter to my left, fighting out of the red corner.
With a record of
4 - 1 - 0, fighting out of London, Bobba Sapp!
And introducing the fighter to my right, fighting out of the blue corner.
With a record of
8 - 4 - 0, fighting out of London, Cloud Strife!
The judges for this bout are Sam Margolis, Chris Edwards and Donald Grub.

The bell rings for round one and we are underway!
Good exchange - Sapp coming out on top.
Sapp jabbing away but nothing is landing.
Sapp throws a series of punches but Strife avoids them all with ease.
Bobba Sapp seems to be the more aggressive standup fighter in this bout.
Sapp circles away from the clinch attempt.
Sapp waving his hands out in front of him, looking to distract Strife.
Sapp works Strife's body with a nice hook.
We've seen a great period of action over the last minute or so - credit to both fighters for going all out!
Sapp lunges in with an uppercut that skims his opponent's chin.
Sapp swinging wildly here.
Sapp is the aggressor but that punch slipped nicely by Strife.

That's one minute gone in the round.
Strife takes an uppercut right on the jaw but it doesn't phase him.
Sapp throws a nice looking combination but Strife bobs and weaves to avoid any damage.
Sapp keeps the fight standing with a nice sprawl.
Sapp throws a jab but it's blocked by Strife.

That's two minutes gone in the round.
Strife shoots in but Sapp avoids the takedown attempt easily.
Strife steps to the side to avoid the strikes from Sapp.
Strife shoots for a takedown but Sapp saw that one coming a mile off and avoided it easily.
Bobba Sapp has stuffed three takedown attempts in the round now. That's going to take a lot out of Cloud Strife.
Sapp misses with a jab, cross combination.
Strife tries to shoot in for a takedown. He's got hold of a leg but Sapp swivels and escapes.
Strife ducks under an overhand right and circles away with a smile on his face.

That's three minutes gone in the round.
Sapp looks to land a combination but Strife avoids it well.
Sapp lands a vicious shot with the stealth of a sniper and the strength of a viper. Are vipers that strong? I can think of lots of things that are stronger than a viper - not many rhyme with sniper though.
Strife looks for a takedown here. Will he get it? Sapp is fending him off so far but Strife persists. Nope, Sapp circles away and we're back to standing.

Strife shoots in from a long way out. He's driving through with the takedown attempt and he eventually gets it, landing in Sapp's guard.
Strife slips nicely into half guard.
Strife missing with some ground and pound from the half guard.

That's four minutes gone in the round.
Strife missing with the ground and pound from half guard.
Strife thows a huge punch but Sapp dodges it nicely.
Strife trying to mount his opponent but Sapp defends it.
Strife throwing shots but Sapp is blocking nicely.
Sapp wants to control but Strife is keeping busy and won't allow it.
As the round comes to an end the crowd are showing their appreciation for a great round of action.

Well, the referee has seen enough. Neither fighter is active enough on the ground so he's stood them back up.
Sapp scores with a crisp jab that stopped Strife in his tracks.
The crowd are loving this. Great action here.
Sapp throws a lazy right hand but Strife sees it coming a mile off and sidesteps it easily.
And thats the end of the round the fighters go back to their corners.
Bobba Sapp dominated that round.
That's the end of the interval. I'm sure that seemed a lot quicker than a minute for our two fighters! Back to the action.

Sapp is the aggressor but that punch slipped nicely by Strife.

Strife gets to the clinch - let's see what his plan is here.
Sapp has had enough of the clinch and is looking to separate.
Strife fails to pull guard.
Strife goes for a takedown in the clinch but Sapp prevents it.
A hook to the body from Strife.
Strife wants a takedown but no success here.
Bobba Sapp has stuffed three takedown attempts in the round now. That's going to take a lot out of Cloud Strife.
Strife tries to score a body lock takedown but Sapp shows good agility there to stay on his feet.
Strife looking for a takedown.
Strife wants the takedown. Sapp is fighting it off but Strife persists and manages to bring the fight to the ground, ending up in Sapp's guard against the ropes.
This is a great period of action - very entertaining stuff!
Strife trying to pass the guard but can't manage it just yet.
Both fighters are absolutely exhausted here.
Sapp avoiding any damage from the ground and pound.
Strife lands a couple of digs.
That's one minute gone in the round.
Strife throwing strikes from guard but Sapp blocks nicely.
Strife passes easily into side control. Nice work.
Strife moves into full mount!
Sapp holding onto his opponent's waist for dear life, as Strife tries to land some strikes to get him to release his grip.
Strife misses with a series of strikes from mount. He'll no doubt be working on his ground and pound when he gets back to the gym.
Strife lands with some strikes.
That's two minutes gone in the round.

Strife with some aggressive grappling here. He's looking for submissions here, rather than waiting for the opportunity to counter.
Strife throwing sloppy strikes here. Perhaps if he tightened up his striking from such a dominant position, he'd be able to finish easier.
Strife lands a shot to the body, followed up by a shot to the exposed head of his trapped opponent.
Strife thuds his fist into the canvas! Oooouch!
Strife thuds his fist into the canvas! Oooouch!
Strife unloading with bombs!
That's three minutes gone in the round.
Sapp takes a big shot to the head but keeps on trying to improve his position.
Sapp taking shots to the head.
The referee warns Sapp that he has to improve his position here as he takes two more clean shots to the head.
Strife looking to finish Sapp with some ground and pound. This is bad for Sapp!
Strife misses with a head shot.
Sapp is looking to improve his position but Strife isn't that keen on the idea.
Strife throws an elbow from mount that misses. Lucky escape for Sapp because Strife loaded up on that one.
That's four minutes gone in the round.
Strife with shots to the head and body - Sapp looks very uncomfortable down there.
Strife landing shots from mount.
We've seen a great period of action over the last minute or so - credit to both fighters for going all out!
Strife scoring with some good ground and pound from mount here. Will he manage to finish Sapp?
Strife punching from mount but Sapp doing a good job of avoiding damage.
Sapp is looking to get to half guard.
Strife throwing strikes here but Sapp is writhing around nicely and avoiding any serious damage.
As the round comes to an end the crowd are showing their appreciation for a great round of action.
The referee warns Sapp that he has to improve his position here as he takes two more clean shots to the head.
Strife landing shots from mount.

It looks like Bobba Sapp has been cut.
Strife sends his fist crashing into the mat - the crowd let out a collective ooooooh. Let's hope he's not broken it!
And thats the end of the round the fighters go back to their corners.
Cloud Strife showed his class in that round. I'd imagine he'll take it on all the scorecards.
The cut man is working on Bobba Sapp's cut.
The referee calls time. The cornermen exit stage left and we're back to business. This is the final round!

Strife uses decent footwork to sidestep a right hand from Sapp.
Strife closes this distance looking for a takedown but Sapp circles away.
Bobba Sapp is winning the standup battle so far.
Sapp rushes forward with a series of wild hooks but Strife moves out of range and avoids them all easily.
Sapp closes the distance and lands a one-two.
Strife tries to shoot in for a takedown. He's got hold of a leg but Sapp swivels and escapes.
Strife ducks under a wild hook from Sapp.
That's one minute gone in the round.
Sapp throws out a token jab with nothing on it.
Sapp throws a right hand that Strife ducks under and follows up with a left that Strife also avoids with ease.
Sapp throws a nice looking combination but Strife bobs and weaves to avoid any damage.
Both fighters are breathing heavily.
Sapp misses with a hook.
Strife avoids a lazy jab quite easily.
Sapp is using his reach advantage well here, landing the more effective single shots from range.
Sapp throws out a loose jab but Strife uses good head movement to avoid it.
That's two minutes gone in the round.
The crowd are hurling abuse towards the fighters... You can hardly blame them though because there isn't a lot going on in the fight.
Sapp looks to score with a combo but nothing lands.
Strife looking for a takedown here - he's got it.
Strife looking to pass the guard.
Sapp working the defensive guard well to avoid strikes from Strife.
Strife distracts Sapp with his right hand and drops a big elbow with his other arm.
That's three minutes gone in the round.
Strife tries to free his leg and advance position but Sapp is retaining full guard.
Strife is persisting with the attempt to improve his position.
Strife drops back, looking for a kneebar! Sapp looks panicked! The fighters roll across the mat, one looking to finish, one looking to escape. Sapp looks to have wriggled free... Yes, he's got his leg free and he's dived into side control! Good work there from Sapp!
Cloud Strife has got the better of the ground game so far.
Strife is not content to let Sapp control the position.
Sapp is going to have to think about doing something other than just controlling because Strife is managing to avoid having the position dictated to him.
Strife sneaks a leg under to get back to half guard.
Both fighters really going for it on the ground here!
That's four minutes gone in the round.
The crowd are hurling abuse towards the fighters... You can hardly blame them though because there isn't a lot going on in the fight.
Strife gets back to full guard.
Sapp wants to stand but Strife is controlling his posture from full guard.
Strife wants to sweep here but Sapp controlling him for the moment.
Sapp wants to get up but he can't break Strife's closed guard. He needs to be careful trying to break the legs open, as he's open to submissions here.
Strife looking for a triangle here. Sapp is fighting it but it looks tight! Strife pulls the arm across and this one won't last much longer! Nope, Sapp is tapping out - this one is all over!
Ladies and gentlemen, after 4:48 of round 3, we have a winner by way of Submission (Triangle Choke). Cloud Strife!
|
|
|
|
|
|
|
|
|
|
|
|
|
|
|
|
|
|
|
|
|
|
|
| S |
C
A |
G |
S |
C
B |
G |
|
S |
C |
G |
|
energy
A | B |
|
hype
A | B |
|
pop
A | B |
|
mgr
A | B |
|
FIGHT
RATING
91% |
|
|
|
|
|
|
