|
|
PBP Commentary |
Coming up we have a welterweight MMA rules bout between Nick Diaz (ranked 0 p4p, 0 weight class) and Martti Molo (ranked 0 p4p, 0 weight class). Chooooooooon! I think Diaz might be my favorite fighter, now he's come out to This Is War. Molo is bouncing up and down as he enters the arena, backed by Nitro Circus. Martti Molo has the power to score a knockout today if he connects clean with Nick Diaz's chin.
 |
|
 |
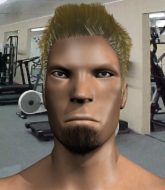
| 183 cm
26
171 lbs
13 - 0 - 0 |
|
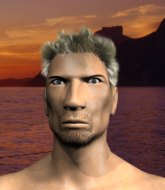
180 cm
21
185 lbs
11 - 2 - 1 |
Powerful takedowns
Excellent boxer
KO power |
|
Good wrestler
Lethal high kicks
Granite chin |
|
| |
|
Ladies and gentlemen. This fight is 5 rounds, in the welterweight division.
Introducing the fighter to my left, fighting out of the red corner.
With a record of
13 - 0 - 0, fighting out of London, Nick Diaz!
And introducing the fighter to my right, fighting out of the blue corner.
With a record of
11 - 2 - 1, fighting out of Helsinki, Martti Molo!
The judges for this bout are James Atkins, Steven Brown and Donald Grub.

The bell rings for round one and we are underway!
Diaz scores with a jab to the body.
Decent striking displayed by Diaz there.
Molo fails to land with a series of punches.
Diaz bobs and weaves well there to avoid the strikes.
Diaz fails to land the takedown.
Diaz ducks down and throws a hook to the body but Molo moves away.
Molo staying out of range there.
Diaz throws out a leg kick but Molo moves out of range and Diaz only half commits.
Donk. Molo catches Diaz right on the button with a cross.
Molo scores with a nice one two combo and darts back out of range to avoid anything coming in the opposite direction.
The fans in attendance giving it up for the two fighters, who have really let it all hang out in the last minute or so!
Diaz on the wrong end of a decent looking cross there.
Molo looks to score with a combo but nothing lands.

That's one minute gone in the round.

Molo drops Diaz with a beautiful combination! Diaz stares up at his opponent, who ushers him back to his feet - Molo is looking for the KO!

Diaz is rocked!

It looks like Nick Diaz has been cut.
Nick Diaz seems to be the more aggressive standup fighter in this bout.
Diaz tries to land with a swinging hook to the body but Molo was well out of range. Poor timing from Diaz.
Diaz misses with a wild body shot.
Diaz misses with a looping left.
Molo misses with a straight left.
Molo misses with a body shot
and Diaz counters with a nice body kick.
Molo shakes his hands off, looking to compose himself, but takes a jab to the jaw whilst he does it.
Diaz lands a jab followed by a nice looking cross.
The fans in attendance giving it up for the two fighters, who have really let it all hang out in the last minute or so!
Diaz shoots for a double leg takedown but Molo sprawls well. He's pushed Diaz's face into the mat and manages to get back to his feet relatively easily.
No luck with that takedown attempt from Diaz.
That's three failed takedown attempts in the round for Nick Diaz. That's going to take a lot out of him.
Molo tries a head kick but it misses.

That's two minutes gone in the round.
Molo swings and misses with a hook to the body.
Molo changes levels and scores with a jab to the body.
Diaz lunges in with an uppercut that skims his opponent's chin.
Diaz throws a combination but it was largely blocked by Molo.
Diaz keeps his opponent at a distance with a nice jab.
Diaz avoids the clinch attempt nicely.
Diaz lands a body shot.

Diaz drives through with a really nice takedown into side control.
Diaz sitting in side control, looking to soften his opponent up with elbows and hammerfists but Molo is avoiding damage well and looking to escape the position.

That's three minutes gone in the round.

Diaz tries for a kimura but Molo is defending well.
An elbow from Diaz crashes against the mat.
Molo gets one leg under and gets the fight to half guard.
Diaz is looking to take a break and control but Molo is keeping him honest, looking to work from the bottom.
Diaz is thwarting Molo's attempts to control the position.

That's four minutes gone in the round.
Well. There's a bit of a lull in the action here and the crowd are starting to get restless.
Molo avoiding damage under a succession of punches from Diaz.
Molo won't allow Diaz to pass to mount.
Diaz is trying to work for a kimura but Molo is defending well.
Molo is looking for a sweep. Diaz is wise to his cunning plan and keeps the top position.
Diaz has been looking to land a fair amount of strikes on the ground. He might be looking to soften his opponent up in order to work for a submission.

Neither fighter is doing enough for the referee's liking and he's decided to stand them back up.
Molo pulls out of a head kick attempt.
As the round comes to an end the crowd are showing their appreciation for a great round of action.
Diaz keeps his opponent at a distance with a nice jab.
Diaz scores with a head kick.
And thats the end of the round the fighters go back to their corners.
That was a close round but I would say that Nick Diaz will probably get the nod.
The cut man is working on Nick Diaz's cut.
The referee calls time. The cornermen exit stage left and we're back to business.

Diaz throws a combination but it was largely blocked by Molo.
Molo throws a right and a left that Diaz avoids nicely.
Molo throws a combination that misses
and Diaz counters with a lovely shot to the body.
Molo moves out of range of the strikes.
Diaz throws a looping overhand right but Molo ducks down to avoid it.
A solid leg kick lands there for Diaz.
Diaz shoots in for a takedown. "I don't think so" says Molo as he avoids it easily.
Diaz throws a combination but comes up with nothing but fresh air.
Diaz shoots in for a takedown - he's clinched up with Molo but Molo pushes him off and we're back to square one.
Diaz throws a series of punches but Molo moves out of range.
That's one minute gone in the round.
Diaz misses with an uppercut.
Molo misses the jab.
Diaz cracks Molo with a nice right hand that draws applause from the crowd.
Molo displays good takedown defense there as he swats away a double leg from Diaz.
That's three failed takedown attempts in the round for Nick Diaz. That's going to take a lot out of him.
Molo throws a big shot that misses.
Martti Molo is looking to keep the fight on the feet at all costs.
Diaz closes this distance looking for a takedown but Molo circles away.
Diaz connects with a looping left hand that seems like it dazed Molo momentarily.
Diaz misses with an uppercut.
Molo lunges in with swinging rights and lefts but Diaz circles away quickly and effectively.
Diaz looks to throw the jab but Molo is out of range.
That's two minutes gone in the round.
Molo moves away from the strike by Diaz.
A slow jab from Diaz misses its intended target.
Molo shakes his hands off, looking to compose himself, but takes a jab to the jaw whilst he does it.
Molo is the aggressor but that punch slipped nicely by Diaz.
Molo throws a combination. Diaz tries to block but a couple of punches get through.
Martti Molo is looking to throw some combinations by the looks of things.
Molo throws a sloppy body shot
and Diaz counters with a head kick. That will keep Molo thinking before he tries any more sloppy attacks!
Diaz bobs and weaves and then throws a good body kick.
Diaz looks to land a body kick but Molo moved away.
An inside leg kick lands from Diaz.
Molo is breathing heavily.
Molo doesn't manage to clinch there - Diaz circles away.
That's three minutes gone in the round.
Molo tries to move into range but Diaz moves to the side and lands with a nice right hand.
Diaz dips down and scores with a jab to the body.
Diaz fakes a head shot and lands one to the body.
Molo walks into a stiff left hand from Diaz.
Nick Diaz is winning the standup battle so far.
Diaz lands a powerful looking uppercut that connected with his opponent's jaw.
Molo leaves Diaz with his face pressed against the mat as he sprawls beautifully, defending against a solid takedown attempt.
Diaz ducks low and lands a nice hook to the body of his opponent.
Molo takes a body punch that cleary hurt but he's trying not to show any weakness.
Fantastic stuff here - a very entertaining period of action, which has drawn cheers from the crowd.
Diaz feints with a shoulder and throws a nice leg kick to Molo's calf.
Molo takes a hook to the side of the head. I wonder if that's got his ears ringing.
That's four minutes gone in the round.
Diaz misses with a wild body shot.
Molo is pinned up against the cage taking some big shots here. The referee is looking closely deciding whether he should stop the fight.
Diaz drops down and drives through with a powerful takedown into guard.
Diaz sitting in guard, not really doing much.
Diaz wants to control from the top but Molo keeps moving.
As the round comes to an end the crowd are showing their appreciation for a great round of action.
Diaz stands up and looks to throw the legs aside to pass to side control. Molo swivels though and keeps the full guard.
And thats the end of the round the fighters go back to their corners.
Nick Diaz dominated that second round.
The cut man is working on Nick Diaz's cut.
The minute break is over - no more time for sponges and pep talks - back to the action!

Diaz lands with a hook. Molo tried to avoid it but it clipped the top of his head.
Molo lands an overhand left. A wild punch that just about connected.
Molo uses good head movement to avoid the hook from Diaz.
Molo throws a hook to the side of Diaz's head but Diaz sees it coming and ducks under it beautifully.
Diaz goes for a high kick. It partially lands.
Molo lunges in with swinging rights and lefts but Diaz circles away quickly and effectively.
Diaz throws a push kick but Molo slaps the foot to one side.
Molo throws a sloppy head kick and Diaz moves out of range easily.
Diaz closes the distance and gets a double leg, slamming Molo to the mat! Molo manages to get full guard.
Molo takes a big intake of breath there - he's definitely tired.
Molo looking to sweep using the butterfly guard but Diaz puts pay to that idea as he passes nicely into half guard.
That's one minute gone in the round.
Molo is staying active underneath Diaz, who seems content to just control the action from this position.
Diaz takes a deep breath and rests his weight momentarily on top of his opponent, to control the position.
Diaz looking for a kimura but he'll have to free his other leg if he wants to finish that. Perhaps he's just using it as a distraction technique.
Molo is staying active underneath Diaz, who seems content to just control the action from this position.
That's two minutes gone in the round.
Well. There's a bit of a lull in the action here and the crowd are starting to get restless.
Diaz is working for a kimura but Molo is defending it quite comfortably.
Diaz is figuring out what he wants to do next.
Diaz wants to pass to mount but Molo is defending the position.
Diaz looking for a kimura but he'll have to free his other leg if he wants to finish that. Perhaps he's just using it as a distraction technique.
That's three minutes gone in the round.
Diaz is keen to just control but Molo is a slippery customer.
We get told so often about how wrestlers don't like to be on their backs. Let's see if Molo can do anything to dispel that myth.
Molo controlling the position well.
The ref warns both fighters not to hold the cage as they work up against the meshing.
Diaz not doing much here.
That's four minutes gone in the round.
My god... these two guys really need to pick up the pace or everyone will leave to go get a beer.
Diaz moves nicely into side control.
Diaz goes for an armbar! This could be all over! Wait, no, Molo rolls with the submission and now he's on top in Diaz's guard! Nice work there by Molo!
Diaz is active off his back here, looking for submissions.
And thats the end of the round the fighters go back to their corners.
Nick Diaz clearly takes that round.
The cut man is working on Nick Diaz's cut.
That's the end of the interval. I'm sure that seemed a lot quicker than a minute for our two fighters! Back to the action.

Diaz shoots in but Molo avoids the takedown attempt easily.
A shot to de liver by Diaz. Beautiful body shot.
Diaz checks a low kick from Molo.
Diaz misses with a body shot.
A jab from Diaz misses.
We've had a slow start to the round here - hopefully the action picks up.
Molo tries to clinch up but Diaz circles away and keeps his distance.
Molo is pinned up against the cage taking some big shots here. The referee is looking closely deciding whether he should stop the fight.
Molo waving his hands out in front of him, looking to distract Diaz.
Diaz throws a mid kick that lands with a slap.
That's one minute gone in the round.
Molo uses good footwork to avoid the strikes from Diaz.
Molo throws a combination but comes up with nothing but fresh air.
Diaz just misses with a punch to the body.
Diaz throws a sloppy head kick and Molo moves out of range easily.
Diaz misses with a body shot.
Molo moves away from the strike by Diaz.
Diaz throws a lazy right hand but Molo sees it coming a mile off and sidesteps it easily.
Molo avoids the head kick by Diaz.
Diaz swings wildly with a hook that is half blocked by Molo.
Diaz looks to land a body kick but Molo moved away.
That's two minutes gone in the round.
Neither fighter has done anything of merit for a good minute or two here and the crowd are not happy about it.
Molo is on the wrong end of a nice combination from Diaz.
Diaz fails to land with the punch combination there - jab, cross, hook, miss, miss, miss.
Diaz stalks Molo and leaps in with a furious combination of punches. Uppercuts and crosses smash into Molo's face. Molo staggers backwards, shaken.
Molo tries to clinch but is not successful on this occasion.
Diaz uses good footwork to get in and out, landing a nice hook.
Diaz shoots in with a takedown attempt and he has Molo pinned against the cage. Molo gets the underhooks and manages to circle away.
Diaz slips a jab and a cross from Molo.
A jab from Diaz misses.
That's three minutes gone in the round.
Diaz misses with a body shot. Nice footwork from Molo.
Diaz lands with a shot to the body.
Molo is absolutely dripping with sweat - he looks exhausted.
Diaz throws a body kick but he was well out of range there.
Diaz tries to score a power double leg takedown but Molo sees that one coming and sprawls well. That will dishearten Diaz somewhat.
That's three failed takedown attempts in the round for Nick Diaz. That's going to take a lot out of him.
Molo misses with a hook to the body
and Molo takes a counter punch right on the button for his troubles.
Diaz digs a good hook to Molo's body.
Diaz shoots in looking for a double leg takedown. Molo defends it nicely.
Diaz looks to land a combination. Molo sees it coming but can only parry a couple of the shots.
That's four minutes gone in the round.
Diaz fails with a rather predictable takedown attempt.
Diaz avoids a punch combination nicely.
Diaz displays some good footwork, moving neatly out of range as Molo throws out the jab.
Molo needs to keep his hands up - Diaz had a free shot at his head there.
Diaz throws a shot from downtown. Molo moves away and avoids it.
Diaz misses with a body shot.
Molo takes a body punch that cleary hurt but he's trying not to show any weakness.
Diaz throws a hook to the body but it doesn't connect.
And thats the end of the round the fighters go back to their corners.
Nick Diaz had his way with Martti Molo in that round.
The cut man is working on Nick Diaz's cut.
That's time! Diaz's corner gives him a slap on the ass as he gets ready to fight. This is the final round!

Diaz tries to land with a swinging hook to the body but Molo was well out of range. Poor timing from Diaz.
Diaz misses with a takedown attempt - Molo sprawls well and throws a nice strike on the way out which just misses.
Nice defenses there by Molo.
Diaz shoots in but no luck this time.
Diaz stuns Molo with a nice body shot, before stepping back out of range.
Molo rushes forward with a series of wild hooks but Diaz moves out of range and avoids them all easily.
We've had a slow start to the round here - hopefully the action picks up.
Molo falls off balance throwing a combination
and Diaz counters with a quick right hand to the jaw.
Diaz avoids a lazy jab quite easily.
Molo is wobbling all over the place through exhaustion. Will he make it to the final bell?
That's one minute gone in the round.
Molo goes for a spinning back kick but it misses.
Diaz moves into range and throws a combination. A nice jab followed by a hook to the body.
Diaz misses the shot to the body.
Diaz checks the leg kick.
Diaz shoots in for a takedown and gets it.
Diaz seems very keen to just sit and control from half guard but Molo does not like that idea so much and is remaining active off his back.
Molo wants to get back to his feet.
That's two minutes gone in the round.
Molo wants to improve his position but Diaz is controlling well.
Diaz is looking for a kimura here.
Martti Molo has stepped it up - he knows he needs a finish here!
Molo is looking to regain full guard. Not this time though.
That's three minutes gone in the round.
Diaz is looking to take a break and control but Molo is keeping him honest, looking to work from the bottom.
Molo blocking the ground and pound attempt from Diaz.
The referee decides to stand the fighters back up.
Diaz misses with a straight left.
Molo throws a jab, cross combination which is slipped
and Molo takes a counter punch right on the button for his troubles.
Molo has a pretty nasty looking mouse under his right eye.
Molo slaps away a takedown attempt from Diaz, before circling back to the center of the mat.
That's three failed takedown attempts in the round for Nick Diaz. That's going to take a lot out of him.
Diaz blocks a head kick by Molo.
Diaz looks to land a right hand but Molo moved out of range.
Diaz is really dominating this fight. Is there anything that Molo can do to turn this around?
That's four minutes gone in the round.
The crowd are hurling abuse towards the fighters... You can hardly blame them though because there isn't a lot going on in the fight.
Diaz lands with a cross to side of his opponent's head.
Well, he's not going to score with shots like that. A lazy body kick attempt from Diaz.
Diaz cracks a nice hook into Molo's ribs.
Diaz fails to land the takedown.
Diaz ducks down and throws a hook to the body but Molo moves away.
Nick Diaz is fighting for a decision here - he's started to take the cautious approach.
Diaz throws a two punch combo that lands nicely.
Diaz circles away from the clinch attempt.
Diaz scores with a nice one two combo and darts back out of range to avoid anything coming in the opposite direction.
And that's the end of the fight!
Nick Diaz showed his dominance in that final round.
Well Diaz has outscored his opponent in every aspect of the fight today. Only a scarily incompetent judge or two will keep him from a well deserved win... Over to the ring announcer for the scorecards.
Ladies and gentlemen, after 5 rounds of action, we go to the scorecards for a decision.
Judge James Atkins scores the fight 50:45
Judge Steven Brown scores the fight 50:45
Judge Donald Grub scores the fight 50:45
In favor of your winner, by unanimous decision... Nick Diaz!
|
|
|
|
|
|
|
|
|
|
|
|
|
|
|
|
|
|
|
|
|
|
|
| S |
C
A |
G |
S |
C
B |
G |
|
S |
C |
G |
|
energy
A | B |
|
hype
A | B |
|
pop
A | B |
|
mgr
A | B |
|
FIGHT
RATING
80% |
|
|
|
|
|
|
