|
|
PBP Commentary |
Coming up we have a featherweight MMA rules bout between Clayton Hayward (ranked 0 p4p, 0 weight class) and Cj Bower (ranked 0 p4p, 0 weight class). We have two fighters making their debuts here, so let's see who comes out of this one with their first professional victory.
 |
|
 |
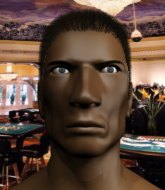
| 180 cm
22
150 lbs
0 - 0 - 0 |
|
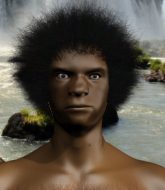
168 cm
22
155 lbs
0 - 0 - 0 |
BJJ Purple Belt
Brawler
KO power |
|
BJJ Brown Belt
Brawler
Intelligent |
|
| |
|
Ladies and gentlemen. This fight is 3 rounds, in the featherweight division.
Introducing the fighter to my left, fighting out of the red corner.
With a record of
0 - 0 - 0, fighting out of Sydney, Clayton Hayward!
And introducing the fighter to my right, fighting out of the blue corner.
With a record of
0 - 0 - 0, fighting out of Sydney, Cj Bower!
The judges for this bout are John Mangel, Bruno Hogan and Skip Squint.

The bell rings for round one and we are underway!
Bower changes levels and looks for a double leg takedown. Hayward tries to avoid it but Bower manages to keep hold of a leg and drag Hayward to the ground. Hayward escapes though and pops straight back up to his feet.
Bower will have to do better than that with his takedown attempts.
No luck with that takedown attempt from Bower.
Clayton Hayward has stuffed three takedown attempts in the round now. That's going to take a lot out of Cj Bower.

Hayward shoots in for a takedown and gets it.
Hayward trying to mount his opponent but Bower defends it.
Still in half guard, Hayward seems content to control.
Hayward wants to control but Bower is keeping him busy.

That's one minute gone in the round.
Still in half guard, Hayward seems content to control.

Hayward decides he's had enough of the ground and stands up.
Hayward shoots in for a takedown and gets it. Oh and he's advanced to full mount straight away.
Hayward trying to control but Bower is having none of it.
Hayward controlling from mount.
Hayward punching from mount but Bower doing a good job of avoiding damage.

That's two minutes gone in the round.
Hayward thowing shots but they're missing.
The ref warns both fighters not to hold the cage as they work up against the meshing.
Hayward controlling from the full mount.
Hayward avoids the attempt from Bower to control.
Hayward thowing shots but they're missing.

That's three minutes gone in the round.
Hayward throwing sloppy strikes, which aren't doing any damage.
Hayward trying to control but Bower is having none of it.
Bower is trying desperately to improve position.
Hayward with the ground and pound from mount.
Hayward will need to keep those long limbs tucked in whilst he's on the ground, to prevent any submissions.
Bower is trying to get to the cage to help him get back to his feet.
Hayward thuds his fist into the canvas! Oooouch!

That's four minutes gone in the round.
Neither fighter has done anything of merit for a good minute or two here and the crowd are not happy about it.
Hayward content just to control the position here.
Bower is squirming around, avoiding Hayward's attempts to control the action.
The fighters are pressed up against the cage, both looking to find a bit of space to work.
Hayward is breathing heavily.

Hayward is looking to secure an arm. He's managed it! He's pivoting for an armbar - that looks tight! But Bower has managed to get out of it and now he's in a dominant position. Nice work from Bower!
The crowd thankful this round is nearly over.
Bower wants to control from the top but Hayward keeps moving.
And thats the end of the round the fighters go back to their corners.
Clayton Hayward dominated that round.
The referee calls time. The cornermen exit stage left and we're back to business.

Bower misses with a takedown attempt

and Hayward counters by moving into the clinch.
Bower keeps control of Hayward as he tries to wriggle out of the double underhooks.
Bower looking for a takedown.
Hayward prevents the takedown attempt.
Clayton Hayward has stuffed three takedown attempts in the round now. That's going to take a lot out of Cj Bower.
Bower drops down for a takedown but doesn't get it.
Hayward pressing his opponent against the cage.

Hayward breaks the clinch and we return to the middle of the mat.
Clayton Hayward is looking to throw some combinations by the looks of things.
Hayward closes the distance and gets a double leg, slamming Bower to the mat! Bower manages to get full guard.
Hayward postures up to throw the ground and pound strikes but they don't connect.
Bower wants to sweep but no luck.
Bower managing to control the position.
Bower working a defensive guard but Hayward passes into half guard.
Both fighters are absolutely exhausted here.
That's one minute gone in the round.
Hayward escapes and gets back to his feet.
Bower with a poor takedown
and Hayward decides to take the opportunity to score a takedown. He's landed in Bower's guard.
Bower is trying to control the position but Hayward postures up.
Bower keeping moving, preventing Hayward from controlling successfully.
Bower can't do much from the bottom at the moment, as Hayward controls the pace.
Hayward seems to have a rather negative gameplan on the ground. He seems keen to just score the takedown and hold down Bower for as long as he can get away with.
That's two minutes gone in the round.
Hayward looking to sit in guard and control but Bower gets the butterfly guard and sweeps. He's now in the guard on the top.
Bower trying to control the position from guard on top but Hayward is wriggling around, looking for whatever he can.
Hayward wants to sweep here but Bower controlling him for the moment.
That's three minutes gone in the round.
Bower thows a big elbow that misses.
Bower drops back for a leg! It's a sloppy attempt though and Bower jumps back into guard quickly, to retain the dominant position.
Bower wants to control from the top but Hayward keeps moving.
Hayward wants to stand but Bower is controlling the position.

It looks like we're going to have a standup here. Neither fighter is doing enough on the ground.
Bower closes the distance and presses his opponent up against the cage.
Bower drops down for a takedown but doesn't get it.
Bower gets an overhook and lands an elbow to the side of the head.
That's four minutes gone in the round.
A few boos can be heard. I'm sure they will multiply if the fighters don't pick up the pace.
Bower ties up his opponent against the cage and manages to drag the fight down to the ground. Bower no doubt will be looking to work submissions from his guard.
Bower is working actively off his back, looking to secure an arm or perhaps work for a triangle.
Hayward working some ground and pound from guard but it's not doing any damage.
Bower looking for submissions from the bottom here. Moving his hips around, possibly looking for an armbar.
Hayward has to be careful here, sitting in the guard of a superior BJJ player.
Hayward controls the pace of the fight for a moment.
Hayward tries to free his leg and advance position but Bower is retaining full guard.
And thats the end of the round the fighters go back to their corners.
Clayton Hayward dominated that second round.
The referee calls time. The cornermen exit stage left and we're back to business. Ladies and gentlemen, this is the final round!

Hayward avoids the clinch attempt nicely.
Bower closes the distance but Hayward moves to the side
and Hayward counters with a nice shoot takedown that brings the fighters to the ground.
Bower has his foot on Hayward's thigh. He's trying to push off and get in position for a triangle, I think. Hayward works his way back into a safe position though.
Hayward lands a couple of digs.
Bower looking for submissions from the bottom but instead Hayward passes into side control.
Hayward stands up and we're back to a striking position.
Both fighters are breathing heavily.
Hayward rushes Bower and presses him up against the cage.
That's one minute gone in the round.
Hayward is leaning against Bower and scores with a nice uppercut to the body.
Hayward is trying to break free.
Bower wants a takedown.
Bower is looking to control Hayward's arms but Hayward gets an underhook and turns him. Now Bower has his back to the cage.
Hayward drops to a knee looking for a takedown but Bower gets the underhooks and prevents it.
Hayward is pressed up against the cage. Bower has hold of a leg and is looking to drag Hayward down to the mat. Hayward avoids the attempt though and has circled away. We're back to striking at a distance.
Hayward shoots in and bounces Bower off the cage to secure the takedown into guard.
Hayward landing with the ground and pound.
Hayward trying to control the position from guard on top but Bower is wriggling around, looking for whatever he can.
That's two minutes gone in the round.
Bower is working actively from the bottom, looking for submissions. He's escaped his hips to the side and he's going for an armbar! Hayward has his hands clasped together but Bower extends an breaks Hayward's desperate grasp, forcing a tap out due to armbar! Nice BJJ displayed there by Bower.
Ladies and gentlemen, after 2:30 of round 3, we have a winner by way of Submission (Armbar). Cj Bower!
|
|
|
|
|
|
|
|
|
|
|
|
|
|
|
|
|
|
|
|
|
|
|
| S |
C
A |
G |
S |
C
B |
G |
|
S |
C |
G |
|
energy
A | B |
|
hype
A | B |
|
pop
A | B |
|
mgr
A | B |
|
FIGHT
RATING
56% |
|
|
|
|
|
|

