|
|
PBP Commentary |
Coming up we have a welterweight MMA rules bout between Joel McTavish (ranked 0 p4p, 0 weight class) and Forrest Hardy (ranked 0 p4p, 0 weight class). Hardy has chosen Shipping Up To Boston as his entrance music. Joel McTavish had a look across the cage there at his opponent. He definitely means business
 |
|
 |
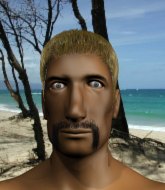
| 195 cm
20
180 lbs
0 - 0 - 0 |
|
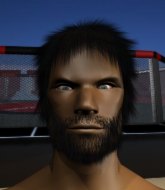
180 cm
21
170 lbs
1 - 0 - 0 |
BJJ Blue Belt
Brawler
Big heart |
|
BJJ Blue Belt
Counter striker
Granite chin |
|
| |
|
Ladies and gentlemen. This fight is 3 rounds, in the welterweight division.
Introducing the fighter to my left, fighting out of the red corner.
With a record of
0 - 0 - 0, fighting out of New York, Joel McTavish!
And introducing the fighter to my right, fighting out of the blue corner.
With a record of
1 - 0 - 0, fighting out of New York, Forrest Hardy!
The judges for this bout are Bruno Lombardi, Joseph Jones and Alyssa Summers.

The bell rings for round one and we are underway!

Hardy closes the distance, clinches up and gets a nice trip takedown into side control. Very smooth.
McTavish wants to control but Hardy postures up.

Hardy is looking to finish here, going for an Americana. McTavish knows the correct defense though, so he's OK.
Hardy tries for an arm triangle. That looks pretty tight to me. Is this one over!?! Possibly, maybe, no Hardy has let go of the choke. Obviously it wasn't as tight as we thought!
Hardy working hard here to secure a kimura but he's not really in the right position for it.
McTavish is positioning himself to get back to half guard.

That's one minute gone in the round.
Hardy wants to lay and pray for a moment but McTavish keeps working.
McTavish is pushing Hardy's head away, looking to escape. Hardy manages to hold on to the position though.

Neither fighter is doing enough for the referee's liking and he's decided to stand them back up.

Hardy rushes McTavish and presses him up against the cage.
McTavish wants to strike at distance but he can't break free of the clinch.
Hardy has picked McTavish up - he's going for a ride! Hardy dumps his opponent to the mat with a thud and settles into half guard.
Hardy is keen to just control but McTavish is a slippery customer.
McTavish misses with some strikes from the bottom.
Hardy keeping composed on the top, looking to control the action.
McTavish scrambles, trying to get to his feet, but Hardy manages to mount him!
McTavish is trying desperately to improve position.
Hardy trying to control but he's not successful this time.

That's two minutes gone in the round.
Hardy looking to control and managing it successfully.
Hardy is thinking about an arm triangle here, looking to tighten it up before moving to side control. McTavish can see it coming though and defends well with a couple of strikes to the head and some good arm positioning.
Hardy looks gassed!
McTavish is writhing around trying to get back to his feet.
McTavish is wriggling around trying to escape.
McTavish is working hard here to advance position.
Hardy content just to control the position here.
McTavish is trying to stand up.

That's three minutes gone in the round.
Hardy working the ground and pound effectively.
Hardy jumps to side control looking for an arm triangle but McTavish manages to avoid the submission attempt.
Hardy goes for an armbar here - this could be all over! But no, McTavish has escaped beautifully and is now on top in side control! Oh, that's unlucky for Hardy but great work by McTavish.
McTavish really does look like a pencil wearing a pair of gloves. Let's hope he has a gameplan to suit that ridiculous body shape.

McTavish stands up and we're back to a striking position.
McTavish dodges the punch combination from Hardy.
Hardy pulls out of a head kick attempt.
Hardy scores with a nice one two combo and darts back out of range to avoid anything coming in the opposite direction.
The fight moves into the clinch position.

Hardy breaks from the clinch.
The fight moves into the clinch position.
Hardy holding his opponent close, against the cage.

That's four minutes gone in the round.
Hardy decides to pull guard.
McTavish avoids a guillotine attempt easily.
Hardy controlling the position.
Hardy keeping busy, throwing shots from the bottom.
Hardy has McTavish pulled in close to control his posture.
Hardy is looking for a triangle but McTavish pushes his legs off easily.
Hardy working the defensive guard well to avoid strikes from McTavish.
Hardy is trying to keep McTavish in close.
McTavish will need to keep those long limbs tucked in whilst he's on the ground, to prevent any submissions.
Hardy is in a good position here but he's just trying to control... And he's not even managing to do that successfully.
And thats the end of the round the fighters go back to their corners.
Forrest Hardy dominated that round.
The minute break is over - no more time for sponges and pep talks - back to the action!

Hardy has closed the distance and engaged McTavish in a clinch.
Hardy tries to land a knee to the head but misses.
McTavish tries to break the clinch but Hardy is controlling the position.
McTavish wants to break the clinch but can't.
McTavish tries a body shot but Hardy blocks it.
McTavish has had enough of the clinch but Hardy keeps him there for the moment.
Hardy tries to score a body lock takedown but McTavish shows good agility there to stay on his feet.
McTavish breaks the clinch.
Hardy changes levels and drives through with a really nice takedown into side control. McTavish looks really pissed at himself for not defending that better.
McTavish is working hard to escape and get back to his feet. After a battle for position, Hardy asserts his dominance and retains side control.
Hardy moving around in side mount but really he's just happy to control for now.
Both fighters are absolutely exhausted here.
Hardy's corner are shouting for him to control the position and he seems happy to oblige.
Hardy tries for a kimura. Not really close to a finish though.
The fighters are pressed up against the cage, both looking to find a bit of space to work.
That's one minute gone in the round.
Hardy tries for an arm triangle. That looks pretty tight to me. Is this one over!?! Possibly, maybe, no Hardy has let go of the choke. Obviously it wasn't as tight as we thought!
Hardy working hard here to secure a kimura but he's not really in the right position for it.
McTavish can't do much from the bottom here.
McTavish tries to bench press Hardy off him but Hardy keeps the position.
McTavish trying to remain calm as Hardy controls from the top position.
The ref warns both fighters not to hold the cage as they work up against the meshing.
That's two minutes gone in the round.
Neither fighter has done anything of merit for a good minute or two here and the crowd are not happy about it.
McTavish prevents Hardy from improving position.
Hardy fails to land a wild elbow strike.
Hardy tries for an arm triangle. That looks pretty tight to me. Is this one over!?! Possibly, maybe, no Hardy has let go of the choke. Obviously it wasn't as tight as we thought!
McTavish is being controlled here.
McTavish is looking to regain half guard here but Hardy keeps moving and retains side control.
It looks like we're going to have a standup here. Neither fight is doing enough on the ground.
Hardy checks a leg kick.
Hardy chopping away at his opponent's legs.
McTavish shoots and misses
and Hardy counters by clinching up.
McTavish wants to break free but Hardy has control.
A right hand to the body from Hardy.
McTavish managing to block the knees to the body from Hardy.
Hardy breaks the clinch and we return to the middle of the mat.
That's three minutes gone in the round.
Hardy slips under a jab.
Nice body kick there by McTavish.
Hardy throws a low kick but his opponent is out of range.
Well, he's not going to score with shots like that. A lazy body kick attempt from Hardy.
Hardy circles away from the clinch attempt
and Hardy makes him pay by landing a thudding low kick.
Hardy has managed to clinch.
Hardy avoiding damage as McTavish throws knees to the body.
Hardy breaks the clinch and we're back to striking at distance.
Hardy throws a right hand that McTavish ducks under and follows up with a left that McTavish also avoids with ease.
McTavish connects with a jab.
McTavish looks to clinch
and Hardy counters with a crisp hook to the side of the head.
McTavish throws a sloppy head kick
and Hardy counters with a single leg into guard. McTavish didn't expect that.
Hardy trying to control but McTavish is working from the bottom.
Hardy preventing the sweep.
McTavish looking to control the pace of the fight rather than finish it.
Hardy trying to stand up but can't free himself from McTavish's guard.
That's four minutes gone in the round.
McTavish is edging up against the cage. He's using the cage to get back to his feet. Nice work there - the fighters are clinched.
McTavish is trying to slow down the pace of the fight but Hardy is keeping busy.
Hardy tries to land knees in the clinch but McTavish avoids the damage to the body.
McTavish escapes the clinch and we're back to striking.
Hardy gets to the clinch - let's see what his plan is here.
McTavish breaks the clinch and we're back to striking at distance.
McTavish explodes with a nice body kick and back out of range. Nice work.
McTavish tries to clinch but Hardy is having none of it.
McTavish swings widly with a right hand
and Hardy counters by clinching up.
The crowd cheering loudly, showing their appreciation for the quality fight we're seeing here.
McTavish wants to push off and get back to the center of the mat but Hardy has him pressed against the cage.
McTavish stops a takedown attempt from Hardy.
Hardy changes levels and goes for a takedown here. McTavish fights it off and pushes away nicely.
Joel McTavish has stuffed three takedown attempts in the round now. That's going to take a lot out of Forrest Hardy.
Hardy tries a head kick but it misses.
McTavish avoids the head kick by Hardy.
Hardy throws a head kick that misses and slips in the process. He scrambles back to his feet and the fighters circle.
And thats the end of the round the fighters go back to their corners.
Forrest Hardy showed his class in that round. I'd imagine he'll take it on all the scorecards.
That's time! Back to the action! And we move into the final round!

McTavish throws a head kick that misses.
Hardy tries a switch kick but it misses it's target.
McTavish closes the distance looking to clinch
and Hardy counters by clinching up.
McTavish breaks the clinch and we return to the middle of the mat.
Hardy fakes with an overhand right and moves in to clinch with McTavish, pushing him back against the cage.
Hardy pushes McTavish back against the cage and unloads with a body punch.
McTavish has had enough of the clinch but Hardy keeps him there for the moment.
Hardy jumps guard and drags McTavish to the mat. He's obviously going to be looking for submissions off his back.
Hardy looking to sweep here. No luck so far.
Hardy bucks up whilst keeping hold of a body lock, managing to reverse the position. Now he's in top in McTavish's guard.
Hardy postures up and scores with a shot to the body and a follow up elbow to the head.
Hardy stands up and waves to McTavish to follow him.
McTavish throws a head kick that misses
and Hardy holds on and brings the fighters into a clinch.
McTavish stalling in the clinch but Hardy improves position.
McTavish breaks the clinch and we return to the middle of the mat.
Hardy takes a big intake of breath there - he's definitely tired.
McTavish wants to clinch
and Hardy counters by clinching up.
McTavish keeps control of Hardy as he tries to wriggle out of the double underhooks.
McTavish is trying to break free.
Hardy fails to pull guard.
That's one minute gone in the round.
McTavish breaks from the clinch.
McTavish clinches up against the cage.
A right handed body shot lands from McTavish.
McTavish avoiding damage as Hardy throws knees to the body.
McTavish unloads a knee to the mid-section. Hardy lets out a prehistoric sounding urrrrgh.
McTavish is trying to break free.
Hardy keeps control of McTavish as he tries to wriggle out of the double underhooks.
McTavish is looking to break free of the clinch but Hardy has double underhooks.
McTavish wants to break the clinch but can't.
Hardy holding his opponent close, against the cage.
McTavish looking to throw knees to the head but Hardy is blocking nicely.
Hardy misses with a knee strike.
Hardy works for underhooks and lands a body shot in the process.
McTavish escapes the clinch and we're back to striking.
McTavish thows a left - swing and a miss!
McTavish scores with a jab to the jaw of his opponent.
Hardy looking to shoot here. He's gone for it and he's landed a takedown into mount! Oh, that's bad for McTavish!
Hardy postures up and cracks his opponent a couple of times before moving back into close ground control. McTavish looks a forlorn figure.
McTavish swinging wildly from the bottom but he's not landing.
Hardy avoids the attempt from McTavish to control.
That's two minutes gone in the round.
McTavish is squirming around, avoiding Hardy's attempts to control the action.
McTavish is writhing around trying to get back to his feet.
McTavish can't escape the position.
Hardy punishing his opponent with strikes.
Hardy sitting in mount, just looking to control for the moment.
Hardy goes for an armbar but McTavish turns quickly into his guard - lovely anticipation from McTavish.
Hardy has his foot on McTavish's thigh. He's trying to push off and get in position for a triangle, I think. McTavish works his way back into a safe position though.
Hardy is pulling down on McTavish's head. It's preventing any offense from McTavish, at least for the moment.
That's three minutes gone in the round.
McTavish stopping the sweep attempt from Hardy.
Forrest Hardy has got the better of the ground game so far.
McTavish trying to control but Hardy is working from the bottom.
Hardy tries to land a sweep but no joy.
McTavish wants to control from the top but Hardy keeps moving.
McTavish forces his way into half guard.
Hardy tries to roll over but McTavish keeps him under control.
McTavish performing his best blanket impression for a moment.
That's four minutes gone in the round.
Neither fighter has done anything of merit for a good minute or two here and the crowd are not happy about it.
Hardy manages to get to full guard.
Hardy looking to control.
McTavish trying to control but Hardy is working from the bottom.
Hardy controls McTavish momentarily but McTavish frees himself.
McTavish trying to stand up but can't free himself from Hardy's guard.
Hardy looking for submissions off his back, moving his hips, looking for an opening.
Joel McTavish has stepped it up - he knows he needs a finish here!
Hardy has momentary wrist control but McTavish slips an elbow through the middle.
And that's the end of the fight!
Forrest Hardy comfortably won the final round on my scorecard.
I've got Hardy winning every round here. Surely the decision will go his way and he'll pick up a well deserved decision victory. Over to the ring announcer for the scorecards.
Ladies and gentlemen, after 3 rounds of action, we go to the scorecards for a decision.
Judge Bruno Lombardi scores the fight 27:30
Judge Joseph Jones scores the fight 27:30
Judge Alyssa Summers scores the fight 27:30
In favor of your winner, by unanimous decision... Forrest Hardy!
|
|
|
|
|
|
|
|
|
|
|
|
|
|
|
|
|
|
|
|
|
|
|
| S |
C
A |
G |
S |
C
B |
G |
|
S |
C |
G |
|
energy
A | B |
|
hype
A | B |
|
pop
A | B |
|
mgr
A | B |
|
FIGHT
RATING
58% |
|
|
|
|
|
|

