|
|
PBP Commentary |
Coming up we have a bantamweight MMA rules bout between nick eat (ranked 0 p4p, 0 weight class) and Doug Wallaby (ranked 0 p4p, 0 weight class). Wallaby comes into a darkened arena with his song building. Europe - The Final Countdown kicks in, the lights come on and the crowd goes wild! What a showman! Over to our ring announcer for the fighter introductions!
 |
|
 |
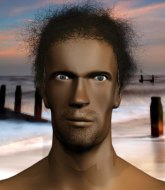
| 175 cm
19
134 lbs
3 - 1 - 0 |
|
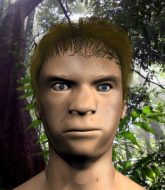
182 cm
25
142 lbs
11 - 8 - 0 |
BJJ White Belt
Excellent boxer
Big right hand |
|
BJJ White Belt
World class boxer
Granite chin |
|
| |
|
Ladies and gentlemen. This fight is 3 rounds, in the bantamweight division.
Introducing the fighter to my left, fighting out of the red corner.
With a record of
3 - 1 - 0, fighting out of Tokyo, nick eat!
And introducing the fighter to my right, fighting out of the blue corner.
With a record of
11 - 8 - 0, fighting out of Tokyo, Doug Wallaby!
The judges for this bout are Yukihiro Shimada, Yukihiro Yamamoto and Yasuomi Hirokawa.

The bell rings for round one and we are underway!
Wallaby avoids the body shot from eat.
Some wild striking there from eat.
eat cracks a nice hook into Wallaby's ribs.
Wallaby connects with a lovely right hand, straight down the pipe.
eat really does look like a pencil wearing a pair of gloves. Let's hope he has a gameplan to suit that ridiculous body shape.
eat cracks Wallaby with a good jab.
eat misses with a two punch combination.
eat throws a right and a left that Wallaby avoids nicely.
Wallaby tries to shoot in for a takedown. He's got hold of a leg but eat swivels and escapes.
eat ducks right into an uppercut from Wallaby.
A jab lands there for Wallaby.
eat lunges in with swinging rights and lefts but Wallaby circles away quickly and effectively.
A telegraphed right hand from eat misses the target.
Wallaby shoots in for a takedown. He's persisting with it as eat sprawls well. eat wins this battle and keeps the fight standing. Wallaby gets slowly back to his feet.
No luck for Wallaby with that takedown attempt.
nick eat has stuffed three takedown attempts in the round now. That's going to take a lot out of Doug Wallaby.
Wallaby cracks eat with a good shot that sees him stumbling back into the cage.

That's one minute gone in the round.
Wallaby throws a left and a right that both miss
and eat counters with a one-two to the body.
Wallaby tries to bum rush eat with a series of wild strikes but eat uses good footwork to avoid the assault.
Wallaby cracks eat with a hook to the jaw. Both fighters smile at eachother and high-five before getting back down to business.
A telegraphed takedown attempt from Wallaby is defended easily by eat.
Wallaby is looking to clinch but eat is avoiding it.
Wallaby looks to clinch
and eat counters with a quick right hand to the jaw.
eat throws a left and a right that both miss
and Wallaby counters with a nice uppercut.
Wallaby throws a right and a left that both miss.
eat swings wildly with a couple of big hooks
and Wallaby connects with a straight left hand counter down the middle.
Wallaby takes a shot to the body in his stride.

The fight moves into the clinch position.
eat is trying to break the clinch but Wallaby is controlling him.

Wallaby manages to break the clinch.
Wallaby shoots in and drives through. eat sprawls well.

That's two minutes gone in the round.
eat throws a jab when Wallaby was well out of range.
Wallaby dodges the punch combination from eat.
Wallaby moves his head to the side to avoid a jab but walks straight into a cross.
eat throws a combination but it was largely blocked by Wallaby.
Wallaby fails with a takedown attempt.
Wallaby looks for a takedown here. Will he get it? eat is fending him off so far but Wallaby persists. Nope, eat circles away and we're back to standing.
Wallaby looks gassed!
Wallaby slips under a jab.
Wallaby fails with the takedown.
eat throws a combination. Wallaby tries to block but a couple of punches get through.
Wooooo! Give it up for these two warriors! They are putting on a show!
eat misses with the combination.
Wallaby tries for a takedown but eat sees it coming a mile off and avoids it easily.
eat connects with a single shot there.

That's three minutes gone in the round.
Wallaby dodges the punch combination from eat.
eat scores with a sloppy punch to the body. Not much technique there but it did the business.
eat dips down and scores with a jab to the body.
Horrible takedown by Wallaby or perhaps it was just good defense by eat which made him look bad.
Danga de danga de dang - eat scores with a four punch combination!
eat swings away but doesn't land with a series of punches.
Wallaby has a takedown stuffed.
Wallaby has used his reach advantage pretty well so far tonight.
eat lets the fists fly and connects with a left straight followed by a right hook.
eat fails to land with a series of punches.
eat misses with a hook.
Wallaby shoots in for a double leg but eat sprawls well. That's going to sap some energy.
eat swings wildly with a couple of big hooks

and Wallaby counters with a takedown into full mount! That could mean trouble for eat!

That's four minutes gone in the round.
eat trying desperately to get to his feet.
eat is squirming around, avoiding Wallaby's attempts to control the action.
You get the feeling that eat really doesn't like being in this position too much.
Wallaby lands with some vicious ground and pound - can eat hang on?
Wallaby landing strikes from the mount and eat is in trouble!
Wallaby throws an elbow from mount that misses. Lucky escape for eat because Wallaby loaded up on that one.
Wallaby controlling from the full mount.
eat holding onto his opponent's waist for dear life, as Wallaby tries to land some strikes to get him to release his grip.
The ref warns both fighters not to hold the cage as they work up against the meshing.
As the round comes to an end the crowd are showing their appreciation for a great round of action.
Wallaby throws some wild stikes that eat manages to avoid easily.
And thats the end of the round the fighters go back to their corners.
That was a close round but I would say that nick eat will probably get the nod.
The fighters' corners scream their final instructions, as the referee calls time. Here we go, back to the action!

eat throws a left and a right that both miss
and Wallaby counters with a three punch combination, finished off with a leg kick. Nice work.
nick eat seems to be the more aggressive standup fighter in this bout.
eat throws a series of punches but Wallaby moves out of range.
eat lands with a good body shot.
nick eat is looking to throw some combinations by the looks of things.
eat misses with a straight left.
Wallaby shoots in with a takedown attempt and he has eat pinned against the cage. eat gets the underhooks and manages to circle away.
Wallaby ducks under an overhand right and circles away with a smile on his face.
Wallaby lands with a nice body punch.
Wallaby avoids a lazy jab quite easily.
eat takes a jab on the nose. He smiles like he loves it and keeps coming.
nick eat is winning the standup battle so far.
eat throws a nice looking combination but Wallaby bobs and weaves to avoid any damage.
A left and a right from Wallaby both land. Nice combination.
Wallaby fails with a takedown attempt.
Wallaby lands a body shot.
Both fighters are absolutely exhausted here.
That's one minute gone in the round.
Wallaby misses with a takedown attempt - eat sprawls well and throws a nice strike on the way out which just misses.
nick eat has stuffed three takedown attempts in the round now. That's going to take a lot out of Doug Wallaby.
eat misses with a combination
and Wallaby counters with a left to the body.
eat misses with a series of wild punches.
eat moves out of range as Wallaby strikes.
nick eat is looking to keep the fight on the feet at all costs.
Wallaby closes the distance and clinches up with eat, looking for a takedown. Wallaby pushes eat against the cage but eat circles to the side and manages to break the clinch.
eat misses with a double jab
and Wallaby counters with a nice double leg into side control. eat won't be happy with that.
eat wants to get back to his feet but Wallaby drags him back down.

Wallaby stands up and we're back to a striking position.
eat throws a left and a right that both miss
and Wallaby counters with a one-two to the body.
That's two minutes gone in the round.
Wallaby shoots in for a takedown. "I don't think so" says eat as he avoids it easily.
Wallaby tries to bum rush eat with a series of wild strikes but eat uses good footwork to avoid the assault.
eat paws at his opponent with the jab and then lunges in with a straight, right on the button.
Wallaby fails with a takedown attempt.
Wallaby shoots in for a takedown. "I don't think so" says eat as he avoids it easily.
eat stalks Wallaby and leaps in with a furious combination of punches. Uppercuts and crosses smash into Wallaby's face. Wallaby staggers backwards, shaken.
eat throws a combination but it was largely blocked by Wallaby.
Wallaby takes a swing at eat's ribcage but misses.
Wallaby lunges in with swinging rights and lefts but eat circles away quickly and effectively.
eat scores with a nice one two combo and darts back out of range to avoid anything coming in the opposite direction.
No luck with that takedown attempt from Wallaby.
Wallaby dodges the punch combination from eat.
That's three minutes gone in the round.
eat falls off balance throwing a combination
and Wallaby counters with a quick right hand to the jaw.
eat blocks a jab.
eat misses with a jab and misses with a cross straight after too.
Wallaby avoids a lazy jab quite easily.
Wallaby falls off balance throwing a combination
enabling eat to counter with a crisp jab.
eat stuffs a takedown. It's all about dictating where the fight takes place and eat wants it to stay on the feet.
eat scores with a crisp jab that stopped Wallaby in his tracks.
Wallaby shoots in but no luck this time.
Wallaby looks shocked there as he takes a right hand to the temple.
Wallaby ducks right into an uppercut from eat.
The crowd cheers as eat lands an impressive looking overhand right. Wallaby doesn't seem phased though.
That's four minutes gone in the round.
Wallaby throws a jab, cross combination which is slipped
and eat counters with a nice jab to the body that keeps Wallaby thinking.
eat throws a jab to the body, straight down the pipe. Boom. That sent Wallaby stumbling backwards but he manages to regain his composure quickly.
eat falls off balance throwing a combination
and Wallaby cracks him with a counter punch right on the button.
eat throws a nice looking combination but Wallaby bobs and weaves to avoid any damage.
Wallaby throws a right hand that eat ducks under and follows up with a left that eat also avoids with ease.
Wallaby takes a punch to the jaw and another one to the bread basket.
Wallaby takes a big uppercut there. He seems a bit wobbly but no, he's OK.
eat misses with a series of wild punches.
Wallaby takes a solid shot to the body. That one hurt him but he's trying not to show it.
The crowd applaud the fighters efforts here as the round comes to an end.
eat throws a looping overhand right but Wallaby ducks down to avoid it.
eat misses with a double jab
and Wallaby counters with a straight right hand.
And thats the end of the round the fighters go back to their corners.
Doug Wallaby showed his class in that round. I'd imagine he'll take it on all the scorecards.
The fighters' corners scream their final instructions, as the referee calls time. Here we go, back to the action! This is the final round!

Wallaby tries to land with a swinging hook to the body but eat was well out of range. Poor timing from Wallaby.
eat gets cracked with a nice right hand there by Wallaby.
eat misses with a jab, cross combination.
eat throws a right and a left that Wallaby avoids nicely.
eat throws a hook to the body but it doesn't connect.
eat misses with the combination.
Wallaby is looking to take this fight into the clinch.
Wallaby dodges the punch combination from eat.
We've had a slow start to the round here - hopefully the action picks up.
eat fails to land with the punch combination there - jab, cross, hook, miss, miss, miss.
A shot to de liver by Wallaby. Beautiful body shot.
Both fighters are breathing heavily.
eat swings away but doesn't land with a series of punches.
Wallaby dodges the punch combination from eat.
That's one minute gone in the round.
Wallaby tries for a takedown but eat sees it coming a mile off and avoids it easily.
Wallaby fails with a takedown attempt from distance.
eat throws a looping overhand right but Wallaby ducks down to avoid it.
eat misses with a few strikes there.
Wallaby tries to close the distance and clinch but eat swats him to one side with an open hand palm strike and circles away.
eat steps to the side to avoid the strikes from Wallaby.
eat throws a series of punches but Wallaby avoids them all with ease.
Wallaby misses with a takedown attempt. He shot from a bit too far out.
nick eat has stuffed three takedown attempts in the round now. That's going to take a lot out of Doug Wallaby.
eat throws a left and a right that both miss
and Wallaby holds on and brings the fighters into a clinch.
A frustrated look appears on eat's face as he tries to break the clinch.
eat tried to land a shot to the body but connects with Wallaby's elbow.
Wallaby tries for a takedown but eat manages to get underhooks.
eat pushes off and circles away, back to the middle of the mat.
eat looks to land a combination but Wallaby avoids it well.
That's two minutes gone in the round.
Neither fighter has done anything of merit for a good minute or two here and the crowd are not happy about it.
eat misses with a jab and misses with a cross straight after too.
Wallaby misses with a few strikes there.
eat just misses with a punch to the body.
Wallaby tries for a takedown but eat sees it coming a mile off and avoids it easily.
eat throws a jab, cross combination which is slipped
and Wallaby holds on and brings the fighters into a clinch.
A short right hand to the side of the head by eat.
Wallaby blocks a couple of punches on the inside.
Wallaby breaks the clinch.
eat stalks Wallaby and leaps in with a furious combination of punches. Uppercuts and crosses smash into Wallaby's face. Wallaby staggers backwards, shaken.
eat tries to keep at a distance but Wallaby has taken the fight into the clinch.
eat working hard to break the clinch.
eat escapes the clinch and we're back to striking.
eat falls off balance throwing a combination
and Wallaby counters with a stiff right hand.
Wallaby slips under a jab from eat.
That's three minutes gone in the round.
Wallaby looks to score with a combo but nothing lands.
Wallaby lands a jab to eat's midsection.
Wallaby tries to clinch up.
Nice takedown defense from eat. No joy for Wallaby on that attempt.
eat moves into range and throws a combination. A nice jab followed by a hook to the body.
eat swings wildly with a couple of big hooks
and Wallaby counters with a quick right hand to the jaw.
Wallaby shoots in but no luck this time.
eat lands three nice shots there - that looked like it hurt!
Wallaby takes a punch to the jaw and another one to the bread basket.
eat scores with a nice one two combo and darts back out of range to avoid anything coming in the opposite direction.
Wallaby avoids a punch combination nicely.
eat uses some good footwork to avoid the body shot by Wallaby.
That's four minutes gone in the round.
Nice uppercut there from Wallaby.
eat works the jab nicely.
eat throws a combination that misses
and Wallaby counters with a quick right hand to the jaw.
eat misses with a series of wild punches.
Wallaby lands with a shot to the body.
Wallaby scores with a nice one two combo and darts back out of range to avoid anything coming in the opposite direction.
Wallaby shoots in for a takedown but doesn't get it.
eat throws a one two combo.
eat throws a left and a right that both miss
and Wallaby counters with a left and a right that stings eat.
eat thuds a left hand into Wallaby's body.
eat will need to tighten up his combinations if he doesn't want to gas himself out, swinging at thin air.
eat lands a glancing blow to the side of Wallaby's head.
And that's the end of the fight!
I would just about give that final round to Doug Wallaby.
I think Wallaby has won this one but let's see whether the judges agree with me. Over to the ring announcer for the scorecards.
Ladies and gentlemen, after 3 rounds of action, we go to the scorecards for a decision.
Judge Yukihiro Shimada scores the fight 29:29
Judge Yukihiro Yamamoto scores the fight 27:30
Judge Yasuomi Hirokawa scores the fight 28:29
In favor of your winner, by majority decision... Doug Wallaby!
|
|
|
|
|
|
|
|
|
|
|
|
|
|
|
|
|
|
|
|
|
|
|
| S |
C
A |
G |
S |
C
B |
G |
|
S |
C |
G |
|
energy
A | B |
|
hype
A | B |
|
pop
A | B |
|
mgr
A | B |
|
FIGHT
RATING
67% |
|
|
|
|
|
|
