|
|
PBP Commentary |
Coming up we have a heavyweight MMA rules bout between Tony Mendez (ranked 0 p4p, 0 weight class) and Cameron Reed (ranked 0 p4p, 0 weight class). We have two fighters making their debuts here, so let's see who comes out of this one with their first professional victory.
 |
|
 |
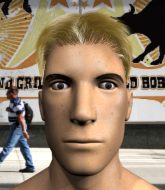
| 200 cm
20
273 lbs
0 - 0 - 0 |
|
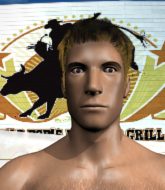
207 cm
18
275 lbs
0 - 0 - 0 |
Dangerous GnP
Brawler
Big heart |
|
BJJ Purple Belt
Brawler
Solid chin |
|
| |
|
Ladies and gentlemen. This fight is 3 rounds, in the heavyweight division.
Introducing the fighter to my left, fighting out of the red corner.
With a record of
0 - 0 - 0, fighting out of Las Vegas, Tony Mendez!
And introducing the fighter to my right, fighting out of the blue corner.
With a record of
0 - 0 - 0, fighting out of Las Vegas, Cameron Reed!
The judges for this bout are George Francis, Daniel Franklin and Robert Twigg.

The bell rings for round one and we are underway!
Mendez stuffs the takedown.
Tony Mendez seems to be the more aggressive standup fighter in this bout.

Mendez scores a trip takedown into side control. Nice.
Mendez connects with a decent looking elbow from side control that caused Reed some visible discomfort.
Reed taking punishment in the form of punches.
Mendez working away diligently from side control. Landing strikes effectively there - that will score him some points on the judges scorecards.
Mendez scores with punches from side control.

Mendez decides to take the fight back to the feet. Mendez scores with a leg kick.
Reed looks gassed!
Mendez feints and then dives in with a takedown. That was a long way out but the feint bought him enough time to close the distance and complete the takedown. Now we'll play guard for a bit and see who can get the better of that position.
Mendez cracks Reed with a solid left hand.

Reed is rocked!
Mendez has to be careful here, sitting in the guard of a superior BJJ player.
Reed will have to put a bit more behind his punches if he's going to do any damage from this position.
Mendez postures up and lands some nice ground and pound.
Reed is trying to control the position but Mendez postures up.
Mendez lands a nice shot whilst sitting in his opponent's guard.
Mendez with a nice head shot there.
Mendez trying to control the position from guard on top but Reed is wriggling around, looking for whatever he can.

That's one minute gone in the round.
Mendez passes Reed's right leg, so he's now in half guard.
Mendez winds up and cracks Reed with a swinging punch to the side of the head.
Mendez is taking a breather. Reed says something to him but it's hard to make out. Perhaps he's telling him to get on with it and actually do something.
Mendez looks to score some points with some ground and pound.
Mendez wants to lay and pray for a moment but Reed keeps working.
Mendez misses with a head shot. Reed uses the momentum to regain guard.
Reed keeping moving, preventing Mendez from controlling successfully.
Reed wants to stand up but Mendez is controlling him.

That's two minutes gone in the round.
Mendez wants to control from the top but Reed keeps moving.
Mendez is in close to Reed's body, working some short punches and elbows.
Reed wants to stand but Mendez is controlling the position.
Reed not looking particularly offensive just at the moment.

Well, the referee has seen enough. Neither fighter is active enough on the ground so he's stood them back up.
Mendez shoots in but Reed avoids the takedown attempt easily.
Reed gets taken down but at least he's managed to land in guard.
Reed is working the butterfly guard. He manages to land a nice scissor sweep and is now in half guard on the top. Nice move.
Reed on his back here. We all know that wrestlers don't like being on their back so let's see if Reed tries to get out of the position.
Reed passes the half guard and he's now in mount! Big trouble for Mendez!
Reed looking to control but Mendez is working nicely, looking to advance position himself.

That's three minutes gone in the round.
Poor strikes thrown by Reed there. More accuracy and less frantic strikes would help!
Mendez is trying to escape the mount.
Mendez is working hard here to advance position.
Mendez wants to control but Reed is having none of it.
Mendez really trying hard to get back to half guard here.

That's four minutes gone in the round.
The crowd are hurling abuse towards the fighters... You can hardly blame them though because there isn't a lot going on in the fight.
Mendez flailing away with punches but nothing is landing.
Mendez can't escape the position.
Mendez wants to control but Reed is having none of it.
Mendez is in all sorts of trouble here.
Poor strikes thrown by Reed there. More accuracy and less frantic strikes would help!
Mendez tries to get back to half guard but can't.
Reed tries to control but Mendez wriggling away.
The crowd applaud the fighters efforts here as the round comes to an end.
Mendez swinging wildly from the bottom but he's not landing.
Mendez throwing hammer fists to the chest of Reed. What's that going to do exactly?
Mendez really trying hard to get back to half guard here.
And thats the end of the round the fighters go back to their corners.
Tony Mendez dominated that round.
The minute break is over - no more time for sponges and pep talks - back to the action!

Mendez shoots in from a long way out. He's driving through with the takedown attempt and he eventually gets it, landing in Reed's guard.
The fighters are pressed up against the cage, both looking to find a bit of space to work.
Mendez trying to pass the guard but can't manage it just yet.
Mendez throws a strike but Reed rolls with it and manages to sweep. Now he's in guard on top.

Mendez is active off his back here, looking for submissions.
Mendez is trying to hold Reed in close to prevent damage but Reed has managed to pass into half guard.
Mendez knows he needs to get back to his feet asap. He's simply no match for Reed on the ground.
Reed is just content to waste time from the top position. Mendez takes advantage of the situation and regains full guard.
Both fighters are absolutely exhausted here.
Mendez looking for a sweep. Not yet Mendez, not yet.
That's one minute gone in the round.
Reed loading up with the ground and pound but he's missing more than he's landing in this flurry.
There's a bit of a scramble here and now Mendez is on top in guard.
Reed preventing the ground and pound from doing any damage.
Tony Mendez overall seems to be getting the better of the ground position in the fight so far.
Mendez with a flurry of punches that miss.
Reed controls Mendez momentarily but Mendez frees himself.
The ref warns both fighters not to hold the cage as they work up against the meshing.
Reed has momentary wrist control but Mendez slips an elbow through the middle.
Mendez pressing down on his opponent's thigh, looking to pass guard. Reed is keeping the position for now.
Mendez connects with a couple of short punches.
Mendez is just sitting in guard, looking to avoid any submissions.
Reed wants to control the position but Mendez says "no thanks buddy" and passes to half guard.
Mendez lands with a punch from half guard.
That's two minutes gone in the round.
Mendez wants to pass the guard but Reed is defending well.
Reed actively working from the bottom here.
Reed looks like he's trying to stand up.
Mendez prevents Reed from improving his position.
Reed works his way to full guard. Good work.
Mendez is in close to Reed's body, working some short punches and elbows.
Mendez gets to his feet and steps away from his opponent.
Mendez changes levels and drives through with a really nice takedown into side control. Reed looks really pissed at himself for not defending that better.
Mendez is putting a hurting on Reed here, landing some big shots from side control.
We've seen a great period of action over the last minute or so - credit to both fighters for leaving it all in the cage!
Reed is sneaking out the side here. He's bucked Mendez off and has taken his back!
Mendez tries to escape but Reed has the hooks in and won't let him break free.
That's three minutes gone in the round.
Reed doesn't have the hooks in and Mendez manages to turn into his guard.
Mendez stopping the sweep attempt from Reed.
Mendez trying to control the position from guard on top but Reed is wriggling around, looking for whatever he can.
Reed is working the butterfly guard. He manages to land a nice scissor sweep and is now in half guard on the top. Nice move.
Reed thows a huge punch but Mendez dodges it nicely.
Mendez is not content to let Reed control the position.
Mendez makes some distance and scrambles quickly back to his feet. Nice work!
Reed is looking to take this fight into the clinch.
Reed misses with a takedown attempt
and Mendez counters with a nice shoot takedown that brings the fighters to the ground.
Mendez decides he's had enough of playing guard and decides to stand. Come on Reed, up you get!
That's four minutes gone in the round.
Reed misses with a takedown
and Mendez counters with a nice single leg takedown and he's in Reed's guard now. Mendez trying to control but Reed is working from the bottom.
Mendez looking to pass the guard.
Mendez stops Reed from standing up.
Mendez trying to control the position from guard on top but Reed is wriggling around, looking for whatever he can.
Mendez drops back looking for a heel hook - he quickly realises he's not going to get it but Reed manages to dive on top of him before he can escape and now Mendez has Reed in his guard.
As the round comes to an end the crowd are showing their appreciation for a great round of action.
Mendez has a loose triangle. He'll be looking to tighten that up but Reed can see exactly what he's planning and manages to posture up and free himself.
And thats the end of the round the fighters go back to their corners.
Tony Mendez dominated that second round.
OK. That's time! The bell goes and we're back to the action. The crowd applaud as we get ready to start the final round!

Mendez feints and then dives in with a takedown. That was a long way out but the feint bought him enough time to close the distance and complete the takedown. Now we'll play guard for a bit and see who can get the better of that position.
Mendez trying to pass the guard but can't manage it just yet.
Reed is looking to stand back up... there's a bit of a scramble and Mendez dives into side control.
Mendez lands a few punches from side control.
Reed taking punishment in the form of punches.
Reed is sneaking out the side here. He's bucked Mendez off and has taken his back!
Mendez prevents Reed from getting a body triangle.
Mendez is really dominating this fight. Is there anything that Reed can do to turn this around?
Reed has the hooks in. Mendez is trying to push off one leg but he has to do so cautiously to avoid being submitted.
Both fighters are breathing heavily.
Mendez is trying to defend against the choke here but Reed has an arm under his chin. This one might not last much longer. Reed Tightens the hold and Mendez taps out furiously! Reed displays superior BJJ to win the fight.
Ladies and gentlemen, after 1:01 of round 3, we have a winner by way of Submission (RNC). Cameron Reed!
|
|
|
|
|
|
|
|
|
|
|
|
|
|
|
|
|
|
|
|
|
|
|
| S |
C
A |
G |
S |
C
B |
G |
|
S |
C |
G |
|
energy
A | B |
|
hype
A | B |
|
pop
A | B |
|
mgr
A | B |
|
FIGHT
RATING
100% |
|
|
|
|
|
|
