|
|
PBP Commentary |
Coming up we have a light heavyweight MMA rules bout between Hado Ken (ranked 0 p4p, 0 weight class) and Masaaki Yamaguchi (ranked 0 p4p, 0 weight class). Hado Ken has the edge in experience - let's see if he can make that count tonight.
 |
|
 |
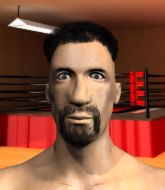
| 195 cm
26
225 lbs
4 - 4 - 0 |
|
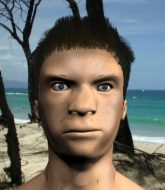
185 cm
26
205 lbs
1 - 2 - 0 |
Abu Dhabi Champ
Solid boxing
Cardio machine |
|
Good wrestler
Good kicks
Solid chin |
|
| |
|
Ladies and gentlemen. This fight is 2 rounds, in the light heavyweight division.
Introducing the fighter to my left, fighting out of the red corner.
With a record of
4 - 4 - 0, fighting out of Tokyo, Hado Ken!
And introducing the fighter to my right, fighting out of the blue corner.
With a record of
1 - 2 - 0, fighting out of Tokyo, Masaaki Yamaguchi!
The judges for this bout are Kenichi Hosakawa, Taro Takaoka and Shigeki Sano.

The bell rings for round one and we are underway!
Yamaguchi takes one on the chin but keeps coming.
Yamaguchi throws a combination but it was largely blocked by Ken.
Ken swings away with a leg kick that misses.
Ken scores with a hook to the body. Yamaguchi takes a step back and tries to catch his breath.
Hado Ken seems to be the more aggressive standup fighter in this bout.
A looping hook to the body misses from Yamaguchi. Ken does a little dance to reset his feet.
Both fighters circling a little - Yamaguchi finishes the exchange with a kick to the body.
Yamaguchi misses with an attempted mid kick.
Yamaguchi throws a hook to the body but it doesn't connect.
Ken stumbles momentarily as he takes a strong leg kick from Yamaguchi.
Ken wings a very wild body shot but it does the job and lands to the midsection.
Yamaguchi fakes a couple of low kicks, before throwing one on the third attempt. It connects and Ken has to reset his feet before getting ready to engage.
Ken blocks the body kick.
Ken wings a very wild body shot but it does the job and lands to the midsection.
Ken scores with a jab to the jaw.
We've seen a great period of action over the last minute or so - credit to both fighters for going all out!
Yamaguchi walks into a straight right hand from Ken.
Yamaguchi moves out of range as Ken strikes.
Ken lands a nice shot to the body.
Yamaguchi looks gassed!

That's one minute gone in the round.
Ken tests Yamaguchi's chin there with a solid looking shot.
Ken fakes high and swings low for a body shot but Yamaguchi manages to avoid it.
Ken comes forward and lands a shot to the body, then darts back out of range.
Yamaguchi keeping a good distance there, avoiding the body shot.
Ken lands an overhand right.
Ken throws a leg kick but Yamaguchi moved away.
Ken is looking to score with low kicks.
Good shot there by Ken.
Ken dips to his left and cracks Yamaguchi with an uppercut!
Ken is using his height advantage well here, landing a good percentage of his punches.
Ken fakes a jab and then connects with a hook.
This is a great period of action - very entertaining stuff!
Ken bobs and weaves and unloads with a good uppercut.

Yamaguchi is rocked!
Both fighters circle each other, looking for something big. Ken moves in and throws an overhand right. That hurt Yamaguchi! Ken continues to tee off on Yamaguchi, landing with a left and a right! Ken connects with a right hand that leaves Yamaguchi sleeping against the ropes! What a finish by Ken!
Ladies and gentlemen, after 1:56 of round 1, we have a winner by way of KO (Punches). Hado Ken!
|
|
|
|
|
|
|
|
|
|
|
|
|
|
|
|
|
|
|
|
|
|
|
| S |
C
A |
G |
S |
C
B |
G |
|
S |
C |
G |
|
energy
A | B |
|
hype
A | B |
|
pop
A | B |
|
mgr
A | B |
|
FIGHT
RATING
100% |
|
|
|
|
|
|

