|
|
PBP Commentary |
Coming up we have a lightweight MMA rules bout between Heihachi Hayashida (ranked 0 p4p, 0 weight class) and Kal Too (ranked 0 p4p, 0 weight class). Kal Too has the better chin. Will he look to stand and bang today?
 |
|
 |
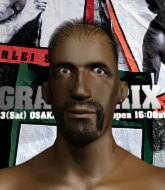
| 177 cm
23
164 lbs
10 - 3 - 0 |
|
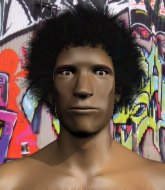
176 cm
22
161 lbs
8 - 1 - 0 |
BJJ Brown Belt
Solid Muay Thai
Very quick |
|
Good wrestler
Decent boxing
Powerful |
|
| |
|
Ladies and gentlemen. This fight is 5 rounds, for the lightweight championship of the world!
Introducing the champion to my left, fighting out of the red corner.
With a record of
10 - 3 - 0, fighting out of Tokyo, Heihachi Hayashida!
And introducing the challenger to my right, fighting out of the blue corner.
With a record of
8 - 1 - 0, fighting out of Tokyo, Kal Too!
The judges for this bout are Yukihiro Shimada, Shirou Masuda and Hirohito Nitta.

The bell rings for round one and we are underway!
Too fakes high and swings low for a body shot but Hayashida manages to avoid it.
Too throws a nice looking combination but Hayashida bobs and weaves to avoid any damage.
Nice defenses there by Hayashida.
Too throws a hook to the side of Hayashida's head but Hayashida sees it coming and ducks under it beautifully.
Hayashida throws a right hand that misses

and Too decides to take the opportunity to score a takedown. He's landed in Hayashida's guard.
Hayashida wants to sweep but no luck.
Too trying to pass the guard. He's being very persistent here but Hayashida manages to land a sweep and now he's on top!
Too tries to land a sweep but no joy.
Too is avoiding any damage by keeping wrist control.
Hayashida trying to control but Too is working from the bottom.
Hayashida in full guard, throwing the ground and pound. No damage this time.
Too is working an open guard here, looking to improve his position. No doubt that will leave him open to counters but at least he's being more offensive.

That's one minute gone in the round.
Hayashida working some strikes from top position.
Hayashida with a flurry of punches that miss.
Hayashida throwing strikes from guard but Too blocks nicely.
Too keeping moving, preventing Hayashida from controlling successfully.
Too controlling Hayashida's posture.
It looks like the ref is thinking about a standup.

Too had isolated an arm as going for a kimura. Hayashida defends it easily.
Hayashida pressing down on his opponent's thigh, looking to pass guard. Too is keeping the position for now.

That's two minutes gone in the round.
Neither fighter has done anything of merit for a good minute or two here and the crowd are not happy about it.
Hayashida is in close to Too's body, working some short punches and elbows.
Hayashida sneaks a leg through and gets to half guard. That was like a knife through butter how easily he passed Too's guard.
Hayashida throwing shots but Too is blocking nicely.
Hayashida is trying for a guillotine from the top but the pressure isn't in the right place so Too is just riding it out for now. Hayashida eventually gives up the hold.
Hayashida missing with the ground and pound from half guard.
Hayashida thows a huge punch but Too dodges it nicely.

That's three minutes gone in the round.
Too is not content to let Hayashida control the position.
Hayashida not throwing his punches with enough precision this time.
The fighters are pressed up against the cage, both looking to find a bit of space to work.
Too blocking the ground and pound attempt from Hayashida.
Hayashida wants to lay and pray for a moment but Too keeps working.
Hayashida looking for a kimura but he'll have to free his other leg if he wants to finish that. Perhaps he's just using it as a distraction technique.
Hayashida thumps the canvas. Not on purpose obviously - he just missed Too's head.

That's four minutes gone in the round.
The crowd are showing their displeasure at the lack of action as loud boos ring out around the arena.
Too is staying active underneath Hayashida, who seems content to just control the action from this position.
Too has no desire to be mounted, so is trying to control. Hayashida is working away from the top position though.
Hayashida missing with some ground and pound from the half guard.
Hayashida not doing much here.
Hayashida missing with the ground and pound from half guard.
Hayashida thows a wild elbow that connects with the canvas.
Hayashida is looking for a kimura. It's pretty deep but Too still has the half guard so he's probably OK. Oh, Too has exploded into a beautiful escape there and after a quick scramble, he's ended up in side control on top! Nice work!
Too in side control, just content to control the action for now.

That's five minutes gone in the round.
Hayashida is looking for a sweep.
You can see the frustration on Hayashida's face, being in this tough position on the bottom.
Hayashida tries to get back to half guard but can't.
Hayashida gets one leg under and gets the fight to half guard.

That's six minutes gone in the round.
My god... these two guys really need to pick up the pace or everyone will leave to go get a beer.
Hayashida wants to control the action here but instead Too manages to pass to full mount!
Hayashida tries to reverse the position but Too maintains control.
Too controlling the position easily from mount.
Too wants to control the pace but Hayashida is squirming around nicely.
Too sitting in mount, just looking to control for the moment.
Hayashida tries to hold on but Too pushes him away.
The ref warns both fighters not to hold the cage as they work up against the meshing.
Too controlling his opponent.

That's seven minutes gone in the round.
Too looking to finish Hayashida with some ground and pound. This is bad for Hayashida!
Hayashida wants to control but Too is having none of it.
Too looking to control but Hayashida is working nicely, looking to advance position himself.
Hayashida is trying to escape the mount.
Too controlling from mount.
Hayashida keeping his composure momentarily, calmly looking to get back to half guard.

That's eight minutes gone in the round.
The crowd are hurling abuse towards the fighters... You can hardly blame them though because there isn't a lot going on in the fight.
Too looking to control but Hayashida is working nicely, looking to advance position himself.
Hayashida is desperately trying to get back to half guard.
Hayashida is working hard here to advance position.

That's nine minutes gone in the round.
Too postures up and cracks his opponent a couple of times before moving back into close ground control. Hayashida looks a forlorn figure.
Hayashida working to try and regain half guard.
Hayashida gets back to half guard.
Too is taking a breather. Hayashida says something to him but it's hard to make out. Perhaps he's telling him to get on with it and actually do something.
Hayashida slips a foot under and gets full guard. Nice work.
The crowd thankful this round is nearly over.
Too trying to control but Hayashida is working from the bottom.
And thats the end of the round the fighters go back to their corners.
Kal Too dominated that round.
The fighters get back to their feet, the hooter sounds and we're back to the action!

Too misses with a leg kick.
Too misses with an uppercut
and Hayashida counters with a thumping low kick.
Too misses with a double jab.
Too will need to tighten up his combinations if he doesn't want to gas himself out, swinging at thin air.
Hayashida takes a hook to the side of the head. I wonder if that's got his ears ringing.
Too clobbers Hayashida with an overhand right that has the crowd gasping. That made a horrendous noise.
Too looks to land a combination but Hayashida avoids it well.
Too blocks a low kick nicely.
A big right from Too misses.
We've had a slow start to the round here - hopefully the action picks up.
Hayashida misses with a head kick.
A punch combination from Too misses.
Hayashida drops down and drives through with a powerful takedown into guard.
Hayashida working some ground and pound from guard but it's not doing any damage.
A big thud reverberates around the arena there as Hayashida accidentally thumps the mat. Hopefully he's not broken his hand.
That's one minute gone in the round.
Hayashida scores with a decent looking elbow strike.
Hayashida stands and throws Too's legs to the side, diving into side control.
Too is looking to regain half guard here but Hayashida keeps moving and retains side control.
Too is not content to let Hayashida control the position.
Hayashida is putting a hurting on Too here, landing some big shots from side control.
Hayashida tries to cartwheel into mount but he doesn't manage it.
Too avoids any damage from the ground and pound of Hayashida.
That's two minutes gone in the round.
Hayashida throwing strikes but missing, from side control.
Too is looking to regain half guard here but Hayashida keeps moving and retains side control.
Hayashida goes for an armbar! This could be all over! Wait, no, Too rolls with the submission and now he's on top in Hayashida's guard! Nice work there by Too!
Hayashida has been looking to land a fair amount of strikes on the ground. He might be looking to soften his opponent up in order to work for a submission.
Hayashida looking for a sweep. Not yet Hayashida, not yet.
Kal Too has got the better of the ground game so far.
Hayashida being controlled here, momentarily.
Hayashida wants to hit a switch here but Too passes into full mount! Oh no, disaster for Hayashida there!
That's three minutes gone in the round.
Hayashida tries to get back to half guard but can't.
Too takes a little breather and maintains the position. The referee will be looking for him to stay active from such a dominant position though.
Too wants to control the pace but Hayashida is squirming around nicely.
Too lands an elbow that was bordering on illegal but the referee lets it go with a warning.
Hayashida bucks up and manages to get a nice reversal! He's in guard on the top - nicely done!
Hayashida trying to control the position from guard on top but Too is wriggling around, looking for whatever he can.
That's four minutes gone in the round.
Hayashida is pushing down on Too's leg trying to pass to half guard. Too is fighting to maintain full guard but Hayashida has managed to sneak the leg through.
Too wants to improve his position but Hayashida is controlling well.
Hayashida throwing shots but they're hitting the canvas more than the man.
Hayashida looking for a kimura but he'll have to free his other leg if he wants to finish that. Perhaps he's just using it as a distraction technique.
Hayashida is trying to control. Too wants to improve his position but can't escape this time.
That's five minutes gone in the round.
Hayashida throws a strike but Too avoids it easily and moves to full guard.
Hayashida throws and elbow that misses. Too uses the momentum to reverse the position. He's now in Hayashida's guard. Nice move by Too!
Too wants to control from the top but Hayashida keeps moving.
Hayashida working from the bottom, still in full guard. He's managed to get a loose triangle. Too doesn't seem to be doing much to defend here, obviously he feels comfortable in the position. Too manages to throw the legs off his shoulder and he's back into guard - no problem.
Too not doing a lot at the moment. He'll have to show some more aggression or the fight will get stood up.
Hayashida controls Too momentarily but Too frees himself.
That's six minutes gone in the round.
A lull in the action here being met with boos from the crowd.
Hayashida keeping moving, preventing Too from controlling successfully.
Hayashida is working an open guard here, looking to improve his position. No doubt that will leave him open to counters but at least he's being more offensive.
Too wants to control from the top but Hayashida keeps moving.

Kal Too has forced the referee to step in and restart the fight on the feet.
Too throws a sloppy head kick
and Hayashida counters with a nice double leg into side control. Too won't be happy with that.
Too dodges the ground and pound from Hayashida.
Too being controlled for a moment.
That's seven minutes gone in the round.
Too avoids any damage from the ground and pound of Hayashida.
Hayashida tries for an arm triangle. That looks pretty tight to me. Is this one over!?! Possibly, maybe, no Hayashida has let go of the choke. Obviously it wasn't as tight as we thought!
Hayashida trying to control the action but Too is working from the bottom.
Hayashida throws an elbow but Too slips to the side and avoids it well.
That's eight minutes gone in the round.
My god... these two guys really need to pick up the pace or everyone will leave to go get a beer.
Hayashida tries for a kimura but Too is defending well.
Too can't do much from the bottom here.
Hayashida creates a bit of distance and throws down some hard shots.
Too dodges the ground and pound from Hayashida.
Too managing to avoid any damage from the strikes thrown by Hayashida.
Hayashida working away.
That's nine minutes gone in the round.
Too is working to avoid the ground and pound but Hayashida connects with a decent elbow.
Hayashida working the ground and pound.
Hayashida in side control lands a nice looking series of punches and elbows.
Hayashida with the ground and pound but Too regains half guard under the barage of strikes.
Too tries to get to full guard but Hayashida has control of the leg.
Hayashida throwing shots but they're hitting the canvas more than the man.
Hayashida thows a huge punch but Too dodges it nicely.
Too is holding on to half guard well.
Hayashida throwing punches and elbows but they're not doing any damage.
And thats the end of the round the fighters go back to their corners.
Heihachi Hayashida dominated that second round.
The fighters get back to their feet, the hooter sounds and we're back to the action!

Too has his takedown stuffed
and Hayashida counters with a big head kick but Too shrugs it off.
Hayashida tries a switch kick but it misses it's target.
Hayashida keeping his hands up high there, blocking the jab from Too.
Hayashida drops his hands and takes a jab to the jaw for his troubles.
Too ducks low and lands a nice hook to the body of his opponent.
Hayashida throws a nice inside leg kick.
Too fakes a couple of low kicks, before throwing one on the third attempt. It connects and Hayashida has to reset his feet before getting ready to engage.
Too moves out of range as Hayashida throws a body kick.
Too lands with a right hand.
A right-left combo lands from Too.
Hayashida fails with a takedown attempt.
Too works the jab nicely.
That's one minute gone in the round.
A punch lands to the side of Hayashida 's head but he takes it in his stride.
Too throws a nice looking combination but Hayashida bobs and weaves to avoid any damage.
Too fakes high and swings low for a body shot but Hayashida manages to avoid it.
Hayashida shoots in looking for a double leg takedown. Too defends it nicely.
Too lands a head shot.
Hayashida tries to clinch up.
Too throws a right hand that Hayashida ducks under and follows up with a left that Hayashida also avoids with ease.
Hayashida throws a nice outside leg kick.
Too misses with a wild body shot.
Too throws a combination. Hayashida tries to block but a couple of punches get through.
Too moves into range and connects with a jab.
Hayashida keeping at a good range here, avoiding a leg kick.
That's two minutes gone in the round.
Too shoots in for a double leg but Hayashida sprawls well. That's going to sap some energy.
Hayashida tries to land with a swinging hook to the body but Too was well out of range. Poor timing from Hayashida.
Too falls off balance throwing a combination
and Hayashida counters with a nice leg kick.
Too misses with a jab, cross combination.
Too lands a leg kick. The shin dug right into the meat of the thigh.
Kal Too is looking to throw some combinations by the looks of things.
Too misses with a double jab
enabling Hayashida to counter with a crisp jab.
Too misses with a combination
and Hayashida counters with a body kick.
Too takes a big intake of breath there - he's definitely tired.
Hayashida has his head snapped back a nice jab. A little nod from Hayashida there as he acknowledges the shot.
Too rushes in with a sloppy looking punch
and Hayashida counters with a left to the body.
Hayashida connects with an inside leg kick.
Hayashida tries to clinch up.
Too throws a hook but Hayashida avoids it easily.
That's three minutes gone in the round.
Too throws out a loose jab but Hayashida uses good head movement to avoid it.
The fighters circling - Hayashida throws out the jab but it was never going to land.
Hayashida swings for the body but Too moves out of range.
Too throws a big shot that misses.
Too throws a sloppy body shot

and Hayashida moves into the clinch.
Too is trying to break free.
Hayashida can't find room to land a body shot as Too controls the action.
Hayashida tries to land knees in the clinch but Too avoids the damage to the body.
Too blocks a punch to the side of the head.
Hayashida tries to land a knee to the body but he is off balance and Too avoids it.

Too breaks the clinch and we return to the middle of the mat.
Hayashida avoids a punch combination nicely.
Too takes one to the chin there.
Too throws a series of punches but Hayashida avoids them all with ease.
That's four minutes gone in the round.
My god... these two guys really need to pick up the pace or everyone will leave to go get a beer.
Too throws a hard body shot but it just misses.
Nice takedown defense from Too. No joy for Hayashida on that attempt.
That's three failed takedown attempts in the round for Heihachi Hayashida. That's going to take a lot out of him.
Too will need to tighten up his combinations if he doesn't want to gas himself out, swinging at thin air.
Hayashida avoids a lazy jab quite easily.
Hayashida ducks down and throws a hook to the body but Too moves away.
Too throws a jab, cross combination which is slipped
and Hayashida counters with a shoot takedown. Too fights it but they end up in guard.
Hayashida trying to control the position from guard on top but Too is wriggling around, looking for whatever he can.
Hayashida wants to pass the guard but Too is keeping the position.
Too lands a beautiful switch and he's in full mount! That could spell trouble for Hayashida!
Hayashida tries to hold on but Too pushes him away.
That's five minutes gone in the round.
Hayashida is wriggling around trying to escape.
Too is in the full mount, landing strikes.
Too sitting in mount, just looking to control for the moment.
Hayashida is looking to improve his position but Too isn't that keen on the idea.
That's six minutes gone in the round.
There's not a lot going on here and the crowd are letting the fighters know they're not willing to tolerate a lack of action.
Too looking for an armbar but decides to keep the dominant position instead.
Hayashida tries to lock up and control but Too gives him a forearm to the face and pushes him away.
Hayashida tries to get back to half guard but can't.
Too working away from the top, dropping strikes.
Too working to secure an arm triangle but it's not happening for him just yet.
Hayashida is working to get back to half guard.
That's seven minutes gone in the round.
Too throwing sloppy strikes, which aren't doing any damage.
Hayashida really trying hard to get back to half guard here.
Hayashida tries to hold on but Too pushes him away.
Too tries to control but Hayashida wriggling away.
Hayashida is trying desperately to improve position.
Hayashida bucks up and manages to get a nice reversal! He's in guard on the top - nicely done!
That's eight minutes gone in the round.
My god... these two guys really need to pick up the pace or everyone will leave to go get a beer.
Too bucks up whilst keeping hold of a body lock, managing to reverse the position. Now he's in top in Hayashida's guard.
Hayashida seems keen to control rather than go for a submission, at least for now.
Too is just sitting in guard, looking to avoid any submissions.
Hayashida working from the bottom, still in full guard. He's managed to get a loose triangle. Too doesn't seem to be doing much to defend here, obviously he feels comfortable in the position. Too manages to throw the legs off his shoulder and he's back into guard - no problem.
Too advances position into side control!
That's nine minutes gone in the round.
Too working away.
Hayashida is looking for a sweep.
Hayashida is working to avoid the ground and pound but Too connects with a decent elbow.
Hayashida stops Too from passing to mount.
Hayashida manages to get back to half guard.
Too is looking to stall here but Hayashida recovers full guard.
Too pressing down on his opponent's thigh, looking to pass guard. Hayashida is keeping the position for now.
And thats the end of the round the fighters go back to their corners.
A close third round but Kal Too just about did enough to take it.
That's time! Hayashida's corner gives him a slap on the ass as he gets ready to fight.

Hayashida slips under a jab from Too.
Hayashida takes a body punch but keeps moving.
Hayashida has a takedown stuffed.
Too wants to slow Hayashida down by chopping away at his legs.
Too scores with a jab to the body.
Too takes a swing at Hayashida's ribcage but misses.
Too misses with a left hand
and Hayashida counters with a good low kick that Too was not able to check.
Hayashida uses some good footwork to avoid the body shot by Too.
We've had a slow start to the round here - hopefully the action picks up.
Too connects with a right hand. Hayashida shakes it off.
A looping hook to the body misses from Hayashida. Too does a little dance to reset his feet.
Hayashida connects with a high kick.
Too misses with a lunging right hand
and Hayashida counters with a shoot takedown. Too fights it but they end up in guard.
That's one minute gone in the round.
Hayashida throws a big right hand that misses.
Hayashida trying to control but Too is working from the bottom.
Too pulls Hayashida in close to prevent any damage.
Hayashida trying to control but Too is working from the bottom.
Hayashida throws a big right hand that misses.
Hayashida is looking to work some ground and pound but Too has wrist control.
Too wants to sweep here but Hayashida controlling him for the moment.
Hayashida works over Too with some ground and pound from guard.
That's two minutes gone in the round.
A lull in the action here being met with boos from the crowd.
Hayashida won't allow Too to sweep him here.
Hayashida throws a big right hand that misses.
Hayashida with a nice head shot there.
Too has Hayashida pulled in close to control his posture.
Hayashida postures up in Too's guard and throws a big left but Too blocks it.
Hayashida is looking to work some ground and pound but Too has wrist control.
Hayashida landing some decent shots from guard.
Too keeping moving, preventing Hayashida from controlling successfully.
That's three minutes gone in the round.
Hayashida trying to pass the guard but can't manage it just yet.
Hayashida scores with a decent looking elbow strike.
Too utilising some decent striking defenses from the guard, preventing the ground and pound.
Hayashida won't allow Too to sweep him here.
Too trying to strike off his back.
Hayashida postures up.
Hayashida postures up to throw the ground and pound strikes but they don't connect.
Hayashida thows a big elbow that misses.
Hayashida scores with a decent looking elbow strike.
Too is absolutely dripping with sweat - he looks exhausted.
Hayashida being controlled here momentarily.
That's four minutes gone in the round.
My god... these two guys really need to pick up the pace or everyone will leave to go get a beer.
A big thud reverberates around the arena there as Hayashida accidentally thumps the mat. Hopefully he's not broken his hand.
Hayashida trying to control but Too is working from the bottom.
Hayashida lands a couple of decent looking shots.
Too keeping moving, preventing Hayashida from controlling successfully.
Too wants to sweep but no luck.
Hayashida with a nice head shot there.
Hayashida throws a big right hand that misses.
That's five minutes gone in the round.
Hayashida throws and elbow that misses. Too uses the momentum to reverse the position. He's now in Hayashida's guard. Nice move by Too!
Too sitting in guard, not really doing much.
Hayashida is looking for a guillotine. You can't force these things though and Too defends well.
Too's corner is telling him to maintain position.
Too trying to control the position from guard on top but Hayashida is wriggling around, looking for whatever he can.
Too is taking a break and basically stalling. The referee will not allow him to do that for long.
That's six minutes gone in the round.
A few boos can be heard. I'm sure they will multiply if the fighters don't pick up the pace.
We must be close to a standup if these guys don't pick up the pace.
Hayashida is looking for a triangle but Too pushes his legs off easily.
Too got a little sloppy there for a moment and Hayashida has worked his way into a loose triangle - can he finish it?! No, Too has managed to get both his arms back between Hayashida's legs - danger averted.
Too trying to control but Hayashida is working from the bottom.
Hayashida working the defensive guard well to avoid strikes from Too.
Hayashida is pulling down on Too's head. It's preventing any offense from Too, at least for the moment.
That's seven minutes gone in the round.
Hayashida looking for submissions from the bottom here. Moving his hips around, possibly looking for an armbar.
Hayashida is trying to hold Too in close to prevent damage but Too has managed to pass into half guard.
Too slows the pace down in half guard.
Hayashida wants to control but Too is keeping busy and won't allow it.
Too looks over to his corner - he wants some instructions but his corner are not responding.
That's eight minutes gone in the round.
Well. There's a bit of a lull in the action here and the crowd are starting to get restless.
Hayashida is trying to control but Too passes into side control!
Hayashida manages to land a sweep and he's now on top! Lovely Jiu Jitsu!
Too is looking to regain full guard. Not this time though.
Hayashida is keen to just control but Too is a slippery customer.
Hayashida is looking for the mount but instead finds himself back in full guard.
Hayashida with a nice head shot there.
Too has control of Hayashida's left arm, preventing Hayashida from doing any damage.
That's nine minutes gone in the round.
Hayashida preventing the sweep.
Hayashida is looking to work some ground and pound but Too has wrist control.
Too keeping moving, preventing Hayashida from controlling successfully.
Hayashida postures up to throw the ground and pound strikes but they don't connect.
Hayashida throws a big right hand that misses.
Hayashida keeps in close for a moment and lands a decent shot to the side of Too's head.
The crowd thankful this round is nearly over.
Too keeping moving, preventing Hayashida from controlling successfully.
Hayashida postures up in Too's guard and throws a big left but Too blocks it.
And thats the end of the round the fighters go back to their corners.
Heihachi Hayashida had his way with Kal Too in that round.
That's the end of the interval. I'm sure that seemed a lot quicker than a minute for our two fighters! Back to the action. This is the final round!

Too swings wildly with a right hand that was never going to find it's target.
Hayashida is looking to wear down Too with body shots, infact he's throwing more body shots than head shots at the moment.
Hayashida slips a jab and a cross from Too.
Too misses with an uppercut. Hayashida saw that one coming.
Too throws a hook to the side of Hayashida's head but Hayashida sees it coming and ducks under it beautifully.
Too on the receiving end of a decent leg kick there by Hayashida. Hayashida obviously looking to wear him down.
Too throws a front kick aimed at Hayashida's knee but Hayashida avoids it well.
Donk. Too catches Hayashida right on the button with a cross.
Too uses decent footwork to sidestep a right hand from Hayashida.
Hayashida has his takedown stuffed
and Too counters with a stiff right hand.
We've had a slow start to the round here - hopefully the action picks up.
Too swings for the body but Hayashida moves out of range.
Hayashida tries for a takedown but Too sees it coming a mile off and avoids it easily.
Too misses with a body shot. Nice footwork from Hayashida.
Too throws a head kick but Hayashida moves out of range.
That's one minute gone in the round.
Too shoots in but doesn't get the takedown
and he gets countered with a snapping leg kick.
Hayashida throws a hard body shot but it just misses.
Hayashida tries to grapple but his opponent circles
and Too counters with a three punch combo that has Hayashida backing up. Hayashida nods at Too to acknowledge the strikes.
Too throws a combination but comes up with nothing but fresh air.
Too shoots and misses
and Hayashida holds on and brings the fighters into a clinch.
Too is wobbling all over the place through exhaustion. Will he make it to the final bell?
Hayashida misses the knee to the body. Nice hip positioning from Too.
A head punch blocked on the inside by Too.
Hayashida is leaning against Too and scores with a nice uppercut to the body.
Hayashida jumps guard.
Too slows down the pace of the fight, as he sits in guard.
Hayashida looking for a guillotine here but Too defends easily.
That's two minutes gone in the round.
Too is stalling in the full guard.
Hayashida looking to control the pace of the fight rather than finish it.
Too sitting in guard here, content to control.
That's three minutes gone in the round.
The referee is asking the fighters to pick up the pace.
Too wants to control from the top but Hayashida keeps moving.
The ref stands the fighters back up, due to lack of action by Kal Too.
Hayashida looks for a takedown here. Will he get it? Too is fending him off so far but Hayashida persists. Nope, Too circles away and we're back to standing.
That's three failed takedown attempts in the round for Heihachi Hayashida. That's going to take a lot out of him.
Hayashida takes a punch to the jaw and another one to the bread basket.
Too slips a jab from Hayashida.
Hayashida will need to close the distance a bit before he attacks - that leg kick was thrown from too far away.
Too throws out a token jab with nothing on it.
Too thuds his right hand into Hayashida's forehead from close range. That could be painful for both fighters.
Hayashida lands a leg kick. The shin dug right into the meat of the thigh.
Too throws a right hand that misses
and Hayashida counters with a shoot takedown into half guard.
Too keeping his head moving to avoid the ground and pound.
That's four minutes gone in the round.
Too is not content to let Hayashida control the position.
Hayashida thows a wild elbow that connects with the canvas.
Hayashida prevents Too from improving his position.
Too has no desire to be mounted, so is trying to control. Hayashida is working away from the top position though.
Too taking some punishment here, with Hayashida in his half guard.
Hayashida drops an elbow to the side of Too's head.
Hayashida is looking for a kimura but he's never going to get it from there.
Too trying to control from the bottom.
That's five minutes gone in the round.
Too wants to get back to full guard.
Hayashida thows a wild elbow that connects with the canvas.
Hayashida throwing shots but Too is blocking nicely.
Hayashida throwing punches and elbows but they're not doing any damage.
Hayashida working some ground and pound from close in. He's looking to maintain this position and strike for a while by the looks of things... although he'll probably advance to full mount in a minute now I've said that.
Hayashida is working for submissions here but there's nothing on.
Too makes his way to full guard. A much better position for Too.
Too is working from a closed guard but he's struggling to control his opponent.
That's six minutes gone in the round.
My god... these two guys really need to pick up the pace or everyone will leave to go get a beer.
Too keeping moving, preventing Hayashida from controlling successfully.
Too working the defensive guard well to avoid strikes from Hayashida.
Too looking to control.
Too keeping moving, preventing Hayashida from controlling successfully.
The referee decides to stand the fighters back up.
A slow jab from Too misses its intended target.
That's seven minutes gone in the round.
Hayashida attempts a low kick but it misses it's target.
Too lands an overhand left. A wild punch that just about connected.
Too scores with a jab. Hayashida acknowledges it with a nod of the head.
Too swings for the body but Hayashida moves out of range.
Hayashida digs a good hook to Too's body.
Too closes the distance and gets a trip takedown into side control. Hayashida quickly recovers to half guard.
Hayashida is refusing to be controlled, as Too sits in half guard.
Hayashida wants to control but Too is keeping busy and won't allow it.
Too looks over to his corner - he wants some instructions but his corner are not responding.
That's eight minutes gone in the round.
Too trying to control the action but Hayashida is working from the bottom.
Hayashida trying to hold on to Too's head to control him but Too postures up.
OK we're going to have a standup here. Kal Too hasn't been effective enough on the ground and the referee wants a restart.
Hayashida tries to clinch up against the cage, rushing in the close the distance. Too manages to break the clinch and circles back to the middle of the mat.
Hayashida misses with a low kick.
Hayashida ducks down and throws a hook to the body but Too moves away.
Too blocks a leg kick.
Too scores with a three punch combo!
Too misses with a combination
and Hayashida counters nicely by changing levels and landing a hook to the body.
Too misses with a series of wild punches.
That's nine minutes gone in the round.
Too shoots in for a takedown from distance. He catches Hayashida napping and manages to drive through into side control!
Too tries for an arm triangle. That looks pretty tight to me. Is this one over!?! Possibly, maybe, no Too has let go of the choke. Obviously it wasn't as tight as we thought!
Too trying to control the position but Hayashida is working away.
Hayashida gets one leg under and gets the fight to half guard.
Too wants to control but Hayashida is keeping him busy.
And that's the end of the fight!
That was a close round. You could make an argument for either fighter but I would give it to Heihachi Hayashida.
I think Hayashida has won this one but let's see what the judges have to say. Over to the ring announcer for the scorecards.
Ladies and gentlemen, after 5 rounds of action, we go to the scorecards for a decision.
Judge Yukihiro Shimada scores the fight for Heihachi Hayashida!
Judge Shirou Masuda scores the fight for Heihachi Hayashida!
Judge Hirohito Nitta scores the fight for Heihachi Hayashida!
Heihachi Hayashida wins by unanimous decision!
Heihachi Hayashida retains his lightweight title!
|
|
|
|
|
|
|
|
|
|
|
|
|
|
|
|
|
|
|
|
|
|
|
| S |
C
A |
G |
S |
C
B |
G |
|
S |
C |
G |
|
energy
A | B |
|
hype
A | B |
|
pop
A | B |
|
mgr
A | B |
|
FIGHT
RATING
46% |
|
|
|
|
|
|
