|
|
PBP Commentary |
Coming up we have a middleweight MMA rules bout between Steve Boa (ranked 0 p4p, 0 weight class) and Tim Horton (ranked 0 p4p, 0 weight class). Boa comes into the arena with Zappa-Why does it hurt when I pee? blaring out of the sound system. There are an array of beautiful celebrities at ringside tonight! I wonder if any of them paid for their tickets.
 |
|
 |
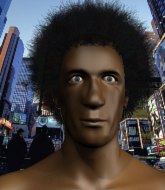
| 185 cm
26
185 lbs
4 - 6 - 0 |
|
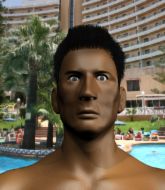
185 cm
27
195 lbs
3 - 5 - 0 |
Good wrestling
Brawler
Very strong |
|
Good takedowns
Decent boxing
Granite chin |
|
| |
|
Ladies and gentlemen. This fight is 3 rounds, in the middleweight division.
Introducing the fighter to my left, fighting out of the red corner.
With a record of
4 - 6 - 0, fighting out of Sydney, Steve Boa!
And introducing the fighter to my right, fighting out of the blue corner.
With a record of
3 - 5 - 0, fighting out of Sydney, Tim Horton!
The judges for this bout are Steve Erwin, Winston Howard and Donatello Bradman.

The bell rings for round one and we are underway!
Horton shoots in for a takedown but Boa shows good takedown defense.
Tim Horton seems to be the more aggressive standup fighter in this bout.
Horton lands with a cross to side of his opponent's head.
A telegraphed takedown attempt from Boa is defended easily by Horton.

Horton shoots in and scores a nice double leg takedown into half guard.
Horton throwing shots but Boa is blocking nicely.
Boa pushes Horton off looking to stand but Horton dives back in and keeps control.
Horton thows a huge punch but Boa dodges it nicely.
Horton has the superior BJJ but he's also working some ground strikes into his gameplan.
Boa is looking for a sweep. Horton is wise to his cunning plan and keeps the top position.
Boa on his back here. We all know that wrestlers don't like being on their back so let's see if Boa tries to get out of the position.
Boa regains full guard, whilst avoiding punches from Horton.
Horton throwing shots from guard but he's hitting more mat than opponent.
Horton with a nice head shot there.
Boa utilising some decent striking defenses from the guard, preventing the ground and pound.
Boa is working the butterfly guard. He manages to land a nice scissor sweep and is now in half guard on the top. Nice move.

Boa is trying to work for a kimura. This could be trouble! No, Horton has managed to free his arm - good work.
The fighters are pressed up against the cage, both looking to find a bit of space to work.

That's one minute gone in the round.
Horton is trying to stand back up but Boa is controlling him
Boa prevents Horton from improving his position.
Boa is looking for a kimura but Horton is holding onto that half guard position, so it's hard for Boa to get the leverage.
Horton tries to roll over but Boa keeps him under control.
Horton trying to control but Boa postures up.
Horton slips a foot under and gets full guard. Nice work.

That's two minutes gone in the round.
There's not a lot going on here and the crowd are letting the fighters know they're not willing to tolerate a lack of action.
Horton has his foot on Boa's thigh. He's trying to push off and get in position for a triangle, I think. Boa works his way back into a safe position though.
Boa is holding a leg here, probably looking for an ankle lock - he drops back and goes for it! Horton is in trouble! Is it all over??? No! Horton has escaped and now he's on top!
Boa trying to control the position here.
Boa utilising some decent striking defenses from the guard, preventing the ground and pound.
Horton content to strike from guard, landing some decent shots.
Horton throwing shots from guard but he's hitting more mat than opponent.
Horton loading up with the ground and pound but he's missing more than he's landing in this flurry.
Boa throwing his legs up looking for a triangle.

That's three minutes gone in the round.
Boa is trying to control the position from the bottom.
Horton throwing strikes from guard but Boa blocks nicely.
Boa has a closed guard, preventing Horton from standing up.
Horton missing there with some ground and pound from the guard.
Boa bucks up whilst keeping hold of a body lock, managing to reverse the position. Now he's in top in Horton's guard.
Boa passes easily into side control. Nice work.
Boa tries to score with some ground and pound. Horton controls his posture well this time though and the shots don't do any damage.
Horton takes a couple of big shots there - the referee warns him that he has to defend himself better.

That's four minutes gone in the round.
Boa goes for an armbar! This could be all over! Wait, no, Horton rolls with the submission and now he's on top in Boa's guard! Nice work there by Horton!
Boa is trying to control the position from the bottom.
Boa looking to control the pace of the fight rather than finish it.
Horton throwing elbows and punches but not connecting, as Boa works some decent striking defense from the bottom.
Boa is working actively off his back, looking to secure an arm or perhaps work for a triangle.
Boa controlling Horton's posture.
Horton landing with the ground and pound.
And thats the end of the round the fighters go back to their corners.
A close round but Tim Horton will probably get the nod.
The corners get their ten second warning. Both fighters stand from their stools and stare eachother down, ready to get back to the action.

Horton connects with the punch.
Horton cracks Boa with a nice right hand that draws applause from the crowd.
Boa lands with a kick to the temple. Horton shrugs as if to say "is that all you've got?"

It looks like Tim Horton has been cut.
Horton stuffs a takedown. It's all about dictating where the fight takes place and Horton wants it to stay on the feet.
Horton fakes and then throws a beautiful body shot. Boa looks a bit winded and takes a step backwards to take a breath.

Horton gets in close and instigates a clinch.
Horton lands a body punch in the clinch.
Horton wants a takedown but no success here.
Horton blocks a couple of punches on the inside.
Horton pushes Boa back against the cage and lands a hook to the side of the head.

Boa breaks the clinch and we're back to striking at distance.
Nice cross by Horton.
Boa shoots in and bounces Horton off the cage to secure the takedown into guard.
Horton looking to hit a scissor sweep but Boa is one step ahead there.
Boa has to be careful here, sitting in the guard of a superior BJJ player.
Horton throwing his legs up looking for a triangle.
That's one minute gone in the round.
Boa tries to free his leg and advance position but Horton is retaining full guard.
Boa drops back, looking for a kneebar! Horton looks panicked! The fighters roll across the mat, one looking to finish, one looking to escape. Horton looks to have wriggled free... Yes, he's got his leg free and he's dived into side control! Good work there from Horton!
Horton with the ground and pound but Boa regains half guard under the barage of strikes.
Boa blocking the ground and pound attempt from Horton.
Horton not landing any meaningful shots this time.
That's two minutes gone in the round.
The crowd are getting on the fighters' backs, as the pace has dropped off in the last minute or so.
Boa wants to control but Horton is keeping busy and won't allow it.
Boa is looking for a sweep. Horton is wise to his cunning plan and keeps the top position.
Horton not throwing his punches with enough precision this time.
Horton uses his free foot to push down on Boa's thigh. Eventually he works his other foot free and he's advanced to mount - this is trouble for Boa.
The ref warns both fighters not to hold the cage as they work up against the meshing.
Horton is in the full mount, landing strikes.
Boa tries to lock up and control but Horton gives him a forearm to the face and pushes him away.
Boa in a bad spot here, taking shots to the head.
The referee warns Boa that he has to improve his position here as he takes two more clean shots to the head.
Boa wriggling around on the bottom manages to avoid the strikes thrown by Horton.
Both fighters are absolutely exhausted here.
Boa holding onto his opponent's waist for dear life, as Horton tries to land some strikes to get him to release his grip.
Boa tries to get back to half guard but can't.
That's three minutes gone in the round.
Horton looking to finish Boa with some ground and pound. This is bad for Boa!
Horton landing strikes, looking to finish!
Boa wants to hold on but Horton pushes him away.
Horton lands a shot to the body, followed up by a shot to the exposed head of his trapped opponent.
Boa tries to reverse the position but Horton maintains control.
Horton landing punches.
Horton throwing shots from mount but they're not landing.
A nice elbow there by Horton.
Boa tries to hold on but Horton postures up.
Boa is in a horrible position here. Horton smacks him with another shot as he tries to escape the position.
That's four minutes gone in the round.
Horton unloading with bombs!
Poor strikes thrown by Horton there. More accuracy and less frantic strikes would help!
The referee warns Boa that he has to improve his position here as he takes two more clean shots to the head.
Poor strikes thrown by Horton there. More accuracy and less frantic strikes would help!
Horton throwing strikes here but Boa is writhing around nicely and avoiding any serious damage.
Horton looking to finish Boa with some ground and pound. This is bad for Boa!
Boa blocking the ground and pound.
Boa blocking the ground and pound.
The crowd applaud the fighters efforts here as the round comes to an end.
Boa is trying to escape the mount.
Horton is still in mount, landing shots to his trapped opponent. Boa can't stay in a position like this for much longer.
Horton dominating with strikes here.
And thats the end of the round the fighters go back to their corners.
Tim Horton showed his class in that round. I'd imagine he'll take it on all the scorecards.
The cut man is working on Tim Horton's cut.
That's time! Boa's corner gives him a slap on the ass as he gets ready to fight. This is the final round!

Horton tries to clinch but Boa moves out of range.
Boa circles away from the clinch attempt.
Steve Boa is looking to throw some combinations by the looks of things.
Horton scores with a jab. Boa acknowledges it with a nod of the head.
Horton lands with a right hand.
Horton moves to clinch but Boa breaks away
and Boa counters with a takedown into side control.
You can see the frustration on Horton's face, being in this tough position on the bottom.
Boa is trying to get an arm triangle but Horton is defending well.
Horton takes a big intake of breath there - he's definitely tired.
Horton wants to control but Boa postures up.
That's one minute gone in the round.
Boa looking for an arm triangle but it's way too loose to do anything.
Boa is looking to finish here, going for an Americana. Horton knows the correct defense though, so he's OK.
Horton is moving his hips around well on the bottom and has managed to get back to half guard.
Boa thumps the canvas. Not on purpose obviously - he just missed Horton's head.
That's two minutes gone in the round.
Well. There's a bit of a lull in the action here and the crowd are starting to get restless.
Boa lands with a punch from half guard.
The fighters are battling for position here. Horton manages to regain full guard. Nice work.
Boa passes easily into side control. Nice work.
Horton is positioning himself to get back to half guard.
Boa in side control, trying to ground and pound but not landing this time.
Horton tries to work a leg under to get back to half guard but Boa wriggles his own leg back out and remains in side control.
Horton dodges the ground and pound from Boa.
Horton wants to control but Boa postures up.
That's three minutes gone in the round.
Boa throws a knee to the body but it doesn't do much damage.
Boa is trying to get an arm triangle but Horton is defending well.

Boa stands up and we're back to a striking position.
Steve Boa has stepped it up - he knows he needs a finish here!
Boa defending well as Horton loads up on a big left hand.
Horton fails with the takedown
and Boa counters with a nice shoot takedown that brings the fighters to the ground.
Boa trying to control the position from guard on top but Horton is wriggling around, looking for whatever he can.
Boa throwing elbows and punches but not connecting, as Horton works some decent striking defense from the bottom.
Tim Horton is fighting for a decision here - he's started to take the cautious approach.
That's four minutes gone in the round.
Horton controls Boa momentarily but Boa frees himself.
Boa in full guard, throwing the ground and pound. No damage this time.
Boa advances position into side control!
The ground and pound from Boa seems to be hitting the mat more than his opponent.
You can see the frustration on Horton's face, being in this tough position on the bottom.
Boa tries to land with some ground and pound but misses.
Boa scores with punches from side control.
And that's the end of the fight!
Steve Boa showed his dominance in that final round.
I think Horton has won this one but let's see whether the judges agree with me. Over to the ring announcer for the scorecards.
Ladies and gentlemen, after 3 rounds of action, we go to the scorecards for a decision.
Judge Steve Erwin scores the fight 28:29
Judge Winston Howard scores the fight 28:29
Judge Donatello Bradman scores the fight 28:29
In favor of your winner, by unanimous decision... Tim Horton!
|
|
|
|
|
|
|
|
|
|
|
|
|
|
|
|
|
|
|
|
|
|
|
| S |
C
A |
G |
S |
C
B |
G |
|
S |
C |
G |
|
energy
A | B |
|
hype
A | B |
|
pop
A | B |
|
mgr
A | B |
|
FIGHT
RATING
62% |
|
|
|
|
|
|

