|
|
PBP Commentary |
Coming up we have a welterweight MMA rules bout between Richard Callaghan (ranked 0 p4p, 0 weight class) and Rick Flare (ranked 0 p4p, 0 weight class). Flare is bobbing his head along to his entrance song: Also Sprach Zarathustra. Both fighters look fresh as a daisy as they make their way towards the cage.
 |
|
 |
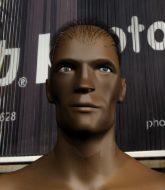
| 185 cm
24
185 lbs
13 - 5 - 0 |
|
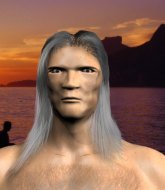
173 cm
27
180 lbs
15 - 8 - 0 |
Good wrestling
World class MT
Insanely flexible |
|
ADCC Champion
Excellent boxer
Heavy handed |
|
| |
|
Ladies and gentlemen. This fight is 3 rounds, in the welterweight division.
Introducing the fighter to my left, fighting out of the red corner.
With a record of
13 - 5 - 0, fighting out of Sydney, Richard Callaghan!
And introducing the fighter to my right, fighting out of the blue corner.
With a record of
15 - 8 - 0, fighting out of Sydney, Rick Flare!
The judges for this bout are Summer Carpenter, Winston Howard and Hugh Johnson.

The bell rings for round one and we are underway!
Flare shoots in looking for a takedown. Callaghan tries to sprawl out of it but Flare keeps driving through. The fighters are pinned against the cage. Callaghan manages to get underhooks and after a bit of a struggle, circles away and we're back to standing.
Flare fails with a takedown attempt from distance.
Callaghan connects with a single shot there.
Flare shoots in with a takedown attempt and he has Callaghan pinned against the cage. Callaghan gets the underhooks and manages to circle away.
Richard Callaghan has stuffed three takedown attempts in the round now. That's going to take a lot out of Rick Flare.
Callaghan throws a head kick that half lands.
Flare will have to do better than that with his takedown attempts.
Flare fails with the takedown.
Jab from Callaghan.

That's one minute gone in the round.
Callaghan moves away from the strike by Flare.
Flare checks the leg kick nicely there.
Callaghan swings wildly with a hook that is half blocked by Flare.
Callaghan blocks a jab.
Flare throws a body punch but Callaghan moves out of range.
Callaghan throws a nice looking combination but Flare bobs and weaves to avoid any damage.
Callaghan is using his reach advantage well here, landing the more effective single shots from range.
Flare checks a low kick from Callaghan.

Flare bobs and weaves into range and then changes levels and scores with a nice takedown into side control.
Flare in side control, throwing shots but Callaghan defends.
Flare working the ground and pound but he's contacting the mat, not the fighter.
Flare creates some space and throws a big elbow, but Callaghan sees it coming and moves his head just enough to avoid the strike.
Flare tries to advance to mount but Callaghan instead regains half guard.

That's two minutes gone in the round.
Flare missing with the ground and pound from half guard.

Flare is looking for a kimura here.
This has been an exciting period of action!
Callaghan wants to improve his position but Flare is controlling well.
Callaghan is staying active underneath Flare, who seems content to just control the action from this position.

That's three minutes gone in the round.
Flare throwing punches and elbows but they're not doing any damage.
Callaghan is defending against the submission attempts here by Flare.
Flare missing with the ground and pound from half guard.
Flare thumps the canvas. Not on purpose obviously - he just missed Callaghan's head.
Flare missing with some ground and pound from the half guard.
Flare drops an elbow to the side of Callaghan's head.
The ref warns both fighters not to hold the cage as they work up against the meshing.
Flare missing with some ground and pound from the half guard.
Flare is looking for a kimura. It's going to be difficult to finish that from half guard though and Callaghan defends it well.

That's four minutes gone in the round.
Flare is working for a submission of some sort.
Flare is looking to advance position but Callaghan won't allow it.
Flare seems to be working for a kimura but Callaghan defends the submission attempt.
As the round comes to an end the crowd are showing their appreciation for a great round of action.
Callaghan is refusing to be controlled, as Flare sits in half guard.
And thats the end of the round the fighters go back to their corners.
A close round but Rick Flare will probably get the nod.
OK. That's time! The bell goes and we're back to the action.

Flare shoots in for a takedown - he's clinched up with Callaghan but Callaghan pushes him off and we're back to square one.
Callaghan throws the left hand but Flare avoids the punch easily.
Richard Callaghan is looking to throw some combinations by the looks of things.
Callaghan tries to clinch up.
Flare misses with a hook to the body
and Callaghan counters with a nice low kick that buckles Flare's knee momentarily.
Flare shoots in for a takedown - he's clinched up with Callaghan but Callaghan pushes him off and we're back to square one.
Callaghan throws a lazy right hand but Flare sees it coming a mile off and sidesteps it easily.
Callaghan stuffs the takedown attempt from Flare. Flare gets slowly back to his feet.
Richard Callaghan has stuffed three takedown attempts in the round now. That's going to take a lot out of Rick Flare.
Flare fails with a takedown attempt.
That's one minute gone in the round.
Flare fails with the takedown.
Flare shoots in for a takedown - he's clinched up with Callaghan but Callaghan pushes him off and we're back to square one.
Flare shoots in looking for a double leg takedown. Callaghan defends it nicely.
Callaghan waving his hands out in front of him, looking to distract Flare.
Richard Callaghan is looking to keep the fight on the feet at all costs.
Nice takedown defense from Callaghan. No joy for Flare on that attempt.
That's two minutes gone in the round.
Flare changes levels and looks for a double leg takedown. Callaghan tries to avoid it but Flare manages to keep hold of a leg and drag Callaghan to the ground. Callaghan escapes though and pops straight back up to his feet.
Callaghan fakes low and throws an overhand right that catches Flare on the side of the head.
Flare scores a trip takedown into side control. Nice.
Callaghan parries the strikes from Flare easily there. Flare is wary of posturing up too much because it might enable Callaghan to escape.
Callaghan manages to land a sweep and he's now on top! Lovely Jiu Jitsu!
Fantastic stuff here - a very entertaining period of action, which has drawn cheers from the crowd.
Callaghan wants to free his trapped foot but Flare is holding on for dear life with his legs.
The fighters are pressed up against the cage, both looking to find a bit of space to work.
Callaghan is taking a breather. Flare says something to him but it's hard to make out. Perhaps he's telling him to get on with it and actually do something.
Rick Flare has got the better of the ground game so far.
Callaghan thows a huge punch but Flare dodges it nicely.
Callaghan not doing much here.
That's three minutes gone in the round.
Flare trying to control but Callaghan postures up.
Flare looking to work for a kimura from the bottom.
Flare is controlling Callaghan's position as best he can from this difficult position.
Callaghan throwing punches and elbows but they're not doing any damage.
Flare tries to get to full guard but Callaghan has control of the leg.
Callaghan thows a huge punch but Flare dodges it nicely.
Callaghan controlling the action here.
The fighters are battling for position here. Flare manages to regain full guard. Nice work.
That's four minutes gone in the round.
Flare escapes his hips to the side and looks to be working for an armbar. Callaghan gives him a little smile and shakes his head. No chance.
Flare trying to control the position.
Callaghan missing there with some ground and pound from the guard.
Callaghan throwing elbows and punches but not connecting, as Flare works some decent striking defense from the bottom.
Callaghan will need to keep those long limbs tucked in whilst he's on the ground, to prevent any submissions.
Flare controls Callaghan momentarily but Callaghan frees himself.
Callaghan throwing elbows and punches but not connecting, as Flare works some decent striking defense from the bottom.
Callaghan stands up and looks to throw the legs aside to pass to side control. Flare swivels though and keeps the full guard.
Flare is throwing his legs up, looking for submissions. Callaghan is aware though and is defending well.
This has been an exciting period of action!
As the round comes to an end the crowd are showing their appreciation for a great round of action.
Flare utilising some decent striking defenses from the guard, preventing the ground and pound.
Flare has the superior BJJ but he's also working some ground strikes into his gameplan.
Flare trying to control the position.
Callaghan postures up in Flare's guard and throws a big left but Flare blocks it.
And thats the end of the round the fighters go back to their corners.
Richard Callaghan dominated that second round.
That's time! Callaghan's corner gives him a slap on the ass as he gets ready to fight. So, we enter the final round. Let's see if either fighter can bring us a finish, or whether we're going to the judges scorecards.

Callaghan works his jab well there, keeping his opponent at a distance.
Callaghan defends well against a solid takedown attempt from Flare.
Flare tries to shoot in for a takedown. He's got hold of a leg but Callaghan swivels and escapes.
No joy there for Callaghan, who threw a few shots but didn't land.
Flare tries for a takedown but Callaghan sees it coming a mile off and avoids it easily.
Richard Callaghan has stuffed three takedown attempts in the round now. That's going to take a lot out of Rick Flare.
Nice defenses there by Flare.
Callaghan lands a jab to the head.
Callaghan slaps away a takedown attempt from Flare, before circling back to the center of the mat.
Callaghan fails in his attempt to clinch.
Flare has a takedown stuffed.
Richard Callaghan is winning the standup battle so far.
That's one minute gone in the round.
Callaghan ducks low and lands a nice hook to the body of his opponent.
Flare takes a big intake of breath there - he's definitely tired.
No joy there for Flare, who threw a few shots but didn't land.
Callaghan lands a right hook to the body.
Callaghan tries to clinch but Flare is having none of it.
Flare misses with a takedown attempt - Callaghan sprawls well and throws a nice strike on the way out which just misses.
Callaghan tries to clinch but is not successful on this occasion.
Nice shot by Callaghan.

It looks like Rick Flare has been cut.
Callaghan tries to clinch up.
Callaghan throws a shot from downtown. Flare moves away and avoids it.
That's two minutes gone in the round.
Flare shoots in for a takedown - he's clinched up with Callaghan but Callaghan pushes him off and we're back to square one.
Flare dives in and grabs Callaghan's left leg, looking for a takedown. Callaghan pushes down on Flare's head and hops out.
This is a great period of action - very entertaining stuff!
A left lands for Flare.
Callaghan stuffs a takedown. It's all about dictating where the fight takes place and Callaghan wants it to stay on the feet.
Callaghan swings away but doesn't land with a series of punches.
Flare swings and misses with a hook to the body.
Callaghan plants his feet and lands a nice head kick!
Flare looks frustrated there after his takedown attempt is stuffed easily.
Flare keeps the fight on the outside.
That's three minutes gone in the round.
Callaghan is looking to clinch but Flare is avoiding it.
Callaghan throws a jab when Flare was well out of range.
Callaghan scores with a jab. Flare acknowledges it with a nod of the head.
Flare catches Callaghan with a nice straight right. He seems pissed - ooooh, it's on now! On like donkey kong!
Callaghan does a little shimmy and throws a leg kick. The leg kick missed by a considerable margin though, making him look a little bit silly for doing the shimmy.
No luck for Flare with that takedown attempt.
Callaghan throws a jab but it's blocked by Flare.
The fight stays on the outside here - Callaghan looks like he's thinking about clinching though.
Callaghan is using his height advantage well here, landing a good percentage of his punches.
Flare chopped to the floor by a nice leg kick but he springs right back up before Callaghan can pounce on him.
That's four minutes gone in the round.

Callaghan clinches up against the cage.
Flare drops to a knee looking for a takedown but Callaghan gets the underhooks and prevents it.
Callaghan lands a knee to the body.
A nice left hand lands by Callaghan.
The crowd are loving this. Great action here.
Callaghan lands with a left to the head.
Callaghan working aggressively here.
Callaghan tries a shoulder strike but it doesn't do any damage.
As the round comes to an end the crowd are showing their appreciation for a great round of action.
Callaghan pushes Flare back against the cage and lands a hook to the side of the head.
Callaghan works for underhooks and lands a body shot in the process.
Callaghan scores with an uppercut up the middle.
Flare tries to pull guard but can't drag his opponent to the mat. Callaghan just stands there and leans against the cage.
And that's the end of the fight!
Richard Callaghan showed his dominance in that final round.
I think Callaghan has won this one but let's see what the judges have to say. Over to the ring announcer for the scorecards.
Ladies and gentlemen, after 3 rounds of action, we go to the scorecards for a decision.
Judge Summer Carpenter scores the fight 29:28
Judge Winston Howard scores the fight 29:28
Judge Hugh Johnson scores the fight 29:28
In favor of your winner, by unanimous decision... Richard Callaghan!
|
|
|
|
|
|
|
|
|
|
|
|
|
|
|
|
|
|
|
|
|
|
|
| S |
C
A |
G |
S |
C
B |
G |
|
S |
C |
G |
|
energy
A | B |
|
hype
A | B |
|
pop
A | B |
|
mgr
A | B |
|
FIGHT
RATING
61% |
|
|
|
|
|
|
