|
|
PBP Commentary |
Coming up we have a light heavyweight MMA rules bout between Kazushi Yamazaki (ranked 0 p4p, 0 weight class) and Matt Rubino (ranked 0 p4p, 0 weight class). Over to our ring announcer for the fighter introductions!
 |
|
 |
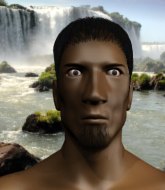
| 186 cm
22
215 lbs
0 - 0 - 0 |
|
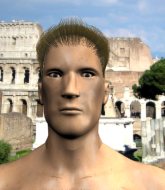
190 cm
22
210 lbs
0 - 1 - 0 |
BJJ White Belt
Improved boxing
Big right hand |
|
Good wrestler
Brawler
Granite chin |
|
| |
|
Ladies and gentlemen. This fight is 3 rounds, in the light heavyweight division.
Introducing the fighter to my left, fighting out of the red corner.
With a record of
0 - 0 - 0, fighting out of Tokyo, Kazushi Yamazaki!
And introducing the fighter to my right, fighting out of the blue corner.
With a record of
0 - 1 - 0, fighting out of Tokyo, Matt Rubino!
The judges for this bout are Sosuke Kotani, Yasuomi Hirokawa and Kenichi Hosakawa.

The bell rings for round one and we are underway!
Rubino is on the wrong end of a nice combination from Yamazaki.

Rubino feints and as Yamazaki raises his hands in defense, Rubino changes levels and drives through with a takedown into guard.
Rubino loading up with the ground and pound but he's missing more than he's landing in this flurry.
Rubino landing with the ground and pound.
Rubino postures up and lands a big shot to Yamazaki's brow.
Rubino postures up to throw the ground and pound strikes but they don't connect.
Rubino distracts Yamazaki with his right hand and drops a big elbow with his other arm.
Rubino is in close to Yamazaki's body, working some short punches and elbows.
Rubino throwing elbows and punches but not connecting, as Yamazaki works some decent striking defense from the bottom.
Rubino has the superior BJJ but he's also working some ground strikes into his gameplan.
Rubino looking to pass the guard.
Yamazaki not looking particularly offensive just at the moment.
The ref warns both fighters not to hold the cage as they work up against the meshing.

Yamazaki uses the cage to get back to his feet.
Rubino shoots in for a takedown. "Ole!" shouts Yamazaki as he jumps to the side.
Rubino fails with the takedown.
Yamazaki misses with a two punch combination.

That's one minute gone in the round.

The fight moves into the clinch position.
Rubino drops to a knee looking for a takedown but Yamazaki gets the underhooks and prevents it.
Kazushi Yamazaki has stuffed three takedown attempts in the round now. That's going to take a lot out of Matt Rubino.
Rubino has hold of a leg and is looking for a trip takedown. Yamazaki avoids it nicely though and we remain in the clinch.
Yamazaki leaning his opponent against the cage.
Rubino drops down for a takedown but doesn't get it.
Rubino looks gassed!
Rubino has a body lock and is looking for a takedown. Yamazaki is bouncing around trying to prevent the takedown and somehow he has indeed managed to stay on his feet.
Rubino is looking for a takedown up against the cage. Yamazaki gets underhooks though and prevents the takedown attempt.
Yamazaki is trying to break the clinch but Rubino has him pressed against the cage.
Rubino wants a takedown.
Yamazaki is looking to break free of the clinch but Rubino has double underhooks.
Yamazaki wants to break the clinch but can't.
Yamazaki can't break the clinch.
Rubino tries to pull guard but Yamazaki holds him up against the cage and eventually Rubino drops back down to his feet.
Yamazaki wants to break free. God knows he wants to breaaaak freeee.
Yamazaki wants to break free. God knows he wants to breaaaak freeee.
Yamazaki is trying to break the clinch but Rubino has him pressed against the cage.
Rubino keeps control of Yamazaki as he tries to wriggle out of the double underhooks.

That's two minutes gone in the round.
Yamazaki controlling the action here for a moment.
Rubino prevents Yamazaki from breaking the clinch.
Rubino fails to pull guard.
Yamazaki is trying to work out of this bad position, with his back against the cage.
Yamazaki is trying to break free.
Yamazaki missing with knees to the body.
Rubino tries to jump guard but he falls flat on his backside. Yamazaki smiles and moves away.
Yamazaki throws a body kick but he was well out of range there.
Rubino fails with a takedown attempt.
Yamazaki takes a step towards his opponent and connects with a left hand, before circling away.
Rubino tries to clinch but Yamazaki is having none of it.
Rubino misses with a double jab
and Yamazaki counters with a lovely shot to the body.
Yamazaki throws a head kick that misses and slips in the process. He scrambles back to his feet and the fighters circle.
Yamazaki tries a head kick but it misses.

That's three minutes gone in the round.
Yamazaki dips down and scores with a jab to the body.
Yamazaki looks for the body kick but Rubino saw that one coming.
Yamazaki doesn't succeed with the takedown
so Rubino counters with a double leg into guard. Good agility.
Rubino throwing strikes but missing.
Rubino trying to pass the guard but can't manage it just yet.
Yamazaki wants to get back to his feet but Rubino is in a dominant position and won't allow it.
Yamazaki utilising some decent striking defenses from the guard, preventing the ground and pound.
Yamazaki has momentary wrist control but Rubino slips an elbow through the middle.
Rubino postures up and scores with a shot to the body and a follow up elbow to the head.
Yamazaki keeping full guard, as Rubino tries to pass.
Yamazaki avoiding any damage from the ground and pound.
Yamazaki looking to control.
Yamazaki wants to stand up but Rubino is controlling him.
Rubino works over Yamazaki with some ground and pound from guard.

That's four minutes gone in the round.
Rubino is looking to work some ground and pound but Yamazaki has wrist control.
Yamazaki avoiding any damage from the ground and pound.
Rubino working from the guard for now, landing some ground and pound.
Rubino throwing strikes from guard but Yamazaki blocks nicely.
Rubino postures up and lands some nice ground and pound.
Rubino works a leg free and moves into half guard.
This has been an exciting period of action!
Yamazaki is looking to escape.
Yamazaki on his back here. We all know that wrestlers don't like being on their back so let's see if Yamazaki tries to get out of the position.
Nice strikes from Rubino there.
The two fighters exchange a few words. I couldn't hear what they were saying but maybe it's more fun if you make it up yourself. Rubino connects with a nice short shot to Yamazaki's temple.
The crowd applaud the fighters efforts here as the round comes to an end.
Rubino throwing shots but Yamazaki is blocking nicely.
Yamazaki wants to get back to his feet.
Yamazaki has hold of Rubino's hands but Rubino slips his arm to the side and lands an elbow.
Rubino winds up and cracks Yamazaki with a swinging punch to the side of the head.
And thats the end of the round the fighters go back to their corners.
Matt Rubino dominated that round.
That's the end of the interval. I'm sure that seemed a lot quicker than a minute for our two fighters! Back to the action.

Rubino shoots in and bounces Yamazaki off the cage to secure the takedown into guard.
Hammerfist, elbow! yells Rubino's corner. There ya go! There ya go!
Rubino pushes down on Yamazaki's leg and manages to get into half guard.
Yamazaki trying to control but Rubino postures up.
Ground and pound from Rubino.
Yamazaki is trying to stand back up but Rubino is controlling him
Matt Rubino has got the better of the ground game so far.
Rubino passes to full mount!
Rubino breaks from Yamazaki's wrist control and lands an elbow.
Rubino with the ground and pound from mount.
Rubino unloading with bombs!
Rubino lands a shot to the body, followed up by a shot to the exposed head of his trapped opponent.
Both fighters are absolutely exhausted here.
Rubino putting on the heat here with some good ground and pound!
Rubino won't let Yamazaki get back to his feet... He wants to keep the fight where it is for now.
Yamazaki wriggling around on the bottom manages to avoid the strikes thrown by Rubino.
The fighters are pressed up against the cage, both looking to find a bit of space to work.
That's one minute gone in the round.
Yamazaki is writhing around trying to get back to his feet.
Yamazaki is really trying hard to get back to his feet.
Rubino scores with a couple of good head shots there.
Yamazaki is writhing around trying to get back to his feet.
Rubino throwing sloppy strikes, which aren't doing any damage.
Yamazaki tries to hold on but Rubino postures up.
Yamazaki is trying to stand up.
Rubino scoring with some good ground and pound from mount here. Will he manage to finish Yamazaki?
Yamazaki's corner are shouting for him to stand up but that's bad cornering - how is he meant to stand up when he's mounted? He should be looking to improve his position on the ground before trying to stand back up.
Rubino with shots to the head and body - Yamazaki looks very uncomfortable down there.
Yamazaki is looking to improve his position but Rubino isn't that keen on the idea.
Rubino working the ground and pound effectively.
That's two minutes gone in the round.
Yamazaki bucks up and manages to get a nice reversal! He's in guard on the top - nicely done!
Rubino scores with a couple of body punches from the bottom.
Rubino throwing some rather feeble looking strikes off his back.
Rubino is working an open guard here, looking to improve his position. No doubt that will leave him open to counters but at least he's being more offensive.
Yamazaki decides to stand up and beckons his opponent to follow.
Yamazaki throws a combination. Rubino tries to block but a couple of punches get through.
Rubino shoots for a takedown but Yamazaki saw that one coming a mile off and avoided it easily.
Yamazaki lands with a two punch combination before moving back out of range.

It looks like Matt Rubino has been cut.
Rubino shoots in for a takedown but Yamazaki shows good takedown defense.
Rubino wants to clinch but Yamazaki slips to the side
and Yamazaki counters with a left and a right that stings Rubino.
This has been an exciting period of action!
Yamazaki shoots in looking for a takedown. Rubino tries to sprawl out of it but Yamazaki keeps driving through. The fighters are pinned against the cage. Rubino manages to get underhooks and after a bit of a struggle, circles away and we're back to standing.
Yamazaki lands with a two punch combination before moving back out of range.
Rubino fails with the takedown.
Kazushi Yamazaki has stuffed three takedown attempts in the round now. That's going to take a lot out of Matt Rubino.
That's three minutes gone in the round.
Yamazaki tries to close the distance and clinch up against the cage but Rubino paws at him with a jab and circles away.
Yamazaki throws a series of strikes that have Rubino backpedaling.
Kazushi Yamazaki is looking to throw some combinations by the looks of things.
Yamazaki throws a two punch combo that lands nicely.
Yamazaki tries a head kick but it misses.
Rubino takes one on the chin but seems OK.
Yamazaki motions for Rubino to come forward. Yamazaki throws a leg kick but it misses it's target.
Yamazaki misses with a few strikes there.
A jab lands there for Yamazaki.
Yamazaki throws a body kick that misses.
Rubino takes a punch to the jaw and another one to the bread basket.
Rubino checks a leg kick.
Yamazaki shoots in but doesn't get the takedown
and Rubino counters with a takedown into full mount! That could mean trouble for Yamazaki!
The crowd are loving this. Great action here.
Yamazaki takes a big shot to the head but keeps on trying to improve his position.
Rubino is still in mount, landing shots to his trapped opponent. Yamazaki can't stay in a position like this for much longer.
Rubino has his opponent pinned against the cage, landing some nasty ground and pound that is really making a bit of a mess out of Yamazaki's face.
Yamazaki can't escape the position.
Yamazaki wriggling around on the bottom manages to avoid the strikes thrown by Rubino.
That's four minutes gone in the round.
Rubino in mount throwing good strikes here, bouncing his opponent's head off the canvas.
Yamazaki is writhing around trying to get back to his feet.
Yamazaki gets back to half guard.
Yamazaki tries to kick Rubino off but Rubino keeps his base steady and stays in half guard.
Rubino lands a big shot. The thud that echoes around the arena is like music to the fans' ears.
Rubino thumps the canvas. Not on purpose obviously - he just missed Yamazaki's head.
Yamazaki is looking to escape.
Yamazaki is looking to improve his position.

The referee has ruled that neither fighter is active enough on the ground and has stood them back up.
Rubino looks for a takedown. He's got it. We're now in half guard.
As the round comes to an end the crowd are showing their appreciation for a great round of action.
Rubino missing with some ground and pound from the half guard.
Yamazaki blocking the ground and pound attempt from Rubino.
Rubino is nestled in close to Yamazaki, controlling him well. He's worked in a nice elbow to the side of the head as well, for good measure.
And thats the end of the round the fighters go back to their corners.
Matt Rubino showed his class in that round. I'd imagine he'll take it on all the scorecards.
The cut man is working on Matt Rubino's cut.
The fighters' corners scream their final instructions, as the referee calls time. Here we go, back to the action! This is the final round!

Yamazaki closes the distance and clinches up with Rubino, looking for a takedown. Yamazaki pushes Rubino against the cage but Rubino circles to the side and manages to break the clinch.
Yamazaki throws a head kick that misses and slips in the process. He scrambles back to his feet and the fighters circle.
Yamazaki with a lazy takedown attempt
and Rubino counters with a shoot takedown. Yamazaki fights it but they end up in guard.
Rubino postures up in Yamazaki's guard and throws a big left but Yamazaki blocks it.
Yamazaki looking to control.
Yamazaki wants to stand up but Rubino is controlling him.
Yamazaki preventing the ground and pound from doing any damage.
Rubino is working Yamazaki over from the guard. He should look to pass the guard and do a little more damage with these strikes.
Rubino postures up in Yamazaki's guard and throws a big left but Yamazaki blocks it.

Yamazaki throwing his legs up looking for a triangle.
Rubino advances position into side control!
Rubino lands an elbow.
Rubino takes a big intake of breath there - he's definitely tired.
Yamazaki is trying to stand back up. He's worked his way up against the cage but Rubino has just dragged him back down to the mat.
Rubino throws a knee to the body but it doesn't do much damage.
Yamazaki is positioning himself to get back to half guard.
That's one minute gone in the round.
Yamazaki is working hard here to advance position.
Yamazaki sneaks back into half guard.
Yamazaki taking some punishment here, with Rubino in his half guard.
Yamazaki wants to get back to his feet.
Rubino drops an elbow to the side of Yamazaki's head.
Rubino prevents Yamazaki from improving his position.
Rubino working Yamazaki over with strikes.
Rubino looks towards his corner to check for any instructions. The corner give him nothing to work with, so he cracks Yamazaki with a short hammerfist. I guess that's as good as any advice he could get in this position.
Yamazaki wants to get back to full guard.
Rubino is keeping good posture, landing some ground and pound.
Yamazaki is looking to escape.
Rubino is thwarting Yamazaki's attempts to control the position.
Rubino stops Yamazaki from getting back to his feet.
That's two minutes gone in the round.
Yamazaki tries to get to full guard but Rubino has control of the leg.
Yamazaki is trying to stand.
The referee decides to stand the fighters back up.
A decent looking cross lands there for Yamazaki.
Matt Rubino seems to be the more aggressive standup fighter in this bout.
Nice sprawl there from Yamazaki as Rubino shoots in.
Yamazaki tries a head kick but it misses.
Yamazaki clinches.
Yamazaki keeps control of Rubino as he tries to wriggle out of the double underhooks.
Yamazaki wants to break free but Rubino has control.
Yamazaki stops a takedown attempt from Rubino.
Yamazaki is trying to break the clinch but Rubino has him pressed against the cage.
Yamazaki is trying to work out of this bad position, with his back against the cage.
Rubino jumps guard but Yamazaki stands there with Rubino around his waist. Rubino gives up and drops back to his feet. We remain in the clinch.
Kazushi Yamazaki has stuffed three takedown attempts in the round now. That's going to take a lot out of Matt Rubino.
Rubino has moved round to his opponent's back and is looking for a suplex! Oh snap! He's tossed Yamazaki clear over his head and slammed him to the mat!
Rubino lands an elbow to the side of the head.
Rubino is landing with strikes from the back.
That's three minutes gone in the round.
Rubino lands a punch to the side of the head from the back.
Rubino throwing damaging strikes from the back! Yamazaki could be in trouble here!

Yamazaki is rocked!
Rubino lands strikes to the head.
Oh Yamazaki is still in real trouble! Will he be able to recover?!!
Rubino cracks Yamazaki with a big shot to body and one to the head - really punishing Yamazaki from the back mount here, looking to soften him up.
Rubino scores with strikes from the back.
Yamazaki looking to stop the rear naked choke attempt by controlling the hands.
Rubino looking to soften up his opponent with punches.
Yamazaki seems to have got his legs back now.
Rubino doesn't have the hooks in and Yamazaki manages to turn into his guard.
Rubino throws a couple of shots from the bottom but they don't land.
Rubino wants to sweep but no luck.
Yamazaki decides he's had enough of playing guard and decides to stand. Come on Rubino, up you get!
Yamazaki lands a jab-cross combination.
Rubino takes a big uppercut there. He seems a bit wobbly but no, he's OK.
Yamazaki throws a body kick that misses.
Yamazaki jabs at Rubino's body.
Yamazaki displaying good standup as he scores with a three punch combination.
That has opened up Matt Rubino's cut even more.
This is a great period of action - very entertaining stuff!
A head kick misses from Yamazaki.
That's four minutes gone in the round.
Nice takedown defense from Yamazaki. No joy for Rubino on that attempt.
Yamazaki pivots as if he's going to throw a leg kick but stops half way.
Yamazaki is looking to clinch.
Yamazaki gets his takedown attempt stuffed easily
and Rubino counters with a nice double leg into half guard.
Rubino frees up his trapped foot and advances to mount.
Yamazaki is in all sorts of trouble here.
Rubino lands with some strikes.
Yamazaki manages to regain half guard. Good work.
Kazushi Yamazaki has stepped it up - he knows he needs a finish here!
Yamazaki is trying to stand up here but Rubino is controlling him well.
Rubino throwing punches and elbows but they're not doing any damage.
Yamazaki punching from the bottom.
As the round comes to an end the crowd are showing their appreciation for a great round of action.
Rubino scoring with strikes to the body and head.
Yamazaki looking to work for a kimura from the bottom.
Rubino works his foot free and advances to mount.
And that's the end of the fight!
Matt Rubino comfortably won the final round on my scorecard.
I've got Rubino winning every round here. Surely the decision will go his way and he'll pick up a well deserved decision victory. Over to the ring announcer for the scorecards.
Ladies and gentlemen, after 3 rounds of action, we go to the scorecards for a decision.
Judge Sosuke Kotani scores the fight 27:30
Judge Yasuomi Hirokawa scores the fight 27:30
Judge Kenichi Hosakawa scores the fight 27:30
In favor of your winner, by unanimous decision... Matt Rubino!
|
|
|
|
|
|
|
|
|
|
|
|
|
|
|
|
|
|
|
|
|
|
|
| S |
C
A |
G |
S |
C
B |
G |
|
S |
C |
G |
|
energy
A | B |
|
hype
A | B |
|
pop
A | B |
|
mgr
A | B |
|
FIGHT
RATING
100% |
|
|
|
|
|
|
