|
|
PBP Commentary |
Coming up we have a bantamweight MMA rules bout between Stu Pain (ranked 0 p4p, 0 weight class) and Nathan McMillan (ranked 0 p4p, 0 weight class). Pain comes to the cage accompanied by http://youtu.be/6Ejga4kJUts. On his way into the cage it seems that Stu Pain has been attacked by a crazed fan! It looks like it might have been the just bleed guy! Luckily Stu Pain seems to be OK! I thought that lunatic was in prison!?
 |
|
 |
| 150 cm
18
130 lbs
0 - 1 - 0 |
|
180 cm
25
142 lbs
3 - 2 - 0 |
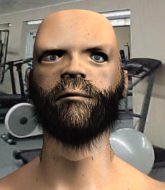
BJJ Brown Belt
Brawler
Granite chin |
|
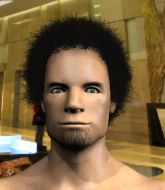
BJJ Blue Belt
Decent boxing
Heavy handed |
|
| |
|
Ladies and gentlemen. This fight is 3 rounds, in the bantamweight division.
Introducing the fighter to my left, fighting out of the red corner.
With a record of
0 - 1 - 0, fighting out of London, Stu Pain!
And introducing the fighter to my right, fighting out of the blue corner.
With a record of
3 - 2 - 0, fighting out of London, Nathan McMillan!
The judges for this bout are James Atkins, William Gold and Richard Clark.

The bell rings for round one and we are underway!
Pain shoots for a takedown but McMillan saw that one coming a mile off and avoided it easily.
Pain shoots in for a takedown but McMillan shows good takedown defense.
No luck for Pain with that takedown attempt.
That's three failed takedown attempts in the round for Stu Pain. That's going to take a lot out of him.
No luck for Pain with that takedown attempt.
Pain walks into a left hand.
Pain looks frustrated there after his takedown attempt is stuffed easily.
Pain throws a monster uppercut resembling something out of street fighter but it doesn't land.
McMillan lands a jab. Then a cross. Then finally a nice hook to the body. Good work there by McMillan.
McMillan throws a combination. Pain tries to block but a couple of punches get through.
Wooooo! Give it up for these two warriors! They are putting on a show!

McMillan closes the distance and pushes Pain back into the cage.
McMillan lands with a light punch inside.

Pain has clasped his hands together around McMillan's back... aaand, he's got a takedown into side control. Nicely done.
McMillan tries to escape but Pain is in control.

Pain decides to take the fight back to the feet.
Pain is breathing heavily.
McMillan shuffles to his left behind two crisp jabs. Pain eats them both and turns towards McMillan to reposition himself and eats a stinging right hand-left hook combo.
Pain ducks down and throws a hook to the body but McMillan moves away.

That's one minute gone in the round.
McMillan misses with a jab, cross combination.
Pain shoots in for a takedown but doesn't get it.
A left and a right from McMillan both land. Nice combination.
McMillan getting the better of the striking in that exchange.
McMillan stuffs the takedown.
Nathan McMillan seems to be the more aggressive standup fighter in this bout.
McMillan pushes forward with a 1-2 combination that forces Pain back to the cage. McMillan follows up with a solid lead hook to the liver.
McMillan fakes a head shot and lands one to the body.
Pain has a takedown stuffed.
Danga de danga de dang - McMillan scores with a four punch combination!
A punch combination from McMillan misses.
McMillan throws a hook but Pain avoids it easily.
Pain will have to do better than that with his takedown attempts.
McMillan misses with the combination.
Wooooo! Give it up for these two warriors! They are putting on a show!
Pain slips a straight right by McMillan.
McMillan looks to land a combination but Pain avoids it well.

That's two minutes gone in the round.
Pain tries to score a power double leg takedown but McMillan sees that one coming and sprawls well. That will dishearten Pain somewhat.
McMillan lands a jab, followed by a cross and another cross, as Pain backs up against the cage.
McMillan pushes forward with a 1-2 combination that forces Pain back to the cage. McMillan follows up with a solid lead hook to the liver.
Pain shoots in looking for a takedown. McMillan tries to sprawl out of it but Pain keeps driving through. The fighters are pinned against the cage. McMillan manages to get underhooks and after a bit of a struggle, circles away and we're back to standing.
McMillan lands a nice looking body shot.
Pain fails with a takedown attempt.
McMillan's corner calls for a 1, 2 combination and McMillan duly obliges.
Pain feints and as McMillan raises his hands in defense, Pain changes levels and drives through with a takedown into guard.

McMillan pushes Pain off and scrambles back to his feet.
Pain throws a looping left and ducks down for a takedown. He's got his arms around McMillan's waist but McMillan gets an underhook and avoids the takedown by throwing Pain off to one side.

That's three minutes gone in the round.
Pain is on the wrong end of a nice combination from McMillan.
Pain shoots in for a takedown - he's clinched up with McMillan but McMillan pushes him off and we're back to square one.
McMillan fakes with an overhand right and moves in to clinch with Pain, pushing him back against the cage.
Pain is working for a takedown up against the cage. He can't get it on this occasion though.
Pain keeps the fight in the clinch, despite McMillan's efforts to push away.
McMillan lands a shoulder strike.
McMillan stalling against the cage.
McMillan is trying to break the clinch but Pain is controlling him.
McMillan with the Thai clinch. He's looking to land a big knee but he's not managed it this time.
A short right from McMillan on the inside.
Pain drops to a knee looking for a takedown but McMillan gets the underhooks and prevents it.
Pain is looking for a takedown.

That's four minutes gone in the round.
McMillan missing with knees to the body.
McMillan is clearly stalling here... Pick up the pace son.
Pain keeps control of McMillan as he tries to wriggle out of the double underhooks.

McMillan's corner calls for him to break the clinch, which he does.
Nice sprawl there from McMillan as Pain shoots in.
No joy there for McMillan, who threw a few shots but didn't land.
Pain shoots for a takedown but McMillan saw that one coming a mile off and avoided it easily.
McMillan misses with a jab, cross combination.
Pain shoots in for a double leg but McMillan sprawls well. That's going to sap some energy.
Wooooo! Give it up for these two warriors! They are putting on a show!
The crowd are going absolutely nuts as the round comes to an end - what a fantastic round of action!
McMillan lunges at Pain with a hook that half lands and is half blocked by Pain's hand.
Pain misses the jab.
McMillan is using his reach advantage to land shots from outside his opponent's range.
Pain throws a looping left and ducks down for a takedown. He's got his arms around McMillan's waist but McMillan gets an underhook and avoids the takedown by throwing Pain off to one side.
Pain takes an uppercut right on the button but keeps his composure.
And thats the end of the round the fighters go back to their corners.
Nathan McMillan dominated that round.
The corners get their ten second warning. Both fighters stand from their stools and stare eachother down, ready to get back to the action.

Pain fakes high and shoots in for a takedown but McMillan avoids it really well and circles away.
McMillan getting the better of the striking in that exchange.
McMillan closes the distance and pushes Pain back into the cage.
McMillan effectively controlling the action here.
Pain goes for a takedown attempt but McMillan pushes him away and we're back to fighting at a distance.
McMillan displays some good footwork, moving neatly out of range as Pain throws out the jab.
McMillan scores with a one two! Pain had his feet all tangled up there and couldn't avoid the strikes.
Pain slips a jab and a cross from McMillan.
No luck for Pain with that takedown attempt.
That's three failed takedown attempts in the round for Stu Pain. That's going to take a lot out of him.
Pain will have to do better than that with his takedown attempts.
McMillan swinging wildly here.
Nathan McMillan seems to be getting the better of the standup.
Both fighters are absolutely exhausted here.
McMillan lands a two punch combo.
That's one minute gone in the round.
Pain scores a takedown into full mount!
McMillan is trying to get back to his feet but can't.

Pain is in full mount, looking to secure a guillotine but McMillan is surviving well by controlling Pain's body position as best he can.
Pain working for a guillotine from mount but McMillan is in no mood to give up.
Pain thowing shots but they're missing.
Pain throwing strikes here but McMillan is writhing around nicely and avoiding any serious damage.
That's two minutes gone in the round.
Pain swings around for an armbar but it's a sloppy attempt and McMillan is now in Pain's guard. A big mistake from Pain there, giving up the dominant position!
McMillan gets to his feet - Pain follows without any prompting.
McMillan goes to the watering hole and comes back with a big thumbs up from the judges as he scores a three punch combo.
Fantastic stuff here - a very entertaining period of action, which has drawn cheers from the crowd.
McMillan tries to close the distance and clinch up but Pain swats him away and circles back towards the center.
McMillan displays good takedown defense there as he swats away a double leg from Pain.
McMillan stalks Pain and leaps in with a furious combination of punches. Uppercuts and crosses smash into Pain's face. Pain staggers backwards, shaken.
McMillan lands with a shot to the body.
Pain fails to land the takedown.
Stu Pain is looking to throw some combinations by the looks of things.
McMillan scores with a sloppy punch to the body. Not much technique there but it did the business.
McMillan misses with a series of wild punches.
McMillan throws a hook to the body but it doesn't connect.
That's three minutes gone in the round.
A combination from McMillan does no damage.
McMillan throws a hook to the body but it doesn't connect.
Pain shoots in looking for a takedown but McMillan manages to keep the fight standing, pushing Pain's face into the canvas for good measure before circling away.
McMillan has used his reach advantage pretty well so far tonight.
Pain is on the wrong end of a nice combination from McMillan.
McMillan connects with a body shot.
McMillan displays good takedown defense there as he swats away a double leg from Pain.
Pain throws a looping left and ducks down for a takedown. He's got his arms around McMillan's waist but McMillan gets an underhook and avoids the takedown by throwing Pain off to one side.
McMillan jabs away that one connects to the head of his opponent.
Pain shoots in looking for a double leg takedown. McMillan defends it nicely.
Pain walks into a stiff left hand from McMillan.
Pain showing good head movement there, avoiding the strikes from McMillan.
McMillan leaves Pain with his face pressed against the mat as he sprawls beautifully, defending against a solid takedown attempt.
McMillan displays good takedown defense there as he swats away a double leg from Pain.
That's four minutes gone in the round.
A right-left combo lands from McMillan.
Pain looks like he's developed a pretty tasty lump over his left eye. He'll need to avoid taking much more damage to that.
Pain shoots in but no luck this time.
Sloppy strikes from McMillan. Those never looked like landing.
McMillan is a painfully thin specimen of a man. You do wonder whether a good body kick would snap him clean in two.
Pain tries to bum rush McMillan with a series of wild strikes but McMillan uses good footwork to avoid the assault.
Horrible takedown by Pain or perhaps it was just good defense by McMillan which made him look bad.
Nice sprawl there from McMillan as Pain shoots in.
McMillan throws a one two combo.
Fantastic stuff here - a very entertaining period of action, which has drawn cheers from the crowd.
McMillan throws a right and a left that Pain avoids nicely.
Pain looks for a takedown but McMillan sprawls well.
As the round comes to an end the crowd are showing their appreciation for a great round of action.
McMillan throws a combination but it was largely blocked by Pain.
Pain looks for a takedown but McMillan sprawls well.
McMillan lands a jab-cross combination.
And thats the end of the round the fighters go back to their corners.
Nathan McMillan showed his class in that round. I'd imagine he'll take it on all the scorecards.
That's time! Back to the action! This is the final round!

Pain shoots in and bounces McMillan off the cage to secure the takedown into guard.
Pain is trying to work a guillotine from the top, or something like that? Don't know how he thinks he's going to get a finish from there.
Pain working in close now, lands a nice elbow to the side of McMillan's head.
McMillan is looking to stand up but Pain isn't so interested in that idea.
McMillan pushes Pain off and gets back to his feet.
A telegraphed takedown attempt from Pain is defended easily by McMillan.
Both fighters are breathing heavily.
McMillan rushes Pain and pushes him back against the cage in a clinch.
That's one minute gone in the round.
McMillan prevents a takedown attempt there.
McMillan tries to circle away but Pain has him pinned against the cage.
McMillan stalling against the cage.
McMillan receives a warning from the referee for stalling.
Pain drops to a knee looking for a takedown but McMillan gets the underhooks and prevents it.
That's three failed takedown attempts in the round for Stu Pain. That's going to take a lot out of him.
McMillan looks like he'd prefer to be striking at range right now.
McMillan throws a blind hook that connects with the side of Pains head.
Pain drops down looking for an ankle pick but McMillan pulls his leg out and moves away.
McMillan looks to land a combination. Pain sees it coming but can only parry a couple of the shots.
That's two minutes gone in the round.
A punch combination from McMillan misses.
Pain shoots in but no luck this time.
Nice sprawl there from McMillan as Pain shoots in.
Pain shoots in looking for a double leg takedown. McMillan defends it nicely.
McMillan showing good head movement there, avoiding the strikes from Pain.
Left hook, right uppercut from McMillan.
Pain misses with a looping right.
McMillan wings a very wild body shot but it does the job and lands to the midsection.
Pain shoots for a double leg takedown but McMillan sprawls well. He's pushed Pain's face into the mat and manages to get back to his feet relatively easily.
Pain shoots in but McMillan avoids the takedown attempt easily.
McMillan misses with a series of wild punches.
Wow, both these guys are really going for it!
This is a great period of action - very entertaining stuff!
McMillan has Pain up against the cage in a clinch.
That's three minutes gone in the round.
Pain can't get the takedown.
McMillan gets underhooks to prevent Pain's takedown attempt.
Pain is looking for a takedown.
McMillan manages to break the clinch.
Pain has a takedown stuffed.
Pain has his head snapped back a nice jab. A little nod from Pain there as he acknowledges the shot.
A decent looking cross lands there for McMillan.
Pain shoots in with a takedown attempt and he has McMillan pinned against the cage. McMillan gets the underhooks and manages to circle away.
A shot to the liver by McMillan. Beautiful body shot.
McMillan fails to land with the punch combination there - jab, cross, hook, miss, miss, miss.
Pain throws the left hand but McMillan avoids the punch easily.
McMillan is working the combinations to good effect here.
That's four minutes gone in the round.
McMillan displays good takedown defense there as he swats away a double leg from Pain.
McMillan changes levels and scores with a jab to the body.
Pain is looking for a takedown here. He's shot in and has managed to get it, finishing up in McMillan's half guard.
Pain is sneakily working for an arm triangle but McMillan sees it coming and defends easily.
Wooooo! Give it up for these two warriors! They are putting on a show!
Pain tries to stand and escape but McMillan actually recovers to full guard.
McMillan wriggles free and stands up.
Stu Pain has stepped it up - he knows he needs a finish here!

McMillan shoots in with a lovely double leg takedown. Pain manages to land in full guard to minimise the damage.
As the round comes to an end the crowd are showing their appreciation for a great round of action.
McMillan stands up and waves to Pain to follow him.
Pain scores with a nice strike.
And that's the end of the fight!
Nathan McMillan comfortably won the final round on my scorecard.
I've got McMillan winning every round here. Surely the decision will go his way and he'll pick up a well deserved decision victory. Over to the ring announcer for the scorecards.
Ladies and gentlemen, after 3 rounds of action, we go to the scorecards for a decision.
Judge James Atkins scores the fight 27:30
Judge William Gold scores the fight 27:30
Judge Richard Clark scores the fight 27:30
In favor of your winner, by unanimous decision... Nathan McMillan!
|
|
|
|
|
|
|
|
|
|
|
|
|
|
|
|
|
|
|
|
|
|
|
| S |
C
A |
G |
S |
C
B |
G |
|
S |
C |
G |
|
energy
A | B |
|
hype
A | B |
|
pop
A | B |
|
mgr
A | B |
|
FIGHT
RATING
100% |
|
|
|
|
|
|
