|
|
PBP Commentary |
Coming up we have a welterweight MMA rules bout between Yushin Ayoki (ranked 0 p4p, 0 weight class) and Daniel Kindbom (ranked 0 p4p, 0 weight class). Ayoki comes to the cage accompanied by "Eye for an Eye" by Blacklisted. Daniel Kindbom will no doubt be trying to keep this one on the feet, where he has a distinct advantage.
 |
|
 |
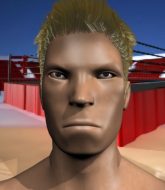
| 180 cm
18
171 lbs
1 - 2 - 0 |
|
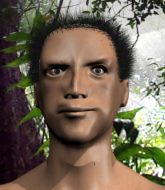
183 cm
22
170 lbs
1 - 0 - 0 |
BJJ Blue Belt
Basic striking
Good chin |
|
BJJ Blue Belt
Brawler
Intelligent |
|
| |
|
Ladies and gentlemen. This fight is 3 rounds, in the welterweight division.
Introducing the fighter to my left, fighting out of the red corner.
With a record of
1 - 2 - 0, fighting out of Tokyo, Yushin Ayoki!
And introducing the fighter to my right, fighting out of the blue corner.
With a record of
1 - 0 - 0, fighting out of Tokyo, Daniel Kindbom!
The judges for this bout are Taro Takaoka, Yukihiro Shimada and Shigeki Sano.

The bell rings for round one and we are underway!
Ayoki fails in his attempt to clinch.
Kindbom looks really tired already! That doesn't bode well for a good, competitive fight!
Ayoki feints with a shoulder and throws a nice leg kick to Kindbom's calf.
Ayoki thows a body kick. Kindbom tries to catch it but that hurt him.
Ayoki throws a combination but it was largely blocked by Kindbom.
Ayoki throws a mid kick that lands with a slap.
Ayoki looks for the body kick but Kindbom saw that one coming.
Ayoki throws a head kick that misses and slips in the process. He scrambles back to his feet and the fighters circle.

Ayoki feints and as Kindbom raises his hands in defense, Ayoki changes levels and drives through with a takedown into guard.
Ayoki stands up and looks to throw the legs aside to pass to side control. Kindbom swivels though and keeps the full guard.
Ayoki showing good wrestling skills to control the position.

Ayoki stands and steps away. Kindbom gets to his feet too and we're back to the striking game.
Ayoki goes for a high kick. It partially lands.
Ayoki fakes and then throws a beautiful body shot. Kindbom looks a bit winded and takes a step backwards to take a breath.
Kindbom with a poor takedown
and Ayoki counters with a three punch combination, finished off with a leg kick. Nice work.
Ayoki is looking to clinch but Kindbom is avoiding it.

That's one minute gone in the round.

Ayoki forces Kindbom back against the cage and clinches.
Ayoki manages to pull guard. Let's see whether he can land a sub off his back.
The fighters are pressed up against the cage, both looking to find a bit of space to work.
Ayoki is avoiding any damage by keeping wrist control.
Ayoki is trying to control the position but Kindbom postures up.
Ayoki is avoiding any damage by keeping wrist control.
Ayoki has butterfly guard. He's looking to stand up here. He pushes Kindbom off him and springs to his feet nicely. The crowd applauds.

That's two minutes gone in the round.
A punch combination from Ayoki misses.
Ayoki looking to take his opponent's legs away with the low kicks.
Kindbom misses with a takedown attempt
and Ayoki counters with a nice shoot takedown that brings the fighters to the ground.
Ayoki is taking a break and basically stalling. The referee will not allow him to do that for long.
Ayoki wants to get up but he can't break Kindbom's closed guard. He needs to be careful trying to break the legs open, as he's open to submissions here.
Kindbom looking to sweep using the butterfly guard but Ayoki puts pay to that idea as he passes nicely into half guard.
Ayoki keeping composed on the top, looking to control the action.
Kindbom wants to improve his position but Ayoki is controlling well.
Ayoki stands, ready to strike. The ref makes him back up and allows Kindbom to get to his feet.

That's three minutes gone in the round.
Ayoki is looking to slow Kindbom down with leg kicks.
Ayoki tries to bum rush Kindbom with a series of wild strikes but Kindbom uses good footwork to avoid the assault.
Kindbom with a lazy takedown attempt
and Ayoki counters with a single leg into guard. Kindbom didn't expect that.
Yushin Ayoki has stuffed three takedown attempts in the round now. That's going to take a lot out of Daniel Kindbom.
Kindbom looking to hit a scissor sweep but Ayoki is one step ahead there.
Ayoki stands up from guard. Let's bang!
Ayoki walks forward and throws out a flicking leg kick. Kindbom checks it nicely though, as he moves to the side.
Kindbom has closed the distance and engaged Ayoki in a clinch.

Kindbom breaks from the clinch.
A kick lands to the mid section there for Ayoki.
Kindbom misses with a takedown
enabling Ayoki to counter with a crisp jab.
Ayoki is looking to clinch but Kindbom is avoiding it.
Ayoki looks to land a body kick but Kindbom moved away.

That's four minutes gone in the round.
Kindbom takes a thudding leg kick, right into the meat of the thigh.
Ayoki lands a jab followed by a nice looking cross.
Kindbom misses with a takedown attempt
and Ayoki counters by clinching up.
Ayoki wants to push off and get back to the center of the mat but Kindbom has him pressed against the cage.
Ayoki wants to strike at distance but he can't break free of the clinch.
Kindbom wants a takedown.
Ayoki is trying to break free.
Kindbom wants a takedown but no success here.
Kindbom tries to pull guard but Ayoki holds him up against the cage and eventually Kindbom drops back down to his feet.
Ayoki tries to break the clinch but Kindbom is controlling the position.
The crowd applaud the fighters efforts here as the round comes to an end.
Ayoki is trying to break free.
Ayoki tries to break the clinch but Kindbom is controlling the position.
And thats the end of the round the fighters go back to their corners.
Yushin Ayoki dominated that round.
That's the end of the round. The referee orders the cornermen out of the cage so we can get back down to business.

Kindbom swinging wilding here.
Ayoki closes the distance and clinches.
Ayoki looking for a takedown.
Kindbom wants to break free but Ayoki has control.
Kindbom keeps control of Ayoki as he tries to wriggle out of the double underhooks.
Ayoki breaks the clinch.
Ayoki gets in close and instigates a clinch.
Kindbom wants a takedown.
Kindbom tries to jump guard but he falls flat on his backside. Ayoki smiles and moves away.
Kindbom blocks a head kick by Ayoki.
Kindbom shoots and misses
and Ayoki counters with a solid body kick.
Yushin Ayoki has stuffed three takedown attempts in the round now. That's going to take a lot out of Daniel Kindbom.
Ayoki shoots in for a takedown! He's got it and he's managed to land in full mount! That's better than Ayoki was expecting from the takedown attempt, I'm sure!
Kindbom is breathing heavily.
Ayoki stands up from the dominant position. He obviously fancies his chances standing.
That's one minute gone in the round.
Kindbom with a poor takedown
so Ayoki counters with a double leg into guard. Good agility.
Kindbom throwing some rather feeble looking strikes off his back.
Ayoki wants to control from the top but Kindbom keeps moving.
Kindbom keeping full guard, as Ayoki tries to pass.
Kindbom wants to control but Ayoki passes easily into half guard.
Ayoki gets to his feet - back to striking we go!
Ayoki lands with a two punch combination before moving back out of range.
Ayoki pushes Kindbom up against the cage in a clinch.
Kindbom has a body lock and is looking for a takedown. Ayoki is bouncing around trying to prevent the takedown and somehow he has indeed managed to stay on his feet.
That's two minutes gone in the round.
Kindbom tries to pull guard but can't drag his opponent to the mat. Ayoki just stands there and leans against the cage.
Kindbom fails to pull guard.
Kindbom drags the fight down to the ground.
Ayoki stands up and waves to Kindbom to follow him.
Ayoki tries a switch kick but it misses it's target.
Kindbom keeping a good distance there, avoiding the body shot.
Ayoki shoots in and drives through. Kindbom sprawls well.
Kindbom stuffs the takedown.
Kindbom shoots in and drives through. Ayoki sprawls well.
Kindbom checks a leg kick.
Ayoki connects with a leg kick. He turned his hip over nicely there.
Ayoki throws a head kick that misses.
Ayoki lands a head kick. Kindbom smiles back at him and beckons him forward.
Kindbom fails to land the takedown.
That's three minutes gone in the round.
Ayoki fails in his attempt to clinch.
Ayoki misses with a double jab.
Kindbom takes a step back and watches a body kick go sailing past his mid section.
Ayoki closes the distance, clinches up and gets a nice trip takedown into side control. Very smooth.
Ayoki decides to stand back up. Ayoki steps back and let's Kindbom get back to his feet.
Ayoki swings for the body but Kindbom moves out of range.
Ayoki fails in his attempt to clinch.
Ayoki scores with a takedown into Kindbom's guard.
Ayoki controlling from the top position.
Ayoki works a leg free and moves into half guard.
Ayoki is working hard to pass the guard. He's done it - he's now in full mount! Trouble for Kindbom!
Yushin Ayoki overall seems to be getting the better of the ground position in the fight so far.
That's four minutes gone in the round.
Ayoki stands up from mount. Strange move.
Ayoki throws a nice outside leg kick.
Ayoki closes the distance, clinches up and gets a nice trip takedown into side control. Very smooth.
Ayoki decides to take the fight back to the feet.
Fantastic stuff here - a very entertaining period of action, which has drawn cheers from the crowd.
Ayoki lands with a head kick! That's gotta hurt.
Danga de danga de dang - Kindbom scores with a four punch combination!
Yushin Ayoki is looking to throw some combinations by the looks of things.
Ayoki chopping away at his opponent's legs.
Ayoki misses with a double jab
and Kindbom counters with a nice double leg into side control. Ayoki won't be happy with that.
Ayoki throws his opponent off and manages to get back to his feet! Nicely done!
Ayoki avoids the body shot from Kindbom.
As the round comes to an end the crowd are showing their appreciation for a great round of action.
Ayoki takes a swing at Kindbom's ribcage but misses.
Ayoki moves in looking to clinch but Kindbom pushes him off.
Kindbom with a poor takedown
and Ayoki counters with a series of strikes. Kindbom will be more careful next time no doubt.
Ayoki throws a body kick that misses.
Kindbom rushes forward with a series of wild hooks but Ayoki moves out of range and avoids them all easily.
And thats the end of the round the fighters go back to their corners.
Yushin Ayoki dominated that second round.
That's time! Ayoki's corner gives him a slap on the ass as he gets ready to fight. This is the final round!

Ayoki throws a sloppy head kick and Kindbom moves out of range easily.
Kindbom swinging wilding here.
Ayoki looks to land a body kick but Kindbom moved away.
Kindbom gets his takedown attempt stuffed easily
and Ayoki counters with a nice double leg into half guard.
Ayoki postures up and decides to stand up, from the half guard. The ref calls for Kindbom to stand up.
Ayoki swings and misses with a hook to the body.
Kindbom takes a nice looking leg kick right on the meat of his thigh there.
Kindbom takes a nasty kick to the mid section... That should keep him thinking. Does he try and block and risk a head kick landing?
A punch combination from Ayoki misses.
Ayoki is really dominating this fight. Is there anything that Kindbom can do to turn this around?
Kindbom misses with a takedown
and Ayoki counters with a shoot takedown. Kindbom fights it but they end up in guard.
Ayoki stands up from Kindbom's guard - Ayoki perhaps looking for a knockout.
Ayoki scores with a head kick.
Kindbom lands a jab-cross combination.
Both fighters are breathing heavily.
This is a great period of action - very entertaining stuff!
Ayoki's corner calls for a 1,2 combination and Ayoki duly obliges.
That's one minute gone in the round.
Ayoki looking to take his opponent's legs away with the low kicks.
Ayoki tries to close the distance and clinch up against the cage but Kindbom paws at him with a jab and circles away.
A combination from Ayoki does no damage.
Ayoki throws a right hand that Kindbom ducks under and follows up with a left that Kindbom also avoids with ease.
Ayoki throws a body kick but he was well out of range there.
Ayoki throws a right hand that Kindbom ducks under and follows up with a left that Kindbom also avoids with ease.
Well, he's not going to score with shots like that. A lazy body kick attempt from Ayoki.
Ayoki misses with a hook.
Kindbom throws a head kick but Ayoki moves out of range.
Ayoki uses some good footwork to avoid the body shot by Kindbom.
Ayoki gets a clinch.
Kindbom tries for a takedown but Ayoki manages to get underhooks.
Yushin Ayoki has stuffed three takedown attempts in the round now. That's going to take a lot out of Daniel Kindbom.
Kindbom drops to a knee looking for a takedown but Ayoki gets the underhooks and prevents it.
Ayoki is trying to work out of this bad position, with his back against the cage.
Ayoki wants to break the clinch but can't.
That's two minutes gone in the round.
There's not a lot going on here and the crowd are letting the fighters know they're not willing to tolerate a lack of action.
Ayoki wants to stall.
Ayoki can't break the clinch.
Kindbom has clasped his hands together around Ayoki's back... aaand, he's got a takedown into side control. Nicely done.
Kindbom throws an elbow but Ayoki slips to the side and avoids it well.
Kindbom wants to lay and pray for a moment but Ayoki keeps working.
Ayoki managing to avoid any damage from the strikes thrown by Kindbom.

Kindbom is looking for a kimura. He might have it! No, Ayoki has escaped the position, nice work there.
The ref warns both fighters not to hold the cage as they work up against the meshing.
Ayoki is trying to control Kindbom's posture but Kindbom avoids it.
That's three minutes gone in the round.
Kindbom creates a bit of distance and throws down some hard shots.
Kindbom working away.
Kindbom tries for an arm triangle. That looks pretty tight to me. Is this one over!?! Possibly, maybe, no Kindbom has let go of the choke. Obviously it wasn't as tight as we thought!
Ayoki tries to escape but Kindbom is in control.
Kindbom working the ground and pound but he's contacting the mat, not the fighter.
You can see the frustration on Ayoki's face, being in this tough position on the bottom.
That's four minutes gone in the round.
Ayoki is in a bad position, trying to hold on for dear life but he is really struggling to maintain any sort of control.
Ayoki is looking to work his way out of this bad position but Kindbom is controlling him well.

The referee has ruled that neither fighter is active enough on the ground and has stood them back up.
Ayoki closes the distance and clinches.
Kindbom drops down for a takedown but doesn't get it.
Ayoki decides to pull guard.
Ayoki working a defensive guard here.
Kindbom is looking to work some ground and pound but Ayoki has wrist control.
Daniel Kindbom has stepped it up - he knows he needs a finish here!
Kindbom works a leg free and moves into half guard.
And that's the end of the fight!
Yushin Ayoki showed his dominance in that final round.
Well Ayoki has outscored his opponent in every aspect of the fight today. Only a scarily incompetent judge or two will keep him from a well deserved win... Over to the ring announcer for the scorecards.
Ladies and gentlemen, after 3 rounds of action, we go to the scorecards for a decision.
Judge Taro Takaoka scores the fight 30:26
Judge Yukihiro Shimada scores the fight 30:26
Judge Shigeki Sano scores the fight 30:27
In favor of your winner, by unanimous decision... Yushin Ayoki!
|
|
|
|
|
|
|
|
|
|
|
|
|
|
|
|
|
|
|
|
|
|
|
| S |
C
A |
G |
S |
C
B |
G |
|
S |
C |
G |
|
energy
A | B |
|
hype
A | B |
|
pop
A | B |
|
mgr
A | B |
|
FIGHT
RATING
64% |
|
|
|
|
|
|
