|
|
PBP Commentary |
Coming up we have a bantamweight MMA rules bout between Sisnik Shala (ranked 0 p4p, 0 weight class) and Hano Bilkerken (ranked 0 p4p, 0 weight class). Shala comes to the cage accompanied by random. The fight MMA fans around the world have waited their entire lives for!
 |
|
 |
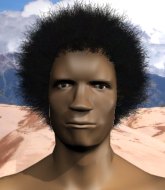
| 156 cm
19
136 lbs
1 - 3 - 0 |
|
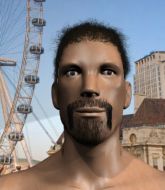
225 cm
25
130 lbs
0 - 6 - 0 |
BJJ Brown Belt
Counter striker
Cuts easily |
|
BJJ Blue Belt
Solid Muay Thai
Determined |
|
| |
|
Ladies and gentlemen. This fight is 3 rounds, in the bantamweight division.
Introducing the fighter to my left, fighting out of the red corner.
With a record of
1 - 3 - 0, fighting out of Amsterdam, Sisnik Shala!
And introducing the fighter to my right, fighting out of the blue corner.
With a record of
0 - 6 - 0, fighting out of Amsterdam, Hano Bilkerken!
The judges for this bout are Wagner Zegers, Albert Achterberg and Nard Betker.

The bell rings for round one and we are underway!

Bilkerken closes the distance and presses his opponent up against the cage.
Shala looks exhausted already! Oh dear, he should have come in in better shape than this!
Bilkerken prevents a takedown attempt there.
Shala on the defensive, avoiding the knees to the body.
Bilkerken is a painfully thin specimen of a man. You do wonder whether a good body kick would snap him clean in two.
Bilkerken working Shala over with knees to the body.
Bilkerken creates a bit of space for himself and sneaks an elbow through Shala's defenses.
Bilkerken landing knees to the body. They look like they could hurt.
Shala is looking to score with knees to the body. Maybe he'll change it up and go body then head. Bilkerken is defending well for now.
Bilkerken tries to land knees in the clinch but Shala avoids the damage to the body.
Shala on the defensive, avoiding the knees to the body.
Bilkerken tries to land a knee to the body but he is off balance and Shala avoids it.
Shala avoiding damage as Bilkerken throws knees to the body.
Bilkerken landing knees to the body. They look like they could hurt.
Bilkerken is trying to wear down his opponent with knees to the body.
Bilkerken lands an elbow inside.
Fantastic stuff here - a very entertaining period of action, which has drawn cheers from the crowd.
Bilkerken lands a good knee to the midsection. Shala won't want to take too many of those.
Bilkerken scores a nice knee to the body.
Bilkerken lands a nice knee to the body.

That's one minute gone in the round.
Bilkerken landing knees to the body.
Knees in the clinch landing for Bilkerken.
Bilkerken is trying to wear down his opponent with knees to the body.
Bilkerken using the Thai clinch to land knees to the body.
Shala on the defensive, avoiding the knees to the body.
Bilkerken missing with knees to the body.
Shala managing to block the knees to the body from Bilkerken.
Bilkerken lands a nice knee to the body.
Shala is trying to drag Bilkerken to the mat but Bilkerken just about manages to keep his footing. He used the cage to his advantage there.
Bilkerken scores a nice knee to the body.
Shala managing to block the knees to the body from Bilkerken.
Bilkerken lands a good knee to the midsection. Shala won't want to take too many of those.
Bilkerken tries to land a knee to the body but he is off balance and Shala avoids it.

That's two minutes gone in the round.
Bilkerken lands a knee to the body.
Shala managing to block the knees to the body from Bilkerken.
Bilkerken lands a knee to the body.
Bilkerken unloads a knee to the mid-section. Shala lets out a prehistoric sounding urrrrgh.
Shala can't break the clinch.
Shala on the defensive, avoiding the knees to the body.
Bilkerken misses the knee to the body. Nice hip positioning from Shala.
Bilkerken tries to land a knee to the body but he is off balance and Shala avoids it.
Knees in the clinch landing for Bilkerken.
Bilkerken missing with knees to the body.

Shala manages to break the clinch.
This is a great period of action - very entertaining stuff!
Shala tries to clinch up but Bilkerken circles away and keeps his distance.
Bilkerken moves into the clinch successfully.
Nice elbow from Bilkerken.

That's three minutes gone in the round.
Bilkerken scores a nice knee to the body.
Kneeeeees! The crowd are calling for knees to the body. Bilkerken obliges.
Shala managing to block the knees to the body from Bilkerken.
Shala is trying to slow down the pace in the clinch, to catch his breath.
Shala tries for a takedown. No joy.
That's three failed takedown attempts in the round for Sisnik Shala. That's going to take a lot out of him.
Bilkerken landing some nice looking knees to the body.
Shala wants to get back to striking at distance but Bilkerken won't allow it.
Bilkerken lands a knee to the body.
Knees in the clinch landing for Bilkerken.
Bilkerken tries to land knees in the clinch but Shala avoids the damage to the body.
Shala changes levels and goes for a takedown here. Bilkerken fights it off and pushes away nicely.
Bilkerken has closed the distance and engaged Shala in a clinch.

That's four minutes gone in the round.
Shala takes a knee to the side of the body.
Bilkerken lands a good knee to the midsection. Shala won't want to take too many of those.
Bilkerken lands a good knee to the midsection. Shala won't want to take too many of those.
Bilkerken lands a nice knee to the body.
Shala avoiding damage as Bilkerken throws knees to the body.
Shala is trying to force a seperation but Bilkerken has the dominant position.
Bilkerken lands a knee to the body.
Bilkerken prevents a takedown attempt there.
Bilkerken putting his Muay Thai to good use. He has Shala in a tight clinch and is doing some damage with knees to the body.
As the round comes to an end the crowd are showing their appreciation for a great round of action.
Shala has a body lock and is looking for a takedown. Bilkerken is bouncing around trying to prevent the takedown and somehow he has indeed managed to stay on his feet.
Bilkerken using the Thai clinch to land knees to the body.
Kneeeeees! The crowd are calling for knees to the body. Bilkerken obliges.
Fantastic stuff here - a very entertaining period of action, which has drawn cheers from the crowd.
Bilkerken tries to land a knee to the body but he is off balance and Shala avoids it.
And thats the end of the round the fighters go back to their corners.
Hano Bilkerken dominated that round.
The fighters' corners scream their final instructions, as the referee calls time. Here we go, back to the action!

Bilkerken instigates a clinch.
Knees to the body from Bilkerken.
Bilkerken landing knees to the body.
Bilkerken is looking to score with knees to the body. Maybe he'll change it up and go body then head. Shala is defending well for now.
The fighters are starting to perspire pretty heavily.
Bilkerken lands a nice knee to the body.
Bilkerken tries to land a knee to the body but he is off balance and Shala avoids it.
Knees to the body from Bilkerken.
Knees to the body from Bilkerken.
Shala tries to break free but Bilkerken pushes him back against the cage.

Bilkerken manages to break the clinch.
Bilkerken has taken the fight to the clinch.
Bilkerken is looking to score with knees to the body. Maybe he'll change it up and go body then head. Shala is defending well for now.
Bilkerken putting his Muay Thai to good use. He has Shala in a tight clinch and is doing some damage with knees to the body.
Bilkerken scores a nice knee to the body.
Shala managing to block the knees to the body from Bilkerken.
Both fighters are absolutely exhausted here.
That's one minute gone in the round.
Shala wants a takedown but no success here.
Shala on the defensive, avoiding the knees to the body.
Knees to the body from Bilkerken.
Shala is looking for a takedown.
Shala blocks a knee to the body. He'll have a nicely bruised forearm in the morning.
Shala on the defensive, avoiding the knees to the body.
Shala has a body lock and is looking for a takedown. Bilkerken is bouncing around trying to prevent the takedown and somehow he has indeed managed to stay on his feet.
That's three failed takedown attempts in the round for Sisnik Shala. That's going to take a lot out of him.
Bilkerken is trying to wear down his opponent with knees to the body.
Shala is looking for a takedown.
Bilkerken scores a nice knee to the body.
Bilkerken missing with knees to the body.
Shala looking for a takedown.
Bilkerken trying to land knees to the body.
Shala is working on a leg, looking for a takedown but Bilkerken is defending well.
That's two minutes gone in the round.
Knees to the body from Bilkerken.
Shala wants to push off and get back to the center of the mat but Bilkerken has him pressed against the cage.
Shala tries to score a body lock takedown but Bilkerken shows good agility there to stay on his feet.
Bilkerken lands an elbow inside that Shala shrugs off.
Shala on the defensive, avoiding the knees to the body.
Shala wants a takedown but no success here.
Bilkerken is looking to score with knees to the body. Maybe he'll change it up and go body then head. Shala is defending well for now.
Shala managing to block the knees to the body from Bilkerken.
Bilkerken putting his Muay Thai to good use. He has Shala in a tight clinch and is doing some damage with knees to the body.
Shala manages to break the clinch.
Wooooo! Give it up for these two warriors! They are putting on a show!
Bilkerken moves into the clinch.
A nice glancing elbow lands by Bilkerken.
Bilkerken gets double underhooks to prevent a takedown attempt from Shala.
Bilkerken scores a nice knee to the body.
That's three minutes gone in the round.
Shala on the defensive, avoiding the knees to the body.
Bilkerken lands a glancing elbow in the clinch.
Shala managing to block the knees to the body from Bilkerken.
Bilkerken misses the knee to the body. Nice hip positioning from Shala.
Shala is working for a takedown up against the cage. He can't get it on this occasion though.
Bilkerken scores a nice knee to the body.
Bilkerken trying to land knees to the body.
Bilkerken using the Thai clinch to land knees to the body.
Hano Bilkerken seems to be working more effectively in the clinch in the fight so far.
Bilkerken misses the knee to the body. Nice hip positioning from Shala.
Bilkerken landing knees to the body.
Shala on the defensive, avoiding the knees to the body.
Shala avoiding damage as Bilkerken throws knees to the body.
Bilkerken lands a good knee to the midsection. Shala won't want to take too many of those.
That's four minutes gone in the round.
Bilkerken utilising his Muay Thai to score with a knee to the body.
Shala wants to strike at distance but he can't break free of the clinch.
Bilkerken has been the more effective fighter overall so far.
Bilkerken landing some nice looking knees to the body.
Bilkerken is looking to score with knees to the body. Maybe he'll change it up and go body then head. Shala is defending well for now.
Shala drops to a knee looking for a takedown but Bilkerken gets the underhooks and prevents it.
Shala has had enough of the clinch and is looking to separate.
Bilkerken working Shala over with knees to the body.
As the round comes to an end the crowd are showing their appreciation for a great round of action.
Kneeeeees! The crowd are calling for knees to the body. Bilkerken obliges.
Shala has dropped down and is looking to force the takedown but it's defended by Bilkerken after a bit of a struggle.
Bilkerken landing some nice looking knees to the body.
Bilkerken missing with knees to the body.
And thats the end of the round the fighters go back to their corners.
Hano Bilkerken showed his class in that round. I'd imagine he'll take it on all the scorecards.
That's the end of the round. The referee orders the cornermen out of the cage so we can get back down to business. This is the final round!

Shala misses with a takedown attempt. He shot from a bit too far out.
Bilkerken clinches with his opponent.
Bilkerken utilising his Muay Thai to score with a knee to the body.
Bilkerken putting his Muay Thai to good use. He has Shala in a tight clinch and is doing some damage with knees to the body.
Bilkerken working Shala over with knees to the body.
Bilkerken using the Thai clinch to land knees to the body.
Bilkerken trying to land knees to the body.
Shala takes an elbow to the temple.
Shala on the defensive, avoiding the knees to the body.
Shala takes an elbow to the temple.
Bilkerken is trying to wear down his opponent with knees to the body.
Both fighters are breathing heavily.
Bilkerken landing knees to the body.
Shala is looking for a takedown up against the cage. Bilkerken gets underhooks though and prevents the takedown attempt.
That's one minute gone in the round.
Knees to the body from Bilkerken.
Bilkerken missing with knees to the body.
Bilkerken putting his Muay Thai to good use. He has Shala in a tight clinch and is doing some damage with knees to the body.
Bilkerken is looking to score with knees to the body. Maybe he'll change it up and go body then head. Shala is defending well for now.
Bilkerken trying to land knees to the body.
Bilkerken stops a takedown attempt from Shala.
That's three failed takedown attempts in the round for Sisnik Shala. That's going to take a lot out of him.
Knees to the body from Bilkerken.
Shala takes an elbow to the forehead.
Bilkerken is pressed up against the cage. Shala has hold of a leg and is looking to drag Bilkerken down to the mat. Bilkerken avoids the attempt though and has circled away. We're back to striking at a distance.
Bilkerken drives through and clinches with Shala against the cage.
Knees to the body from Bilkerken.
Bilkerken using the Thai clinch to land knees to the body.
Shala avoiding damage as Bilkerken throws knees to the body.
Shala has hold of a leg and is looking for a trip takedown. Bilkerken avoids it nicely though and we remain in the clinch.
That's two minutes gone in the round.
Bilkerken is looking to score with knees to the body. Maybe he'll change it up and go body then head. Shala is defending well for now.
Shala is trying to drag Bilkerken to the mat but Bilkerken just about manages to keep his footing. He used the cage to his advantage there.
Shala could do with losing a few pounds - he looks very soft around the mid section, to put it politely.
Shala blocks a knee to the body. He'll have a nicely bruised forearm in the morning.
Shala is working for takedown but Bilkerken is calmly controlling the position for now.
Bilkerken utilising his Muay Thai to score with a knee to the body.
Bilkerken crunches a lovely knee into Shala's ribcage.
Shala takes a knee to the side of the body.
Bilkerken stops a takedown attempt from Shala.
Bilkerken tries to land a knee to the body but he is off balance and Shala avoids it.
Wooooo! Give it up for these two warriors! They are putting on a show!
Bilkerken working Shala over with knees to the body.
Shala can't get the takedown.
That's three minutes gone in the round.
Bilkerken missing with knees to the body.
Shala avoiding damage as Bilkerken throws knees to the body.
Bilkerken tries to land knees in the clinch but Shala avoids the damage to the body.
Bilkerken unloads a knee to the mid-section. Shala lets out a prehistoric sounding urrrrgh.
Shala drops down looking for an ankle pick but Bilkerken pulls his leg out and moves away.
Bilkerken rushes Shala and pushes him back against the cage in a clinch.
Shala wants to take the fight to the mat but Bilkerken manages to get underhooks and keep the fight in the clinch.
Bilkerken using the Thai clinch to land knees to the body.
Bilkerken lands a nice knee to the body.
Bilkerken tries to land a knee to the body but he is off balance and Shala avoids it.
Shala blocks a knee to the body. He'll have a nicely bruised forearm in the morning.
Shala is looking for a takedown.
That's four minutes gone in the round.
Bilkerken putting his Muay Thai to good use. He has Shala in a tight clinch and is doing some damage with knees to the body.
Bilkerken tries to land knees in the clinch but Shala avoids the damage to the body.
Shala blocks a knee to the body. He'll have a nicely bruised forearm in the morning.
Shala blocks a knee to the body. He'll have a nicely bruised forearm in the morning.
Bilkerken landing knees to the body. They look like they could hurt.
Bilkerken is trying to wear down his opponent with knees to the body.
Shala on the defensive, avoiding the knees to the body.
Bilkerken misses the knee to the body. Nice hip positioning from Shala.
Bilkerken tries to land knees in the clinch but Shala avoids the damage to the body.
Hano Bilkerken is fighting for a decision - hopefully he's judged it right and he's actually winning the fight.
Bilkerken tries to land knees in the clinch but Shala avoids the damage to the body.
As the round comes to an end the crowd are showing their appreciation for a great round of action.
Shala on the defensive, avoiding the knees to the body.
Sisnik Shala has stepped it up - he knows he needs a finish here!
Bilkerken is trying to wear down his opponent with knees to the body.
And that's the end of the fight!
Hano Bilkerken comfortably won the final round on my scorecard.
Well Bilkerken has outworked and out performed his opponent in all aspects of the game today. He was simply too good and the decision should be no more than a formality. Over to the ring announcer for the scorecards.
Ladies and gentlemen, after 3 rounds of action, we go to the scorecards for a decision.
Judge Wagner Zegers scores the fight 27:30
Judge Albert Achterberg scores the fight 27:30
Judge Nard Betker scores the fight 27:30
In favor of your winner, by unanimous decision... Hano Bilkerken!
A victorious Hano Bilkerken thanked his army of followers in his post fight interview, telling people to make sure they follow him on Twitter.
|
|
|
|
|
|
|
|
|
|
|
|
|
|
|
|
|
|
|
|
|
|
|
| S |
C
A |
G |
S |
C
B |
G |
|
S |
C |
G |
|
energy
A | B |
|
hype
A | B |
|
pop
A | B |
|
mgr
A | B |
|
FIGHT
RATING
67% |
|
|
|
|
|
|

