|
|
PBP Commentary |
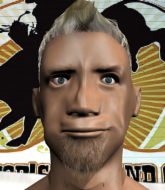
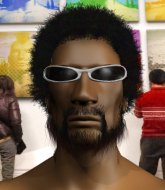
Coming up we have a welterweight MMA rules bout between Kanye West (ranked 0 p4p, 0 weight class) and Che Satomi (ranked 0 p4p, 0 weight class). West comes to the cage accompanied by Jesus Walks. Satomi has chosen Bad Boys as his entrance music. Che Satomi is the more experienced fighter, so let's see if that makes a difference tonight.
 |
|
 |
| 176 cm
22
184 lbs
6 - 0 - 0 |
|
185 cm
23
179 lbs
10 - 3 - 0 |
BJJ Brown Belt
Counter striker
Granite chin |
|
BJJ Brown Belt
Basic striking
Solid chin |
|
| |
|
Ladies and gentlemen. This fight is 3 rounds, in the welterweight division.
Introducing the fighter to my left, fighting out of the red corner.
With a record of
6 - 0 - 0, fighting out of Las Vegas, Kanye West!
And introducing the fighter to my right, fighting out of the blue corner.
With a record of
10 - 3 - 0, fighting out of Las Vegas, Che Satomi!
The judges for this bout are Daniel Franklin, Alan Glass and Robert Twigg.

The bell rings for round one and we are underway!
Satomi has his hands up protecting his head but a hook from West finds it's way round the side to connect with Satomi's head.
Satomi throws a lazy right hand but West sees it coming a mile off and sidesteps it easily.
West stuffs the takedown.
Satomi looks frustrated there after his takedown attempt is stuffed easily.
Satomi fails miserably with a takedown attempt.
Kanye West has stuffed three takedown attempts in the round now. That's going to take a lot out of Che Satomi.
West stuffs the takedown attempt from Satomi. Satomi gets slowly back to his feet.
Satomi shoots for a takedown but West saw that one coming a mile off and avoided it easily.
Che Satomi seems to be the more aggressive standup fighter in this bout.
We've had a slow start to the round here - hopefully the action picks up.
West scores with a jab to the jaw.
Satomi tries for a takedown but West sees it coming a mile off and avoids it easily.
West throws a body punch but Satomi moves out of range.
West throws a hard body shot but it just misses.

West shoots in for a takedown and gets it. Let's see what he's got on the mat.

That's one minute gone in the round.
West wants to pass the guard but Satomi is keeping the position.
West passes easily into side control. Nice work.
Satomi sneaks back into half guard.
West seems very keen to just sit and control from half guard but Satomi does not like that idea so much and is remaining active off his back.
Satomi is trying to get back to full guard.
Satomi works his way to full guard. Good work.
Satomi working a defensive guard but West manages to pass into side control anyway.
The fighters are pressed up against the cage, both looking to find a bit of space to work.
Satomi is trying to get back to half guard.
The ref warns both fighters not to hold the cage as they work up against the meshing.
Satomi sneaks back into half guard.
Both fighters really going for it on the ground here!
Satomi tries to get to full guard but West has control of the leg.

That's two minutes gone in the round.

West is working for submissions here but there's nothing on.
West thumps the canvas. Not on purpose obviously - he just missed Satomi's head.
West is trying to work for a kimura. He's got his hands clasped together - this could be trouble! No, Satomi has managed to free his arm - good work.
Satomi actively working from the bottom here.
Satomi looks gassed!
Satomi tries to roll over but West keeps him under control.
Satomi looking for submissions from an awkward position here.
West seems to be looking for submissions.

That's three minutes gone in the round.

It looks like we're going to have a standup here. Neither fight is doing enough on the ground.
Satomi shoots in but doesn't get the takedown
and West counters with a shoot takedown. Satomi fights it but they end up in guard.
The fighters are going at a pretty good pace and they're both starting to sweat now.
West drops back looking for a heel hook - he quickly realises he's not going to get it but Satomi manages to dive on top of him before he can escape and now West has Satomi in his guard.
West throws his legs up looking for a submission but Satomi uses it to pass to side control.
Satomi works to advance to full mount. West defends for a few seconds but eventually he succumbs.
West is working to get back to half guard.
West is working hard here to advance position.

That's four minutes gone in the round.
Satomi swings around for an armbar but it's a sloppy attempt and West is now in Satomi's guard. A big mistake from Satomi there, giving up the dominant position!
Satomi is working actively off his back, looking to secure an arm or perhaps work for a triangle.
Satomi trying to keep a closed guard but West is proving a slippery customer.
West wants to control from the top but Satomi keeps moving.
West slips nicely into half guard.
West seems to be taking a bit of a break to think of his next move. He lands a short punch in the meantime.
Satomi wants to improve his position but West is controlling well.
West is thinking about going for an arm triangle but he can't free his leg.
And thats the end of the round the fighters go back to their corners.
Kanye West dominated that round.
Well, the break between rounds is over. Let's get back to the scrappin!

West connects nicely with a jab. Noted by the judges no doubt.
Satomi tries to clinch but fails miserably
and West counters with a crisp hook to the side of the head.
Satomi bobs and weaves into range and then changes levels and scores with a nice takedown into side control.
West can't do much from the bottom here.
West is sneaking out the side here. He's bucked Satomi off and has taken his back!
Satomi manages to reverse the position and now he's in West's guard. Nice work there by Satomi.
Satomi postures up.
Satomi drops back for a leg here. A bit of a high risk move... He's looking for a kneebar by the looks of things. Now both of them are looking for submissions. Satomi seems to have locked his on tight now - West screams in pain and taps out furiously! It certainly was a high risk move but it's paid off for Satomi, as he picks up the win!
Ladies and gentlemen, after 1:01 of round 2, we have a winner by way of Submission (Kneebar). Che Satomi!
|
|
|
|
|
|
|
|
|
|
|
|
|
|
|
|
|
|
|
|
|
|
|
| S |
C
A |
G |
S |
C
B |
G |
|
S |
C |
G |
|
energy
A | B |
|
hype
A | B |
|
pop
A | B |
|
mgr
A | B |
|
FIGHT
RATING
89% |
|
|
|
|
|
|
