|
|
PBP Commentary |
Coming up we have a lightweight MMA rules bout between Carl Condit (ranked 0 p4p, 0 weight class) and Simon Audley (ranked 0 p4p, 0 weight class). Condit comes into the arena with Pride FC blaring out of the sound system. Both fighter's entrance songs getting the crowd jumping here.
 |
|
 |
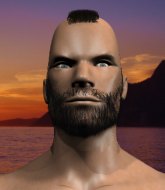
| 177 cm
25
162 lbs
3 - 0 - 0 |
|
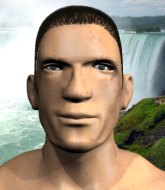
173 cm
25
160 lbs
3 - 0 - 0 |
BJJ White Belt
Solid boxing
Good chin |
|
BJJ White Belt
Good elbows
Granite chin |
|
| |
|
Ladies and gentlemen. This fight is 3 rounds, in the lightweight division.
Introducing the fighter to my left, fighting out of the red corner.
With a record of
3 - 0 - 0, fighting out of Los Angeles, Carl Condit!
And introducing the fighter to my right, fighting out of the blue corner.
With a record of
3 - 0 - 0, fighting out of Sydney, Simon Audley!
The judges for this bout are Shigeki Sano, Ren Mimura and Shirou Masuda.

The bell rings for round one and we are underway!
A swing and a miss from Condit.
Condit fakes high and swings low for a body shot but Audley manages to avoid it.
Audley wants to clinch up but Condit keeps it at a distance.
Audley tries to clinch but Condit moves out of range.
Condit misses with a wild body shot.

Audley rushes Condit and pushes him back against the cage in a clinch.
Condit takes a knee right on the jaw!
Audley trying to land knees to the body.
Audley working Condit over with knees to the body.
The pace really dropping off here, momentarily.
Audley landing some nice looking knees to the body.
Audley throws a knee to the head but misses.
Audley tries to land knees in the clinch but Condit avoids the damage to the body.
Audley using the Thai plumb to throw knees but Condit has his back arched nicely, preventing the strike.
Condit is trying to push Audley away but Audley has him pressed against the cage, so he's going nowhere.
Knees in the clinch landing for Audley.
We've seen a great period of action over the last minute or so - credit to both fighters for going all out!
Knees to the body from Audley.

That's one minute gone in the round.
Audley lands a damaging elbow.
Condit is trying to work for a single leg takedown but Audley pulls him back up using the underhooks.
Audley taking a breather.
Condit blocks an elbow strike from Audley.
Audley gets underhooks to prevent Condit's takedown attempt.
Knees to the body from Audley.
Condit is breathing heavily.
Condit takes an elbow to the forehead.
Audley prevents the takedown attempt.
That's three failed takedown attempts in the round for Carl Condit. That's going to take a lot out of him.
Audley's corner are urging him to control the action in the clinch for a moment, rather than mount any serious offense. I'm sure the crowd appreciate those instructions... not.
Audley utilising his Muay Thai to score with a knee to the body.
Audley lands a knee to the body.

That's two minutes gone in the round.
Audley lands a good knee to the midsection. Condit won't want to take too many of those.
Wooooo! Give it up for these two warriors! They are putting on a show!
The two fighters are working to gain dominance in the clinch.
Audley trying to land knees to the body.
Audley lands a damaging elbow.
Audley creates a bit of space for himself and sneaks an elbow through Condit's defenses.
Audley lands a knee to the body.
Audley is stalling here.
Audley lands a nice elbow.
Audley lands an elbow inside that Condit shrugs off.
Audley tries to land a knee to the head but misses.
Condit changes levels and goes for a takedown here. Audley fights it off and pushes away nicely.
Audley tries to clinch up.

That's three minutes gone in the round.
Audley doesn't manage to clinch there - Condit circles away.
Condit tries to land with a swinging hook to the body but Audley was well out of range. Poor timing from Condit.
Simon Audley seems to be the more aggressive standup fighter in this bout.
Condit keeps the fight on the outside.
Audley tries to clinch but is not successful on this occasion.
Audley is looking to clinch.
Audley tries to clinch up but Condit circles away and keeps his distance.
Audley tries to clinch up.
The fight stays on the outside here - Audley looks like he's thinking about clinching though.
Wow, both these guys are really going for it!
Audley tries to clinch but Condit moves away
and Condit counters with a shot to the ribs. That looked like it hurt.
Condit thows a body shot but no joy.
Audley tries to clinch but Condit is having none of it.
Audley is looking to take this fight into the clinch.
Audley drives through and clinches with Condit against the cage.
Condit takes a knee to the side of the body.
Audley comes over the top with an elbow. That landed flush.
Audley gets an overhook and lands an elbow to the side of the head.
Audley lands an elbow that stopped Condit in his tracks for a moment.

That's four minutes gone in the round.
Audley gets an overhook and lands an elbow to the side of the head.
Audley lands a damaging elbow.
Condit is trying to work for a single leg takedown but Audley pulls him back up using the underhooks.
Audley holding his opponent close, against the cage.
This is a great period of action - very entertaining stuff!
Audley lands an elbow just above Condit 's eye.
Condit takes an elbow to the forehead.
Audley comes over the top with an elbow. That landed flush.
As the round comes to an end the crowd are showing their appreciation for a great round of action.
Audley crunches a lovely knee into Condit's ribcage.
Audley stalling against the cage.
Audley misses with a knee to the head.
And thats the end of the round the fighters go back to their corners.
Simon Audley dominated that round.
The fighters' corners scream their final instructions, as the referee calls time. Here we go, back to the action!

Condit throws a hard body shot but it just misses.
Audley tries to clinch but Condit is having none of it.
Condit is looking to wear down Audley with body shots, infact he's throwing more body shots than head shots at the moment.
Condit fakes high and swings low for a body shot but Audley manages to avoid it.
Audley is looking to clinch but Condit is avoiding it.
Condit circles away from the clinch attempt.
Condit misses with a straight left.
Audley doesn't manage to clinch there - Condit circles away.
Audley tries to clinch up.
Condit looks to score with a jab to the body but Audley is just out of range.
Simon Audley is looking to throw some combinations by the looks of things.
Audley tries to close the distance and clinch but Condit swats him to one side with an open hand palm strike and circles away.
Audley keeping a good distance there, avoiding the body shot.
Audley slips a jab from Condit.
Audley moves in looking to clinch but Condit pushes him off.
Audley fails in his attempt to clinch.
The fight stays on the outside here - Audley looks like he's thinking about clinching though.
Condit throws a hook to the body but it doesn't connect.
Audley tries to clinch up against the cage, rushing in the close the distance. Condit manages to break the clinch and circles back to the middle of the mat.
Audley slips a straight right by Condit.
Both fighters are absolutely exhausted here.
That's one minute gone in the round.
Condit thows a left - swing and a miss!
Audley moves into the clinch successfully.
Audley landing knees to the body.
Audley landing some nice looking knees to the body.
Audley lands a damaging elbow.
The fighters are going at a pretty good pace and they're both starting to sweat now.
Condit is trying to pull guard but Audley has him pressed against the cage.
Audley is clearly stalling here... Pick up the pace son.
Audley lands a glancing elbow in the clinch.
Audley blocks a knee to the body. He'll have a nicely bruised forearm in the morning.
Audley lands a nice elbow from the clinch.
Nice elbow from Audley.
Audley working Condit over with knees to the body.
Audley landing knees to the body. They look like they could hurt.
Simon Audley seems to be working more effectively in the clinch in the fight so far.
The crowd cheering loudly, showing their appreciation for the quality fight we're seeing here.
Condit letting Audley take a breather here.
That's two minutes gone in the round.
Audley tries to land knees in the clinch but Condit avoids the damage to the body.
Audley landing some nice looking knees to the body.
Audley lands a glancing elbow in the clinch.
Audley stalls.
Audley comes over the top with an elbow. That landed flush.
Audley landing knees to the body. They look like they could hurt.
Audley comes over the top with an elbow. That landed flush.
Audley stalling the fight.
Condit takes an elbow to the temple.
That's three minutes gone in the round.
Audley scores a nice knee to the body.
Audley has been the more effective fighter overall so far.
Audley displaying some good clinch control by pressing Condit up against the cage.
Audley using the Thai plumb to throw knees but Condit has his back arched nicely, preventing the strike.
Condit avoiding damage as Audley throws knees to the body.
Audley throws a knee to the head but misses.
Audley effectively controlling the action here.
Condit looking for a takedown.
Audley gets an overhook and lands an elbow to the side of the head.
Audley lands an elbow inside that Condit shrugs off.
Audley is struggling to control the position.
That's four minutes gone in the round.
Audley keeps control of Condit as he tries to wriggle out of the double underhooks.
A battle for position here, against the cage.
Audley lands a glancing elbow in the clinch.
Audley lands a glancing elbow in the clinch.
Audley stops a takedown attempt from Condit.
That's three failed takedown attempts in the round for Carl Condit. That's going to take a lot out of him.
Condit takes an elbow to the temple.
Audley scores a nice knee to the body.
We've seen a great period of action over the last minute or so - credit to both fighters for going all out!
As the round comes to an end the crowd are showing their appreciation for a great round of action.
Audley's corner are urging him to control the action in the clinch for a moment, rather than mount any serious offense. I'm sure the crowd appreciate those instructions... not.
And thats the end of the round the fighters go back to their corners.
Simon Audley showed his class in that round. I'd imagine he'll take it on all the scorecards.
The fighters' corners scream their final instructions, as the referee calls time. Here we go, back to the action! The crowd applaud as we get ready to start the final round!

Condit circles away from the clinch attempt.
Audley moves in looking to clinch but Condit pushes him off.
Audley tries to clinch up but Condit circles away and keeps his distance.
Condit throws a right and a left that Audley avoids nicely.
Audley fails with an attempt to clinch.
Audley tries to clinch but is not successful on this occasion.
Audley moves into the clinch successfully.
Knees in the clinch landing for Audley.
Audley lands a knee to the head there! That was nasty!
Audley lands a knee to the head.
Audley comes over the top with an elbow. That landed flush.
Audley lands a nice knee to the body.
Both fighters are breathing heavily.
Audley dictating the pace here, as the fighters clinch against the cage.
Condit has Audley pressed up against the cage and is working for takedown. Audley manages to improve position though and keeps the fight standing.
Audley lands a nice elbow from the clinch.
That's one minute gone in the round.
Audley looking to throw knees to the head but Condit is blocking nicely.
The fighters are pressed against the cage, as the pace of the fight slows.
Audley lands an elbow just above Condit 's eye.
Audley lands an elbow inside.
Audley lands a nice elbow from the clinch.
Audley unloads a knee to the mid-section.
Audley utilising his Muay Thai to score with a knee to the body.
Audley lands a knee to the head there! That was nasty!
Audley landing knees to the body. They look like they could hurt.
Audley will no doubt start fighting again in a minute but for now he's just having a little rest, leaning Condit up against the cage.
Audley scores a nice knee to the body.
That's two minutes gone in the round.
Audley controlling the action here for a moment.
Audley lands a damaging elbow.
This is a great period of action - very entertaining stuff!
Condit is trying to force a seperation but Audley has the dominant position.
Audley is stalling here.
Audley using the Thai clinch to land knees to the body.
Audley lands a glancing elbow in the clinch.
The referee calls for Audley to work.
Audley lands a glancing elbow in the clinch.
That's three minutes gone in the round.
Audley lands an elbow just above Condit 's eye.
Audley leaning his opponent against the cage.
Audley lands a nice elbow from the clinch.
Audley lands a good knee to the midsection. Condit won't want to take too many of those.
Audley content to slow the pace in the clinch.
Audley misses the knee to the body. Nice hip positioning from Condit.
Audley landing knees to the head.
Audley slowing the pace effectively.
Audley scores with a knee to the head.
Audley misses with a knee strike.
Condit managing to block the knees to the body from Audley.
Audley stalling the fight.
That's four minutes gone in the round.
Kneeeeees! The crowd are calling for knees to the body. Audley obliges.
Audley unloads a knee to the mid-section.
Audley misses with a knee strike.
The fans in attendance giving it up for the two fighters, who have really let it all hang out in the last minute or so!
Audley lands a glancing elbow in the clinch.
Audley lands an elbow inside that Condit shrugs off.
A frustrated look appears on Condit's face as he tries to break the clinch.
Audley just leaning against Condit, taking a breather.
Audley with the Thai clinch, lands a knee to the head.
The pace really dropping off here, momentarily.
Audley landing knees to the body. They look like they could hurt.
Carl Condit has stepped it up - he knows he needs a finish here!
Simon Audley is fighting for a decision - hopefully he's judged it right and he's actually winning the fight.
As the round comes to an end the crowd are showing their appreciation for a great round of action.
Audley connects with a knee to the head.
And that's the end of the fight!
Simon Audley comfortably won the final round on my scorecard.
Well Audley has outworked and out performed his opponent in all aspects of the game today. He was simply too good and the decision should be no more than a formality. Over to the ring announcer for the scorecards.
Ladies and gentlemen, after 3 rounds of action, we go to the scorecards for a decision.
Judge Shigeki Sano scores the fight 26:30
Judge Ren Mimura scores the fight 26:30
Judge Shirou Masuda scores the fight 26:30
In favor of your winner, by unanimous decision... Simon Audley!
Jumping up and down and very excited, Simon Audley waved his t-shirt featuring Valhalla Q160 Nutrition's logo in front of the cameras.
|
|
|
|
|
|
|
|
|
|
|
|
|
|
|
|
|
|
|
|
|
|
|
| S |
C
A |
G |
S |
C
B |
G |
|
S |
C |
G |
|
energy
A | B |
|
hype
A | B |
|
pop
A | B |
|
mgr
A | B |
|
FIGHT
RATING
86% |
|
|
|
|
|
|
