|
|
PBP Commentary |
Coming up we have a featherweight MMA rules bout between Bucky The Badger (ranked 0 p4p, 0 weight class) and Kelsey Curtis (ranked 0 p4p, 0 weight class). Kelsey Curtis is staring across the cage at his opponent, tweaking his nipples.
 |
|
 |
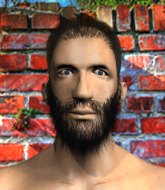
| 160 cm
25
160 lbs
14 - 2 - 0 |
|
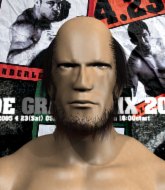
171 cm
26
155 lbs
11 - 5 - 0 |
Good wrestling
World class MT
Granite chin |
|
ADCC Champion
Excellent MT
Good gas tank |
|
| |
|
Ladies and gentlemen. This fight is 5 rounds, for the featherweight championship of the world!
Introducing the champion to my left, fighting out of the red corner.
With a record of
14 - 2 - 0, fighting out of Sydney, Bucky The Badger!
And introducing the challenger to my right, fighting out of the blue corner.
With a record of
11 - 5 - 0, fighting out of Sydney, Kelsey Curtis!
The judges for this bout are Damien Edna, Donatello Bradman and Hugh Johnson.

The bell rings for round one and we are underway!
The Badger doesn't manage to clinch there - Curtis circles away.
Curtis slips a straight right by The Badger.
Curtis takes a nasty kick to the mid section... That should keep him thinking. Does he try and block and risk a head kick landing?
Curtis bobs and weaves well there to avoid the strikes.
The Badger cracks Curtis with an open hand slap.
The Badger takes a swing at Curtis's ribcage but misses.
The Badger throws a head kick but Curtis moves out of range.

Curtis shoots in for a takedown and gets it. Oh and he's advanced to full mount straight away.
We could do with one of the fighters taking the initiative a bit more on the ground - they're both waiting to capitalize on a mistake.
Curtis trying to control but he's not successful this time.

Curtis jumps to the side looking to secure the arm triangle
. Ooooh, that looks tight
The Badger is gargling but he's managed to escape! Nice work there by The Badger and Curtis has given up the dominant position trying to land that submission.
The Badger might be looking to lock onto one of his opponent's long limbs for a submission, whilst we're on the ground.
The Badger is trying to control Curtis's posture but Curtis avoids it.
The fighters are pressed up against the cage, both looking to find a bit of space to work.

That's one minute gone in the round.
Curtis throwing strikes but missing, from side control.
Sloppy strikes there by Curtis.
The Badger knows he needs to get back to his feet asap. He's simply no match for Curtis on the ground.
The Badger parries the strikes from Curtis easily there. Curtis is wary of posturing up too much because it might enable The Badger to escape.
Curtis in side control, trying to ground and pound but not landing this time.
Curtis in side control, throwing shots but The Badger defends.
Curtis working hard here to secure a kimura but he's not really in the right position for it.
The ref warns both fighters not to hold the cage as they work up against the meshing.
Curtis is trying to land an Americana. He has the arm isolated but The Badger is keeping cool and he's avoided the danger for now.
Curtis wants to work for a kimura but he's foiled early by The Badger, who protects the arm well.

That's two minutes gone in the round.
Curtis goes for an armbar! This could be all over! Wait, no, The Badger rolls with the submission and now he's on top in Curtis's guard! Nice work there by The Badger!
The Badger throwing strikes from guard but Curtis blocks nicely.
Curtis is controlling The Badger's posture.
The Badger trying to control but Curtis is working from the bottom.
The Badger is intent on slowing down the pace of the fight, simply looking to control.
Curtis pulls The Badger in close to prevent any damage.

That's three minutes gone in the round.
Curtis looking to sweep here. No luck so far.

It looks like we're going to have a standup here. Neither fighter is doing enough on the ground.
The Badger throws a hook to the side of Curtis's head but Curtis sees it coming and ducks under it beautifully.
The Badger will need to close the distance a bit before he attacks - that leg kick was thrown from too far away.
Curtis shoots in but doesn't get the takedown
letting The Badger counter with a right hand.
A lazy left from The Badger finds it's target.
Bucky The Badger is looking to keep the fight on the feet at all costs.
The Badger throws a leg kick which misses Curtis's front leg but catches the back leg as Curtis tries to avoid it.
Curtis throws a looping left and ducks down for a takedown. He's got his arms around The Badger's waist but The Badger gets an underhook and avoids the takedown by throwing Curtis off to one side.
The Badger smiles there as he lands a nice right hand right on the button.
The Badger darts in and out, connecting with a jab.
Curtis keeping his hands up high there, blocking the jab from The Badger.

That's four minutes gone in the round.
The Badger uses good footwork to get in and out and land a nice right hand before Curtis has time to react.
Curtis closes the distance and clinches up with The Badger, looking for a takedown. Curtis pushes The Badger against the cage but The Badger circles to the side and manages to break the clinch.
Bucky The Badger has stuffed three takedown attempts in the round now. That's going to take a lot out of Kelsey Curtis.
Curtis shoots in and scores a nice double leg takedown into half guard.
The Badger is looking to regain full guard. Not this time though.
The fans in attendance giving it up for the two fighters, who have really let it all hang out in the last minute or so!
Curtis is thwarting The Badger's attempts to control the position.
Curtis is trying for a guillotine from the top but the pressure isn't in the right place so The Badger is just riding it out for now. Curtis eventually gives up the hold.
As the round comes to an end the crowd are showing their appreciation for a great round of action.
The Badger trying to control from the bottom.
And thats the end of the round the fighters go back to their corners.
A close round but Kelsey Curtis will probably get the nod.
That's the end of the round. The referee orders the cornermen out of the cage so we can get back down to business.

Nice sprawl there from The Badger as Curtis shoots in.
The Badger moves out of range as Curtis throws a body kick.
The Badger scores with a straight right hand, right through his opponent's guard.
Curtis tries to score a power double leg takedown but The Badger sees that one coming and sprawls well. That will dishearten Curtis somewhat.
Curtis has his front leg slapped to the side - a nice low kick landing there from The Badger.
The Badger throws a lazy uppercut
and Curtis counters with a nice single leg takedown and he's in The Badger's guard now.
Curtis tries to free his leg and advance position but The Badger is retaining full guard.
Kelsey Curtis has got the better of the ground game so far.
Curtis throwing shots from guard but he's hitting more mat than opponent.
Curtis in full guard, throwing the ground and pound. No damage this time.
Curtis looking to pass the guard.
Wooooo! Give it up for these two warriors! They are putting on a show!
A big thud reverberates around the arena there as Curtis accidentally thumps the mat. Hopefully he's not broken his hand.
That's one minute gone in the round.
The Badger working the defensive guard well to avoid strikes from Curtis.
The Badger trying to control the position here.
The Badger looking to control.
The Badger utilising some decent striking defenses from the guard, preventing the ground and pound.
Curtis throws a strike but The Badger rolls with it and manages to sweep. Now he's in guard on top.
A big thud reverberates around the arena there as The Badger accidentally thumps the mat. Hopefully he's not broken his hand.
The Badger with a flurry of punches that miss.
That's two minutes gone in the round.
The Badger looking to pass the guard.
Curtis tries to land a sweep but no joy.
Curtis manages to sweep nicely, so he's now on top. The Badger manages to get himself to full guard.
Curtis with a nice head shot there.
Curtis tries to free his leg and advance position but The Badger is retaining full guard.
Curtis looking to sit in guard and control but The Badger gets the butterfly guard and sweeps. He's now in the guard on the top.
The Badger postures up.
The Badger preventing the sweep.
Fantastic stuff here - a very entertaining period of action, which has drawn cheers from the crowd.
The Badger wants to control from the top but Curtis keeps moving.
Curtis is trying to control the position but The Badger postures up.
That's three minutes gone in the round.
The Badger trying to control the position from guard on top but Curtis is wriggling around, looking for whatever he can.
Curtis avoiding any damage from the ground and pound.
The Badger won't allow Curtis to sweep him here.
The Badger wants to control from the top but Curtis keeps moving.
Curtis manages to land a sweep and now he's in mount on top!
The Badger really trying hard to get back to half guard here.
Curtis has control of The Badger's right arm, working for a kimura. It's a bit of a token attempt though and The Badger regains control of the situation pretty easily.
That's four minutes gone in the round.
Curtis avoids the attempt from The Badger to control.
Curtis prevents The Badger from getting the reversal.
Curtis has hold of The Badger's left arm, perhaps looking for a submission. The two fighters tussle over control of the isolated limb and The Badger manages to get his arm back to his side and away from danger.
Curtis looking to finish The Badger with some ground and pound. This is bad for The Badger!
As the round comes to an end the crowd are showing their appreciation for a great round of action.
The Badger regains half guard.
The crowd are loving this. Great action here.
Curtis is looking for submissions but instead, The Badger has regained full guard.
And thats the end of the round the fighters go back to their corners.
Kelsey Curtis showed his class in that round. I'd imagine he'll take it on all the scorecards.
Well, the break between rounds is over. Let's get back to the scrappin!

Curtis moves away from the strike by The Badger.
Bucky The Badger seems to be the more aggressive standup fighter in this bout.
The Badger cracks Curtis with a nice right hand that draws applause from the crowd.
A head kick misses from The Badger.
The Badger throws a couple of head shots and lands with the final one - a decent hook, which struck Curtis on the side of the head.
Curtis shoots and misses
and The Badger counters with a body kick that stops Curtis in his tracks momentarily.
The Badger looks for the body kick but Curtis saw that one coming.
Curtis chopped to the floor by a nice leg kick but he springs right back up before The Badger can pounce on him.
Curtis defending well as The Badger loads up on a big left hand.

The Badger has managed to clinch.
Curtis tries for a takedown but The Badger manages to get underhooks.
That's one minute gone in the round.
The Badger pushes off an throws an elbow but Curtis leans to the side and avoids it. We're back to clinching against the cage.

The Badger has hold of one of Curtis's legs. Curtis is fighting the takedown attempt but The Badger gets the trip and lands the takedown into guard.
A big thud reverberates around the arena there as The Badger accidentally thumps the mat. Hopefully he's not broken his hand.
The Badger missing there with some ground and pound from the guard.
The Badger with a flurry of punches that miss.
Curtis has the superior BJJ but he's also working some ground strikes into his gameplan.
Curtis lands a beautiful switch and he's in full mount! That could spell trouble for The Badger!
The Badger manages to regain half guard. Good work.
Curtis is trying to work for a kimura but The Badger is defending well.
The Badger is trying to defend against the ground and pound but Curtis scores with a couple of nice shots.
That's two minutes gone in the round.
The Badger trying to control from the bottom.
The Badger is trying to defend against the ground and pound but Curtis scores with a couple of nice shots.
We've seen a great period of action over the last minute or so - credit to both fighters for going all out!
The Badger is trying to get back to full guard.
The Badger keeping his head moving to avoid the ground and pound.
Curtis is looking for a kimura but he's never going to get it from there.
Curtis tries to pass the half guard into mount. The Badger knows what he's doing though and prevents the attempt.
That's three minutes gone in the round.
Curtis not throwing his punches with enough precision this time.
Curtis sitting in half guard, looking to land shots. The Badger defending well though.
The Badger avoiding damage under a succession of punches from Curtis.
Curtis is working for a kimura but The Badger is defending it quite comfortably.
The Badger has no desire to be mounted, so is trying to control. Curtis is working away from the top position though.
Curtis is working for a submission of some sort.
Curtis is nestled in close to The Badger, controlling him well. He's worked in a nice elbow to the side of the head as well, for good measure.
That's four minutes gone in the round.
Curtis winds up and cracks The Badger with a swinging punch to the side of the head.
The fighters are battling for position here. The Badger manages to regain full guard. Nice work.
Curtis drops back looking for a heel hook - he quickly realises he's not going to get it but The Badger manages to dive on top of him before he can escape and now Curtis has The Badger in his guard.
Curtis is controlling The Badger's posture.
This has been an exciting period of action!
As the round comes to an end the crowd are showing their appreciation for a great round of action.
The Badger controls from within his opponent's guard.
The Badger loading up with the ground and pound but he's missing more than he's landing in this flurry.
And thats the end of the round the fighters go back to their corners.
A close third round but Kelsey Curtis just about did enough to take it.
The referee calls time. The cornermen exit stage left and we're back to business.

The Badger tries a switch kick but it misses it's target.
The Badger stuffs the takedown.
The Badger scores with a crisp jab that stopped Curtis in his tracks.
Curtis slips under a jab from The Badger.
Curtis misses with a takedown
and The Badger counters with a stiff right hand.
Nice sprawl there from The Badger as Curtis shoots in.
Bucky The Badger has stuffed three takedown attempts in the round now. That's going to take a lot out of Kelsey Curtis.
The Badger tries a switch kick but it misses it's target.
Curtis shoots in for a takedown. He's persisting with it as The Badger sprawls well. The Badger wins this battle and keeps the fight standing. Curtis gets slowly back to his feet.
The Badger swings wildly with a hook that is half blocked by Curtis.
That's one minute gone in the round.
The Badger throws a lazy uppercut
and Curtis counters with a shoot takedown into half guard.
Curtis is looking for a kimura but The Badger is holding onto that half guard position, so it's hard for Curtis to get the leverage.
The Badger is looking for a sweep. Curtis is wise to his cunning plan and keeps the top position.
The Badger keeping control of the leg, stopping his opponent passing to mount.
Curtis in half guard on the top. He's looking for a kimura... He's got it locked and he's managed to free his trapped foot. The Badger tries to escape but it's on too tight and he has to tap! Great BJJ skills there from Curtis!
Ladies and gentlemen, after 2:56 of round 4, we have a winner by way of Submission (Kimura). Kelsey Curtis!
Kelsey Curtis is the new featherweight champion!
Kelsey Curtis was full of energy after the big win and talked about how he thinks he can do big things in this sport. The crowd were appreciative of his determination to succeed.
|
|
|
|
|
|
|
|
|
|
|
|
|
|
|
|
|
|
|
|
|
|
|
| S |
C
A |
G |
S |
C
B |
G |
|
S |
C |
G |
|
energy
A | B |
|
hype
A | B |
|
pop
A | B |
|
mgr
A | B |
|
FIGHT
RATING
100% |
|
|
|
|
|
|
