|
|
PBP Commentary |
Coming up we have a light heavyweight MMA rules bout between Krayzie Bone (ranked 0 p4p, 0 weight class) and Craig David (ranked 0 p4p, 0 weight class). Bone's ring entrance music is that housewives' favourite, Thuggish Ruggish Bone. David has chosen Craig David - Rise and Fall as his entrance music. Craig David is staring across the cage at his opponent, tweaking his nipples.
 |
|
 |
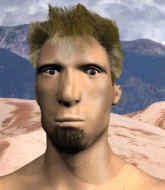
| 191 cm
34
206 lbs
22 - 5 - 0 |
|
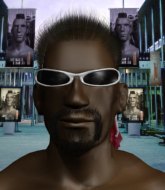
179 cm
32
225 lbs
18 - 19 - 0 |
Decent wrestler
Solid boxing
KO power |
|
BJJ Purple Belt
Decent boxing
Granite chin |
|
| |
|
Ladies and gentlemen. This fight is 3 rounds, in the light heavyweight division.
Introducing the fighter to my left, fighting out of the red corner.
With a record of
22 - 5 - 0, fighting out of Los Angeles, Krayzie Bone!
And introducing the fighter to my right, fighting out of the blue corner.
With a record of
18 - 19 - 0, fighting out of Los Angeles, Craig David!
The judges for this bout are Timothy Bukovac, Don Winkell and Frank Antenori.

The bell rings for round one and we are underway!
David shoots in for a takedown. He's persisting with it as Bone sprawls well. Bone wins this battle and keeps the fight standing. David gets slowly back to his feet.

Bone clinches up with David and pushes him back against the cage.
David is working for a takedown up against the cage. He can't get it on this occasion though.

David breaks from the clinch.
Both fighters are looking to counter, which isn't making for the most exciting fight in the world.
Jab by Bone.

It looks like Craig David has been cut.
David with a lazy takedown attempt
and Bone counters with a lovely straight right hand!
Krayzie Bone has stuffed three takedown attempts in the round now. That's going to take a lot out of Craig David.
David throws a combination but it was largely blocked by Bone.
David closes this distance looking for a takedown but Bone circles away.

That's one minute gone in the round.

David scores a takedown into full mount!
The fighters are pressed up against the cage, both looking to find a bit of space to work.
Bone's corner are shouting for him to stand up but that's bad cornering - how is he meant to stand up when he's mounted? He should be looking to improve his position on the ground before trying to stand back up.
Bone tries to hold on but David pushes him away.
Bone is desperately trying to improve his position but David has a good base and remains in mount.
David looking to ground and pound his opponent to a finish here.
Bone avoids a series of strikes thrown by David.

David jumps to side control looking for an arm triangle but Bone manages to avoid the submission attempt.
David lands a decent elbow from side control.
This is a great period of action - very entertaining stuff!
An elbow from David crashes against the mat.

That's two minutes gone in the round.
David throws a strike aimed at the side of Bone's head but Bone avoids it well.
Bone can't do much from the bottom here.
David fails to land a wild elbow strike.
Bone dodges the ground and pound from David.
David misses with the ground and pound.
David misses with a strike but at least he's keeping busy, looking to cause some damage - that will still help him when it comes to the judges scorecards.
David working the ground and pound but Bone is defending the strikes.
David working away.
David is looking for a kimura. He might have it! No, Bone has escaped the position, nice work there.
David lands a nice forearm strike.

That's three minutes gone in the round.
Bone wants to escape from the position here - easier said than done!
David works a knee to the body and follows up with a nice elbow to the head.

David stands up.
Bone lands with an overhand left.
David closes the distance and gets a double leg, slamming Bone to the mat! Bone manages to get full guard.

That's four minutes gone in the round.
David throwing shots from guard but he's hitting more mat than opponent.
David content to strike from guard, landing some decent shots.
We've seen a great period of action over the last minute or so - credit to both fighters for going all out!
Bone working the defensive guard well to avoid strikes from David.
David throwing elbows and punches but not connecting, as Bone works some decent striking defense from the bottom.
Bone looking for a sweep. Not yet Bone, not yet.
Bone has momentary wrist control but David slips an elbow through the middle.
David throwing strikes from guard but Bone blocks nicely.
Bone wants to sweep but no luck.
David works over Bone with some ground and pound from guard.
The crowd are going absolutely nuts as the round comes to an end - what a fantastic round of action!
David is looking to work some ground and pound but Bone has wrist control.
David throws an elbow that misses. Bone uses the momentum to reverse the position. He's now in David's guard. Nice move by Bone!
David trying to control the position.
And thats the end of the round the fighters go back to their corners.
Craig David dominated that round.
The cut man is working on Craig David's cut.
The fighters' corners scream their final instructions, as the referee calls time. Here we go, back to the action!

David shoots in looking for a double leg takedown. Bone defends it nicely.
David misses with a takedown attempt - Bone sprawls well and throws a nice strike on the way out which just misses.
We've had a slow start to the round here - hopefully the action picks up.
David shoots in for a takedown but Bone shows good takedown defense.
Krayzie Bone has stuffed three takedown attempts in the round now. That's going to take a lot out of Craig David.
That's one minute gone in the round.
Bone defends well against a solid takedown attempt from David.
Bone swings away but doesn't land with a series of punches.
Bone swings away but doesn't land with a series of punches.
David looks for a takedown here. Will he get it? Bone is fending him off so far but David persists. Nope, Bone circles away and we're back to standing.
A jab lands there for Bone.
David looks frustrated there after his takedown attempt is stuffed easily.
That's two minutes gone in the round.
Bone keeps the fight on the outside.
Bone lands a beauty of a right hand that gets the crowd cheering.
David shoots in looking for a double leg takedown. Bone defends it nicely.
David shoots in looking for a takedown but Bone manages to keep the fight standing, pushing David's face into the canvas for good measure before circling away.
That's three minutes gone in the round.
Bone pushes forward with a 1-2 combination that forces David back to the cage. Bone follows up with a solid lead hook to the liver.
David shoots in but doesn't get the takedown
enabling Bone to counter with a crisp jab.
A head kick misses from Bone.
Bone is using his reach advantage well here, landing the more effective single shots from range.
David shoots in but Bone avoids the takedown attempt easily.
That's four minutes gone in the round.
David shoots in and drives through. Bone sprawls well.
Craig David seems to be the more aggressive standup fighter in this bout.
David shoots for a takedown but Bone saw that one coming a mile off and avoided it easily.
David misses with a takedown attempt
enabling Bone to counter with a crisp jab.
David is breathing heavily.
David shoots in for a takedown. He's persisting with it as Bone sprawls well. Bone wins this battle and keeps the fight standing. David gets slowly back to his feet.
This is a great period of action - very entertaining stuff!
The crowd applaud the fighters efforts here as the round comes to an end.
David throws a wild combination but nothing lands.
And thats the end of the round the fighters go back to their corners.
Krayzie Bone dominated that second round.
The cut man is working on Craig David's cut.
The fighters get back to their feet, the hooter sounds and we're back to the action! This is the final round!

Bone scores with a body shot.
A head kick misses from Bone.
David tries to clinch up but Bone circles away and keeps his distance.
Krayzie Bone is looking to throw some combinations by the looks of things.
David shoots in looking for a takedown. Bone tries to sprawl out of it but David keeps driving through. The fighters are pinned against the cage. Bone manages to get underhooks and after a bit of a struggle, circles away and we're back to standing.
Bone scores with a sloppy punch to the body. Not much technique there but it did the business.
That's one minute gone in the round.
Bone displays good takedown defense there as he swats away a double leg from David.
Bone pulls out of a head kick attempt.
David shoots in for a takedown - he's clinched up with Bone but Bone pushes him off and we're back to square one.
Krayzie Bone has stuffed three takedown attempts in the round now. That's going to take a lot out of Craig David.
Bone tries to clinch but is not successful on this occasion.
That's two minutes gone in the round.
The crowd are hurling abuse towards the fighters... You can hardly blame them though because there isn't a lot going on in the fight.
David throws a right hand that Bone ducks under and follows up with a left that Bone also avoids with ease.
Bone takes a step back and watches a body kick go sailing past his mid section.
David fails with the takedown
and Bone counters into the clinch. Nicely done.
David takes a big intake of breath there - he's definitely tired.
David has Bone pressed up against the cage and is working for takedown. Bone manages to improve position though and keeps the fight standing.
David misses with a punch on the inside.
Bone has had enough of the clinch but David keeps him there for the moment.

Bone breaks the clinch.
Bone gets in close and instigates a clinch.
That's three minutes gone in the round.
Bone is looking to break free of the clinch but David has double underhooks.
Bone manages to break the clinch.
Bone throws a head kick that misses.
Bone is using his height advantage well here, landing a good percentage of his punches.
David fails with a takedown attempt.
Bone tries a head kick but it misses.
Bone throws a push kick but David slaps the foot to one side.
That's four minutes gone in the round.
David decides to change it up a bit and drives through with a nice takedown into half guard.
The fighters are starting to get a bit slippery now, which will make submissions a bit more difficult.
David not throwing his punches with enough precision this time.
Bone is trying to stand back up but David is controlling him
Bone wants to control but David is keeping busy and won't allow it.
David is thinking about going for an arm triangle but he can't free his leg.
David wants to take a breather but Bone is having none of it.
David thows a wild elbow that connects with the canvas.
The crowd applaud the fighters efforts here as the round comes to an end.
David seems to be working for a kimura but Bone defends the submission attempt.
David is thwarting Bone's attempts to control the position.
And that's the end of the fight!
That was a close round. You could make an argument for either fighter but I would give it to Krayzie Bone.
I think Bone has won this one but let's see what the judges have to say. Over to the ring announcer for the scorecards.
Ladies and gentlemen, after 3 rounds of action, we go to the scorecards for a decision.
Judge Timothy Bukovac scores the fight 29:28
Judge Don Winkell scores the fight 29:28
Judge Frank Antenori scores the fight 29:28
In favor of your winner, by unanimous decision... Krayzie Bone!
|
|
|
|
|
|
|
|
|
|
|
|
|
|
|
|
|
|
|
|
|
|
|
| S |
C
A |
G |
S |
C
B |
G |
|
S |
C |
G |
|
energy
A | B |
|
hype
A | B |
|
pop
A | B |
|
mgr
A | B |
|
FIGHT
RATING
40% |
|
|
|
|
|
|
